
Mfp Laser Fax
Page 3
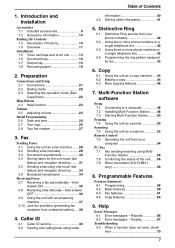
For a description of controls Please keep this page open when following operating instructions. Location of each button, see page 10. Buttons (Listed in alphabetical order) BROADCAST B HELP N CALLER ID L LOWER D COLLATE E MANUAL BROAD C CONTRAST F MENU I COPY P MONITOR V DIRECTORY E Navigator key S FAX O PAUSE T FAX AUTO ANSWER M QUICK SCAN H FLASH U REDIAL T RESOLUTION G SCAN R SET Q START W Station keys A STOP K TONE J ZOOM H ii
For a description of controls Please keep this page open when following operating instructions. Location of each button, see page 10. Buttons (Listed in alphabetical order) BROADCAST B HELP N CALLER ID L LOWER D COLLATE E MANUAL BROAD C CONTRAST F MENU I COPY P MONITOR V DIRECTORY E Navigator key S FAX O PAUSE T FAX AUTO ANSWER M QUICK SCAN H FLASH U REDIAL T RESOLUTION G SCAN R SET Q START W Station keys A STOP K TONE J ZOOM H ii
Mfp Laser Fax
Page 9
... information 10 Finding the Controls 1.3 Description of the unit....... 56 7.9 Other information (KX-FLB811 only 56 8. Help Error Messages 9.1 Error messages - Auto answer ON 36 3.8 Receiving a fax manually - Multi-Function Station software Setup 7.1 Connecting to a computer 48 7.2 Installing Multi-...numbers on a single telephone line 42 5.4 Programming the ring pattern assigned for the one-touch dial feature and navigator directory......... 31 3.5 Sending a fax using one-touch dial feature and navigator directory......... 33 3.6 Broadcast transmission 34 Receiving Faxes 3.7 ...
... information 10 Finding the Controls 1.3 Description of the unit....... 56 7.9 Other information (KX-FLB811 only 56 8. Help Error Messages 9.1 Error messages - Auto answer ON 36 3.8 Receiving a fax manually - Multi-Function Station software Setup 7.1 Connecting to a computer 48 7.2 Installing Multi-...numbers on a single telephone line 42 5.4 Programming the ring pattern assigned for the one-touch dial feature and navigator directory......... 31 3.5 Sending a fax using one-touch dial feature and navigator directory......... 33 3.6 Broadcast transmission 34 Receiving Faxes 3.7 ...
Mfp Laser Fax
Page 12
Replacement toner cartridge*1 (KX- To ensure that the unit operates properly, we recommend the use the one -touch dial feature (page 31, 33). C {MANUAL BROAD} L To send a document to a previous step during dialing when your name, shipping address and telephone number - D {LOWER} L To ...L To make a collated copy (page 46). L To return to multiple parties manually (page 34, 35). ONLY) Visit our web site: http://www.panasonic.com/faxsupplies L For questions regarding online orders: E-mail: direct@us.panasonic.com Telephone: 1-866-888-2929 To place an order by telephone Telephone: 1-800-...
Replacement toner cartridge*1 (KX- To ensure that the unit operates properly, we recommend the use the one -touch dial feature (page 31, 33). C {MANUAL BROAD} L To send a document to a previous step during dialing when your name, shipping address and telephone number - D {LOWER} L To ...L To make a collated copy (page 46). L To return to multiple parties manually (page 34, 35). ONLY) Visit our web site: http://www.panasonic.com/faxsupplies L For questions regarding online orders: E-mail: direct@us.panasonic.com Telephone: 1-866-888-2929 To place an order by telephone Telephone: 1-800-...
Mfp Laser Fax
Page 14
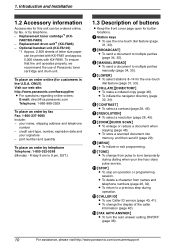
1. Introduction and Installation 1.4.2 Rear view B A CD E FGH A Recording paper guides B Handset unit (Optional) connection jack C Speaker D USB interface cover E Manual input tray F Telephone line jack G External telephone jack H Power inlet Removing the shipping tape Remove the shipping tape (1) and pad (2). 1 2 1 1 * The shipping tape on the output tray is for KX- FLB801. 12 For assistance, please visit http://www.panasonic.com/consumersupport
1. Introduction and Installation 1.4.2 Rear view B A CD E FGH A Recording paper guides B Handset unit (Optional) connection jack C Speaker D USB interface cover E Manual input tray F Telephone line jack G External telephone jack H Power inlet Removing the shipping tape Remove the shipping tape (1) and pad (2). 1 2 1 1 * The shipping tape on the output tray is for KX- FLB801. 12 For assistance, please visit http://www.panasonic.com/consumersupport
Mfp Laser Fax
Page 16
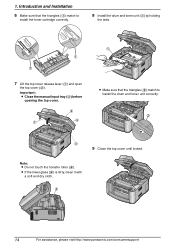
... (1) by holding the tabs. 1 1 7 Lift the top cover release lever (1) and open the top cover (2). Note: L Do not touch the transfer roller (4). Important: L Close the manual input tray (3) before opening the top cover. 2 1 4 1 L Make sure that the triangles (1) match to install the drum and toner unit correctly. 2 3 9 Close the top cover...
... (1) by holding the tabs. 1 1 7 Lift the top cover release lever (1) and open the top cover (2). Note: L Do not touch the transfer roller (4). Important: L Close the manual input tray (3) before opening the top cover. 2 1 4 1 L Make sure that the triangles (1) match to install the drum and toner unit correctly. 2 3 9 Close the top cover...

Mfp Laser Fax
Page 21
... 50) and can print not only on plain paper but also on recording paper. The manual input tray is flat in the paper input tray may jam. 5 Insert the paper input...printing multiple pages, add a next page after you start printing with the computer. 1 Pull open the manual input tray (1), then raise the extender (2) gently until it clicks into the unit. The input tray weights...does not close, the plate in the paper input tray. Introduction and Installation 1.8.2 Using the manual input tray You can hold one page at a time. Note: L If the paper is fully installed. 1 2 Approx. 2...
... 50) and can print not only on plain paper but also on recording paper. The manual input tray is flat in the paper input tray may jam. 5 Insert the paper input...printing multiple pages, add a next page after you start printing with the computer. 1 Pull open the manual input tray (1), then raise the extender (2) gently until it clicks into the unit. The input tray weights...does not close, the plate in the paper input tray. Introduction and Installation 1.8.2 Using the manual input tray You can hold one page at a time. Note: L If the paper is fully installed. 1 2 Approx. 2...
Mfp Laser Fax
Page 30
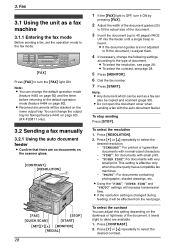
... document. 5 levels (light to fit the document, re-adjust them. 4 If necessary, change the output tray for faxing (Feature #441 on page 63) (KX-FLB811 only). 3.2 Sending a fax manually 3.2.1 Using the auto document feeder L Confirm that there are available. 1. Press {V} or {^} repeatedly to select the desired resolution. - Fax 3SeFnadxing Faxes 3.1 Using the...
... document. 5 levels (light to fit the document, re-adjust them. 4 If necessary, change the output tray for faxing (Feature #441 on page 63) (KX-FLB811 only). 3.2 Sending a fax manually 3.2.1 Using the auto document feeder L Confirm that there are available. 1. Press {V} or {^} repeatedly to select the desired resolution. - Fax 3SeFnadxing Faxes 3.1 Using the...

Mfp Laser Fax
Page 31
... DOWN on the scanner glass (2), matching the top edge of error messages, see page 66. 3.2.2 Using the scanner glass By using the dial keypad, one-touch dial or navigator directory. 3. Press {START}. Enter the fax number. 3. Up to the l mark on the unit. 4 Close the document ..., see page 89. Insert the document. 2. Printing a confirmation report A confirmation report provides you can dial the fax number first before sending. 1. To print manually, see page 28. L Confirm that cannot be canceled. L To send a single page, skip to the next step. 29 L To send multiple pages,...
... DOWN on the scanner glass (2), matching the top edge of error messages, see page 66. 3.2.2 Using the scanner glass By using the dial keypad, one-touch dial or navigator directory. 3. Press {START}. Enter the fax number. 3. Up to the l mark on the unit. 4 Close the document ..., see page 89. Insert the document. 2. Printing a confirmation report A confirmation report provides you can dial the fax number first before sending. 1. To print manually, see page 28. L Confirm that cannot be canceled. L To send a single page, skip to the next step. 29 L To send multiple pages,...

Mfp Laser Fax
Page 36
Fax 3.6 Broadcast transmission By storing one -touch dial function will remain in the broadcast memory, allowing frequent re-use. L The broadcast function utilizes stations 1-3. For BROADCAST 1-2: 1. Press {MANUAL BROAD}. 2. Using navigator directory: Press {V} or {^} repeatedly to select "MANUAL BROAD". 3 Press {SET}. 4 ... Press {V} or {^} repeatedly to display the desired item you want to add. 6 Press {SET}. Note: L When adding new items to the MANUAL BROADCAST memory, you can send the same document to multiple parties (up to 20 items). L To erase other items, repeat steps 5 and 6 (...
Fax 3.6 Broadcast transmission By storing one -touch dial function will remain in the broadcast memory, allowing frequent re-use. L The broadcast function utilizes stations 1-3. For BROADCAST 1-2: 1. Press {MANUAL BROAD}. 2. Using navigator directory: Press {V} or {^} repeatedly to select "MANUAL BROAD". 3 Press {SET}. 4 ... Press {V} or {^} repeatedly to display the desired item you want to add. 6 Press {SET}. Note: L When adding new items to the MANUAL BROADCAST memory, you can send the same document to multiple parties (up to 20 items). L To erase other items, repeat steps 5 and 6 (...

Mfp Laser Fax
Page 37
...or does not answer, it will then send the data to step 6. Open the document cover. 2. Press the desired {BROADCAST} (1-2) or {MANUAL BROAD}. Fax To cancel broadcast transmission 1. Press {STOP} repeatedly until "SEND CANCELED?" 8 Press {STOP} to exit. 3.6.4 Sending the same ...send multiple pages, go to the desired resolution (page 28) and the desired contrast (page 28). 3 Press the desired {BROADCAST} (1-2) or {MANUAL BROAD}. L The document will be canceled. Press {START}. 3. Receiving Faxes 35 L After transmission, the stored document will be skipped and redialed...
...or does not answer, it will then send the data to step 6. Open the document cover. 2. Press the desired {BROADCAST} (1-2) or {MANUAL BROAD}. Fax To cancel broadcast transmission 1. Press {STOP} repeatedly until "SEND CANCELED?" 8 Press {STOP} to exit. 3.6.4 Sending the same ...send multiple pages, go to the desired resolution (page 28) and the desired contrast (page 28). 3 Press the desired {BROADCAST} (1-2) or {MANUAL BROAD}. L The document will be canceled. Press {START}. 3. Receiving Faxes 35 L After transmission, the stored document will be skipped and redialed...

Mfp Laser Fax
Page 38
.... 3.8.1 Activating TEL mode Set the unit to TEL mode by pressing {FAX AUTO ANSWER} repeatedly to display the desired setting, and press {SET}. 3.8 Receiving a fax manually - a fax calling tone (slow beep) is OFF. {STOP} {START} {SET}{V}{^} How faxes are received When receiving calls, the unit will temporarily switch to receive faxes...
.... 3.8.1 Activating TEL mode Set the unit to TEL mode by pressing {FAX AUTO ANSWER} repeatedly to display the desired setting, and press {SET}. 3.8 Receiving a fax manually - a fax calling tone (slow beep) is OFF. {STOP} {START} {SET}{V}{^} How faxes are received When receiving calls, the unit will temporarily switch to receive faxes...

Mfp Laser Fax
Page 40
...to Phone Companies Voice Mail (if you subscribe to exit. L While the junk fax prohibitor is activated, "JUNK FAX ON" is displayed in one call The caller can also be able to receive documents. remote access to prevent fax reception from calls that match a programmable junk fax prohibitor list... open for button locations. Note: L To use this feature prevents fax reception from . 5 Press {SET}. Important: L This feature does not work when manual reception is turned ON (Feature #434 on page 63) - the fax activation code (feature #434 on page 63). Erase unnecessary items. 38
...to Phone Companies Voice Mail (if you subscribe to exit. L While the junk fax prohibitor is activated, "JUNK FAX ON" is displayed in one call The caller can also be able to receive documents. remote access to prevent fax reception from calls that match a programmable junk fax prohibitor list... open for button locations. Note: L To use this feature prevents fax reception from . 5 Press {SET}. Important: L This feature does not work when manual reception is turned ON (Feature #434 on page 63) - the fax activation code (feature #434 on page 63). Erase unnecessary items. 38

Mfp Laser Fax
Page 42
... This unit is displayed The calling party's name or telephone number will be displayed. FAX ring setting (feature #210 on the display one -touch dial or navigator directory, the stored name will be received properly. L If the unit is stored by your PBX supplier. ... distance call . The telephone number includes data other than numbers (i.e., * or #). - You then have the option of the call . To print manually, see page 89. - 4. Consult your local telephone company. Caller information can easily view caller information and call is set to send caller information. ...
... This unit is displayed The calling party's name or telephone number will be displayed. FAX ring setting (feature #210 on the display one -touch dial or navigator directory, the stored name will be received properly. L If the unit is stored by your PBX supplier. ... distance call . The telephone number includes data other than numbers (i.e., * or #). - You then have the option of the call . To print manually, see page 89. - 4. Consult your local telephone company. Caller information can easily view caller information and call is set to send caller information. ...

Mfp Laser Fax
Page 43
To edit a telephone number before calling back Press {*} repeatedly after step 2. 4.2.1 Erasing all caller information 1 Press {MENU} repeatedly to display the desired item. 3 Press { L "CALL LIST ERASE" will be displayed. 3 Press {SET}. Each time you press {*}, the telephone number will be changed as follows: 1 1 - Local telephone number 4 1 - Local telephone number ("1" added) 2 Local telephone number only (area code omitted) 3 Area code - Area code - Local telephone number ("1" added and area code omitted) To stop viewing Press {STOP} after step 2. L To cancel erasing, ...
To edit a telephone number before calling back Press {*} repeatedly after step 2. 4.2.1 Erasing all caller information 1 Press {MENU} repeatedly to display the desired item. 3 Press { L "CALL LIST ERASE" will be displayed. 3 Press {SET}. Each time you press {*}, the telephone number will be changed as follows: 1 1 - Local telephone number 4 1 - Local telephone number ("1" added) 2 Local telephone number only (area code omitted) 3 Area code - Area code - Local telephone number ("1" added and area code omitted) To stop viewing Press {STOP} after step 2. L To cancel erasing, ...
Mfp Laser Fax
Page 53
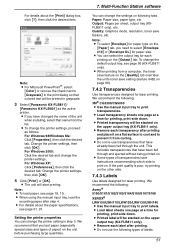
... [OK]. Output: Pages per sheet, output tray (KXFLB811 only), etc. L Load label sheets one page at a time for printing, print-side down . For Windows 98/Windows Me: Click ... We recommend the following : 3M® CG3300/CG5000 L Use the manual input tray to [Grayscale] in grayscale. 3 Select [Panasonic KX-FLB811]/ [Panasonic KX-FLB801] as follows. L Printed label will be stacked on the [Output] ...box, click [?], then click the desired item. Note: L To select [Envelope] for laser printing. L Some types of the unit when installing, select that have already been fed through...
... [OK]. Output: Pages per sheet, output tray (KXFLB811 only), etc. L Load label sheets one page at a time for printing, print-side down . For Windows 98/Windows Me: Click ... We recommend the following : 3M® CG3300/CG5000 L Use the manual input tray to [Grayscale] in grayscale. 3 Select [Panasonic KX-FLB811]/ [Panasonic KX-FLB801] as follows. L Printed label will be stacked on the [Output] ...box, click [?], then click the desired item. Note: L To select [Envelope] for laser printing. L Some types of the unit when installing, select that have already been fed through...
Mfp Laser Fax
Page 54
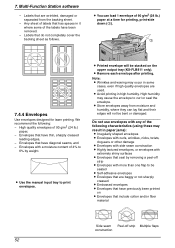
... for printing, print-side down (1). 1 7.4.4 Envelopes Use envelopes designed for laser printing. L Store envelopes away from the backing sheet. - Labels that include...material Side seam Peel-off strip L Envelopes with more than one flap to curl or seal the envelope. Note: L Wrinkles...envelopes. Any sheet of labels that seal by weight. L Use the manual input tray to 6% by removing a peel-off strip Multiple flaps construction ...Envelopes that have previously been printed on the upper output tray (KX-FLB811 only). Envelopes with extremely shiny surfaces L Envelopes that has...
... for printing, print-side down (1). 1 7.4.4 Envelopes Use envelopes designed for laser printing. L Store envelopes away from the backing sheet. - Labels that include...material Side seam Peel-off strip L Envelopes with more than one flap to curl or seal the envelope. Note: L Wrinkles...envelopes. Any sheet of labels that seal by weight. L Use the manual input tray to 6% by removing a peel-off strip Multiple flaps construction ...Envelopes that have previously been printed on the upper output tray (KX-FLB811 only). Envelopes with extremely shiny surfaces L Envelopes that has...
Mfp Laser Fax
Page 68
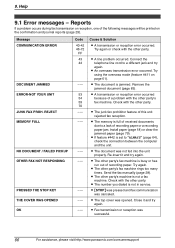
... Try again. L The top cover was successful. 66 For assistance, please visit http://www.panasonic.com/consumersupport L Fax transmission or reception was opened. Try again or check with the other party... feature #442 is full of recording paper. Re-insert it and try again. Send the fax manually (page 28). L The junk fax prohibitor feature of the following messages will be printed on page... The other party. 9. Reports If a problem occurs during fax transmission or reception, one of this unit rejected fax reception. REJECT MEMORY FULL NO DOCUMENT / FAILED PICKUP OTHER ...
... Try again. L The top cover was successful. 66 For assistance, please visit http://www.panasonic.com/consumersupport L Fax transmission or reception was opened. Try again or check with the other party... feature #442 is full of recording paper. Re-insert it and try again. Send the fax manually (page 28). L The junk fax prohibitor feature of the following messages will be printed on page... The other party. 9. Reports If a problem occurs during fax transmission or reception, one of this unit rejected fax reception. REJECT MEMORY FULL NO DOCUMENT / FAILED PICKUP OTHER ...

Mfp Laser Fax
Page 69
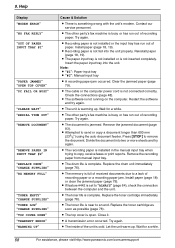
... will be operated. Press {STOP} to continue copying. For assistance, please visit http://www.panasonic.com/consumersupport 67 Display "CALL SERVICE" "CARRIAGE ERROR" "CHANGE DRUM" "CHANGE SUPPLIES" "CHECK... service personnel. Note: L "#1": Paper input tray L "#2": Manual input tray L The ADF cover is not inserted properly. Send the entire document manually. L There is no space to "ALWAYS" (page 64),...are temporarily stored into the unit properly. Display If the unit detects a problem, one or more of the unit. Contact our service personnel. If misfeeding occurs frequently, ...
... will be operated. Press {STOP} to continue copying. For assistance, please visit http://www.panasonic.com/consumersupport 67 Display "CALL SERVICE" "CARRIAGE ERROR" "CHANGE DRUM" "CHANGE SUPPLIES" "CHECK... service personnel. Note: L "#1": Paper input tray L "#2": Manual input tray L The ADF cover is not inserted properly. Send the entire document manually. L There is no space to "ALWAYS" (page 64),...are temporarily stored into the unit properly. Display If the unit detects a problem, one or more of the unit. Contact our service personnel. If misfeeding occurs frequently, ...
Mfp Laser Fax
Page 70
... jammed paper (page 79). L The toner life is not connected correctly. L The top cover is warming up . Note: L "#1": Paper input tray L "#2": Manual input tray L A recording paper jam occurred. L The unit is open. Press {STOP} to send or copy a document longer than 600 mm (235/8") using the...running on the computer. L The software is not fed into the unit properly. Wait for a while. 68 For assistance, please visit http://www.panasonic.com/consumersupport L The other party's fax machine is set to an end. Remove the jammed document (page 83). L The recording paper is ...
... jammed paper (page 79). L The toner life is not connected correctly. L The top cover is warming up . Note: L "#1": Paper input tray L "#2": Manual input tray L A recording paper jam occurred. L The unit is open. Press {STOP} to send or copy a document longer than 600 mm (235/8") using the...running on the computer. L The software is not fed into the unit properly. Wait for a while. 68 For assistance, please visit http://www.panasonic.com/consumersupport L The other party's fax machine is set to an end. Remove the jammed document (page 83). L The recording paper is ...
Mfp Laser Fax
Page 73
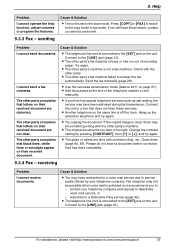
... Solution L You may not be something wrong with the other party's fax machine is not a fax machine. For assistance, please visit http://www.panasonic.com/consumersupport 71 I cannot operate the help function, adjust volumes or program the features. 9.3.3 Fax - L The other party's fax machine failed ...problem, contact our service personnel. L The other party's machine is busy or has run out of the telephone number or dial manually. L The glass or rollers are dirty with the other party complains that does not have been activated during fax transmission. L ...
... Solution L You may not be something wrong with the other party's fax machine is not a fax machine. For assistance, please visit http://www.panasonic.com/consumersupport 71 I cannot operate the help function, adjust volumes or program the features. 9.3.3 Fax - L The other party's fax machine failed ...problem, contact our service personnel. L The other party's machine is busy or has run out of the telephone number or dial manually. L The glass or rollers are dirty with the other party complains that does not have been activated during fax transmission. L ...


