Digital Proprietary Telephone
Page 1
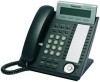
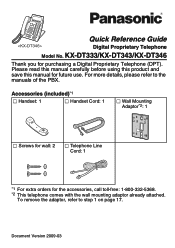
For more details, please refer to step 1 on page 17. KX-DT333/KX-DT343/KX-DT346 Thank you for future use. Please read this manual carefully before using this product and save this manual for purchasing a Digital Proprietary Telephone (DPT). Accessories (included)*1 Handset: 1 Handset Cord: 1 Wall Mounting Adaptor*2: 1 Screws for wall: 2 Telephone ...332-5368. *2 This telephone comes with the wall mounting adaptor already attached. To remove the adaptor, refer to the manuals of the PBX. Document Version 2009-03 Quick Reference Guide Digital Proprietary Telephone Model No.
For more details, please refer to step 1 on page 17. KX-DT333/KX-DT343/KX-DT346 Thank you for future use. Please read this manual carefully before using this product and save this manual for purchasing a Digital Proprietary Telephone (DPT). Accessories (included)*1 Handset: 1 Handset Cord: 1 Wall Mounting Adaptor*2: 1 Screws for wall: 2 Telephone ...332-5368. *2 This telephone comes with the wall mounting adaptor already attached. To remove the adaptor, refer to the manuals of the PBX. Document Version 2009-03 Quick Reference Guide Digital Proprietary Telephone Model No.
Digital Proprietary Telephone
Page 2
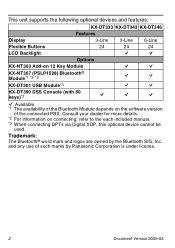
...: KX-DT333 KX-DT343 KX-DT346 Features Display 3-Line 3-Line 6-Line Flexible Buttons LCD Backlight 24 24 24 Q Q Options KX-NT303 Add-on 12 Key Module Q Q KX-NT307 (PSLP1528) Bluetooth® Module*1 *2 *3 Q Q KX-DT301 USB Module*3 Q Q KX-DT390 DSS Console (with 60 keys)*2 Q Q Q Q: Available *1 The availability of the Bluetooth Module depends on connecting, refer to the each included manual...
...: KX-DT333 KX-DT343 KX-DT346 Features Display 3-Line 3-Line 6-Line Flexible Buttons LCD Backlight 24 24 24 Q Q Options KX-NT303 Add-on 12 Key Module Q Q KX-NT307 (PSLP1528) Bluetooth® Module*1 *2 *3 Q Q KX-DT301 USB Module*3 Q Q KX-DT390 DSS Console (with 60 keys)*2 Q Q Q Q: Available *1 The availability of the Bluetooth Module depends on connecting, refer to the each included manual...
Digital Proprietary Telephone
Page 16
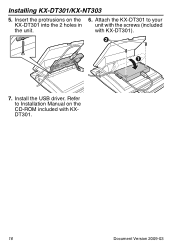
Install the USB driver. Attach the KX-DT301 to Installation Manual on the 6. Refer to your KX-DT301 into the 2 holes in unit with KXDT301. 16 Document Version 2009-03 Installing KX-DT301/KX-NT303 5. Insert the protrusions on the CD-ROM included with the screws (included the unit. with KX-DT301). 7.
Install the USB driver. Attach the KX-DT301 to Installation Manual on the 6. Refer to your KX-DT301 into the 2 holes in unit with KXDT301. 16 Document Version 2009-03 Installing KX-DT301/KX-NT303 5. Insert the protrusions on the CD-ROM included with the screws (included the unit. with KX-DT301). 7.

Digital Proprietary Telephone
Page 20
... risk of other heat source. 7. Improper adjustment of fire or electric shock, do not disassemble this unit. There is damaged or frayed. Place this manual. Do not locate this unit from the main unit before cleaning. C. F. Incorrect reassembly can cause electric shock. 11.Unplug this unit where the cord... unit through openings, as they may result if the unit falls. 6. Clean with a soft cloth. 4. Never spill liquid of any kind into this manual. If the unit has been exposed to this unit on the unit. D. SAVE THESE INSTRUCTIONS 20 Document Version 2009-03
... risk of other heat source. 7. Improper adjustment of fire or electric shock, do not disassemble this unit. There is damaged or frayed. Place this manual. Do not locate this unit from the main unit before cleaning. C. F. Incorrect reassembly can cause electric shock. 11.Unplug this unit where the cord... unit through openings, as they may result if the unit falls. 6. Clean with a soft cloth. 4. Never spill liquid of any kind into this manual. If the unit has been exposed to this unit on the unit. D. SAVE THESE INSTRUCTIONS 20 Document Version 2009-03


