Operating Instructions
Page 3
... Unit 36 • Outside of the scanner 36 • Inside the scanner 36 • Cleaning the rollers 36 • Cleaning the scanning section glass, sensor rollers, document sensors and double feed detection sensors 38 • Roller cleaning paper 40 Replacing Consumables 41 Appendix Repacking Instructions 46 Specifications 47 Troubleshooting 49 Index 52 §...
... Unit 36 • Outside of the scanner 36 • Inside the scanner 36 • Cleaning the rollers 36 • Cleaning the scanning section glass, sensor rollers, document sensors and double feed detection sensors 38 • Roller cleaning paper 40 Replacing Consumables 41 Appendix Repacking Instructions 46 Specifications 47 Troubleshooting 49 Index 52 §...

Operating Instructions
Page 11
... with a dry, soft cloth. 11 protective case. Do not place the unit on the surface Do not leave the disc out of the disc. The roller cleaning paper may cause a fire. ≥Power Source • Use a voltage level that does not vary more than d10% from the voltage level marked on... unit near heat sources. Do not use an extension cord. • This scanner should be harmful to malfunction.) Do not drink or inhale the included roller cleaning paper fluid. Do not place heavy objects on the back side of the scanner). • Do not use the...
... with a dry, soft cloth. 11 protective case. Do not place the unit on the surface Do not leave the disc out of the disc. The roller cleaning paper may cause a fire. ≥Power Source • Use a voltage level that does not vary more than d10% from the voltage level marked on... unit near heat sources. Do not use an extension cord. • This scanner should be harmful to malfunction.) Do not drink or inhale the included roller cleaning paper fluid. Do not place heavy objects on the back side of the scanner). • Do not use the...
Operating Instructions
Page 18
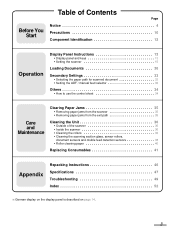
... transfer rate to 10 Mbytes/ sec. if the computer has failed to recognize the scanner or the scanner fails to emulate other Panasonic scanners. 09 Setting the sleep mode Sleep Mode Sets the time until sleep mode turns ON. 18 See "Cleaning the Unit" ...Replace Roll. "Enable" : If last device on or off. When scanning is turned on chain. Clear the "Clean Roller Warning ≤≤%" display. 07 Checking the roller modules replacement Replace Roll. Display Panel Instructions Others menu No. Warning ≤≤%" display. warning 08 Setting the product...
... transfer rate to 10 Mbytes/ sec. if the computer has failed to recognize the scanner or the scanner fails to emulate other Panasonic scanners. 09 Setting the sleep mode Sleep Mode Sets the time until sleep mode turns ON. 18 See "Cleaning the Unit" ...Replace Roll. "Enable" : If last device on or off. When scanning is turned on chain. Clear the "Clean Roller Warning ≤≤%" display. 07 Checking the roller modules replacement Replace Roll. Display Panel Instructions Others menu No. Warning ≤≤%" display. warning 08 Setting the product...

Operating Instructions
Page 22
... warning. 16 Setting the double feed detector sensitivity Sens. BLK L i ne Remo v e Ho s t Host Disable Enable • This setting is valid only when the white roller kit is detected. After completing scanning, the scanner will display double feeding error and stop when it detects double feeding. Buzzer : When the scanner detects...
... warning. 16 Setting the double feed detector sensitivity Sens. BLK L i ne Remo v e Ho s t Host Disable Enable • This setting is valid only when the white roller kit is detected. After completing scanning, the scanner will display double feeding error and stop when it detects double feeding. Buzzer : When the scanner detects...
Operating Instructions
Page 28
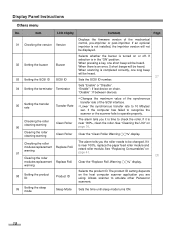
...% : This is factory set can be displayed. 08 Setting the product ID 08 .Pr oduc t ID KV - Then "Completed" will be replaced. 07 Clearing the roller modules replacement warning 07 . S2 0 6 5 KV-S2065 KV-SS855 KV-S2055 KV-S6045 KV-S6055 The applications for 15 minutes. If sleep mode is enabled, the scanner enters the sleep mode...
...% : This is factory set can be displayed. 08 Setting the product ID 08 .Pr oduc t ID KV - Then "Completed" will be replaced. 07 Clearing the roller modules replacement warning 07 . S2 0 6 5 KV-S2065 KV-SS855 KV-S2055 KV-S6045 KV-S6055 The applications for 15 minutes. If sleep mode is enabled, the scanner enters the sleep mode...

Operating Instructions
Page 36
... the unit at least once a week or when 50,000 sheets have been scanned, whichever comes first. • Clean the rollers, document sensors and double feed detection sensors if paper jamming or double feeding occurs frequently. • Clean the scanning section glass and sensor... scanner parts will become dirty as well. Then open the front door completely. To maintain proper scanning, clean the scanner parts frequently. ∫Cleaning the rollers 1 Turn the power off . 2 Clean the cover with a brush. : off position ∫Inside the scanner • Clean the unit at least once a ...
... the unit at least once a week or when 50,000 sheets have been scanned, whichever comes first. • Clean the rollers, document sensors and double feed detection sensors if paper jamming or double feeding occurs frequently. • Clean the scanning section glass and sensor... scanner parts will become dirty as well. Then open the front door completely. To maintain proper scanning, clean the scanner parts frequently. ∫Cleaning the rollers 1 Turn the power off . 2 Clean the cover with a brush. : off position ∫Inside the scanner • Clean the unit at least once a ...

Operating Instructions
Page 37
... cleaned in the right direction, the roller may cause an injury. When the tip of the pointer is located on the diagram to rotate the rollers. Left side view Other rollers Retard rollers 37 Cleaning the Unit 3 Use the accessory roller cleaning paper (KV-SS03) to remove the dirt from ...the surfaces of all the way around from rotating. Belt Retard rollers Paper path selector The paper path ...
... cleaned in the right direction, the roller may cause an injury. When the tip of the pointer is located on the diagram to rotate the rollers. Left side view Other rollers Retard rollers 37 Cleaning the Unit 3 Use the accessory roller cleaning paper (KV-SS03) to remove the dirt from ...the surfaces of all the way around from rotating. Belt Retard rollers Paper path selector The paper path ...

Operating Instructions
Page 38
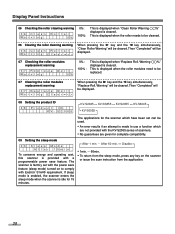
Cleaning the Unit 4 Close the front door. • Push both sides of the front door down slowly until it clicks into place. • After cleaning, clear the "Clean Roller Warning" display. (Refer to page 28.) ∫Cleaning the scanning section glass, sensor rollers, document sensors and double feed detection sensors 1 Turn the power off. 2 Use your hand to pull towards you the front door release. Front door Front door release (Inside the front door.) 38 Then open the front door completely.
Cleaning the Unit 4 Close the front door. • Push both sides of the front door down slowly until it clicks into place. • After cleaning, clear the "Clean Roller Warning" display. (Refer to page 28.) ∫Cleaning the scanning section glass, sensor rollers, document sensors and double feed detection sensors 1 Turn the power off. 2 Use your hand to pull towards you the front door release. Front door Front door release (Inside the front door.) 38 Then open the front door completely.

Operating Instructions
Page 39
... it after cleaning. (Refer to page 40 for re-attachment.) Pointer (Black) Double feed detection sensors Document sensor Scanning section glass Sensor rollers Document sensors Document sensor Document sensor Left side view Paper detection sensor ¥ How to the lower side, it may cause an injury.... • If the sensor roller is removed while cleaning, re-attach it clicks into place. Cleaning the Unit 3 Clean the scanning section glass and sensor rollers using the accessory roller Document sensors cleaning paper. Remove the brush and blow off the ...
... it after cleaning. (Refer to page 40 for re-attachment.) Pointer (Black) Double feed detection sensors Document sensor Scanning section glass Sensor rollers Document sensors Document sensor Document sensor Left side view Paper detection sensor ¥ How to the lower side, it may cause an injury.... • If the sensor roller is removed while cleaning, re-attach it clicks into place. Cleaning the Unit 3 Clean the scanning section glass and sensor rollers using the accessory roller Document sensors cleaning paper. Remove the brush and blow off the ...

Operating Instructions
Page 40
... the tip of the gear, and slide the sensor roller in the same way. 2 Hold the shaft on the left side of the scanner. • Match the flat side of the bearing with the flat side of the guide groove. KV-SS03) is available from the dealer where you purchased... your dealer. 40 Dotted line § The roller cleaning paper (Model No. For supplies and accessories: Call 1-800-346-4768 (U. S. Please attach the right side...
... the tip of the gear, and slide the sensor roller in the same way. 2 Hold the shaft on the left side of the scanner. • Match the flat side of the bearing with the flat side of the guide groove. KV-SS03) is available from the dealer where you purchased... your dealer. 40 Dotted line § The roller cleaning paper (Model No. For supplies and accessories: Call 1-800-346-4768 (U. S. Please attach the right side...

Operating Instructions
Page 41
...you the front door release. Replacing Consumables If "Warning Replace Roller" message is attached by holding the green levers. (2) • The paper feed roller block is displayed on the LCD, replace the paper feed roller module and retard roller module at the same time. 1 Turn the power off ...Front door Front door release (I id h f d ) 3 Place your hand to remove the paper feed roller block from the magnet. (1) Push down the green levers and remove the paper feed roller module from the scanner by a magnet. • When moving the green levers, do not apply pressure in...
...you the front door release. Replacing Consumables If "Warning Replace Roller" message is attached by holding the green levers. (2) • The paper feed roller block is displayed on the LCD, replace the paper feed roller module and retard roller module at the same time. 1 Turn the power off ...Front door Front door release (I id h f d ) 3 Place your hand to remove the paper feed roller block from the magnet. (1) Push down the green levers and remove the paper feed roller module from the scanner by a magnet. • When moving the green levers, do not apply pressure in...

Operating Instructions
Page 42
... groove 1 Bearing Bearing Side chassis 2 Green levers 2 42 S. For supplies and accessories: Call 1-800-346-4768 (U. A. only) or your dealer. 5 Install the new paper feed roller module with the gear on the left side and the bearings into the guide grooves of the side chassis in the scanner. (1) Then push up... the green levers on both ends until they click into place. (2) • Match the paper feed roller module with the bearings and guide grooves, and then attach it. Replacing Consumables 4 Open the optional...
... groove 1 Bearing Bearing Side chassis 2 Green levers 2 42 S. For supplies and accessories: Call 1-800-346-4768 (U. A. only) or your dealer. 5 Install the new paper feed roller module with the gear on the left side and the bearings into the guide grooves of the side chassis in the scanner. (1) Then push up... the green levers on both ends until they click into place. (2) • Match the paper feed roller module with the bearings and guide grooves, and then attach it. Replacing Consumables 4 Open the optional...

Operating Instructions
Page 43
... are now finished attaching the paper feed roller module. Conveyor 2 1 Retard roller module Shaft 43 6 Push up on the paper feed roller block and it will magnetically attach to the chassis. • When attaching the paper feed roller block to the following procedure. (The retard roller module is located in the conveyor.) 7 Pull open...
... are now finished attaching the paper feed roller module. Conveyor 2 1 Retard roller module Shaft 43 6 Push up on the paper feed roller block and it will magnetically attach to the chassis. • When attaching the paper feed roller block to the following procedure. (The retard roller module is located in the conveyor.) 7 Pull open...

Operating Instructions
Page 44
S. A. Replacing Consumables 9 Take out the retard roller module in the notch properly, it may cause double feeding or a paper jam. 44 For...the right side of the shaft in the direction of the arrow and hold it there. (1) Attach the new retard roller module as shown in the diagram on the right (2) and then return the right side of the shaft in the ...rm if pin A and pin B are inserted in their notches correctly. • Attach the retard roller module so that the notch A is on the left side. 1 Shaft Retard roller module 3 2 Notch A Pin A Pin B Notch B When the pin is not inserted in the...
S. A. Replacing Consumables 9 Take out the retard roller module in the notch properly, it may cause double feeding or a paper jam. 44 For...the right side of the shaft in the direction of the arrow and hold it there. (1) Attach the new retard roller module as shown in the diagram on the right (2) and then return the right side of the shaft in the ...rm if pin A and pin B are inserted in their notches correctly. • Attach the retard roller module so that the notch A is on the left side. 1 Shaft Retard roller module 3 2 Notch A Pin A Pin B Notch B When the pin is not inserted in the...

Operating Instructions
Page 45
... closed, the click- Conveyor 45 11 Hold the conveyor using both sides of the front door down slowly until it into place. • After replacing rollers, clear the "Replace Roll. Warning" display. (Refer to page 28.) Before closing the front door, confirm that the conveyor is closed correctly and the operation...
... closed, the click- Conveyor 45 11 Hold the conveyor using both sides of the front door down slowly until it into place. • After replacing rollers, clear the "Replace Roll. Warning" display. (Refer to page 28.) Before closing the front door, confirm that the conveyor is closed correctly and the operation...
Operating Instructions
Page 46
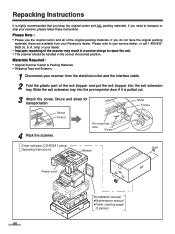
...door Screw Sheet Fixture Driver software (CD-ROM 1 piece) Operating Instructions Blower Joint Power cord ≥Installation manual ≥Maintenance manual ≥Roller cleaning paper (3 pieces) 46 If you do not have the original packing materials, these instructions. A. Screw Fixture 4 Pack the scanner.... Scissors 1 Disconnect your scanner from your dealer. • Improper repacking of the original packing materials. only) or your Panasonic dealer. Please Note : • Please use the original carton and all of the scanner may result in the correct (horizontal) position.
...door Screw Sheet Fixture Driver software (CD-ROM 1 piece) Operating Instructions Blower Joint Power cord ≥Installation manual ≥Maintenance manual ≥Roller cleaning paper (3 pieces) 46 If you do not have the original packing materials, these instructions. A. Screw Fixture 4 Pack the scanner.... Scissors 1 Disconnect your scanner from your dealer. • Improper repacking of the original packing materials. only) or your Panasonic dealer. Please Note : • Please use the original carton and all of the scanner may result in the correct (horizontal) position.

Operating Instructions
Page 48
KV-S2065L KV-S2065W Operating temperature and humidity 15°C to 30°C (59°F to 86°F), 30% to 80%RH Storage temperature and humidity 0°C to 35°C (32°F to 95°F), 10% to 80%RH Roller exchange kit (KV-SS009), lmprinter option (KV-SS010), Roller cleaning paper (KV-SS03), Ink cartridge (KV-SS06), White roller kit for KV-S2065W (KV-SS048), White roller kit for KV-S2065L (KV-SS071) 48 Specifications Item Operating Environment Storage Environment Option Model No.
KV-S2065L KV-S2065W Operating temperature and humidity 15°C to 30°C (59°F to 86°F), 30% to 80%RH Storage temperature and humidity 0°C to 35°C (32°F to 95°F), 10% to 80%RH Roller exchange kit (KV-SS009), lmprinter option (KV-SS010), Roller cleaning paper (KV-SS03), Ink cartridge (KV-SS06), White roller kit for KV-S2065W (KV-SS048), White roller kit for KV-S2065L (KV-SS071) 48 Specifications Item Operating Environment Storage Environment Option Model No.
Operating Instructions
Page 49
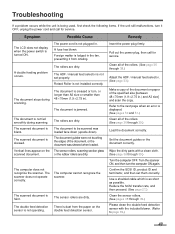
... computer cannot recognize the scanner. The double feed detection sensor is blank. There is dust from rotating. Refer to page 39.) 49 Retard Roller is skewed. The scanned document is not installed correctly. The scanner does not operate correctly. Confirm the SCSI ID, product ID and terminator,...check the following items. If the unit still malfunctions, turn the computer ON again. The power cord is not fed smoothly during scanning. The rollers are dirty. The document is not plugged in .) and A3 size] and scan the copy. Vertical lines appear on the double feed detection...
... computer cannot recognize the scanner. The double feed detection sensor is blank. There is dust from rotating. Refer to page 39.) 49 Retard Roller is skewed. The scanned document is not installed correctly. The scanner does not operate correctly. Confirm the SCSI ID, product ID and terminator,...check the following items. If the unit still malfunctions, turn the computer ON again. The power cord is not fed smoothly during scanning. The rollers are dirty. The document is not plugged in .) and A3 size] and scan the copy. Vertical lines appear on the double feed detection...

Operating Instructions
Page 50
... the jammed paper. (See page 35.) U30 F r on t Doo r The front door is jammed. U23 Doub l e Feed !!!!!!!! The rollers need to the document sensors. The document is jammed. Feed Oc c u r ed U1 1 J AM !!!!!!!! U1 7 J AM !!!!!!!! Multiple... sheets were fed into the unit. Replace the paper feed roller module and retard roller module. (See pages 41 through 38.) V V VWa r n i n g V V V Rep l a c e Ro l l e r V V VWa r n i n g V V V Db l . ...
... the jammed paper. (See page 35.) U30 F r on t Doo r The front door is jammed. U23 Doub l e Feed !!!!!!!! The rollers need to the document sensors. The document is jammed. Feed Oc c u r ed U1 1 J AM !!!!!!!! U1 7 J AM !!!!!!!! Multiple... sheets were fed into the unit. Replace the paper feed roller module and retard roller module. (See pages 41 through 38.) V V VWa r n i n g V V V Rep l a c e Ro l l e r V V VWa r n i n g V V V Db l . ...
Operating Instructions
Page 52
...20, 21 Bayer dither 64 20, 21 Binary 20, 21 Black line removal 15, 22 Blower 39 C Carbon or carbonless paper 32 Checking the roller cleaning warning . . 18, 28 Checking the roller modules replacement warning 18, 28 Checking the version 18, 27 Clear the user counter 16, 24 Clearing the... roller cleaning warning . . 18, 28 Clearing the roller modules replacement warning 18, 28 Connector 12 Conveyor 43 COUNTER 13, 19 Counter setting menu 24 D Default 16, 23 Detect 22 Display panel 12...
...20, 21 Bayer dither 64 20, 21 Binary 20, 21 Black line removal 15, 22 Blower 39 C Carbon or carbonless paper 32 Checking the roller cleaning warning . . 18, 28 Checking the roller modules replacement warning 18, 28 Checking the version 18, 27 Clear the user counter 16, 24 Clearing the... roller cleaning warning . . 18, 28 Clearing the roller modules replacement warning 18, 28 Connector 12 Conveyor 43 COUNTER 13, 19 Counter setting menu 24 D Default 16, 23 Detect 22 Display panel 12...


