Scanner
Page 3
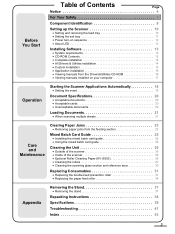
...up the Scanner 10 • Setting and removing the feed tray 10 • Setting the exit tray 11 • Power turn-on sequence 12 • About LED 12 Installing Software 13 &#...Operation Starting the Scanner Applications Automatically 18 • Setting the event 18 Document Specifications 20 • Acceptable documents 20 • Acceptable cards 20 • Unacceptable documents 20 Loading Documents 21 •... the Unit 26 • Outside of the scanner 26 • Inside of the scanner 26 • Optional Roller Cleaning Paper (KV-SS03 26 • Cleaning the rollers 27 ...
...up the Scanner 10 • Setting and removing the feed tray 10 • Setting the exit tray 11 • Power turn-on sequence 12 • About LED 12 Installing Software 13 &#...Operation Starting the Scanner Applications Automatically 18 • Setting the event 18 Document Specifications 20 • Acceptable documents 20 • Acceptable cards 20 • Unacceptable documents 20 Loading Documents 21 •... the Unit 26 • Outside of the scanner 26 • Inside of the scanner 26 • Optional Roller Cleaning Paper (KV-SS03 26 • Cleaning the rollers 27 ...
Scanner
Page 12
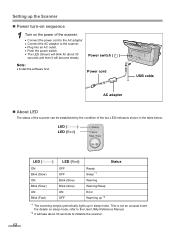
...; Connect the power cord to the AC adaptor. • Connect the AC adaptor to initialize the scanner. 12 Power switch ( ) Note: • Install the software first. This is not an unusual event. Setting up in the table below: LED (Green) LED (Red) Ready Error Start / Stop LED (Green) ... OFF OFF Blink (Slow) Blink (Slow) ON OFF Ready Sleep *1 Warning Warning/Sleep Error Warming up *2 *1 The scanning lamp(s) periodically lights up the Scanner „ Power turn-on sequence 1 Turn on sleep mode, refer to the User Utility Reference Manual. *2 It will take about 30 seconds and then it...
...; Connect the power cord to the AC adaptor. • Connect the AC adaptor to initialize the scanner. 12 Power switch ( ) Note: • Install the software first. This is not an unusual event. Setting up in the table below: LED (Green) LED (Red) Ready Error Start / Stop LED (Green) ... OFF OFF Blink (Slow) Blink (Slow) ON OFF Ready Sleep *1 Warning Warning/Sleep Error Warming up *2 *1 The scanning lamp(s) periodically lights up the Scanner „ Power turn-on sequence 1 Turn on sleep mode, refer to the User Utility Reference Manual. *2 It will take about 30 seconds and then it...
Scanner
Page 13
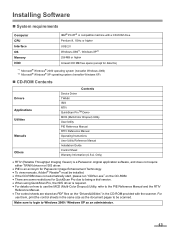
...(Reliable Throughput Imaging Viewer) is a Panasonic original application software, and does not require either TWAIN driver.... 13 Make sure to login to Windows 2000 / Windows XP as the document pages to use them, print the control sheets in the CD-ROM provided with... Windows XP*2 256 MB or higher At least 200 MB free space (except for Panasonic Image Enhancement Technology. • To view manuals, Adobe® Reader® must be... Guide Control Sheet Warranty Information (U.S.A. Installing Software „ System requirements Computer CPU Interface OS Memory HDD IBM® ...
...(Reliable Throughput Imaging Viewer) is a Panasonic original application software, and does not require either TWAIN driver.... 13 Make sure to login to Windows 2000 / Windows XP as the document pages to use them, print the control sheets in the CD-ROM provided with... Windows XP*2 256 MB or higher At least 200 MB free space (except for Panasonic Image Enhancement Technology. • To view manuals, Adobe® Reader® must be... Guide Control Sheet Warranty Information (U.S.A. Installing Software „ System requirements Computer CPU Interface OS Memory HDD IBM® ...
Scanner
Page 14
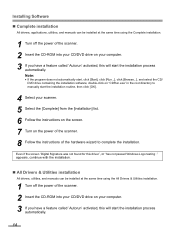
...Run...], click [Browse...], and select the CD/ DVD drive containing the installation software, double-click on "CDRun.exe" in the root directory to manually start the installation routine, then click [OK]. 4 Select your scanner. 5 Select the [Complete] from the [Installation] list. 6 Follow the ... on your computer. 3 If you have a feature called 'Autorun' activated, this will start the installation process automatically. Installing Software „ Complete installation All drivers, applications, utilities, and manuals can be installed at the same time using the Complete installation....
...Run...], click [Browse...], and select the CD/ DVD drive containing the installation software, double-click on "CDRun.exe" in the root directory to manually start the installation routine, then click [OK]. 4 Select your scanner. 5 Select the [Complete] from the [Installation] list. 6 Follow the ... on your computer. 3 If you have a feature called 'Autorun' activated, this will start the installation process automatically. Installing Software „ Complete installation All drivers, applications, utilities, and manuals can be installed at the same time using the Complete installation....
Scanner
Page 15
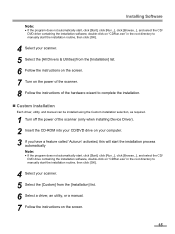
......], click [Browse...], and select the CD/ DVD drive containing the installation software, double-click on "CDRun.exe" in the root directory to manually start the installation routine, then click [OK]. 4 Select your scanner. 5 Select the [All Drivers & Utilities] from the [Installation] list...click [Run...], click [Browse...], and select the CD/ DVD drive containing the installation software, double-click on "CDRun.exe" in the root directory to manually start the installation routine, then click [OK]. 4 Select your scanner. 5 Select the [Custom] from the [Installation] list. 6 Select a driver...
......], click [Browse...], and select the CD/ DVD drive containing the installation software, double-click on "CDRun.exe" in the root directory to manually start the installation routine, then click [OK]. 4 Select your scanner. 5 Select the [All Drivers & Utilities] from the [Installation] list...click [Run...], click [Browse...], and select the CD/ DVD drive containing the installation software, double-click on "CDRun.exe" in the root directory to manually start the installation routine, then click [OK]. 4 Select your scanner. 5 Select the [Custom] from the [Installation] list. 6 Select a driver...
Scanner
Page 16
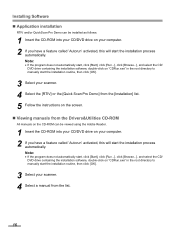
Installing Software „ Application installation RTIV and/or QuickScan Pro Demo can be installed as follows. 1 Insert the CD-ROM into your CD/DVD drive on your scanner. 4 Select a manual from the Drivers&Utilities CD-ROM All manuals on the CD-ROM can be viewed using...; If the program does not automatically start, click [Start], click [Run...], click [Browse...], and select the CD/ DVD drive containing the installation software, double-click on your computer. 2 If you have a feature called 'Autorun' activated, this will start the installation process automatically. Note: •...
Installing Software „ Application installation RTIV and/or QuickScan Pro Demo can be installed as follows. 1 Insert the CD-ROM into your CD/DVD drive on your scanner. 4 Select a manual from the Drivers&Utilities CD-ROM All manuals on the CD-ROM can be viewed using...; If the program does not automatically start, click [Start], click [Run...], click [Browse...], and select the CD/ DVD drive containing the installation software, double-click on your computer. 2 If you have a feature called 'Autorun' activated, this will start the installation process automatically. Note: •...
Scanner
Page 17
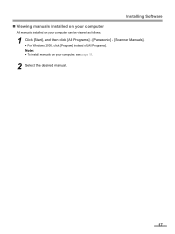
Installing Software „ Viewing manuals installed on your computer All manuals installed on your computer can be viewed as follows. 1 Click [Start], and then click [All Programs] - [Panasonic] - [Scanner Manuals]. • For Windows 2000, click [Program] instead of [All Programs]. Note: • To install manuals on your computer, see page 15. 2 Select the desired manual. 17
Installing Software „ Viewing manuals installed on your computer All manuals installed on your computer can be viewed as follows. 1 Click [Start], and then click [All Programs] - [Panasonic] - [Scanner Manuals]. • For Windows 2000, click [Program] instead of [All Programs]. Note: • To install manuals on your computer, see page 15. 2 Select the desired manual. 17


