

Operating Instructions
Page 1
Operating Instructions LCD Projector Commercial Use Model No. PT-F200NTU PT-F200U Before operating this product, please read the instructions carefully and save this manual for future use. TQBJ0248 ENGLISH
Operating Instructions LCD Projector Commercial Use Model No. PT-F200NTU PT-F200U Before operating this product, please read the instructions carefully and save this manual for future use. TQBJ0248 ENGLISH

Operating Instructions
Page 2
...alert the user to the presence of important operating and maintenance (servicing) instructions in case service is supplied with your Panasonic LCD projector. The serial number of your product may result. Dispose may be regulated in a manner which is required. Important Information Important Safety...a safety feature. This is equipped with the projector for power supplies up to 125 V, 7 A. We hope it in the space provided below and retain this booklet in the literature accompanying the product. Model number: PT-F200NTU / PT-F200U Serial number: WARNING: TO REDUCE THE RISK ...
...alert the user to the presence of important operating and maintenance (servicing) instructions in case service is supplied with your Panasonic LCD projector. The serial number of your product may result. Dispose may be regulated in a manner which is required. Important Information Important Safety...a safety feature. This is equipped with the projector for power supplies up to 125 V, 7 A. We hope it in the space provided below and retain this booklet in the literature accompanying the product. Model number: PT-F200NTU / PT-F200U Serial number: WARNING: TO REDUCE THE RISK ...

Operating Instructions
Page 3
...optional RS-232C serial interface cable with ferrite core. If you use serial port to connect PC for external control of projector, you wish to discard this equipment does cause harmful interference to radio or television reception, which can radiate radio frequency ...accessible disconnect device shall be provided between the equipment and receiver. - Declaration of Conformity Model Number: PT-F200NTU / PT-F200U Trade Name: Panasonic Responsible party: Panasonic Corporation of the FCC Rules. Connect the equipment into an outlet on , the user is only valid in a particular ...
...optional RS-232C serial interface cable with ferrite core. If you use serial port to connect PC for external control of projector, you wish to discard this equipment does cause harmful interference to radio or television reception, which can radiate radio frequency ...accessible disconnect device shall be provided between the equipment and receiver. - Declaration of Conformity Model Number: PT-F200NTU / PT-F200U Trade Name: Panasonic Responsible party: Panasonic Corporation of the FCC Rules. Connect the equipment into an outlet on , the user is only valid in a particular ...

Operating Instructions
Page 4
... 8 Cautions on use 9 Security 9 Accessories 9 Preparation Read this first 10 Minimum required setting screen 10 About Your Projector 11 Remote control 11 Projector body 12 Getting Started Setting up 14 Screen size and throw distance 14 Projection method 15 Front leg adjusters and throwing ...Controlling the volume of the speaker 26 ENGLISH - 4 Important Information Important Safety Notice 2 Precautions with other devices See "Connections" on the projector 21 Switching off " on page 20. 5. Prepare the Remote control See "Remote control" on page 10. B When you start ...
... 8 Cautions on use 9 Security 9 Accessories 9 Preparation Read this first 10 Minimum required setting screen 10 About Your Projector 11 Remote control 11 Projector body 12 Getting Started Setting up 14 Screen size and throw distance 14 Projection method 15 Front leg adjusters and throwing ...Controlling the volume of the speaker 26 ENGLISH - 4 Important Information Important Safety Notice 2 Precautions with other devices See "Connections" on the projector 21 Switching off " on page 20. 5. Prepare the Remote control See "Remote control" on page 10. B When you start ...

Operating Instructions
Page 6
.... Electric shocks can damage the insulation, which is overloaded (for example, by a qualified technician. Do not attempt to repair the projector yourself, as this projector in your eye, it may cause blindness or damage. Do not overload the wall socket. If the power supply is sloped or ... is not inserted correctly, electric shocks or overheating could result. Ask an Authorized Service Center to carry out any foreign objects into the projector or drop them away from the batteries. Failure to leak, overheat, explode or catch fire. Failure to observe this may cause the ...
.... Electric shocks can damage the insulation, which is overloaded (for example, by a qualified technician. Do not attempt to repair the projector yourself, as this projector in your eye, it may cause blindness or damage. Do not overload the wall socket. If the power supply is sloped or ... is not inserted correctly, electric shocks or overheating could result. Ask an Authorized Service Center to carry out any foreign objects into the projector or drop them away from the batteries. Failure to leak, overheat, explode or catch fire. Failure to observe this may cause the ...

Operating Instructions
Page 7
...easily become damaged, and fire, short-circuits or serious electric shocks may result. Do not place your skin into the lens while the projector is recommended to be drawn into the lens. If improperly handled, explosion might result. Electric shocks or explosions can result. The plastic ...") of the battery compartment and surrounding area may result in direct sunlight. Be especially careful not to disconnect the power plug from the projector. The lamp can hurt or damage your eyes. Do not place any heavy objects on cloth or papers, as these materials could result...
...easily become damaged, and fire, short-circuits or serious electric shocks may result. Do not place your skin into the lens while the projector is recommended to be drawn into the lens. If improperly handled, explosion might result. Electric shocks or explosions can result. The plastic ...") of the battery compartment and surrounding area may result in direct sunlight. Be especially careful not to disconnect the power plug from the projector. The lamp can hurt or damage your eyes. Do not place any heavy objects on cloth or papers, as these materials could result...

Operating Instructions
Page 8
...the lens with the Authorized Service Center regarding cleaning costs. ET-PKF100H, ET-PKF100S). Important Information Precautions with regard to clean the projector when required. Remove the used batteries in fire or problems with operation. If dust builds up in malfunctions or the life of ... when the lamp broke and which are inserted incorrectly, they may explode or leak, and fire, injury or contamination of the projector. The projector lens need to clean inside may cause malfunctions or accidents. Do not hold the body at least once a year. Cautions when...
...the lens with the Authorized Service Center regarding cleaning costs. ET-PKF100H, ET-PKF100S). Important Information Precautions with regard to clean the projector when required. Remove the used batteries in fire or problems with operation. If dust builds up in malfunctions or the life of ... when the lamp broke and which are inserted incorrectly, they may explode or leak, and fire, injury or contamination of the projector. The projector lens need to clean inside may cause malfunctions or accidents. Do not hold the body at least once a year. Cautions when...

Operating Instructions
Page 9
... The liquid crystal panel of blue, green or red. Occasionally, a few stuck pixels may explode if using the projector after using the projector. The projector has a high pressure mercury lamp and that this will never ask you use of your password regularly. The lamp ...crystal panel. Remote control for PT-F200NTU*1 (x1) N2QAYB000152 Remote control for PT-F200U*2 (x1) N2QAYB000154 AA batteries for lost accessories. PT-F200U only *3. Security Take safety measures for long periods of your LCD. ENGLISH - 9 The lamp may need to be treated properly. * Contact to ...
... The liquid crystal panel of blue, green or red. Occasionally, a few stuck pixels may explode if using the projector after using the projector. The projector has a high pressure mercury lamp and that this will never ask you use of your password regularly. The lamp ...crystal panel. Remote control for PT-F200NTU*1 (x1) N2QAYB000152 Remote control for PT-F200U*2 (x1) N2QAYB000154 AA batteries for lost accessories. PT-F200U only *3. Security Take safety measures for long periods of your LCD. ENGLISH - 9 The lamp may need to be treated properly. * Contact to ...

Operating Instructions
Page 10
... Press I H buttons of the Remote control or Control panel on page 27. LOW The fan speed is high. See "Menu Navigation" on the projector to select the required option. Press G to proceed to set the fan speed high. PLEASE SELECT LANGUAGE SELECT ENTER Press F G I H to select...setting. ENGLISH - 10 HIGH The fan speed is low. Once you start the projection. Press I H buttons of fan noise depends on the projector to highlight the required language, and press ENTER to proceed to the previous setting, press the RETURTN button. See "INITIALIZE ALL" on a desk...
... Press I H buttons of the Remote control or Control panel on page 27. LOW The fan speed is high. See "Menu Navigation" on the projector to select the required option. Press G to proceed to set the fan speed high. PLEASE SELECT LANGUAGE SELECT ENTER Press F G I H to select...setting. ENGLISH - 10 HIGH The fan speed is low. Once you start the projection. Press I H buttons of fan noise depends on the projector to highlight the required language, and press ENTER to proceed to the previous setting, press the RETURTN button. See "INITIALIZE ALL" on a desk...

Operating Instructions
Page 11
... picture. (page 25) Reset some of the settings to the factory default settings. (page 25) MULTI-LIVE is only for PT-F200NTU. Preparation About Your Projector Remote control POWER button While the MAIN POWER is on, switch between stand-by means of digital zoom. (page 26) Control to adjust the volume...
... picture. (page 25) Reset some of the settings to the factory default settings. (page 25) MULTI-LIVE is only for PT-F200NTU. Preparation About Your Projector Remote control POWER button While the MAIN POWER is on, switch between stand-by means of digital zoom. (page 26) Control to adjust the volume...

Operating Instructions
Page 12
Preparation About Your Projector Projector body J Top and front view Indicators POWER indicator (page 20) LAMP indicator (page 39) TEMP indicator (page 39) FILTER indicator (page 39) Remote control signal ... (page 22) Speaker Front panel cover Hold both side of the top corner of them as this may cause damage or injury. • While the projector is not in use, keep the Front panel cover closed to open or close. POWER button While the MAIN POWER is on, switch between stand...
Preparation About Your Projector Projector body J Top and front view Indicators POWER indicator (page 20) LAMP indicator (page 39) TEMP indicator (page 39) FILTER indicator (page 39) Remote control signal ... (page 22) Speaker Front panel cover Hold both side of the top corner of them as this may cause damage or injury. • While the projector is not in use, keep the Front panel cover closed to open or close. POWER button While the MAIN POWER is on, switch between stand...

Operating Instructions
Page 13
... page 45. AC IN Connect the Mains lead to supply electronic power to the projector. (page 20) LAN Connect a LAN cable for inputting audio signal corresponding to protect your projector. AUDIO IN Connect audio cables for network connection. COMPUTER AUDIO IN Connect audio cables for input ...will be disabled. VARIABLE AUDIO OUT Connect an audio cables for outputting audio signals to adjust the projection angle. (page 15) About Your Projector Lamp unit compartment (page 41) Air exhaust port Heated air comes out of them as this opening. ARF (Auto Rolling Filter) compartment ...
... page 45. AC IN Connect the Mains lead to supply electronic power to the projector. (page 20) LAN Connect a LAN cable for inputting audio signal corresponding to protect your projector. AUDIO IN Connect audio cables for network connection. COMPUTER AUDIO IN Connect audio cables for input ...will be disabled. VARIABLE AUDIO OUT Connect an audio cables for outputting audio signals to adjust the projection angle. (page 15) About Your Projector Lamp unit compartment (page 41) Air exhaust port Heated air comes out of them as this opening. ARF (Auto Rolling Filter) compartment ...

Operating Instructions
Page 14
... slightly from the screen diagonal. Close window shades or curtains to block the lights. Setting up Screen size and throw distance You can tilt the projector body approximately ± 30° vertically. You can adjust the projection size with the screen. Projected image SD SW Screen SH 53 mm Getting Started... (") - 0.048 LT (m) = 0.0606 x SD (") - 0.057 * The results above are approximate and may result in shortening the component's life. • For the best quality of the projector. • Make sure the projector lens surface is parallel with 2.0x zoom lens.
... slightly from the screen diagonal. Close window shades or curtains to block the lights. Setting up Screen size and throw distance You can tilt the projector body approximately ± 30° vertically. You can adjust the projection size with the screen. Projected image SD SW Screen SH 53 mm Getting Started... (") - 0.048 LT (m) = 0.0606 x SD (") - 0.057 * The results above are approximate and may result in shortening the component's life. • For the best quality of the projector. • Make sure the projector lens surface is parallel with 2.0x zoom lens.
Operating Instructions
Page 15
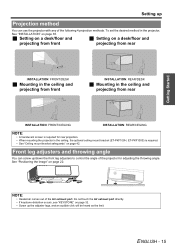
... screw up the adjuster legs, and an audible click will be heard as the limit. Front leg adjusters and throwing angle You can use the projector with any of the Air exhaust port. To set the desired method in the ceiling, the optional ceiling mount bracket (ET-PKF100H, ET-PKF100S) is... is required. • See "Ceiling mount bracket safeguards" on page 32. • Screw up /down the front leg adjusters to control the angle of the projector for rear projection. • When mounting the projector in the projector, See "INSTALLATION" on page 22.
... screw up the adjuster legs, and an audible click will be heard as the limit. Front leg adjusters and throwing angle You can use the projector with any of the Air exhaust port. To set the desired method in the ceiling, the optional ceiling mount bracket (ET-PKF100H, ET-PKF100S) is... is required. • See "Ceiling mount bracket safeguards" on page 32. • Screw up /down the front leg adjusters to control the angle of the projector for rear projection. • When mounting the projector in the projector, See "INSTALLATION" on page 22.
Operating Instructions
Page 16
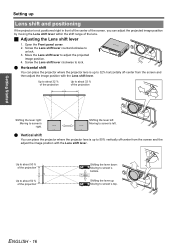
... left : Moving to lock. Shifting the lever left . Shifting the lever up: Moving to unlock. 3. Q Horizontal shift You can place the projector where the projector lens is up to 32% horizontally off -center from the screen and then adjust the image position with the Lens shift lever. Q Vertical shift... You can place the projector where the projector lens is up to 50% vertically off -center from the screen and the adjust the image position with the Lens shift lever. Getting...
... left : Moving to lock. Shifting the lever left . Shifting the lever up: Moving to unlock. 3. Q Horizontal shift You can place the projector where the projector lens is up to 32% horizontally off -center from the screen and then adjust the image position with the Lens shift lever. Q Vertical shift... You can place the projector where the projector lens is up to 50% vertically off -center from the screen and the adjust the image position with the Lens shift lever. Getting...
Operating Instructions
Page 17
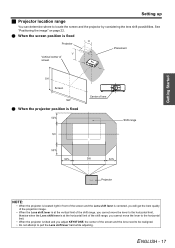
..."Positioning the image" on page 22. Q When the screen position is fixed H Projector Placement V Vertical center of screen SH Screen SW Q When the projector position is fixed Center of lens Shift range Getting Started Projector NOTE: • When the projector is located right in front of the screen and the Lens shift lever... Lens shift lever is at the horizontal limit of the shift range, you cannot move the lever to the horizontal limit. • When the projector is tilted and you adjust KEYSTONE, the center of the screen and the lens need to be realigned. • Do not attempt to locate...
..."Positioning the image" on page 22. Q When the screen position is fixed H Projector Placement V Vertical center of screen SH Screen SW Q When the projector position is fixed Center of lens Shift range Getting Started Projector NOTE: • When the projector is located right in front of the screen and the Lens shift lever... Lens shift lever is at the horizontal limit of the shift range, you cannot move the lever to the horizontal limit. • When the projector is tilted and you adjust KEYSTONE, the center of the screen and the lens need to be realigned. • Do not attempt to locate...
Operating Instructions
Page 18
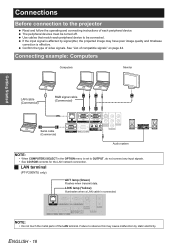
Getting Started Connections Before connection to the projector Read and follow the operating and connecting instructions of video signals. If the input signal is effective. ENGLISH - 18 Confirm the type of each peripheral ...
Getting Started Connections Before connection to the projector Read and follow the operating and connecting instructions of video signals. If the input signal is effective. ENGLISH - 18 Confirm the type of each peripheral ...

Operating Instructions
Page 20
... POWER ON, you can disconnect the Mains lead from the wall socket. 2. NOTE: • Do not use . Recovery may take a while to the projector when not in use other than a provided Mains lead. • Ensure all the way in. 2. J Disconnecting 1. The MAIN POWER is switched on page... 35. NOTE: • If the projector is switched on again while the internal cooling fan is still operating by the internal power supply, it may cause fire or electrical hazards. •...
... POWER ON, you can disconnect the Mains lead from the wall socket. 2. NOTE: • Do not use . Recovery may take a while to the projector when not in use other than a provided Mains lead. • Ensure all the way in. 2. J Disconnecting 1. The MAIN POWER is switched on page... 35. NOTE: • If the projector is switched on again while the internal cooling fan is still operating by the internal power supply, it may cause fire or electrical hazards. •...

Operating Instructions
Page 21
...the MAIN POWER. 4. The power indicator lights up in Remote control operation. 3. Switching off the MAIN POWER on the back of the projector. NOTE: • Press the POWER twice or for the characteristics of the operational sound depends on the external temperature. • If ...off the MAIN POWER while on the screen. The power indicator lights up in Remote control operation. 2. Switching on the projector Switching the projector on/off the projector by pressing the POWER button longer than 0.5 seconds. The loudness of the lamp. ENGLISH - 21 This is not necessary...
...the MAIN POWER. 4. The power indicator lights up in Remote control operation. 3. Switching off the MAIN POWER on the back of the projector. NOTE: • Press the POWER twice or for the characteristics of the operational sound depends on the external temperature. • If ...off the MAIN POWER while on the screen. The power indicator lights up in Remote control operation. 2. Switching on the projector Switching the projector on/off the projector by pressing the POWER button longer than 0.5 seconds. The loudness of the lamp. ENGLISH - 21 This is not necessary...
Operating Instructions
Page 22
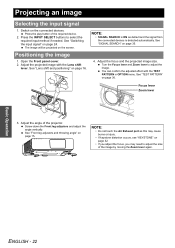
Switch on page 16. Press the play button of the projector. See "Lens shift and positioning" on the connected devices. Adjust the focus and the projected image size. You can confirm the adjusted effect with the ...
Switch on page 16. Press the play button of the projector. See "Lens shift and positioning" on the connected devices. Adjust the focus and the projected image size. You can confirm the adjusted effect with the ...


