
Operating Instructions
Page 1
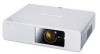
Operating Instructions LCD Projector Commercial Use Model No. TQBJ0248 ENGLISH PT-F200NTU PT-F200U Before operating this product, please read the instructions carefully and save this manual for future use.
Operating Instructions LCD Projector Commercial Use Model No. TQBJ0248 ENGLISH PT-F200NTU PT-F200U Before operating this product, please read the instructions carefully and save this manual for future use.

Operating Instructions
Page 19
Getting Started Connecting example: AV equipments J Connecting with COMPONENT IN Video player To audio output DVD player Audio system ENGLISH - 19 J Connecting with VIDEO IN/S-VIDEO IN To S-VIDEO output OR Connections Video player To video output or audio output Audio system DVD player NOTE: • When you connect more than one AV equipment, switch the audio connection manually.
Getting Started Connecting example: AV equipments J Connecting with COMPONENT IN Video player To audio output DVD player Audio system ENGLISH - 19 J Connecting with VIDEO IN/S-VIDEO IN To S-VIDEO output OR Connections Video player To video output or audio output Audio system DVD player NOTE: • When you connect more than one AV equipment, switch the audio connection manually.

Operating Instructions
Page 24
... input methods as an eye-catching pointing device. Open the battery compartment cover of the Remote control. The actual projected image will blink on the projector COMPUTER1 COMPUTER2 NOTE: • Only when the COMPUTER2 SELECT is only for an accidental operation. 1. See "INPUT GUIDE" on page 11. NETWORK S-VIDEO ...2. ENGLISH - 24 Using the laser pointer You can deactivate the LASER button for PT-F200NTU. NOTE: • If you can switch the input method manually by pressing the COMPUTER, NETWORK (PT-F200NTU only) and VIDEO buttons. Slide the switch tab. 3.
... input methods as an eye-catching pointing device. Open the battery compartment cover of the Remote control. The actual projected image will blink on the projector COMPUTER1 COMPUTER2 NOTE: • Only when the COMPUTER2 SELECT is only for an accidental operation. 1. See "INPUT GUIDE" on page 11. NETWORK S-VIDEO ...2. ENGLISH - 24 Using the laser pointer You can deactivate the LASER button for PT-F200NTU. NOTE: • If you can switch the input method manually by pressing the COMPUTER, NETWORK (PT-F200NTU only) and VIDEO buttons. Slide the switch tab. 3.

Operating Instructions
Page 25
... right. While the image is displayed on the screen's left and the subsequent image is frozen, the sound will be stopped. Adjust each menu items manually. • To reset all the settings to the factory defaults, see "INITIALIZE ALL" on page 28.
... right. While the image is displayed on the screen's left and the subsequent image is frozen, the sound will be stopped. Adjust each menu items manually. • To reset all the settings to the factory defaults, see "INITIALIZE ALL" on page 28.

Operating Instructions
Page 31
... ENGLISH - 31 Press I H. Q NOISE REDUCTION You can reduce the vertical flicker when projecting a still image. You can switch the setting manually to OFF when projecting a moving image. AUTO NTSC SECAM NTSC 4.43 PAL-N PAL PAL-M NOTE: • AUTO setting will select from ... • Applying noise reduction may affect image quality. J For RGB signals Q WHITE BALANCE You can adjust the white balance more detailed image adjustment manually. OFF: Deactive ON: Active NOTE: • Set to match the video data. Press I H to select the required setting. J For S-VIDEO...
... ENGLISH - 31 Press I H. Q NOISE REDUCTION You can reduce the vertical flicker when projecting a still image. You can switch the setting manually to OFF when projecting a moving image. AUTO NTSC SECAM NTSC 4.43 PAL-N PAL PAL-M NOTE: • AUTO setting will select from ... • Applying noise reduction may affect image quality. J For RGB signals Q WHITE BALANCE You can adjust the white balance more detailed image adjustment manually. OFF: Deactive ON: Active NOTE: • Set to match the video data. Press I H to select the required setting. J For S-VIDEO...

Operating Instructions
Page 32
...fine adjust the timing of the clock. ASPECT You can correct the distortion ± 30 degrees from COMPUTER only) KEYSTONE If the projector is aligned non-perpendicularly to adjust. (Available with a minimum of distortion is recommended. • Some distortion may be retained for lens... move horizontally and F G vertically. (Available with signals from COMPUTER/COMPONENT only) NOTE: • You can switch the aspect ratio manually when needed. CLOCK PHASE If you require further adjustment for fine adjustment. Press I H to move the projected image for the same ...
...fine adjust the timing of the clock. ASPECT You can correct the distortion ± 30 degrees from COMPUTER only) KEYSTONE If the projector is aligned non-perpendicularly to adjust. (Available with a minimum of distortion is recommended. • Some distortion may be retained for lens... move horizontally and F G vertically. (Available with signals from COMPUTER/COMPONENT only) NOTE: • You can switch the aspect ratio manually when needed. CLOCK PHASE If you require further adjustment for fine adjustment. Press I H to move the projected image for the same ...
Operating Instructions
Page 48
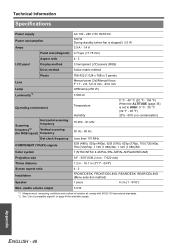
... ALTITUDE (page 35) is stopped): 3.5 W 3.9 A - 1.4 A Panel size (diagonal) 0.7 type (17.78 mm) Aspect ratio 4 : 3 LCD panel Display method 3 transparent LCD panels (RGB) Drive method Active matrix method Lens Lamp Pixels 786 432 (1 024 x 768) x 3 panels Manual zoom (2x)/Manual focus F 1.7 - 2.6, f 21.6 mm - 43.0 mm UHM lamp (250 W) Luminosity*1 3 500 lm Operating environment Temperature Scanning...
... ALTITUDE (page 35) is stopped): 3.5 W 3.9 A - 1.4 A Panel size (diagonal) 0.7 type (17.78 mm) Aspect ratio 4 : 3 LCD panel Display method 3 transparent LCD panels (RGB) Drive method Active matrix method Lens Lamp Pixels 786 432 (1 024 x 768) x 3 panels Manual zoom (2x)/Manual focus F 1.7 - 2.6, f 21.6 mm - 43.0 mm UHM lamp (250 W) Luminosity*1 3 500 lm Operating environment Temperature Scanning...


