

Operating Instructions
Page 1
TQBJ0213 ENGLISH PT-F100NTU PT-F100U Before operating this product, please read the instructions carefully and save this manual for future use. Operating Instructions LCD Projector Commercial Use Model No.
TQBJ0213 ENGLISH PT-F100NTU PT-F100U Before operating this product, please read the instructions carefully and save this manual for future use. Operating Instructions LCD Projector Commercial Use Model No.

Operating Instructions
Page 2
... point within an equilateral triangle is intended to alert the user to the presence of important operating and maintenance (servicing) instructions in your Panasonic LCD projector. This plug will help you might require. We hope it in case service is intended to alert the user to the presence of uninsulated...obtain a separate 250 V power cord. Do not defeat the purpose of the grounding plug. Model number: Serial number: PT-F100NTU / PT-F100U WARNING: TO REDUCE THE RISK OF FIRE OR ELECTRIC SHOCK, DONOT EXPOSE THIS PRODUCT TO RAIN OR MOISTURE. Do not remove the grounding pin on...
... point within an equilateral triangle is intended to alert the user to the presence of important operating and maintenance (servicing) instructions in your Panasonic LCD projector. This plug will help you might require. We hope it in case service is intended to alert the user to the presence of uninsulated...obtain a separate 250 V power cord. Do not defeat the purpose of the grounding plug. Model number: Serial number: PT-F100NTU / PT-F100U WARNING: TO REDUCE THE RISK OF FIRE OR ELECTRIC SHOCK, DONOT EXPOSE THIS PRODUCT TO RAIN OR MOISTURE. Do not remove the grounding pin on...
Operating Instructions
Page 3
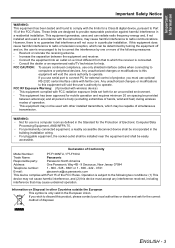
... connected equipment, a readily accessible disconnect device shall be determined by one or more of Conformity Model Number: PT-F100NTU / PT-F100U Trade Name: Panasonic Responsible party: Panasonic North America Address: One Panasonic Way 4B - 9 Secaucus, New Jersey 07094 Telephone number: 1 - 800 - 528 - 8601 or 1 - 800 - ... with ferrite core. Information on a circuit different from that interference will void the users authority to Part 15 of projector, you wish to computers or peripheral devices. WARNING: A Not for use only shielded interface cables when connecting to ...
... connected equipment, a readily accessible disconnect device shall be determined by one or more of Conformity Model Number: PT-F100NTU / PT-F100U Trade Name: Panasonic Responsible party: Panasonic North America Address: One Panasonic Way 4B - 9 Secaucus, New Jersey 07094 Telephone number: 1 - 800 - 528 - 8601 or 1 - 800 - ... with ferrite core. Information on a circuit different from that interference will void the users authority to Part 15 of projector, you wish to computers or peripheral devices. WARNING: A Not for use only shielded interface cables when connecting to ...
Operating Instructions
Page 6
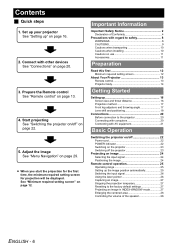
...Prepare the Remote control See "Remote control" on page 12. See "Minimum required setting screen" on page 13. 4. Set up your projector See "Setting up the image position automatically 25 Switching the input signal 26 Using the laser pointer 26 Capturing an image 27 Stopping the ...throw distance 16 Projection method 17 Front leg adjusters and throwing angle 17 Lens shift and positioning 18 Connections 20 Before connection to the projector 20 Connecting with computers 20 Connecting with other devices See "Connections" on page 20. 3. Contents J Quick steps 1. Connect with AV...
...Prepare the Remote control See "Remote control" on page 12. See "Minimum required setting screen" on page 13. 4. Set up your projector See "Setting up the image position automatically 25 Switching the input signal 26 Using the laser pointer 26 Capturing an image 27 Stopping the ...throw distance 16 Projection method 17 Front leg adjusters and throwing angle 17 Lens shift and positioning 18 Connections 20 Before connection to the projector 20 Connecting with computers 20 Connecting with other devices See "Connections" on page 20. 3. Contents J Quick steps 1. Connect with AV...

Operating Instructions
Page 8
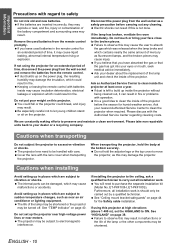
...Center to carry out any inspection, adjustment and repair work (such as this may cause blindness or damage. If water spills onto the projector or gets inside it from becoming covered in such cases, otherwise fire or electric shocks could result. During a thunderstorm, do anything ...that no more smoke is not strong enough to take the full weight of the projector. Do not use the projector in dust. If the power supply is not inserted correctly, electric shocks or overheating could result. High voltages can result. ...
...Center to carry out any inspection, adjustment and repair work (such as this may cause blindness or damage. If water spills onto the projector or gets inside it from becoming covered in such cases, otherwise fire or electric shocks could result. During a thunderstorm, do anything ...that no more smoke is not strong enough to take the full weight of the projector. Do not use the projector in dust. If the power supply is not inserted correctly, electric shocks or overheating could result. High voltages can result. ...

Operating Instructions
Page 9
...which could result in damage or injury. Fire or electric shocks can cause burns. Do not place your eyes. Strong light is emitted from the projector's lens. If you are correct. Be especially careful not to let young children look directly into the lens. Do not place your hands or ...cover gets very hot, and touching it to cool for at least 50 cm (20") of the battery compartment and surrounding area may cause the projector to become unbalanced and fall, which cannot withstand heat close to touch the remote control unit. Before replacing the lamp, be carried out by a...
...which could result in damage or injury. Fire or electric shocks can cause burns. Do not place your eyes. Strong light is emitted from the projector's lens. If you are correct. Be especially careful not to let young children look directly into the lens. Do not place your hands or ...cover gets very hot, and touching it to cool for at least 50 cm (20") of the battery compartment and surrounding area may cause the projector to become unbalanced and fall, which cannot withstand heat close to touch the remote control unit. Before replacing the lamp, be carried out by a...
Operating Instructions
Page 10
...or explosion which may result. You will need to sudden temperature changes, such as fluorescent lamps, and the broken pieces may damage the projector. Remove the used batteries in fire. We are subject to safety Do not mix old and new batteries. The life of time, ..., abnormal internal temperature rising or explosion. See "TEMP indicator" on page 38. The internal parts can be handled with batteries inside the projector without being cleaned out, it may result. Do not touch or bring your dealer or a recycling company. Ask an Authorized Service Center ...
...or explosion which may result. You will need to sudden temperature changes, such as fluorescent lamps, and the broken pieces may damage the projector. Remove the used batteries in fire. We are subject to safety Do not mix old and new batteries. The life of time, ..., abnormal internal temperature rising or explosion. See "TEMP indicator" on page 38. The internal parts can be handled with batteries inside the projector without being cleaned out, it may result. Do not touch or bring your dealer or a recycling company. Ask an Authorized Service Center ...
Operating Instructions
Page 11
...x1) K2CG3DH0053 CD-ROM*3 (x1) TQBH9009 *1. The lamp life is characterised as fixed points of time, as this may greatly affect on use of your LCD. Screen Do not apply any windows and turn off may remain as an afterimage on or off any lights near the screen to switch off... the projector once and try after the instructed lamp replacement timing. PT-F100U only *3. Optical components If you use . If the surface of the lens becomes dirty from shining onto the screen....
...x1) K2CG3DH0053 CD-ROM*3 (x1) TQBH9009 *1. The lamp life is characterised as fixed points of time, as this may greatly affect on use of your LCD. Screen Do not apply any windows and turn off may remain as an afterimage on or off any lights near the screen to switch off... the projector once and try after the instructed lamp replacement timing. PT-F100U only *3. Optical components If you use . If the surface of the lens becomes dirty from shining onto the screen....

Operating Instructions
Page 12
...return to the previous setting, press the RETURTN button. Once you finish the minimum requirement setting, it will be displayed again unless the projector is initialised. Preparation Read this first Minimum required setting screen When you start the projection. NOTE: • At 1 400 m (4 ...See "INITIALIZE ALL" on the HIGHLAND setting. SELECT ENTER Press F G I H buttons of the Remote control or Control panel on the projector to highlight the required language, and press ENTER to proceed to the INSTALLATION, press F. If you need to set the fan speed high....
...return to the previous setting, press the RETURTN button. Once you finish the minimum requirement setting, it will be displayed again unless the projector is initialised. Preparation Read this first Minimum required setting screen When you start the projection. NOTE: • At 1 400 m (4 ...See "INITIALIZE ALL" on the HIGHLAND setting. SELECT ENTER Press F G I H buttons of the Remote control or Control panel on the projector to highlight the required language, and press ENTER to proceed to the INSTALLATION, press F. If you need to set the fan speed high....

Operating Instructions
Page 13
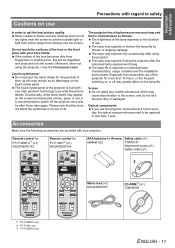
... SEARCH button is only for PT-F100NTU. Attaching a hand strap You can attach a favourite strap on to the polarity diagram indicated inside. Preparation About Your Projector Remote control POWER button While the MAIN POWER is on, switch between stand-by means of digital zoom. (page 28) Control to adjust the volume...
... SEARCH button is only for PT-F100NTU. Attaching a hand strap You can attach a favourite strap on to the polarity diagram indicated inside. Preparation About Your Projector Remote control POWER button While the MAIN POWER is on, switch between stand-by means of digital zoom. (page 28) Control to adjust the volume...

Operating Instructions
Page 14
ENGLISH - 14 Preparation About Your Projector Projector body J Top and front view Indicators POWER indicator (page 22) LAMP indicator (page 41) TEMP indicator (page 41) FILTER indicator (page 41) Remote control signal ... (page 24) Speaker Front panel cover Hold both side of the top corner of them as this may cause damage or injury. • While the projector is on, switch between stand-by mode and projection mode. (page 22) Navigation buttons Navigate through the menus with FGIH, and activate the menu item...
ENGLISH - 14 Preparation About Your Projector Projector body J Top and front view Indicators POWER indicator (page 22) LAMP indicator (page 41) TEMP indicator (page 41) FILTER indicator (page 41) Remote control signal ... (page 24) Speaker Front panel cover Hold both side of the top corner of them as this may cause damage or injury. • While the projector is on, switch between stand-by mode and projection mode. (page 22) Navigation buttons Navigate through the menus with FGIH, and activate the menu item...

Operating Instructions
Page 15
...MicroSaver Security System. ARF (Auto Rolling Filter) compartment (page 42) Font leg adjusters Screw up/down to protect your projector. Preparation J Back and bottom view Security lock Attache the commercial shackle lock, manufactured by menu operation. This terminal is connected to the... projector. (page 22) Safety cable attachment point Attach the Safety cable when mounted in speaker will be disabled. Selectable for inputting...
...MicroSaver Security System. ARF (Auto Rolling Filter) compartment (page 42) Font leg adjusters Screw up/down to protect your projector. Preparation J Back and bottom view Security lock Attache the commercial shackle lock, manufactured by menu operation. This terminal is connected to the... projector. (page 22) Safety cable attachment point Attach the Safety cable when mounted in speaker will be disabled. Selectable for inputting...

Operating Instructions
Page 16
... more detailed screen dimension from the actual measurements. J Calculation methods for 16:9 aspect ratio" on page 52. • Do not use the projector at a raised or a horizontally tilted position as follows. Projected image SD SW Screen SH ˎˎˎˎmm Getting Started Projection size ... result in shortening the component's life. • For the best quality of the projector. • Make sure the projector lens surface is parallel with 2.0x zoom lens. You can tilt the projector body approximately ± 30° vertically. Close window shades or curtains to block ...
... more detailed screen dimension from the actual measurements. J Calculation methods for 16:9 aspect ratio" on page 52. • Do not use the projector at a raised or a horizontally tilted position as follows. Projected image SD SW Screen SH ˎˎˎˎmm Getting Started Projection size ... result in shortening the component's life. • For the best quality of the projector. • Make sure the projector lens surface is parallel with 2.0x zoom lens. You can tilt the projector body approximately ± 30° vertically. Close window shades or curtains to block ...

Operating Instructions
Page 17
.... • See "Ceiling mount bracket safeguards" on page 24. Front leg adjusters and throwing angle You can screw up Projection method You can use the projector with any of the following 4 projection methods. NOTE: • Heated air comes out of the Air exhaust port. Do not touch the Air exhaust port.... • If keystone distortion occurs, see "KEYSTONE" on page 37.. Getting Started Setting up /down the front leg adjusters to control the angle of the projector for rear projection. • When mounting the projector in the projector, See "INSTALLATION" on page 34.
.... • See "Ceiling mount bracket safeguards" on page 24. Front leg adjusters and throwing angle You can screw up Projection method You can use the projector with any of the following 4 projection methods. NOTE: • Heated air comes out of the Air exhaust port. Do not touch the Air exhaust port.... • If keystone distortion occurs, see "KEYSTONE" on page 37.. Getting Started Setting up /down the front leg adjusters to control the angle of the projector for rear projection. • When mounting the projector in the projector, See "INSTALLATION" on page 34.

Operating Instructions
Page 18
Q Horizontal shift You can place the projector where the projector lens is up to 50% vertically off -center from the screen and the adjust the image position with the Lens shift lever. Shifting the lever ... the projected image position. 4. ENGLISH - 18 Getting Started Setting up Lens shift and positioning If the projector is not positioned right in front of the center of the screen, you can place the projector where the projector lens is up to 32% horizontally off -center from the screen and then adjust the image...
Q Horizontal shift You can place the projector where the projector lens is up to 50% vertically off -center from the screen and the adjust the image position with the Lens shift lever. Shifting the lever ... the projected image position. 4. ENGLISH - 18 Getting Started Setting up Lens shift and positioning If the projector is not positioned right in front of the center of the screen, you can place the projector where the projector lens is up to 32% horizontally off -center from the screen and then adjust the image...

Operating Instructions
Page 19
... lever hard while adjusting. Q When the screen position is fixed H Projector Placement V Vertical center of screen SH Screen SW Q When the projector position is fixed Center of lens Shift range Getting Started Projector NOTE: • When the projector is located right in front of the screen and the Lens shift lever...Lens shift lever is at the horizontal limit of the shift range, you cannot move the lever to the horizontal limit. • When the projector is tilted and you adjust KEYSTONE, the center of the screen and the lens need to be realigned. • Do not attempt to locate...
... lever hard while adjusting. Q When the screen position is fixed H Projector Placement V Vertical center of screen SH Screen SW Q When the projector position is fixed Center of lens Shift range Getting Started Projector NOTE: • When the projector is located right in front of the screen and the Lens shift lever...Lens shift lever is at the horizontal limit of the shift range, you cannot move the lever to the horizontal limit. • When the projector is tilted and you adjust KEYSTONE, the center of the screen and the lens need to be realigned. • Do not attempt to locate...

Operating Instructions
Page 20
... signals" on page 46. Use cables that match each peripheral device. See "List of video signals. ENGLISH - 20 Getting Started Connections Before connection to the projector Read and follow the operating and connecting instructions of each peripheral device to OUTPUT, do not connect any input signals. • See CD-ROM contents...
... signals" on page 46. Use cables that match each peripheral device. See "List of video signals. ENGLISH - 20 Getting Started Connections Before connection to the projector Read and follow the operating and connecting instructions of each peripheral device to OUTPUT, do not connect any input signals. • See CD-ROM contents...
Operating Instructions
Page 22
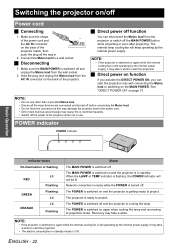
... fire or electrical hazards. • Switch off before connecting the Mains lead. • Do not force the connector as this may damage the projector and/or the power cord. • Dirt or dust build-up around plugs may take a while to start the projection. • The ...electric consumption in use other than a provided Mains lead. • Ensure all the way in standby. NOTE: • If the projector is switched on again when cooling the lamp and recovering to project. POWER indicator POWER indicator Basic Operation Indicator status No illumination or flashing RED...
... fire or electrical hazards. • Switch off before connecting the Mains lead. • Do not force the connector as this may damage the projector and/or the power cord. • Dirt or dust build-up around plugs may take a while to start the projection. • The ...electric consumption in use other than a provided Mains lead. • Ensure all the way in standby. NOTE: • If the projector is switched on again when cooling the lamp and recovering to project. POWER indicator POWER indicator Basic Operation Indicator status No illumination or flashing RED...

Operating Instructions
Page 23
... in ORANGE while cooling the lamp, then illuminates RED when is normal and does not affect the performance of the projector. Switch off the MAIN POWER on the back of the projector. • If you disconnected the Mains lead or switched off the MAIN POWER. 4. The power indicator lights up in GREEN... the MAIN POWER while on projecting mode, the projection will start with connecting the Mains lead or switching on the MAIN POWER. Switching on the projector Switching the projector on/off the projector Basic Operation 1.
... in ORANGE while cooling the lamp, then illuminates RED when is normal and does not affect the performance of the projector. Switch off the MAIN POWER on the back of the projector. • If you disconnected the Mains lead or switched off the MAIN POWER. 4. The power indicator lights up in GREEN... the MAIN POWER while on projecting mode, the projection will start with connecting the Mains lead or switching on the MAIN POWER. Switching on the projector Switching the projector on/off the projector Basic Operation 1.
Operating Instructions
Page 24
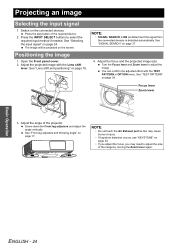
... INPUT SELECT buttons to adjust the image. See "Lens shift and positioning" on page 37. 4. Switch on page 17. Press the play button of the projector. NOTE: • SIGNAL SEARCH is detected automatically. You can confirm the adjusted effect with the Lens shift lever. Positioning the image 1. Basic Operation ENGLISH - 24...
... INPUT SELECT buttons to adjust the image. See "Lens shift and positioning" on page 37. 4. Switch on page 17. Press the play button of the projector. NOTE: • SIGNAL SEARCH is detected automatically. You can confirm the adjusted effect with the Lens shift lever. Positioning the image 1. Basic Operation ENGLISH - 24...


