
CQC1100U User Guide
Page 5
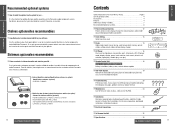
...among 4 models 7 Recommended optional systems 8 ❒ Power and Sound Controls 12 Power, volume, mute, display change, SQ (sound quality), audio mode (bass/treble/balance/fader/sub woofer) ❒ Clock Setting 13 Initial time, time reset ❒ Radio 14 Radio mode, band, manual tuning, seek tuning, direct memory, preset station setting, preset station calling, display change , pause, track selection, track search, direct track selection, repeat play, random play, scan play ❒ Remote Control Unit 18 Only for getting the best quality sound to use the Panasonic audio component...
...among 4 models 7 Recommended optional systems 8 ❒ Power and Sound Controls 12 Power, volume, mute, display change, SQ (sound quality), audio mode (bass/treble/balance/fader/sub woofer) ❒ Clock Setting 13 Initial time, time reset ❒ Radio 14 Radio mode, band, manual tuning, seek tuning, direct memory, preset station setting, preset station calling, display change , pause, track selection, track search, direct track selection, repeat play, random play, scan play ❒ Remote Control Unit 18 Only for getting the best quality sound to use the Panasonic audio component...
CQC1100U User Guide
Page 7
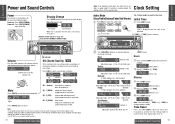
... indicator lights. Volume Bass Treble Regular mode Sub Woofer Fader (Only for CQ-C1200U) Balance Push "AdJ" is displayed when the clock is not adjusted. [k TUNE], [l TUNE] (Hours, minutes) VOLUME / PUSH SEL APM POWER SRC 7 MUTE 1 8 9 2 3 CQ-C1200U 10 11 45 12 SCAN 6 SQ D•M TUNE TRACK REP CLOCK DISP w Turn [VOLUME] clockwise or counterclockwise to change numbers rapidly. Press [SQ] to select a sound type as follows: (default) Up Down Mute Press [MUTE] to the clock display...
... indicator lights. Volume Bass Treble Regular mode Sub Woofer Fader (Only for CQ-C1200U) Balance Push "AdJ" is displayed when the clock is not adjusted. [k TUNE], [l TUNE] (Hours, minutes) VOLUME / PUSH SEL APM POWER SRC 7 MUTE 1 8 9 2 3 CQ-C1200U 10 11 45 12 SCAN 6 SQ D•M TUNE TRACK REP CLOCK DISP w Turn [VOLUME] clockwise or counterclockwise to change numbers rapidly. Press [SQ] to select a sound type as follows: (default) Up Down Mute Press [MUTE] to the clock display...

CQC1100U User Guide
Page 8
... preset station memories. Frequency Clock display q Band Press [BAND] to select a desired band. (➡ page 14) APM POWER SRC VOLUME / PUSH SEL ST 7 MUTE 1 8 9 2 3 CQ-C1200U 10 11 45 12 SCAN 6 SQ D•M TUNE TRACK REP CLOCK DISP Preset buttons from [1] to preset sta- Direct Memory(D·M) Your favorite FM/AM radio station can call back the radio station just by pressing the button whatever the current sound source is, even if the power is received. D-M lights...
... preset station memories. Frequency Clock display q Band Press [BAND] to select a desired band. (➡ page 14) APM POWER SRC VOLUME / PUSH SEL ST 7 MUTE 1 8 9 2 3 CQ-C1200U 10 11 45 12 SCAN 6 SQ D•M TUNE TRACK REP CLOCK DISP Preset buttons from [1] to preset sta- Direct Memory(D·M) Your favorite FM/AM radio station can call back the radio station just by pressing the button whatever the current sound source is, even if the power is received. D-M lights...
CQC1100U User Guide
Page 9
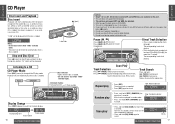
... than 2 seconds. Repeat play and eject the disc. Stop and Disc Eject Press [u] (eject) to the CD play . APM POWER SRC VOLUME / PUSH SEL DISC 7 MUTE 11 8 9 22 33 CQ-C1200U TRACK 10 11 44 55 12 SCAN 66 SQ D•M TUNE TRACK REP CLOCK DISP Direct Track Selection • Press a track number button from [7] to [12] ([1] to resume the regular play mode. DISC Track playing time TRACK track number Clock display 16 CQ-C1200U/C1120U...
... than 2 seconds. Repeat play and eject the disc. Stop and Disc Eject Press [u] (eject) to the CD play . APM POWER SRC VOLUME / PUSH SEL DISC 7 MUTE 11 8 9 22 33 CQ-C1200U TRACK 10 11 44 55 12 SCAN 66 SQ D•M TUNE TRACK REP CLOCK DISP Direct Track Selection • Press a track number button from [7] to [12] ([1] to resume the regular play mode. DISC Track playing time TRACK track number Clock display 16 CQ-C1200U/C1120U...
CQC1100U User Guide
Page 10
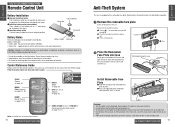
... batteries. Remove the removable face plate. e Pull it with normal use (at the main unit's sensor. [PWR] (Power) (➡ page 12) [MODE] (Mode (source)) (➡ pages 14, 16) [BAND] (Band) (Pause) (➡ page 14, 17) PWR (ATT) MUTE MODE VOL PRG BAND/DISC UP TUNE TRACK Car Audio Note: CQ-C1100U has no remote control function. 18 CQ-C1200U/C1120U/C1110U/C1100U BAND VOLUME / PUSH SEL APM POWER SRC [MUTE] (Mute) (➡ page 12) 7 MUTE...
... batteries. Remove the removable face plate. e Pull it with normal use (at the main unit's sensor. [PWR] (Power) (➡ page 12) [MODE] (Mode (source)) (➡ pages 14, 16) [BAND] (Band) (Pause) (➡ page 14, 17) PWR (ATT) MUTE MODE VOL PRG BAND/DISC UP TUNE TRACK Car Audio Note: CQ-C1100U has no remote control function. 18 CQ-C1200U/C1120U/C1110U/C1100U BAND VOLUME / PUSH SEL APM POWER SRC [MUTE] (Mute) (➡ page 12) 7 MUTE...

CQC1100U User Guide
Page 11
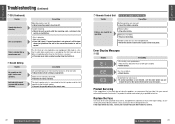
... be used. ➡The unit may not successfully play back a CD-R/RW that is made , or disc is ejected automatically. Refer to instructions for the concerned devices for repairs. If You Suspect Something Wrong Immediately switch the power off. Grounding wire is connected in the correct direction with the label side up of a combination of writing software, a CD recorder (CD-R/RW drive) and a disc which are correct. Mute is set...
... be used. ➡The unit may not successfully play back a CD-R/RW that is made , or disc is ejected automatically. Refer to instructions for the concerned devices for repairs. If You Suspect Something Wrong Immediately switch the power off. Grounding wire is connected in the correct direction with the label side up of a combination of writing software, a CD recorder (CD-R/RW drive) and a disc which are correct. Mute is set...
CQC1100U User Guide
Page 12
...; Sound Setting Trouble No sound from left speaker wire to the right speaker. ➡Connect the speaker wires to the unit. If the replacement fuse fails, contact your nearest authorized Panasonic Servicenter. E N G Troubleshooting (Continued) L I ❐ Remote Control Unit Only for CQ-C1200U/C1120U/C1110U S H Trouble Cause/Step 12 Battery polarities are reversed. ➡Insert the battery correctly. Disc is not ejected. • Disc is counted but no sound comes out. E N G L I S H ❐ CD (Continued) 11 Trouble Cause/Step Sound...
...; Sound Setting Trouble No sound from left speaker wire to the right speaker. ➡Connect the speaker wires to the unit. If the replacement fuse fails, contact your nearest authorized Panasonic Servicenter. E N G Troubleshooting (Continued) L I ❐ Remote Control Unit Only for CQ-C1200U/C1120U/C1110U S H Trouble Cause/Step 12 Battery polarities are reversed. ➡Insert the battery correctly. Disc is not ejected. • Disc is counted but no sound comes out. E N G L I S H ❐ CD (Continued) 11 Trouble Cause/Step Sound...
CQC1100U User Guide
Page 13
... a motor car by the combination of writing software, a CD recorder (CD-R/RW drive) and a disc if they may have trouble playing back some CD-R/RW discs recorded on the disc label in the dashboard. • Check the operation of potential dangers involved in attempting to install this Unit Use a dry, soft cloth to use , keep the disc in any ordinary music CDs with a 12 V DC negative ground auto battery system...
... a motor car by the combination of writing software, a CD recorder (CD-R/RW drive) and a disc if they may have trouble playing back some CD-R/RW discs recorded on the disc label in the dashboard. • Check the operation of potential dangers involved in attempting to install this Unit Use a dry, soft cloth to use , keep the disc in any ordinary music CDs with a 12 V DC negative ground auto battery system...
CQC1100U User Guide
Page 14
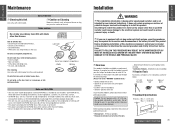
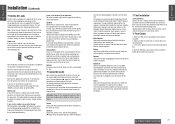
... wires and fasten them to the fuse block and find the fuse port for one: Cut the connector wires one at the end. ❐ Connect All Leads Now that each . If your car has a radio or is not wired for an audio unit: Go to the stereo unit wires. The wiring diagram (\ page 30) shows the proper connections and color coding of distance between the speaker leads/amplifier unit and the antenna/antenna extension cord...
... wires and fasten them to the fuse block and find the fuse port for one: Cut the connector wires one at the end. ❐ Connect All Leads Now that each . If your car has a radio or is not wired for an audio unit: Go to the stereo unit wires. The wiring diagram (\ page 30) shows the proper connections and color coding of distance between the speaker leads/amplifier unit and the antenna/antenna extension cord...
CQC1100U User Guide
Page 15
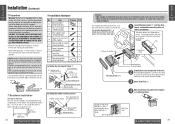
... memory in other model. 1 Insert Mounting Collar q into the dashboard, and bend the mounting tabs out with a screwdriver, be installed in the mounting holes of the unit to back up at shipment.* Caution: Various settings that there is designed specially for this electronic component, contact your 18 hands and fingers. Example: Tab y Power Connector q Mounting Collar Mounting Springs (C) Mounting Holes t Mounting Bolt 2 Establish the rear connection...
... memory in other model. 1 Insert Mounting Collar q into the dashboard, and bend the mounting tabs out with a screwdriver, be installed in the mounting holes of the unit to back up at shipment.* Caution: Various settings that there is designed specially for this electronic component, contact your 18 hands and fingers. Example: Tab y Power Connector q Mounting Collar Mounting Springs (C) Mounting Holes t Mounting Bolt 2 Establish the rear connection...

CQC1100U User Guide
Page 16
... car has a drive computer or a navigation computer, the data of speaker leads (except for connecting to a tweeter). • Do not use with switch actuated power antenna. (Dark blue) Sub-Woofer cord (monaoural) S•W-OUT (R) Red (L) White To remove the Fuse Fuse Fuse (15 A)C C If the fuse (rear panel) blows fre- 3 1 quently, they may be something 2 wrong with the unit or wiring. Bundle all cables and keep cable terminals free from touching any exposed wires...
... car has a drive computer or a navigation computer, the data of speaker leads (except for connecting to a tweeter). • Do not use with switch actuated power antenna. (Dark blue) Sub-Woofer cord (monaoural) S•W-OUT (R) Red (L) White To remove the Fuse Fuse Fuse (15 A)C C If the fuse (rear panel) blows fre- 3 1 quently, they may be something 2 wrong with the unit or wiring. Bundle all cables and keep cable terminals free from touching any exposed wires...
CQC1100U User Guide
Page 17
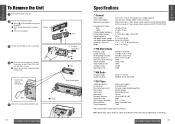
... removable face plate will be opened. E N G To Remove the Unit L I ❐ General S H Power supply: Current consumption: 12 V DC (11 V-16 V), test voltage 14.4 V, negative ground Less than 2.2 A (CD play mode; 0.5 W×4 channels) 22 Maximum power output: 50 W×4 channels at 1 kHz, volume control maximum (CQ-C1200U/C1120U) 45 W×4 channels at 1 kHz, volume control maximum (CQ-C1110U/C1100U) Tone adjustment range: Bass: ±12 dB at 100 Hz Treble: ±...
... removable face plate will be opened. E N G To Remove the Unit L I ❐ General S H Power supply: Current consumption: 12 V DC (11 V-16 V), test voltage 14.4 V, negative ground Less than 2.2 A (CD play mode; 0.5 W×4 channels) 22 Maximum power output: 50 W×4 channels at 1 kHz, volume control maximum (CQ-C1200U/C1120U) 45 W×4 channels at 1 kHz, volume control maximum (CQ-C1110U/C1100U) Tone adjustment range: Bass: ±12 dB at 100 Hz Treble: ±...


