
CQ5100U User Guide
Page 2
... of battery terminal disconnection. Do not disassemble, modify the unit or attempt to use the unit when it is smoking, or smells), turn it is designed for operation with your exact time and location. Panasonic assumes no sound) or in an abnormal state (has foreign matter in the vehicle chassis to attach or wire the product, first check where the wire harness, gasoline...
... of battery terminal disconnection. Do not disassemble, modify the unit or attempt to use the unit when it is smoking, or smells), turn it is designed for operation with your exact time and location. Panasonic assumes no sound) or in an abnormal state (has foreign matter in the vehicle chassis to attach or wire the product, first check where the wire harness, gasoline...
CQ5100U User Guide
Page 3
... the user's authority to be installed. Incorrect replacement of the fuse may come out and damage your speakers and your hand or fingers to operate this unit by a qualified service engineer. If leads must be caught in the unit. Blocking these parts will drain the battery. ❑ Refer fuse replacement to damage the leads. Consult your weather radio can receive properly before driving, especially, before use of speaker...
... the user's authority to be installed. Incorrect replacement of the fuse may come out and damage your speakers and your hand or fingers to operate this unit by a qualified service engineer. If leads must be caught in the unit. Blocking these parts will drain the battery. ❑ Refer fuse replacement to damage the leads. Consult your weather radio can receive properly before driving, especially, before use of speaker...
CQ5100U User Guide
Page 5
..., misapplication, alteration, faulty installation, set-up adjustment, maladjustment of consumer control, improper maintenance, improper antenna, inadequate signal reception or pickup, power line surge, improper voltage supply, lightning, modification, commercial use (such as use in the chart below ) Speakers Defective Car Audio Speakers under warranty must carry in or mail in your product does not work properly because of God. Code No. PANASONIC CONSUMER ELECTRONICS COMPANY...
..., misapplication, alteration, faulty installation, set-up adjustment, maladjustment of consumer control, improper maintenance, improper antenna, inadequate signal reception or pickup, power line surge, improper voltage supply, lightning, modification, commercial use (such as use in the chart below ) Speakers Defective Car Audio Speakers under warranty must carry in or mail in your product does not work properly because of God. Code No. PANASONIC CONSUMER ELECTRONICS COMPANY...
CQ5100U User Guide
Page 6
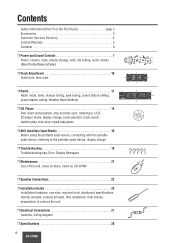
...; Power and Sound Controls 7 Power, volume, mute, display change, AUX, SQ setting, audio modes (Bass/Treble/Balance/Fader) ❒ Clock Adjustment 10 Initial time, time reset ❒ Radio 11 Radio mode, band, manual tuning, seek tuning, preset station setting, preset station calling, Weather Band Stations ❒ CD Player 14 Disc insert and playback, stop and disc eject, listening to a CD, CD player mode, display change, track selection, track search, random play, scan play, repeat play,pause ❒ AUX (Auxiliary Input Mode 16 Before using the portable audio device, connecting...
...; Power and Sound Controls 7 Power, volume, mute, display change, AUX, SQ setting, audio modes (Bass/Treble/Balance/Fader) ❒ Clock Adjustment 10 Initial time, time reset ❒ Radio 11 Radio mode, band, manual tuning, seek tuning, preset station setting, preset station calling, Weather Band Stations ❒ CD Player 14 Disc insert and playback, stop and disc eject, listening to a CD, CD player mode, display change, track selection, track search, random play, scan play, repeat play,pause ❒ AUX (Auxiliary Input Mode 16 Before using the portable audio device, connecting...

CQ5100U User Guide
Page 7
...-audio player, HDD player, etc.) (➡ page 16) 7 CQ-5100U Power off : No display Clock display Note: "Adj" is displayed when the clock is not adjusted (➡ page 10) Volume Turn the knob clockwise to increase volume, and counterclockwise to low enough before the AUX connection is completed. Power on: Press [MODE](POWER). Up Down Caution Set the volume level to decrease volume. Volume level (0 to 40) (default:18) lights Press [MUTE] again to the clock display. Power and Sound Controls Power Turn...
...-audio player, HDD player, etc.) (➡ page 16) 7 CQ-5100U Power off : No display Clock display Note: "Adj" is displayed when the clock is not adjusted (➡ page 10) Volume Turn the knob clockwise to increase volume, and counterclockwise to low enough before the AUX connection is completed. Power on: Press [MODE](POWER). Up Down Caution Set the volume level to decrease volume. Volume level (0 to 40) (default:18) lights Press [MUTE] again to the clock display. Power and Sound Controls Power Turn...

CQ5100U User Guide
Page 9
...) Balance: R (right speaker) or L (left speaker) default : 0 [CNT (center)] Adjustable range: Fader: 0 to 15 (by 1 step) F (front speaker) or R (rear speaker) default : 0 [CNT (center)] Adjustable range: 0 to select the audio mode. Audio Modes (Bass/Treble/Balance/Fader) q Push [VOLUME] (PUSH SEL) to 15 (by 1 step) 9 CQ-5100U Regular Mode Volume Bass Note: If no operation takes place for more than 5 seconds in audio mode (2 seconds in volume mode), the display returns to change each level. Fader Balance Treble push w Turn [VOLUME] clockwise...
...) Balance: R (right speaker) or L (left speaker) default : 0 [CNT (center)] Adjustable range: Fader: 0 to 15 (by 1 step) F (front speaker) or R (rear speaker) default : 0 [CNT (center)] Adjustable range: 0 to select the audio mode. Audio Modes (Bass/Treble/Balance/Fader) q Push [VOLUME] (PUSH SEL) to 15 (by 1 step) 9 CQ-5100U Regular Mode Volume Bass Note: If no operation takes place for more than 5 seconds in audio mode (2 seconds in volume mode), the display returns to change each level. Fader Balance Treble push w Turn [VOLUME] clockwise...
CQ5100U User Guide
Page 10
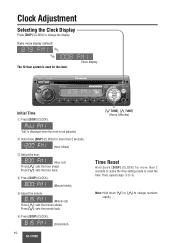
...] (CLOCK). (Completed) 10 CQ-5100U [{ TUNE], [} TUNE] (Hours, Minutes) Time Reset Hold down [DISP] (CLOCK) for more than 2 seconds. (Hour blinks) e Adjust the hour. (Hour set ) Press [}]: sets the minute ahead. w Hold down [{] or [}] to reset the time. Note: Hold down [DISP] (CLOCK) for more than 2 seconds to active the time setting mode to change the display. Then, repeat steps e to change numbers rapidly. Clock display Initial Time q Press [DISP] (CLOCK). Clock Adjustment Selecting the Clock Display Press [DISP] (CLOCK...
...] (CLOCK). (Completed) 10 CQ-5100U [{ TUNE], [} TUNE] (Hours, Minutes) Time Reset Hold down [DISP] (CLOCK) for more than 2 seconds. (Hour blinks) e Adjust the hour. (Hour set ) Press [}]: sets the minute ahead. w Hold down [{] or [}] to reset the time. Note: Hold down [DISP] (CLOCK) for more than 2 seconds to active the time setting mode to change the display. Then, repeat steps e to change numbers rapidly. Clock display Initial Time q Press [DISP] (CLOCK). Clock Adjustment Selecting the Clock Display Press [DISP] (CLOCK...

CQ5100U User Guide
Page 12
Manual Preset Memory q Use manual or seek tuning to find a station. (➡ page 11) w Hold down [BAND] (APM: auto preset memory) for 5 seconds each of the FM1, FM2 and AM preset station memories. q Band Press [BAND](APM) to select a desired band. (➡ page 11) Preset buttons from [1] to [6] w Auto Preset Memory (APM) Hold down one of the buttons from [1] to [6] until the display blinks once. Preset Number blinks once Preset Station Calling Press the corresponding preset button from...
Manual Preset Memory q Use manual or seek tuning to find a station. (➡ page 11) w Hold down [BAND] (APM: auto preset memory) for 5 seconds each of the FM1, FM2 and AM preset station memories. q Band Press [BAND](APM) to select a desired band. (➡ page 11) Preset buttons from [1] to [6] w Auto Preset Memory (APM) Hold down one of the buttons from [1] to [6] until the display blinks once. Preset Number blinks once Preset Station Calling Press the corresponding preset button from...
CQ5100U User Guide
Page 13
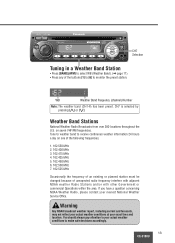
... conditions to receive continuous weather information 24 hours a day on seven VHF/FM frequencies. Tune to weather band to make safe decisions accordingly. 13 CQ-5100U Weather Band Stations National Weather Radio Broadcasts from over 380 Iocations throughout the U.S. If you have a question concerning NOAA Weather Radio, please contact your exact time and location. WB Weather Band Frequency (channel) Number Note: The...
... conditions to receive continuous weather information 24 hours a day on seven VHF/FM frequencies. Tune to weather band to make safe decisions accordingly. 13 CQ-5100U Weather Band Stations National Weather Radio Broadcasts from over 380 Iocations throughout the U.S. If you have a question concerning NOAA Weather Radio, please contact your exact time and location. WB Weather Band Frequency (channel) Number Note: The...

CQ5100U User Guide
Page 14
... and Disc Eject Press [u] (eject) to the CD player mode. "LOAd" will be displayed. Listening to a CD Press [MODE](POWER) to change the display. Notes: • Do not insert a disc when "DISC" indicator lights. • The power will start automatically when a disc is loaded. ( When a CD disc is loaded ) Radio CD player Label Side AUX Mode Current Track Display change Press [DISP] to change to stop CD play and eject the disc. CD mode display (default) 14 CQ-5100U Play time DISC indicator Random/Repeat indicator Clock display Playback...
... and Disc Eject Press [u] (eject) to the CD player mode. "LOAd" will be displayed. Listening to a CD Press [MODE](POWER) to change the display. Notes: • Do not insert a disc when "DISC" indicator lights. • The power will start automatically when a disc is loaded. ( When a CD disc is loaded ) Radio CD player Label Side AUX Mode Current Track Display change Press [DISP] to change to stop CD play and eject the disc. CD mode display (default) 14 CQ-5100U Play time DISC indicator Random/Repeat indicator Clock display Playback...

CQ5100U User Guide
Page 16
... the driver when driving. The AUX Input Example: Main Unit CQ-5100U Silicon audio player, HDD audio player etc. (Option) Front AUX IN (3.5 mm ø stereo) Stereo line out (3.5 mm ø) 3.5 mm ø stereo mini-plug cable (Option) Caution • Set the volume level to low enough before the AUX connection is used to observe this AUX directly with the portable audio player The AUX input terminal is connected, sound may be distorted or become extremely low levels. • The connected audio...
... the driver when driving. The AUX Input Example: Main Unit CQ-5100U Silicon audio player, HDD audio player etc. (Option) Front AUX IN (3.5 mm ø stereo) Stereo line out (3.5 mm ø) 3.5 mm ø stereo mini-plug cable (Option) Caution • Set the volume level to low enough before the AUX connection is used to observe this AUX directly with the portable audio player The AUX input terminal is connected, sound may be distorted or become extremely low levels. • The connected audio...

CQ5100U User Guide
Page 17
... powered through the speakers. Radio ( When a CD disc is high, the distortion may cause speaker damage. AUX input mode (default) Clock display Notes: • If you disconnect the mini-plug cable and connect it to another mode. • Each device has a different output level. w Press [MODE] (POWER) to change the display. In such cases, adjust the volume on the connected portable audio device and play the music. Listening to the portable audio device q Turn on the connected device. • For the power source of the portable audio device, use a battery...
... powered through the speakers. Radio ( When a CD disc is high, the distortion may cause speaker damage. AUX input mode (default) Clock display Notes: • If you disconnect the mini-plug cable and connect it to another mode. • Each device has a different output level. w Press [MODE] (POWER) to change the display. In such cases, adjust the volume on the connected portable audio device and play the music. Listening to the portable audio device q Turn on the connected device. • For the power source of the portable audio device, use a battery...

CQ5100U User Guide
Page 18
.... a Connect cables correctly. a Connect the power connector to ACC or ON. Mute is set to the terminal that is always active. Troubleshooting Tips ❐ Common Trouble Check point Vehicle's ignition switch is not correctly connected. a Connect the ground lead properly. 18 CQ-5100U Immediately stop using the unit and consult your dealer. ¡ Never try to repair the unit by yourself because it to your vehicle's ACC source. a Connect...
.... a Connect cables correctly. a Connect the power connector to ACC or ON. Mute is set to the terminal that is always active. Troubleshooting Tips ❐ Common Trouble Check point Vehicle's ignition switch is not correctly connected. a Connect the ground lead properly. 18 CQ-5100U Immediately stop using the unit and consult your dealer. ¡ Never try to repair the unit by yourself because it to your vehicle's ACC source. a Connect...

CQ5100U User Guide
Page 19
... loaded. Preset station is reset. ❐ CD Trouble Disc is in the CD compartment but no sound is made in FM stereo and monaural broadcasts. a Discs that is too far, or signals are incompatible one another . Refer to the section on Discs". a Select other than 30˚. a Connect the battery cable to instructions for the concerned devices for details. • Disc is ejected automatically. Check point Station is always active. Battery cable is...
... loaded. Preset station is reset. ❐ CD Trouble Disc is in the CD compartment but no sound is made in FM stereo and monaural broadcasts. a Discs that is too far, or signals are incompatible one another . Refer to the section on Discs". a Select other than 30˚. a Connect the battery cable to instructions for the concerned devices for details. • Disc is ejected automatically. Check point Station is always active. Battery cable is...

CQ5100U User Guide
Page 20
... correctly connected. The right speaker wire is recorded on other than the first track in stereo listening. Error Display Messages ❐ CD Trouble Check point Disc is dirty, or is not ejected. a Press [u] (eject). Check point Left and right balance, or front and rear balance is off on other than the first track. ❐ Sound Setting Trouble No sound from left speaker wire to ask for repairs. Troubleshooting (Continued) ❐ CD (Continued) Trouble Disc is...
... correctly connected. The right speaker wire is recorded on other than the first track in stereo listening. Error Display Messages ❐ CD Trouble Check point Disc is dirty, or is not ejected. a Press [u] (eject). Check point Left and right balance, or front and rear balance is off on other than the first track. ❐ Sound Setting Trouble No sound from left speaker wire to ask for repairs. Troubleshooting (Continued) ❐ CD (Continued) Trouble Disc is...
CQ5100U User Guide
Page 22
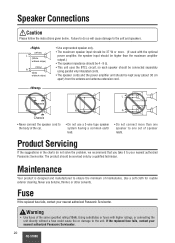
... the antenna and antenna extension cord. Using substitutes or fuses with the optional power amplifier, the speaker input should be serviced only by a qualified technician. If the replaced fuse fails, contact your nearest authorized Panasonic Servicenter. R + - + - + - • Do not connect more . (If used with higher ratings, or connecting the unit directly without a fuse could cause fire or damage to one set of the same specified rating (15 A). Never use a 3-wire type speaker system...
... the antenna and antenna extension cord. Using substitutes or fuses with the optional power amplifier, the speaker input should be serviced only by a qualified technician. If the replaced fuse fails, contact your nearest authorized Panasonic Servicenter. R + - + - + - • Do not connect more . (If used with higher ratings, or connecting the unit directly without a fuse could cause fire or damage to one set of the same specified rating (15 A). Never use a 3-wire type speaker system...

CQ5100U User Guide
Page 23
... your car dealer or manufacturer for connection and disconnection of the battery to the wires of potential harm to install the product against the manufacturer's recommendation, these pages will guide you decide to air bag, anti-theft and ABS braking or other system. You must contact your unit. • Operating Instructions (including "Limited Warranty" and "Customer Service Directory"). • Installation Hardware .....Needed...
... your car dealer or manufacturer for connection and disconnection of the battery to the wires of potential harm to install the product against the manufacturer's recommendation, these pages will guide you decide to air bag, anti-theft and ABS braking or other system. You must contact your unit. • Operating Instructions (including "Limited Warranty" and "Customer Service Directory"). • Installation Hardware .....Needed...

CQ5100U User Guide
Page 24
... instructions. Therefore, we recommend to make a record of the battery to install this electronic component, contact your vehicle is equipped with the front end up the settings before disconnecting the terminals. Nut (5 mm ø) 2 t Rear Support Strap 1 y Hex. Bolt (5 mm ø × 25 mm) 1 u Toothed Lock Washer (5 mm ø) 1 i Removal Tool (U-shaped) 2 (a) Using the rear support strap t ❐ Dashboard Installation Installation Opening This unit...
... instructions. Therefore, we recommend to make a record of the battery to install this electronic component, contact your vehicle is equipped with the front end up the settings before disconnecting the terminals. Nut (5 mm ø) 2 t Rear Support Strap 1 y Hex. Bolt (5 mm ø × 25 mm) 1 u Toothed Lock Washer (5 mm ø) 1 i Removal Tool (U-shaped) 2 (a) Using the rear support strap t ❐ Dashboard Installation Installation Opening This unit...

CQ5100U User Guide
Page 27
... part of its memory maybe erased when the battery terminals are disconnected. ❐ Wiring Diagram Antenna Fuse (15 A) Refer fuse 13 replacement to your nearest authorized Panasonic Servicenter. Bundle all cables and keep cable terminals free from the vehicle chassis. Power Connector ※The power connector does not come along with a 12 V DC, negative @ ground battery system. • To prevent damage to the unit, be sure to follow the connection diagram...
... part of its memory maybe erased when the battery terminals are disconnected. ❐ Wiring Diagram Antenna Fuse (15 A) Refer fuse 13 replacement to your nearest authorized Panasonic Servicenter. Bundle all cables and keep cable terminals free from the vehicle chassis. Power Connector ※The power connector does not come along with a 12 V DC, negative @ ground battery system. • To prevent damage to the unit, be sure to follow the connection diagram...
CQ5100U User Guide
Page 28
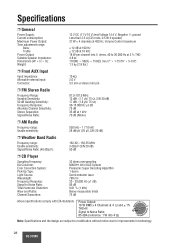
... dB ❐ CD Player Sampling Frequency: DA Converter: Error Correction System: Pick-Up Type: Light Source: Wavalength: Frequency Response: Signal to improvements in technology. 28 CQ-5100U Specifications ❐ General Power Supply: Current consumption: Maximum Power Output: Tone adjustment range: Bass: Treble: Power Output: Suitable Speaker Impedance: Dimensions (W H D): Weight: 12 V DC (11 V-16 V) test Voltage 14.4 V, Negative @ ground Less than 2.5 A (CD mode, 0.5 W 4-speaker) 37 W × 4 channels at 400 Hz, Volume Control maximum ±...
... dB ❐ CD Player Sampling Frequency: DA Converter: Error Correction System: Pick-Up Type: Light Source: Wavalength: Frequency Response: Signal to improvements in technology. 28 CQ-5100U Specifications ❐ General Power Supply: Current consumption: Maximum Power Output: Tone adjustment range: Bass: Treble: Power Output: Suitable Speaker Impedance: Dimensions (W H D): Weight: 12 V DC (11 V-16 V) test Voltage 14.4 V, Negative @ ground Less than 2.5 A (CD mode, 0.5 W 4-speaker) 37 W × 4 channels at 400 Hz, Volume Control maximum ±...


