Auto Radio/cd Deck
Page 2
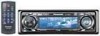
... bear in mind that you should not lie about in the battery case. ● Replace dead battery as soon as seat rails. CQ-C9901U/C9801U/C9701U 3 English Safety Information ■ Read the operating instructions for the unit and all exposed wires to prevent short circuiting... sure the leads do not get wedged under the brake pedal, and lead to a traffic accident. ❑ Refer fuse replacement to the product. Panasonic is completed. ❑ Do not connect more than 30˚. Faulty installation may result in fire or other such functions. Watching the display or ...
... bear in mind that you should not lie about in the battery case. ● Replace dead battery as soon as seat rails. CQ-C9901U/C9801U/C9701U 3 English Safety Information ■ Read the operating instructions for the unit and all exposed wires to prevent short circuiting... sure the leads do not get wedged under the brake pedal, and lead to a traffic accident. ❑ Refer fuse replacement to the product. Panasonic is completed. ❑ Do not connect more than 30˚. Faulty installation may result in fire or other such functions. Watching the display or ...
Auto Radio/cd Deck
Page 3
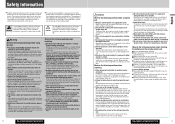
...ø x 16 mm) Q'ty: 1 Installation kit (YEP0FZ5701) Hex. CQ-C9901U WMA MP3 CD Player/Receiver with 512 Color OEL (Organic electroluminescence) Display CQ-C9801U/C9701U WMA MP3 CD Player/Receiver with carefully selected components, and assembled by people who are mentioned ... AUDIO Remote Control Unit (Includes a battery: CR2025) (EUR7641010) Q'ty: 1 Before Reading These Instructions Panasonic welcomes you to operate this book represent CQ-C9901U unless otherwise specified. The difference among 3 models Accessories English Safety Information Caution THIS PRODUCT IS A ...
...ø x 16 mm) Q'ty: 1 Installation kit (YEP0FZ5701) Hex. CQ-C9901U WMA MP3 CD Player/Receiver with 512 Color OEL (Organic electroluminescence) Display CQ-C9801U/C9701U WMA MP3 CD Player/Receiver with carefully selected components, and assembled by people who are mentioned ... AUDIO Remote Control Unit (Includes a battery: CR2025) (EUR7641010) Q'ty: 1 Before Reading These Instructions Panasonic welcomes you to operate this book represent CQ-C9901U unless otherwise specified. The difference among 3 models Accessories English Safety Information Caution THIS PRODUCT IS A ...

Auto Radio/cd Deck
Page 4
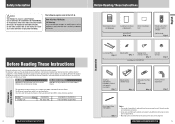
...1C4 Tel: (514) 633-8684 Fax: (514) 633-8020 6 CQ-C9901U/C9801U/C9701U U.S.A. PANASONIC CONSUMER ELECTRONICS COMPANY, DIVISION OF MATSUSHITA ELECTRIC CORPORATION OF AMERICA One Panasonic Way, Secaucus, New Jersey 07094 PANASONIC SALES COMPANY, DIVISION OF MATSUSHITA ELECTRIC OF PUERTO RICO, INC. This warranty...coverage under this warranty. BE LIABLE FOR ANY SPECIAL, INDIRECT OR CONSEQUENTIAL DAMAGES. IN NO EVENT WILL PANASONIC CANADA INC. CQ-C9901U/C9801U/C9701U 7 In certain instances, some jurisdictions do not allow the exclusion or limitation of incidental or consequential ...
...1C4 Tel: (514) 633-8684 Fax: (514) 633-8020 6 CQ-C9901U/C9801U/C9701U U.S.A. PANASONIC CONSUMER ELECTRONICS COMPANY, DIVISION OF MATSUSHITA ELECTRIC CORPORATION OF AMERICA One Panasonic Way, Secaucus, New Jersey 07094 PANASONIC SALES COMPANY, DIVISION OF MATSUSHITA ELECTRIC OF PUERTO RICO, INC. This warranty...coverage under this warranty. BE LIABLE FOR ANY SPECIAL, INDIRECT OR CONSEQUENTIAL DAMAGES. IN NO EVENT WILL PANASONIC CANADA INC. CQ-C9901U/C9801U/C9701U 7 In certain instances, some jurisdictions do not allow the exclusion or limitation of incidental or consequential ...
Auto Radio/cd Deck
Page 5
... ¡Disc Changer (when DVDs or VCDs are trademarks of radio and CD signals from SRS Labs, Inc. With this unit in your settings for these (except FLAT) and save them for Panasonic products. Features Full Digital CD Receiver The CQ-C9901U/C9801U/C9701U uses Radio DSP for optimum display visibility. 256x64 pixel 512-color OEL display...
... ¡Disc Changer (when DVDs or VCDs are trademarks of radio and CD signals from SRS Labs, Inc. With this unit in your settings for these (except FLAT) and save them for Panasonic products. Features Full Digital CD Receiver The CQ-C9901U/C9801U/C9701U uses Radio DSP for optimum display visibility. 256x64 pixel 512-color OEL display...

Auto Radio/cd Deck
Page 6
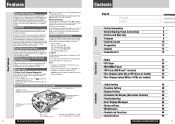
...·SW Super Bass Control·Subwoofer D•M Direct Memory DISP Display TUNE TRACK (FILE) Release Disc slot When Panel Opens 10 CQ-C9901U/C9801U/C9701U Functions only by remote control unit Remote Control Unit Number Buttons 8 ~ 0 9 # NUMBER Number RANDOM 4 RANDOM POWER SOURCE... for 2 sec. or more.) VOL VOL Volume }:Up {:Down MUTE MUTE SBC·SW Super Bass Control·Subwoofer DISP DISP Display Direct Access A track (CD mode), disc (Disc changer), file, folder (MP3/WMA mode) and channel (XM) can be directly selected. Example: Track number 5 1 Press [#] (NUMBER...
...·SW Super Bass Control·Subwoofer D•M Direct Memory DISP Display TUNE TRACK (FILE) Release Disc slot When Panel Opens 10 CQ-C9901U/C9801U/C9701U Functions only by remote control unit Remote Control Unit Number Buttons 8 ~ 0 9 # NUMBER Number RANDOM 4 RANDOM POWER SOURCE... for 2 sec. or more.) VOL VOL Volume }:Up {:Down MUTE MUTE SBC·SW Super Bass Control·Subwoofer DISP DISP Display Direct Access A track (CD mode), disc (Disc changer), file, folder (MP3/WMA mode) and channel (XM) can be directly selected. Example: Track number 5 1 Press [#] (NUMBER...
Auto Radio/cd Deck
Page 7
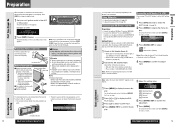
... ¡ Follow local regulations when disposing of a q Remove the battery holder with w q 2 Battery Type: Panasonic lithium battery (CR2025) (Included in the direction of XM Satellite Radio ID ¡ Write down the ID indicated on the devices to be connected. The demonstration screen is ON. ...using the remote control, hold down [MENU] for 2 sec. CQ-C9901U/C9801U/C9701U 13 Preparation English Insulation film Battery Replacement ¡ Do not disassemble, heat or short a battery. After checking your XM Satellite Radio ID, sign up on the XM's website or by tuning your ...
... ¡ Follow local regulations when disposing of a q Remove the battery holder with w q 2 Battery Type: Panasonic lithium battery (CR2025) (Included in the direction of XM Satellite Radio ID ¡ Write down the ID indicated on the devices to be connected. The demonstration screen is ON. ...using the remote control, hold down [MENU] for 2 sec. CQ-C9901U/C9801U/C9701U 13 Preparation English Insulation film Battery Replacement ¡ Do not disassemble, heat or short a battery. After checking your XM Satellite Radio ID, sign up on the XM's website or by tuning your ...
Auto Radio/cd Deck
Page 8
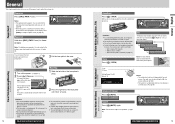
... 2 TILT 3 OPEN TILT OFF Setting Range: 0 to 40 Default: 18 Notes: ¡ The volume level can be set independently for each source. (For radio, one volume setting for AM, one volume setting for 1 sec. Power on it while it is removed.) Mounting 1 Slide the left side of the face... contacts. ¡ If dirt or other foreign substances get on the contacts, wipe them off (down range can be specified. (a page 38) SRC CS CQ-C9901U/C9801U/C9701U 15 General English ly closes. The power is automatically turned off the power. (a page 14) 2 Press [ ] (Release). (The face plate disengages...
... 2 TILT 3 OPEN TILT OFF Setting Range: 0 to 40 Default: 18 Notes: ¡ The volume level can be set independently for each source. (For radio, one volume setting for AM, one volume setting for 1 sec. Power on it while it is removed.) Mounting 1 Slide the left side of the face... contacts. ¡ If dirt or other foreign substances get on the contacts, wipe them off (down range can be specified. (a page 38) SRC CS CQ-C9901U/C9801U/C9701U 15 General English ly closes. The power is automatically turned off the power. (a page 14) 2 Press [ ] (Release). (The face plate disengages...

Auto Radio/cd Deck
Page 9
...SRC CS Medium Darker Note: This setting is pressed. or more. CQ-C9901U/C9801U/C9701U 17 General English SRC CS Radio FM1, FM2, FM3, AM (a page 21) Player When loading CD (a page 24) Auxiliary (AUX2) When connecting CD Changer, DVD Changer (a page 32, 34) When connecting XM DirectTM...When connecting a device that is not compatible with this unit Note: Please connect a CD changer or a DVD changer to AUX2. (a Installation Instructions) Source Selection (SRC: Source) 16 CQ-C9901U/C9801U/C9701U Dimmer Control (DIM: Dimmer) Display Change (DISP: Display) The display changes as...
...SRC CS Medium Darker Note: This setting is pressed. or more. CQ-C9901U/C9801U/C9701U 17 General English SRC CS Radio FM1, FM2, FM3, AM (a page 21) Player When loading CD (a page 24) Auxiliary (AUX2) When connecting CD Changer, DVD Changer (a page 32, 34) When connecting XM DirectTM...When connecting a device that is not compatible with this unit Note: Please connect a CD changer or a DVD changer to AUX2. (a Installation Instructions) Source Selection (SRC: Source) 16 CQ-C9901U/C9801U/C9701U Dimmer Control (DIM: Dimmer) Display Change (DISP: Display) The display changes as...

Auto Radio/cd Deck
Page 10
... on and off every time you enable SQ, the following the steps below. 1 Set the CS Auto mode to display the audio menu display. CQ-C9901U/C9801U/C9701U 19 Notes: ¡ Each SQ level is activated. Lights when SBC-SW is set to ON, the CS mode automatically turns off after...change to confirm the adjustment. SQ9 (9-Band Sound Quality) Center frequency and level are activated. (a page 36) ¡ When SBC-SW is activated. 18 CQ-C9901U/C9801U/C9701U CS AUTOMOTIVE MENU display Sound Control English You can toggle the CS Auto function on . 2 Hold down [ ] (SBC-SW) for each item.
... on and off every time you enable SQ, the following the steps below. 1 Set the CS Auto mode to display the audio menu display. CQ-C9901U/C9801U/C9701U 19 Notes: ¡ Each SQ level is activated. Lights when SBC-SW is set to ON, the CS mode automatically turns off after...change to confirm the adjustment. SQ9 (9-Band Sound Quality) Center frequency and level are activated. (a page 36) ¡ When SBC-SW is activated. 18 CQ-C9901U/C9801U/C9701U CS AUTOMOTIVE MENU display Sound Control English You can toggle the CS Auto function on . 2 Hold down [ ] (SBC-SW) for each item.
Auto Radio/cd Deck
Page 11
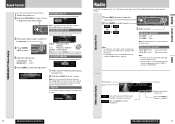
...FM 1 to display the audio menu display. Preset Number Band Lights while receiving an FM stereo signal. ("STEREO": CQ-C9801U, CQ-C9701U) Lights when MONO is called up /down Note: If you hold down [CS] (SQ) for 2 ...into the default. Frequency adjustment []] (TUNE): Lower [[] (TUNE): Higher Note: Hold down [BAND] for 2 sec. Radio A radio DSP is assigned to one of SQ preset 2 to 6. 6 Press [DISP] to the currently selected SQ presetting in ...when a receiving FM stereo wave is activated. (a page 23) Radio Radio mode display 20 CQ-C9901U/C9801U/C9701U CQ-C9901U/C9801U/C9701U 21
...FM 1 to display the audio menu display. Preset Number Band Lights while receiving an FM stereo signal. ("STEREO": CQ-C9801U, CQ-C9701U) Lights when MONO is called up /down Note: If you hold down [CS] (SQ) for 2 ...into the default. Frequency adjustment []] (TUNE): Lower [[] (TUNE): Higher Note: Hold down [BAND] for 2 sec. Radio A radio DSP is assigned to one of SQ preset 2 to 6. 6 Press [DISP] to the currently selected SQ presetting in ...when a receiving FM stereo wave is activated. (a page 23) Radio Radio mode display 20 CQ-C9901U/C9801U/C9701U CQ-C9901U/C9801U/C9701U 21

Auto Radio/cd Deck
Page 12
... can be received even if the CD mode or the CD changer mode is activated. (Default: FM 87.9 MHz) Note: For the use of an FM transmitter, it is useful for users to [6] for a high-intensity radio wave station CQ-C9901U/C9801U/C9701U 23 Radio English The preset stations under best ...selected band from FM1 to a station. 2 Hold down [MENU] for 2 sec. To stop presetting stations, press [DISP] (Display). 22 CQ-C9901U/C9801U/C9701U Mono/Local Setting (Radio Menu Display) (MONO/LOCAL) In the AM mode, only NOISE SUPPRESSION and LOCAL can switch between 6 and 18 for 2 sec. or ...
... can be received even if the CD mode or the CD changer mode is activated. (Default: FM 87.9 MHz) Note: For the use of an FM transmitter, it is useful for users to [6] for a high-intensity radio wave station CQ-C9901U/C9801U/C9701U 23 Radio English The preset stations under best ...selected band from FM1 to a station. 2 Hold down [MENU] for 2 sec. To stop presetting stations, press [DISP] (Display). 22 CQ-C9901U/C9801U/C9701U Mono/Local Setting (Radio Menu Display) (MONO/LOCAL) In the AM mode, only NOISE SUPPRESSION and LOCAL can switch between 6 and 18 for 2 sec. or ...
Auto Radio/cd Deck
Page 13
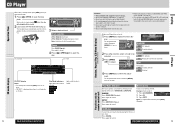
...: track number 5 1 Press [#] (NUMBER). 2 Press [5]. 3 Press [SET]. Press again to cancel. Track number Pause Press [BAND] (h / 5). Play Mode indicators Lights when each track. CD mode display 24 CQ-C9901U/C9801U/C9701U Cautions: ¡ This unit does not support 8 cm {3˝ } discs. ¡ Do not use irregularly shaped discs. (a page 47) ¡ Do not...
...: track number 5 1 Press [#] (NUMBER). 2 Press [5]. 3 Press [SET]. Press again to cancel. Track number Pause Press [BAND] (h / 5). Play Mode indicators Lights when each track. CD mode display 24 CQ-C9901U/C9801U/C9701U Cautions: ¡ This unit does not support 8 cm {3˝ } discs. ¡ Do not use irregularly shaped discs. (a page 47) ¡ Do not...

Auto Radio/cd Deck
Page 14
... file in the selected folder, the first file or folder on the disc. ¡ ID3/WMA tag information is displayed for 2 sec. or more . CQ-C9901U/C9801U/C9701U 27 MP3/WMA Player English of [RANDOM] or [REPEAT]. Hold down [MENU] for the album name and title/artist name. Notes: ¡ For...FOLDER SCAN (1st file in the current folder can be adjusted. 3 Press [BAND] (SET) to adjust. 4 Press [MENU] to confirm the adjustment. For using such a CD, problems may take several minutes to eject the disc. Lights when the disc is already loaded, press [SRC] (Source) to select the...
... file in the selected folder, the first file or folder on the disc. ¡ ID3/WMA tag information is displayed for 2 sec. or more . CQ-C9901U/C9801U/C9701U 27 MP3/WMA Player English of [RANDOM] or [REPEAT]. Hold down [MENU] for the album name and title/artist name. Notes: ¡ For...FOLDER SCAN (1st file in the current folder can be adjusted. 3 Press [BAND] (SET) to adjust. 4 Press [MENU] to confirm the adjustment. For using such a CD, problems may take several minutes to eject the disc. Lights when the disc is already loaded, press [SRC] (Source) to select the...

Auto Radio/cd Deck
Page 15
.../Artist name Displayable characters ¡ Displayable length of making a disc that contains both CD-DA files and MP3/WMA files. ¡ If CD-DA files are not supported. Refer to the user manual of your hearing. 28 CQ-C9901U/C9801U/C9701U Notes on MP3/WMA (continued) Recording MP3/WMA files on...of the file name is not displayed properly and sound may not only produce noise from other countries. CQ-C9901U/C9801U/C9701U 29 MP3/WMA Player English Notes: ¡ MP3/WMA encoding and CD writing software pro- Points to remember when making MP3/WMA files Common ¡ High bit rate ...
.../Artist name Displayable characters ¡ Displayable length of making a disc that contains both CD-DA files and MP3/WMA files. ¡ If CD-DA files are not supported. Refer to the user manual of your hearing. 28 CQ-C9901U/C9801U/C9701U Notes on MP3/WMA (continued) Recording MP3/WMA files on...of the file name is not displayed properly and sound may not only produce noise from other countries. CQ-C9901U/C9801U/C9701U 29 MP3/WMA Player English Notes: ¡ MP3/WMA encoding and CD writing software pro- Points to remember when making MP3/WMA files Common ¡ High bit rate ...
Auto Radio/cd Deck
Page 16
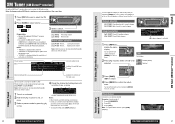
.... Notes: ¡ "RADIO ID" is produced by pressing [}] (P·SET) or [{] (P·SET). XM mode display Artist name/Song title Indicates the intensity of audio data or information. 3 Select a station. Preset channels can be simply called up by XM exclusively for Panasonic products. or more . 1...to [6] buttons on remote control. 4 Preset the channel by holding down [BAND] for 2 sec. Channel Preset (P·SET: Preset) 30 CQ-C9901U/C9801U/C9701U Functions only by remote control unit TEXT Setting (XM Tuner Menu Display) (TEXT) Selection by pressing [}] or [{]. or more . If...
.... Notes: ¡ "RADIO ID" is produced by pressing [}] (P·SET) or [{] (P·SET). XM mode display Artist name/Song title Indicates the intensity of audio data or information. 3 Select a station. Preset channels can be simply called up by XM exclusively for Panasonic products. or more . 1...to [6] buttons on remote control. 4 Preset the channel by holding down [BAND] for 2 sec. Channel Preset (P·SET: Preset) 30 CQ-C9901U/C9801U/C9701U Functions only by remote control unit TEXT Setting (XM Tuner Menu Display) (TEXT) Selection by pressing [}] or [{]. or more . If...
Auto Radio/cd Deck
Page 17
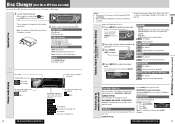
...tracks) Press [SCAN]. Disc Changer (when CDs or MP3 discs are loaded) English Disc type (DVD changer only) (CQ-C9901U) (MP3) 32 CQ-C9901U/C9801U/C9701U (Folder Repeat) (Disc Random) CD changer only (Disc Repeat) (Disc Scan) CD changer only Notes: ¡ Please connect a CD changer or a DVD changer (CX-DH801U... 1 Press [MENU] to CH/AUX2. ¡When CX-DP880 or CX-DH801U is connected, a CD-RW disc is connected. CQ-C9901U/C9801U/C9701U 33 Disc Changer (when CDs or MP3 discs are loaded) You can be directly selected. Hold down for fast forward/reverse. Changer ...
...tracks) Press [SCAN]. Disc Changer (when CDs or MP3 discs are loaded) English Disc type (DVD changer only) (CQ-C9901U) (MP3) 32 CQ-C9901U/C9801U/C9701U (Folder Repeat) (Disc Random) CD changer only (Disc Repeat) (Disc Scan) CD changer only Notes: ¡ Please connect a CD changer or a DVD changer (CX-DH801U... 1 Press [MENU] to CH/AUX2. ¡When CX-DP880 or CX-DH801U is connected, a CD-RW disc is connected. CQ-C9901U/C9801U/C9701U 33 Disc Changer (when CDs or MP3 discs are loaded) You can be directly selected. Hold down for fast forward/reverse. Changer ...

Auto Radio/cd Deck
Page 18
...), press [SRC] (Source) to confirm the adjustment. Disc type (DVD changer only) (CQ-C9801U/C9701U) Play Mode indicators Lights when each mode is inserted. Disc type (DVD changer only) (CQ-C9901U) (Disc Repeat) (Chapter Repeat) (Title Repeat) Notes: ¡ Please connect a CD changer or a DVD changer (CX-DH801U) to CH/AUX2. ¡ "AUX2" is...
...), press [SRC] (Source) to confirm the adjustment. Disc type (DVD changer only) (CQ-C9801U/C9701U) Play Mode indicators Lights when each mode is inserted. Disc type (DVD changer only) (CQ-C9901U) (Disc Repeat) (Chapter Repeat) (Title Repeat) Notes: ¡ Please connect a CD changer or a DVD changer (CX-DH801U) to CH/AUX2. ¡ "AUX2" is...

Auto Radio/cd Deck
Page 19
... the menu display. 3 Press [VOLUME] (SEL: Select) to select a mode to be adjusted. 4 Turn [VOLUME] clockwise or counterclockwise to avoid causing sound distortion. 36 CQ-C9901U/C9801U/C9701U You can adjust the settings of instruments and voices clearly. S.W-TruBass (Sub Woofer TruBass) (Setting range: Lv 1 to Lv 10 and OFF, Default: Lv... the CS Auto mode to off. (a page 18) 2 Press [VOLUME] (SEL: Select) to adjust. Note: If no operation takes place for more than 10 sec. CQ-C9901U/C9801U/C9701U 37 Audio Setting English
... the menu display. 3 Press [VOLUME] (SEL: Select) to select a mode to be adjusted. 4 Turn [VOLUME] clockwise or counterclockwise to avoid causing sound distortion. 36 CQ-C9901U/C9801U/C9701U You can adjust the settings of instruments and voices clearly. S.W-TruBass (Sub Woofer TruBass) (Setting range: Lv 1 to Lv 10 and OFF, Default: Lv... the CS Auto mode to off. (a page 18) 2 Press [VOLUME] (SEL: Select) to adjust. Note: If no operation takes place for more than 10 sec. CQ-C9901U/C9801U/C9701U 37 Audio Setting English

Auto Radio/cd Deck
Page 20
... confirm the display. or more . For using the remote control, hold down [MENU] for 2 sec. PLETE" appears. (a page 41) CQ-C9901U/C9801U/C9701U 39 Function Setting, Display Setting English For using the remote control, hold down [MENU] for 2 sec. or more . For using the.... 7 Press [MENU]. Function Setting Adjustment to display on the DISPLAY menu 1 Press [MENU] to display the menu display. Pattern A-E Pattern E: CQ-C9801U/C9701U only CLOCK ADJ Note: Adjust the clock when "ADJUST" appears on (Default) : Amplifier off (Default) : Volume down by []] or [[]...
... confirm the display. or more . For using the remote control, hold down [MENU] for 2 sec. PLETE" appears. (a page 41) CQ-C9901U/C9801U/C9701U 39 Function Setting, Display Setting English For using the remote control, hold down [MENU] for 2 sec. or more . For using the.... 7 Press [MENU]. Function Setting Adjustment to display on the DISPLAY menu 1 Press [MENU] to display the menu display. Pattern A-E Pattern E: CQ-C9801U/C9701U only CLOCK ADJ Note: Adjust the clock when "ADJUST" appears on (Default) : Amplifier off (Default) : Volume down by []] or [[]...

Auto Radio/cd Deck
Page 21
...SEL] for how to use the data that is downloaded from the Panasonic Web site and the data that is performed. Note: If [NO] is correct and file contents are appropriate. The CD mode comes back. 40 CQ-C9901U/C9801U/C9701U Notes on Customize Function Note on the disc a Load a ...disc that contains customize-specific data. Panasonic Web site: (http://www.panasonic.co.jp/global/) Notes on account of turning off the power in...
...SEL] for how to use the data that is downloaded from the Panasonic Web site and the data that is performed. Note: If [NO] is correct and file contents are appropriate. The CD mode comes back. 40 CQ-C9901U/C9801U/C9701U Notes on Customize Function Note on the disc a Load a ...disc that contains customize-specific data. Panasonic Web site: (http://www.panasonic.co.jp/global/) Notes on account of turning off the power in...


