Ip Camera
Page 1
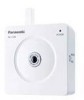
BL-C1A Wired Type BL-C20A BL-C20A Wireless/Wired Type Please read this manual before using, and save this manual for customers in the USA or Puerto Rico Panasonic Network Camera Website: http://www.panasonic.com/netcam for future reference. Operating Instructions BL-C1A Network Camera Indoor Use Only Model No.
BL-C1A Wired Type BL-C20A BL-C20A Wireless/Wired Type Please read this manual before using, and save this manual for customers in the USA or Puerto Rico Panasonic Network Camera Website: http://www.panasonic.com/netcam for future reference. Operating Instructions BL-C1A Network Camera Indoor Use Only Model No.
Ip Camera
Page 3
.... • All other trademarks identified herein are of BL-C20A. is indicated on the upper left of the front of the main unit.) The illustrations and images used in this manual are the property of the Independent JPEG Group. Read this manual carefully and use the Network Camera properly. (The model no. Operating Instructions Documentation This...
.... • All other trademarks identified herein are of BL-C20A. is indicated on the upper left of the front of the main unit.) The illustrations and images used in this manual are the property of the Independent JPEG Group. Read this manual carefully and use the Network Camera properly. (The model no. Operating Instructions Documentation This...

Ip Camera
Page 39
See http:// panasonic.co.jp/pcc/products/en/netwkcam/ and your router's manual for auto port forwarding. 1. After UPnPTM is [Static] or [DHCP], enabling auto port forwarding allows you to support UPnPTM, and it accessible from the Internet] on the Network page (see page 130). [For assistance, please call: ... shortcut to enable UPnPTM. Setting Description Auto Port Forwarding • If the network setting is enabled on the router, set [Enable] for details of how to the camera in the My Icon in My Network Places folder. In order to use this feature when using Windows XP or ...
See http:// panasonic.co.jp/pcc/products/en/netwkcam/ and your router's manual for auto port forwarding. 1. After UPnPTM is [Static] or [DHCP], enabling auto port forwarding allows you to support UPnPTM, and it accessible from the Internet] on the Network page (see page 130). [For assistance, please call: ... shortcut to enable UPnPTM. Setting Description Auto Port Forwarding • If the network setting is enabled on the router, set [Enable] for details of how to the camera in the My Icon in My Network Places folder. In order to use this feature when using Windows XP or ...
Ip Camera
Page 40
...'s UPnPTM feature following the router manual before you set up the camera. Note • • On some routers, the UPnPTM feature is displayed. 2.4.1 Connecting the Camera to UPnP page]. • The UPnP page is disabled by default. is set in Getting Started. See the Panasonic Network Camera support website at http:// panasonic.co.jp/pcc/products/en...
...'s UPnPTM feature following the router manual before you set up the camera. Note • • On some routers, the UPnPTM feature is displayed. 2.4.1 Connecting the Camera to UPnP page]. • The UPnP page is disabled by default. is set in Getting Started. See the Panasonic Network Camera support website at http:// panasonic.co.jp/pcc/products/en...

Ip Camera
Page 41
... a Router that does not Support UPnP™ To allow camera access from those offered on the Network page. (1) Access the camera (see page 10). (2) Click the [Setup] tab at the top of the IP address and port number, since they are required to enable port ... forwarding on the Network page. • The Static IP Address Configuration page is required to allow access from the Internet with a router that does not support UPnPTM. See the router manual for a global one. Register with a router that does not support UPnPTM, follow the procedures below. 1. Each camera must be called ...
... a Router that does not Support UPnP™ To allow camera access from those offered on the Network page. (1) Access the camera (see page 10). (2) Click the [Setup] tab at the top of the IP address and port number, since they are required to enable port ... forwarding on the Network page. • The Static IP Address Configuration page is required to allow access from the Internet with a router that does not support UPnPTM. See the router manual for a global one. Register with a router that does not support UPnPTM, follow the procedures below. 1. Each camera must be called ...
Ip Camera
Page 120
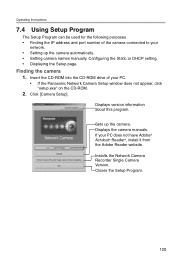
If your PC. • If the Panasonic Network Camera Setup window does not appear, click "setup.exe" on the CD-ROM. 2. Displays the camera manuals. Installs the Network Camera Recorder Single Camera Version. Click [Camera Setup]. Closes the Setup Program. 120 Displays version information about this program. Sets up the camera automatically. • Setting camera names manually. Insert the CD-ROM into the...
If your PC. • If the Panasonic Network Camera Setup window does not appear, click "setup.exe" on the CD-ROM. 2. Displays the camera manuals. Installs the Network Camera Recorder Single Camera Version. Click [Camera Setup]. Closes the Setup Program. 120 Displays version information about this program. Sets up the camera automatically. • Setting camera names manually. Insert the CD-ROM into the...
Ip Camera
Page 122
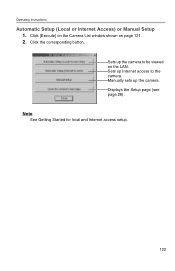
Manually sets up Internet access to be viewed on page 121. 2. Click [Execute] on the Camera List window shown on the LAN. Sets up the camera. Operating Instructions Automatic Setup (Local or Internet Access) or Manual Setup 1. Click the corresponding button. Sets up the camera to the camera. Displays the Setup page (see page 28). Note See Getting Started for local and Internet access setup. 122
Manually sets up Internet access to be viewed on page 121. 2. Click [Execute] on the Camera List window shown on the LAN. Sets up the camera. Operating Instructions Automatic Setup (Local or Internet Access) or Manual Setup 1. Click the corresponding button. Sets up the camera to the camera. Displays the Setup page (see page 28). Note See Getting Started for local and Internet access setup. 122
Ip Camera
Page 123
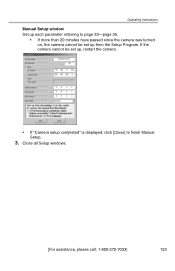
Close all Setup windows. [For assistance, please call: 1-800-272-7033] 123 Operating Instructions Manual Setup window Set up each parameter referring to finish Manual Setup. 3. If the camera cannot be set up , restart the camera. • If "Camera setup completed" is displayed, click [Close] to page 33-page 35. • If more than 20 minutes have passed since the camera was turned on, the camera cannot be set up from the Setup Program.
Close all Setup windows. [For assistance, please call: 1-800-272-7033] 123 Operating Instructions Manual Setup window Set up each parameter referring to finish Manual Setup. 3. If the camera cannot be set up , restart the camera. • If "Camera setup completed" is displayed, click [Close] to page 33-page 35. • If more than 20 minutes have passed since the camera was turned on, the camera cannot be set up from the Setup Program.
Ip Camera
Page 135
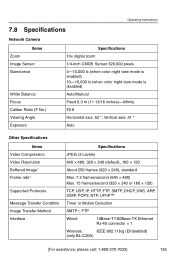
... 7.8 Specifications Network Camera Items Zoom Image Sensor Illuminance White Balance Focus Caliber Ratio (F No.) Viewing Angle Exposure Specifications 10× digital zoom 1/4-inch CMOS Sensor 320,000 pixels 4-10,000 lx (when color night view mode is enabled) 10-10,000 lx (when color night view mode is disabled) Auto/Manual Fixed 0.3 m (11..., POP3, NTP, UPnP™ Timer or Motion Detection SMTP*3, FTP Wired: 10Base-T/100Base-TX Ethernet RJ-45 connector × 1 Wireless: IEEE 802.11b/g (Embedded) (only BL-C20A) [For assistance, please call: 1-800-272-7033] 135
... 7.8 Specifications Network Camera Items Zoom Image Sensor Illuminance White Balance Focus Caliber Ratio (F No.) Viewing Angle Exposure Specifications 10× digital zoom 1/4-inch CMOS Sensor 320,000 pixels 4-10,000 lx (when color night view mode is enabled) 10-10,000 lx (when color night view mode is disabled) Auto/Manual Fixed 0.3 m (11..., POP3, NTP, UPnP™ Timer or Motion Detection SMTP*3, FTP Wired: 10Base-T/100Base-TX Ethernet RJ-45 connector × 1 Wireless: IEEE 802.11b/g (Embedded) (only BL-C20A) [For assistance, please call: 1-800-272-7033] 135

