Ip Camera
Page 4
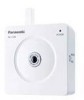
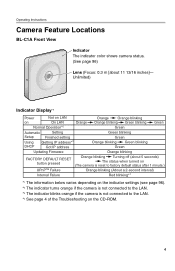
... IP address Orange blinking Green blinking Green Updating Firmware Orange blinking FACTORY DEFAULT RESET button pressed Orange blinking Turning off (about 11 13/16 inches]- Operating Instructions Camera Feature Locations BL-C1A Front View Indicator The indicator color shows camera status. (See page 96) Lens (Focus:... 0.3 m [about 5 seconds) The status when turned on (The camera is reset to factory default status after 1 ...
... IP address Orange blinking Green blinking Green Updating Firmware Orange blinking FACTORY DEFAULT RESET button pressed Orange blinking Turning off (about 11 13/16 inches]- Operating Instructions Camera Feature Locations BL-C1A Front View Indicator The indicator color shows camera status. (See page 96) Lens (Focus:... 0.3 m [about 5 seconds) The status when turned on (The camera is reset to factory default status after 1 ...
Ip Camera
Page 8
... 98 Confirming Session Status 98 Confirming Sensor Logs 99 Restarting the Camera 99 Updating the Camera Firmware 100 Creating a Configuration File 103 Loading Settings from a Configuration File 104 Resetting the Camera to Factory Default 105 Support page 106 The Help page 106 [For BL-C20A] The Wireless Help page 107 Product Information 107 Support Information 107...
... 98 Confirming Session Status 98 Confirming Sensor Logs 99 Restarting the Camera 99 Updating the Camera Firmware 100 Creating a Configuration File 103 Loading Settings from a Configuration File 104 Resetting the Camera to Factory Default 105 Support page 106 The Help page 106 [For BL-C20A] The Wireless Help page 107 Product Information 107 Support Information 107...
Ip Camera
Page 24
Operating Instructions 1.4.1 Deleting Buffered Images If you are buffering images to the internal memory, the following operations also delete all buffered images. - Turning off the camera. - Changing the Enable/Disable settings on the Trigger page (see page 60 or page 70). Saving the Date and Time page. - Restarting, updating firmware or resetting the camera to delete images for each transfer method, click [Delete Buffered Images] on the Image Buffer/Transfer page (See page 60 or page 70). 24 Note • If you intend to factory default. -
Operating Instructions 1.4.1 Deleting Buffered Images If you are buffering images to the internal memory, the following operations also delete all buffered images. - Turning off the camera. - Changing the Enable/Disable settings on the Trigger page (see page 60 or page 70). Saving the Date and Time page. - Restarting, updating firmware or resetting the camera to delete images for each transfer method, click [Delete Buffered Images] on the Image Buffer/Transfer page (See page 60 or page 70). 24 Note • If you intend to factory default. -

Ip Camera
Page 69
Note • If you are saved. • When finished, "Success!" Operating Instructions 8. Saving the Date and Time page. - Turning off the camera. - Click [Go to factory default. [For assistance, please call: 1-800-272-7033] 69 Confirm the settings, and click [Save]. • The new settings are buffering images to the internal memory, the following operations also delete all buffered images. - Restarting, updating firmware or resetting the camera to Trigger page]. • The Trigger page is displayed. 9. is displayed.
Note • If you are saved. • When finished, "Success!" Operating Instructions 8. Saving the Date and Time page. - Turning off the camera. - Click [Go to factory default. [For assistance, please call: 1-800-272-7033] 69 Confirm the settings, and click [Save]. • The new settings are buffering images to the internal memory, the following operations also delete all buffered images. - Restarting, updating firmware or resetting the camera to Trigger page]. • The Trigger page is displayed. 9. is displayed.

Ip Camera
Page 82
... • If you are buffering images to a large phone bill. Saving the Date and Time page. - For example, if the camera transfers 3 images per minute frequency is displayed. Restarting, updating firmware or resetting the camera to Trigger page]. • The Trigger page is recommended. • Motion Detection transfer stops operating until after the...
... • If you are buffering images to a large phone bill. Saving the Date and Time page. - For example, if the camera transfers 3 images per minute frequency is displayed. Restarting, updating firmware or resetting the camera to Trigger page]. • The Trigger page is recommended. • Motion Detection transfer stops operating until after the...
Ip Camera
Page 97
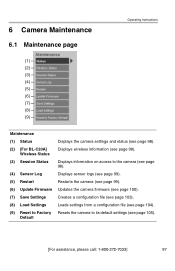
... and status (see page 98). (2) [For BL-C20A] Displays wireless information (see page 105). Wireless Status (3) Session Status Displays information on access to the camera (see page 98). (4) Sensor Log Displays sensor logs (see page 99). (5) Restart Restarts the camera (see page 99). (6) Update Firmware Updates the camera firmware (see page 100). (7) Save Settings Creates a configuration file...
... and status (see page 98). (2) [For BL-C20A] Displays wireless information (see page 105). Wireless Status (3) Session Status Displays information on access to the camera (see page 98). (4) Sensor Log Displays sensor logs (see page 99). (5) Restart Restarts the camera (see page 99). (6) Update Firmware Updates the camera firmware (see page 100). (7) Save Settings Creates a configuration file...
Ip Camera
Page 100
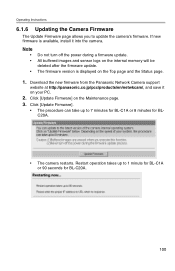
... for BL-C20A. 100 All buffered images and sensor logs on the Maintenance page. 3. Click [Update Firmware] on the internal memory will be deleted after the firmware update. Click [Update Firmware]. • The procedure can take up to 1 minute for BL-C1A or 90 seconds for BLC20A. • The camera restarts. Download the new firmware from the Panasonic Network Camera support...
... for BL-C20A. 100 All buffered images and sensor logs on the Maintenance page. 3. Click [Update Firmware] on the internal memory will be deleted after the firmware update. Click [Update Firmware]. • The procedure can take up to 1 minute for BL-C1A or 90 seconds for BLC20A. • The camera restarts. Download the new firmware from the Panasonic Network Camera support...
Ip Camera
Page 101
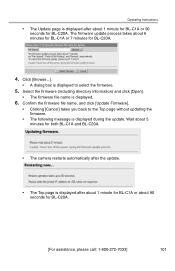
... directory information) and click [Open]. • The firmware file name is displayed during the update. Wait about 5 minutes for both BL-C1A and BL-C20A. • The camera restarts automatically after the update. • The Top page is displayed after about 90 seconds for BL-C20A. [For assistance, please call: 1-800-272-7033] 101 Operating Instructions •...
... directory information) and click [Open]. • The firmware file name is displayed during the update. Wait about 5 minutes for both BL-C1A and BL-C20A. • The camera restarts automatically after the update. • The Top page is displayed after about 90 seconds for BL-C20A. [For assistance, please call: 1-800-272-7033] 101 Operating Instructions •...
Ip Camera
Page 102
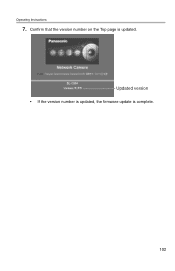
Confirm that the version number on the Top page is complete. 102 Operating Instructions 7. Updated version • If the version number is updated, the firmware update is updated.
Confirm that the version number on the Top page is complete. 102 Operating Instructions 7. Updated version • If the version number is updated, the firmware update is updated.
Ip Camera
Page 103
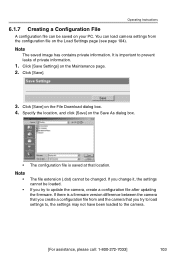
... you try to load settings to, the settings may not have been loaded to update the camera, create a configuration file after updating the firmware. Click [Save Settings] on the File Download dialog box. 4. If you create a configuration file from the configuration file on the Load... (.dat) cannot be loaded. Note The saved image has contains private information. Operating Instructions 6.1.7 Creating a Configuration File A configuration file can load camera settings from and the camera that location. If you try to the camera. [For assistance, please call: 1-800-272-7033] 103
... you try to load settings to, the settings may not have been loaded to update the camera, create a configuration file after updating the firmware. Click [Save Settings] on the File Download dialog box. 4. If you create a configuration file from the configuration file on the Load... (.dat) cannot be loaded. Note The saved image has contains private information. Operating Instructions 6.1.7 Creating a Configuration File A configuration file can load camera settings from and the camera that location. If you try to the camera. [For assistance, please call: 1-800-272-7033] 103
Ip Camera
Page 104
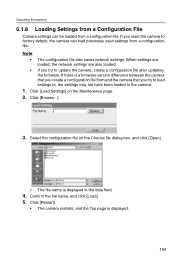
.... 4. When settings are loaded, the network settings are also loaded. • If you try to load settings to, the settings may not have been loaded to update the camera, create a configuration file after updating the firmware. Confirm the file name, and click ...a firmware version difference between the camera that you create a configuration file from and the camera that you reset the camera to factory default, the camera can be loaded from a configuration file. Select the configuration file on the Maintenance page. 2. Note • The configuration file also saves network settings...
.... 4. When settings are loaded, the network settings are also loaded. • If you try to load settings to, the settings may not have been loaded to update the camera, create a configuration file after updating the firmware. Confirm the file name, and click ...a firmware version difference between the camera that you create a configuration file from and the camera that you reset the camera to factory default, the camera can be loaded from a configuration file. Select the configuration file on the Maintenance page. 2. Note • The configuration file also saves network settings...
Ip Camera
Page 140
Operating Instructions Trademarks 3 U Update Firmware page 100 UPnP page 39 W WEP 37 Wireless Help page 107 Wireless page 36 Wireless Status page 98 140
Operating Instructions Trademarks 3 U Update Firmware page 100 UPnP page 39 W WEP 37 Wireless Help page 107 Wireless page 36 Wireless Status page 98 140
