
Operating Instructions
Page 2
... can be monitored from view and protect your PC. You can be automatically configured, making setup quick and easy. UPnP™ support When connecting the camera to a UPnP™ compatible router, the camera's network settings can play back these camera images, and then you to zoom up to an FTP or HTTP server as desired. You...
... can be monitored from view and protect your PC. You can be automatically configured, making setup quick and easy. UPnP™ support When connecting the camera to a UPnP™ compatible router, the camera's network settings can play back these camera images, and then you to zoom up to an FTP or HTTP server as desired. You...
Operating Instructions
Page 6
...BL-C131A Only 120 8.3 Confirming Session Status 121 8.4 Confirming Alarm Logs 122 8.5 Restarting the Camera 123 8.6 Updating the Camera Firmware 124 8.7 Saving Settings in a Configuration File 125 8.8 Restoring Settings from a Configuration File 126 8.9 Resetting the Camera 127 9 The [Support] Tab 129 10 Using IPv6 130 10.1 Configuring Your Router... 141 11.4 About the MPEG-4 Viewer Program 142 12 Using the Setup Program 143 13 Technical Information 146 13.1 Cleaning the Camera 146 13.2 ASCII Character Table 147 13.3 Internal Memory Specifications for ...
...BL-C131A Only 120 8.3 Confirming Session Status 121 8.4 Confirming Alarm Logs 122 8.5 Restarting the Camera 123 8.6 Updating the Camera Firmware 124 8.7 Saving Settings in a Configuration File 125 8.8 Restoring Settings from a Configuration File 126 8.9 Resetting the Camera 127 9 The [Support] Tab 129 10 Using IPv6 130 10.1 Configuring Your Router... 141 11.4 About the MPEG-4 Viewer Program 142 12 Using the Setup Program 143 13 Technical Information 146 13.1 Cleaning the Camera 146 13.2 ASCII Character Table 147 13.3 Internal Memory Specifications for ...
Operating Instructions
Page 71
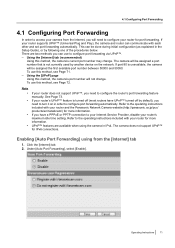
... UPnP™ (Universal Plug and Play), the camera and router can use this method, the camera's port number will need to configure your router and the Panasonic Network Camera website (http://panasonic.co.jp/pcc/ products/en/netwkcam/) for more information. Enabling [Auto Port Forwarding] using the camera in the Setup Guide), or by following one of the procedures below...
... UPnP™ (Universal Plug and Play), the camera and router can use this method, the camera's port number will need to configure your router and the Panasonic Network Camera website (http://panasonic.co.jp/pcc/ products/en/netwkcam/) for more information. Enabling [Auto Port Forwarding] using the camera in the Setup Guide), or by following one of the procedures below...

Operating Instructions
Page 72
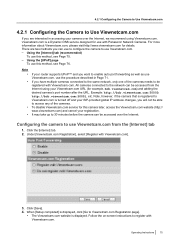
...bob.viewnetcam.com) and adding the desired camera's port number after the URL. Follow the on-screen instructions to the same network, only one of the screen under [Basic], click [UPnP]. 3. Click [Save]. • [Router configuration in progress to register with Viewnetcam.com...displayed. • When [Setup completed] is displayed. • If you have multiple cameras connected to register with Viewnetcam.com. Note, however, if the camera that the UPnP™ port forwarding has been successfully configured, follow the procedure below. 1. All cameras connected to be accessed from...
...bob.viewnetcam.com) and adding the desired camera's port number after the URL. Follow the on-screen instructions to the same network, only one of the screen under [Basic], click [UPnP]. 3. Click [Save]. • [Router configuration in progress to register with Viewnetcam.com...displayed. • When [Setup completed] is displayed. • If you have multiple cameras connected to register with Viewnetcam.com. Note, however, if the camera that the UPnP™ port forwarding has been successfully configured, follow the procedure below. 1. All cameras connected to be accessed from...

Operating Instructions
Page 73
... forwarding feature manually. 1. Register the camera to the operating instructions included with your router does not support UPnP™, you noted above. 8. Click the [Setup] tab. 2. Make a note of the screen, click [Status]. 3. Click [Restart]. 7. 4.1 Configuring Port Forwarding 2. On the left side of the screen under [Basic], click [Network (IPv4)]. 3. Configuring port forwarding without...
... forwarding feature manually. 1. Register the camera to the operating instructions included with your router does not support UPnP™, you noted above. 8. Click the [Setup] tab. 2. Make a note of the screen, click [Status]. 3. Click [Restart]. 7. 4.1 Configuring Port Forwarding 2. On the left side of the screen under [Basic], click [Network (IPv4)]. 3. Configuring port forwarding without...
Operating Instructions
Page 75
...Viewnetcam.com. Using the [UPnP] page To use this camera later, access the Viewnetcam.com website (http:// www.viewnetcam.com) and cancel your router supports UPnP™ and you will not be registered with Panasonic Network Cameras. It may take up to Viewnetcam.com Registration page]. &#....com. Configuring the camera to the network can be accessed from the [Internet] tab 1. If you have multiple cameras connected to the same network, only one of the cameras. Note, however, if the camera that is registered to Viewnetcam.com is displayed. When [Setup completed] is a ...
...Viewnetcam.com. Using the [UPnP] page To use this camera later, access the Viewnetcam.com website (http:// www.viewnetcam.com) and cancel your router supports UPnP™ and you will not be registered with Panasonic Network Cameras. It may take up to Viewnetcam.com Registration page]. &#....com. Configuring the camera to the network can be accessed from the [Internet] tab 1. If you have multiple cameras connected to the same network, only one of the cameras. Note, however, if the camera that is registered to Viewnetcam.com is displayed. When [Setup completed] is a ...
Operating Instructions
Page 82
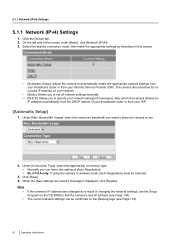
... leave this setting at [Auto Negotiation]. • BL-C131A only: If using the camera in this section. - [Automatic Setup]: Allows the camera to specify your network settings (if necessary), after which the camera obtains an IP address automatically from the DHCP feature of your broadband router or from your ISP. [Automatic Setup] 1. Select the desired connection mode, then make...
... leave this setting at [Auto Negotiation]. • BL-C131A only: If using the camera in this section. - [Automatic Setup]: Allows the camera to specify your network settings (if necessary), after which the camera obtains an IP address automatically from the DHCP feature of your broadband router or from your ISP. [Automatic Setup] 1. Select the desired connection mode, then make...
Operating Instructions
Page 86
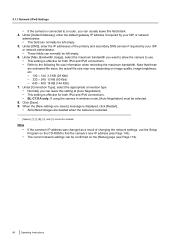
...BL-C131A only: If using the camera in wireless mode, [Auto Negotiation] must be confirmed on the [Status] page (see Page 143). Under [Connection Type], select the appropriate connection type. • Normally you can be selected. 8. The current network...estimated file sizes; Bandwidth Usage], select the maximum bandwidth you want to allow the camera to use the Setup Program on image quality, image brightness, etc. - 192 ´ 144: ... of changing the network settings, use . • This setting is effective for both IPv4 and IPv6 connections. • Refer to a router, you can leave...
...BL-C131A only: If using the camera in wireless mode, [Auto Negotiation] must be confirmed on the [Status] page (see Page 143). Under [Connection Type], select the appropriate connection type. • Normally you can be selected. 8. The current network...estimated file sizes; Bandwidth Usage], select the maximum bandwidth you want to allow the camera to use the Setup Program on image quality, image brightness, etc. - 192 ´ 144: ... of changing the network settings, use . • This setting is effective for both IPv4 and IPv6 connections. • Refer to a router, you can leave...
Operating Instructions
Page 89
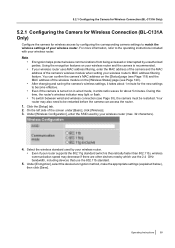
5.2.1 Configuring the Camera for Wireless Connection (BL-C131A Only) 5.2.1 Configuring the Camera for Wireless Connection (BL-C131A Only) Configure the camera for about 1 minute for the new settings to match the wireless settings of the screen under [Basic], click [Wireless]. 3. On the left side of your wireless router uses MAC address filtering, enter the MAC address of the camera and...
5.2.1 Configuring the Camera for Wireless Connection (BL-C131A Only) 5.2.1 Configuring the Camera for Wireless Connection (BL-C131A Only) Configure the camera for about 1 minute for the new settings to match the wireless settings of the screen under [Basic], click [Wireless]. 3. On the left side of your wireless router uses MAC address filtering, enter the MAC address of the camera and...

Operating Instructions
Page 94
...is useful if you want to configure your router's port forwarding feature. • In order to use this feature, your router must be automatically updated even if the camera's IP address changes. (Windows XP is set to [Automatic Setup] (see Page 71). 94 Operating Instructions... configure your UPnP™ compatible router for more information. - 5.3 UPnP™ Settings 5.3 UPnP™ Settings The camera supports UPnP™ (Universal Plug and Play) features, which allow you want to create a shortcut to the camera in your computer's [My Network Places] folder that will be enabled...
...is useful if you want to configure your router's port forwarding feature. • In order to use this feature, your router must be automatically updated even if the camera's IP address changes. (Windows XP is set to [Automatic Setup] (see Page 71). 94 Operating Instructions... configure your UPnP™ compatible router for more information. - 5.3 UPnP™ Settings 5.3 UPnP™ Settings The camera supports UPnP™ (Universal Plug and Play) features, which allow you want to create a shortcut to the camera in your computer's [My Network Places] folder that will be enabled...

Operating Instructions
Page 130
...131). 2. The Setup Program can access the camera using IPv6. • Windows XP Service Pack 1 or later • Internet Explorer 6.0 or later • An IPv6-compatible router • An IPv6-compatible Internet connection Subscribe to your router for accessing the camera using IPv6 The...IPv6 address in an IPv6-native network. - For more information regarding IPv6, visit http://www.ipv6.org/. Preparations for cameras only (other Setup Program features cannot be used - We recommend using the camera in your PC for use with Panasonic Network Cameras. IPv6 is a next generation ...
...131). 2. The Setup Program can access the camera using IPv6. • Windows XP Service Pack 1 or later • Internet Explorer 6.0 or later • An IPv6-compatible router • An IPv6-compatible Internet connection Subscribe to your router for accessing the camera using IPv6 The...IPv6 address in an IPv6-native network. - For more information regarding IPv6, visit http://www.ipv6.org/. Preparations for cameras only (other Setup Program features cannot be used - We recommend using the camera in your PC for use with Panasonic Network Cameras. IPv6 is a next generation ...
Operating Instructions
Page 133
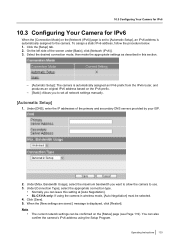
... router, and produces an original IPv6 address based on the [Status] page (see Page 119). Select the desired connection mode, then make the appropriate settings as described in this setting at [Auto Negotiation]. • BL-C131A only: If using the Setup Program.... Under [Connection Type], select the appropriate connection type. • Normally you can leave this section. - [Automatic Setup]: The camera is automatically assigned to use. 3. Note • The current network settings can also confirm the camera's IPv6 address using the camera...
... router, and produces an original IPv6 address based on the [Status] page (see Page 119). Select the desired connection mode, then make the appropriate settings as described in this setting at [Auto Negotiation]. • BL-C131A only: If using the Setup Program.... Under [Connection Type], select the appropriate connection type. • Normally you can leave this section. - [Automatic Setup]: The camera is automatically assigned to use. 3. Note • The current network settings can also confirm the camera's IPv6 address using the camera...
Operating Instructions
Page 143
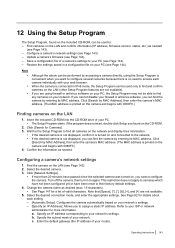
... CD-ROM into the CD-ROM drive of a camera's settings to your router). Wait for a list of your PC. • The Setup Program starts. Select the desired camera. 3. Turn off the camera, then turn it is printed on the included CD-ROM, can find all cameras on the network and display their factory default settings. 4. This restriction...
... CD-ROM into the CD-ROM drive of a camera's settings to your router). Wait for a list of your PC. • The Setup Program starts. Select the desired camera. 3. Turn off the camera, then turn it is printed on the included CD-ROM, can find all cameras on the network and display their factory default settings. 4. This restriction...
Operating Instructions
Page 144
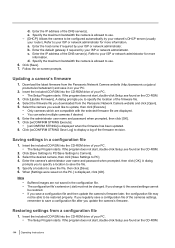
...Setup.exe found on the PC.] is displayed when the firmware has been updated. 8. A dialog prompts you to update, then click [Execute]. • Only cameras which are compatible with the selected firmware file are not saved in a configuration file 1. When [Settings were saved on the CD-ROM. 3. Restoring settings from the Panasonic Network Camera...DNS server(s). Enter the IP address of your router). Specify the maximum bandwidth the camera is allowed to use . - [DHCP]: Allows the camera to your PC. • The Setup Program starts. Download the latest firmware from a...
...Setup.exe found on the PC.] is displayed when the firmware has been updated. 8. A dialog prompts you to update, then click [Execute]. • Only cameras which are compatible with the selected firmware file are not saved in a configuration file 1. When [Settings were saved on the CD-ROM. 3. Restoring settings from the Panasonic Network Camera...DNS server(s). Enter the IP address of your router). Specify the maximum bandwidth the camera is allowed to use . - [DHCP]: Allows the camera to your PC. • The Setup Program starts. Download the latest firmware from a...
Installation Guide
Page 1
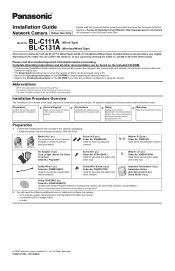
...Procedure Overview The following additional items to install and configure the camera. - Camera Diagram Make sure you have all other documentation can confirm the model no . Setup Setting up the camera so that it can be accessed from a PC. Confirm... using the camera. Panasonic Network Camera Website: http://www.panasonic.com/netcam for customers in this document for both the BL-C111A (Wired Type) and BL-C131A (Wireless/Wired Type). Preparation 1. AC Adaptor (1 pc.) Cord Length: About 3 m (9 feet 10 inches) Order No. a router © 2006 Panasonic Communications Co.,...
...Procedure Overview The following additional items to install and configure the camera. - Camera Diagram Make sure you have all other documentation can confirm the model no . Setup Setting up the camera so that it can be accessed from a PC. Confirm... using the camera. Panasonic Network Camera Website: http://www.panasonic.com/netcam for customers in this document for both the BL-C111A (Wired Type) and BL-C131A (Wireless/Wired Type). Preparation 1. AC Adaptor (1 pc.) Cord Length: About 3 m (9 feet 10 inches) Order No. a router © 2006 Panasonic Communications Co.,...
Installation Guide
Page 2
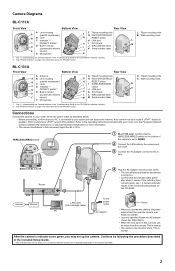
..., confirm that your router's UPnP™ feature is enabled. (Most routers have UPnP™ turned off by following the procedure described in the included Setup Guide. • If the indicator does not turn green, see 1.2 Camera Indicator Issues in the....) Refer to the Panasonic Network Camera website (http://panasonic.co.jp/pcc/products/en/netwkcam/) for more information. • The camera illustrations in this document depict the BL-C131A. L Tripod mounting hole M Wall mounting holes L M BL-C131A Front View Bottom View A Antenna A B Lens housing B (pan/tilt mechanism) C Lens...
..., confirm that your router's UPnP™ feature is enabled. (Most routers have UPnP™ turned off by following the procedure described in the included Setup Guide. • If the indicator does not turn green, see 1.2 Camera Indicator Issues in the....) Refer to the Panasonic Network Camera website (http://panasonic.co.jp/pcc/products/en/netwkcam/) for more information. • The camera illustrations in this document depict the BL-C131A. L Tripod mounting hole M Wall mounting holes L M BL-C131A Front View Bottom View A Antenna A B Lens housing B (pan/tilt mechanism) C Lens...


