Operating Instructions
Page 6
...Password 103 6.3 General Users ...104 6.4 Guest Users ...107 6.5 The Login Tab ...109 7 Advanced Settings 110 7.1 Changing Image Display Settings 110 7.2 Registering Multiple Cameras 113 7.3 Specifying Operation Times 115 7.4 Changing the Indicator Display 117 7.5 Privacy Mode ...118 8 Camera Administration and Maintenance 119 8.1 Confirming Camera Status 119 8.2 Confirming Wireless Status (BL-C131A... 13.1 Cleaning the Camera 146 13.2 ASCII Character Table 147 13.3 Internal Memory Specifications for Buffered Images 148 13.4 Default Setting List ...149 ...
...Password 103 6.3 General Users ...104 6.4 Guest Users ...107 6.5 The Login Tab ...109 7 Advanced Settings 110 7.1 Changing Image Display Settings 110 7.2 Registering Multiple Cameras 113 7.3 Specifying Operation Times 115 7.4 Changing the Indicator Display 117 7.5 Privacy Mode ...118 8 Camera Administration and Maintenance 119 8.1 Confirming Camera Status 119 8.2 Confirming Wireless Status (BL-C131A... 13.1 Cleaning the Camera 146 13.2 ASCII Character Table 147 13.3 Internal Memory Specifications for Buffered Images 148 13.4 Default Setting List ...149 ...

Operating Instructions
Page 25
... support the overlay feature. *2 The audio controls displayed for other cameras. *3 If the camera does not support pan and tilt features, this camera using their corresponding buttons or controls will need to enter a valid user name and password in 192 ´ 144 pixel resolution, images are configured for ... be displayed for the multi camera page, make sure that the cameras you may be able to improve the refresh rate by the other cameras depend on network conditions, PC performance, the number of people accessing the cameras, and the type of the camera image to use the click to...
... support the overlay feature. *2 The audio controls displayed for other cameras. *3 If the camera does not support pan and tilt features, this camera using their corresponding buttons or controls will need to enter a valid user name and password in 192 ´ 144 pixel resolution, images are configured for ... be displayed for the multi camera page, make sure that the cameras you may be able to improve the refresh rate by the other cameras depend on network conditions, PC performance, the number of people accessing the cameras, and the type of the camera image to use the click to...
Operating Instructions
Page 126
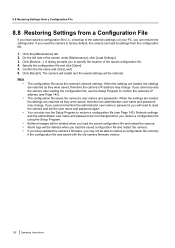
... file and click [Open]. 5. Alarm logs will be deleted when you reset the camera to reset the camera and set the user name and password again. Buffered images will need to factory default, the camera can also use the Setup Program to restore a configuration file (see Page 143). .... Confirm the file name and click [Load]. 6. Note • • • • • • The configuration file saves the camera's network settings. If you have saved a configuration file (i.e., a backup of the saved configuration file. 4. When the settings are loaded, the settings are not ...
... file and click [Open]. 5. Alarm logs will be deleted when you reset the camera to reset the camera and set the user name and password again. Buffered images will need to factory default, the camera can also use the Setup Program to restore a configuration file (see Page 143). .... Confirm the file name and click [Load]. 6. Note • • • • • • The configuration file saves the camera's network settings. If you have saved a configuration file (i.e., a backup of the saved configuration file. 4. When the settings are loaded, the settings are not ...

Operating Instructions
Page 127
...] tab. 2. When the lens finishes panning and tilting, it is reset, the following information will be deleted: - 8.9 Resetting the Camera 8.9 Resetting the Camera You can reset all of the screen under [Maintenance], click [Reset To Factory Default]. 3. All camera settings (including the user name, password, IP address, subnet mask etc.) The network connection mode changes to turn...
...] tab. 2. When the lens finishes panning and tilting, it is reset, the following information will be deleted: - 8.9 Resetting the Camera 8.9 Resetting the Camera You can reset all of the screen under [Maintenance], click [Reset To Factory Default]. 3. All camera settings (including the user name, password, IP address, subnet mask etc.) The network connection mode changes to turn...
Operating Instructions
Page 144
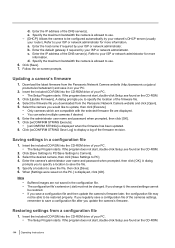
Enter the default gateway if required by your ISP or network administrator. Click [Save]. 7. Download the latest firmware from the Panasonic Network Camera website (http://panasonic.co.jp/pcc/ products/en/netwkcam/) and save the file, then click [Save]. 6.... • You can select multiple cameras if desired. 6. Enter the administrator user name and password when prompted, then click [OK]. 7. Restoring settings from the Panasonic Network Camera website and click [Open]. 5. d. Enter the camera's administrator user name and password when prompted, then click [OK]....
Enter the default gateway if required by your ISP or network administrator. Click [Save]. 7. Download the latest firmware from the Panasonic Network Camera website (http://panasonic.co.jp/pcc/ products/en/netwkcam/) and save the file, then click [Save]. 6.... • You can select multiple cameras if desired. 6. Enter the administrator user name and password when prompted, then click [OK]. 7. Restoring settings from the Panasonic Network Camera website and click [Open]. 5. d. Enter the camera's administrator user name and password when prompted, then click [OK]....
Operating Instructions
Page 150
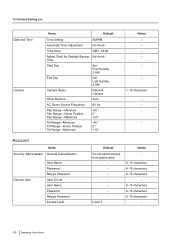
... Time Start Day End Day Camera Name White Balance AC Power Source Frequency Pan Range-Minimum Pan Range-Home Position Pan Range-Maximum Tilt Range-Minimum Tilt Range-Home Position Tilt Range-Maximum AM/PM No check GMT -05:00 No check Apr First Sunday 2 AM Oct Last Sunday 2 AM Network Camera Auto 60 Hz -50...
... Time Start Day End Day Camera Name White Balance AC Power Source Frequency Pan Range-Minimum Pan Range-Home Position Pan Range-Maximum Tilt Range-Minimum Tilt Range-Home Position Tilt Range-Maximum AM/PM No check GMT -05:00 No check Apr First Sunday 2 AM Oct Last Sunday 2 AM Network Camera Auto 60 Hz -50...


