Operating Instructions
Page 71
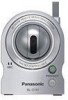
...to the operating instructions included with your router for more information. Enabling [Auto Port Forwarding] using the camera in the Setup Guide), or by default), you need to configure the router's port forwarding feature manually. Using the [UPnP] page Using... Instructions 71 Using the [Internet] tab (recommended) Using this method, the camera's port number will not change . Refer to the operating instructions included with your router and the Panasonic Network Camera website (http://panasonic.co.jp/pcc/ products/en/netwkcam/) for more information. 4.1 Configuring Port ...
...to the operating instructions included with your router for more information. Enabling [Auto Port Forwarding] using the camera in the Setup Guide), or by default), you need to configure the router's port forwarding feature manually. Using the [UPnP] page Using... Instructions 71 Using the [Internet] tab (recommended) Using this method, the camera's port number will not change . Refer to the operating instructions included with your router and the Panasonic Network Camera website (http://panasonic.co.jp/pcc/ products/en/netwkcam/) for more information. 4.1 Configuring Port ...

Operating Instructions
Page 73
... 2. You will need to the UPnP™ related items in 1.3 Camera Setup Issues and 1.5 Camera Access Issues in the Troubleshooting Guide. Register the camera to know these settings when configuring the router for port forwarding. 5. On the left side of the screen under [Basic], click [Network (IPv4)]. 3. Make a note of the IP address and port number...
... 2. You will need to the UPnP™ related items in 1.3 Camera Setup Issues and 1.5 Camera Access Issues in the Troubleshooting Guide. Register the camera to know these settings when configuring the router for port forwarding. 5. On the left side of the screen under [Basic], click [Network (IPv4)]. 3. Make a note of the IP address and port number...

Operating Instructions
Page 81
... clicking [Save], the camera must log in to the camera as explained in order to confirm the camera's IP address (see Page 130. Note • • • • • You must be restarted. Ask your network uses the IPv6 protocol, see Page 143) or reconfigure the camera as the administrator in the Setup Guide. You can change...
... clicking [Save], the camera must log in to the camera as explained in order to confirm the camera's IP address (see Page 130. Note • • • • • You must be restarted. Ask your network uses the IPv6 protocol, see Page 143) or reconfigure the camera as the administrator in the Setup Guide. You can change...

Operating Instructions
Page 88
c. Restart the camera in Wireless Mode (BL-C131A Only) The BL-C131A can be used wirelessly. In this case, there is no need to connect a LAN cable to use the camera wirelessly, you have not done this. In order to the camera. Configure the camera for wired connection. Configure the camera's wireless settings (see Page 93). 88 Operating Instructions 5.2 Using the Camera in Wireless Mode (BL-C131A Only) 5.2 Using the Camera in wireless mode (see Page 89). Refer to the included Installation Guide and Setup Guide if you must: a. b.
c. Restart the camera in Wireless Mode (BL-C131A Only) The BL-C131A can be used wirelessly. In this case, there is no need to connect a LAN cable to use the camera wirelessly, you have not done this. In order to the camera. Configure the camera for wired connection. Configure the camera's wireless settings (see Page 93). 88 Operating Instructions 5.2 Using the Camera in Wireless Mode (BL-C131A Only) 5.2 Using the Camera in wireless mode (see Page 89). Refer to the included Installation Guide and Setup Guide if you must: a. b.
Operating Instructions
Page 117
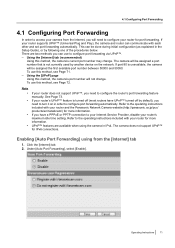
... location of the screen under [Advanced], click [Indicator Control]. 3. Click the [Setup] tab. 2. Note • If the indicator lights in any color other than green, refer to 1.2 Camera Indicator Issues in the Troubleshooting Guide. Click [Save]. On the left side of the camera to a more appropriate location if necessary. - Select the desired setting. 4. Always...
... location of the screen under [Advanced], click [Indicator Control]. 3. Click the [Setup] tab. 2. Note • If the indicator lights in any color other than green, refer to 1.2 Camera Indicator Issues in the Troubleshooting Guide. Click [Save]. On the left side of the camera to a more appropriate location if necessary. - Select the desired setting. 4. Always...

Operating Instructions
Page 127
... the camera. When the lens finishes panning and tilting, it is reset, the following information will be deleted: - All buffered images - Change the setting if necessary (see Page 95). 8.9 Resetting the Camera 8.9 Resetting the Camera You can reset all of the camera's settings to the [Setup Guide]. On... screen under [Maintenance], click [Reset To Factory Default]. 3. All camera settings (including the user name, password, IP address, subnet mask etc.) The network connection mode changes to turn off the camera while the camera is reset, the internal clock will not be reset, but the ...
... the camera. When the lens finishes panning and tilting, it is reset, the following information will be deleted: - All buffered images - Change the setting if necessary (see Page 95). 8.9 Resetting the Camera 8.9 Resetting the Camera You can reset all of the camera's settings to the [Setup Guide]. On... screen under [Maintenance], click [Reset To Factory Default]. 3. All camera settings (including the user name, password, IP address, subnet mask etc.) The network connection mode changes to turn off the camera while the camera is reset, the internal clock will not be reset, but the ...
Installation Guide
Page 1
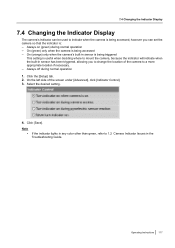
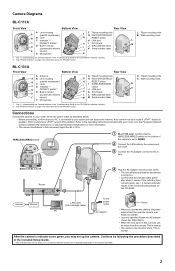
... are included in the included Setup Guide). Connections Connecting the camera to the power outlet. a PC (see the system requirements in this document. Panasonic Network Camera Website: http://www.panasonic.com/netcam for securing the safety wire to secure the camera after wall mounting it. printed...ROM. • This document (Installation Guide) explains how to physically connect the camera to the power supply and network, as "the CD-ROM" in this document) (1 pc.) Setup Guide (1 pc.) Setup CD-ROM (1 pc.) Order No. BL-C111A BL-C131A Main Unit (1 pc.) The appearance of...
... are included in the included Setup Guide). Connections Connecting the camera to the power outlet. a PC (see the system requirements in this document. Panasonic Network Camera Website: http://www.panasonic.com/netcam for securing the safety wire to secure the camera after wall mounting it. printed...ROM. • This document (Installation Guide) explains how to physically connect the camera to the power supply and network, as "the CD-ROM" in this document) (1 pc.) Setup Guide (1 pc.) Setup CD-ROM (1 pc.) Order No. BL-C111A BL-C131A Main Unit (1 pc.) The appearance of...
Installation Guide
Page 2
... and to the Panasonic Network Camera website (http://panasonic.co.jp/pcc/products/en/netwkcam/) for more information. • The camera illustrations in the Troubleshooting Guide on . • Confirm that your PC is set up the camera. If the indicator does not light green, see 1.2 Camera Indicator Issues in this document depict the BL-C131A. Bottom of the camera is connected...
... and to the Panasonic Network Camera website (http://panasonic.co.jp/pcc/products/en/netwkcam/) for more information. • The camera illustrations in the Troubleshooting Guide on . • Confirm that your PC is set up the camera. If the indicator does not light green, see 1.2 Camera Indicator Issues in this document depict the BL-C131A. Bottom of the camera is connected...
Installation Guide
Page 3
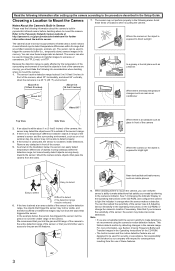
...If you are not satisfied with respect to the Panasonic Network Camera website at an area outside of the camera's sensor and the surrounding environment, such as glass in the Setup Guide. The sensor can easily detect temperature differences of the camera are sharp temperature changes such as desired. We ... front of objects moving slowly towards the sensor. This feature detects motion by referring to the pan and tilt features. 30° 8. When deciding where to mount the camera, you can view these features. 49° 3 If the sensor is obstructed, the sensor...
...If you are not satisfied with respect to the Panasonic Network Camera website at an area outside of the camera's sensor and the surrounding environment, such as glass in the Setup Guide. The sensor can easily detect temperature differences of the camera are sharp temperature changes such as desired. We ... front of objects moving slowly towards the sensor. This feature detects motion by referring to the pan and tilt features. 30° 8. When deciding where to mount the camera, you can view these features. 49° 3 If the sensor is obstructed, the sensor...


