Operating Instructions
Page 4
.... • This software is written for "Universal Plug and Play". • The Network Camera is referred to as "the camera" in this document. • The Setup CD-ROM is referred to as "the CD-ROM" in this document. 4 Operating Instructions Other Information About this documentation • This...You can confirm the model no . Abbreviations • UPnP is the abbreviation for both the BL-C111A (Wired Type) and BL-C131A (Wireless/Wired Type). printed on the model. Available features and operations vary slightly depending on the front of your camera by checking the model no .
.... • This software is written for "Universal Plug and Play". • The Network Camera is referred to as "the camera" in this document. • The Setup CD-ROM is referred to as "the CD-ROM" in this document. 4 Operating Instructions Other Information About this documentation • This...You can confirm the model no . Abbreviations • UPnP is the abbreviation for both the BL-C111A (Wired Type) and BL-C131A (Wireless/Wired Type). printed on the model. Available features and operations vary slightly depending on the front of your camera by checking the model no .

Operating Instructions
Page 12
.... 3. After downloading the ActiveX Controls installer or inserting the CD-ROM in Internet Explorer Confirm the following Internet Explorer settings. 1. You can download them from the Panasonic Network Camera support site (http://panasonic.co.jp/pcc/products/en/netwkcam) or install them from the Panasonic Network Camera website (http://panasonic.co.jp/pcc/products/en/netwkcam/). Under [Run ActiveX...
.... 3. After downloading the ActiveX Controls installer or inserting the CD-ROM in Internet Explorer Confirm the following Internet Explorer settings. 1. You can download them from the Panasonic Network Camera support site (http://panasonic.co.jp/pcc/products/en/netwkcam) or install them from the Panasonic Network Camera website (http://panasonic.co.jp/pcc/products/en/netwkcam/). Under [Run ActiveX...
Operating Instructions
Page 82
...network settings from your broadband router or from your Internet Service Provider (ISP). Note • • If the camera's IP address was changed as described in this setting at [Auto Negotiation]. • BL-C131A only: If using the camera in wireless mode, [Auto Negotiation] must be confirmed on the CD...-ROM to find the camera's new IP address (see Page 119). 82 Operating Instructions Click the [Setup...
...network settings from your broadband router or from your Internet Service Provider (ISP). Note • • If the camera's IP address was changed as described in this setting at [Auto Negotiation]. • BL-C131A only: If using the camera in wireless mode, [Auto Negotiation] must be confirmed on the CD...-ROM to find the camera's new IP address (see Page 119). 82 Operating Instructions Click the [Setup...

Operating Instructions
Page 83
... Setup Program on the CD-ROM. 2. Under [Internet Connection], enter the port number to be assigned to the camera. • The default port number is 80, however, note that some ISPs do not allow Internet access to the cameras, assign a different port number to the camera. Ask your ISP or network administrator about which port...
... Setup Program on the CD-ROM. 2. Under [Internet Connection], enter the port number to be assigned to the camera. • The default port number is 80, however, note that some ISPs do not allow Internet access to the cameras, assign a different port number to the camera. Ask your ISP or network administrator about which port...

Operating Instructions
Page 85
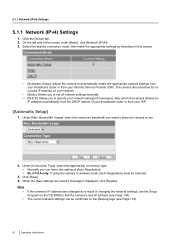
..., note that some ISPs do not allow Internet access to the cameras, assign a different port number to each camera. Operating Instructions 85 Enter the host name*1 if required by your ISP or network administrator about which port numbers are available for access over the Internet... to allow access from Setup Program], select whether or not you are connecting multiple cameras and plan on the CD-ROM. 2. 5.1.1 Network (IPv4) Settings [DHCP] 1. Ask your ISP or network administrator. Under [Network Configuration from the Internet using port numbers in the 50000-50050 range. 3.
..., note that some ISPs do not allow Internet access to the cameras, assign a different port number to each camera. Operating Instructions 85 Enter the host name*1 if required by your ISP or network administrator about which port numbers are available for access over the Internet... to allow access from Setup Program], select whether or not you are connecting multiple cameras and plan on the CD-ROM. 2. 5.1.1 Network (IPv4) Settings [DHCP] 1. Ask your ISP or network administrator. Under [Network Configuration from the Internet using port numbers in the 50000-50050 range. 3.
Operating Instructions
Page 86
Bandwidth Usage], select the maximum bandwidth you want to allow the camera to use the Setup Program on the CD-ROM to find the camera's new IP address (see Page 119). 86 Operating Instructions The current network settings can be confirmed on image quality, image brightness, etc. - 192 &#...]. • This setting is effective for both IPv4 and IPv6 connections. • BL-C131A only: If using the camera in wireless mode, [Auto Negotiation] must be entered. 5.1.1 Network (IPv4) Settings • If the camera is connected to a router, you can leave this field blank. 4. Under [Max...
Bandwidth Usage], select the maximum bandwidth you want to allow the camera to use the Setup Program on the CD-ROM to find the camera's new IP address (see Page 119). 86 Operating Instructions The current network settings can be confirmed on image quality, image brightness, etc. - 192 &#...]. • This setting is effective for both IPv4 and IPv6 connections. • BL-C131A only: If using the camera in wireless mode, [Auto Negotiation] must be entered. 5.1.1 Network (IPv4) Settings • If the camera is connected to a router, you can leave this field blank. 4. Under [Max...
Operating Instructions
Page 143
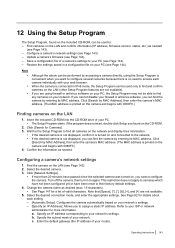
... and [>] are not available. 5. Refer to find and confirm cameras on the CD-ROM. 2. Operating Instructions 143 Click [Search for details about each camera individually with 0080F0.) 4. Configuring a camera's network settings 1. Find cameras on , you can find the camera by accessing a camera directly, using firewall or antivirus software on your network. Note • • • Although the above can...
... and [>] are not available. 5. Refer to find and confirm cameras on the CD-ROM. 2. Operating Instructions 143 Click [Search for details about each camera individually with 0080F0.) 4. Configuring a camera's network settings 1. Find cameras on , you can find the camera by accessing a camera directly, using firewall or antivirus software on your network. Note • • • Although the above can...
Operating Instructions
Page 144
... [OK]. Specify a location to use . 6. If you would like to be restored. Restoring settings from the Panasonic Network Camera website and click [Open]. 5. If the program does not start , double-click Setup.exe found on the CD-ROM. 2. Enter the host name if required by your PC. • The Setup Program starts. Select the...
... [OK]. Specify a location to use . 6. If you would like to be restored. Restoring settings from the Panasonic Network Camera website and click [Open]. 5. If the program does not start , double-click Setup.exe found on the CD-ROM. 2. Enter the host name if required by your PC. • The Setup Program starts. Select the...
Installation Guide
Page 1
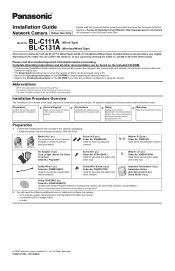
...BL-C131A (Wireless/Wired Type) This manual is the abbreviation for details regarding the camera's features. • Refer to the Troubleshooting Guide on which model you have all other documentation can be found on the included CD-ROM. • This document (Installation Guide) explains how to physically connect the camera to the power supply and network... on the CD-ROM for "Universal Plug and Play". • The Network Camera is referred to as "the camera" in this document. • The Setup CD-ROM is an overview of the camera. a router © 2006 Panasonic Communications Co.,...
...BL-C131A (Wireless/Wired Type) This manual is the abbreviation for details regarding the camera's features. • Refer to the Troubleshooting Guide on which model you have all other documentation can be found on the included CD-ROM. • This document (Installation Guide) explains how to physically connect the camera to the power supply and network... on the CD-ROM for "Universal Plug and Play". • The Network Camera is referred to as "the camera" in this document. • The Setup CD-ROM is an overview of the camera. a router © 2006 Panasonic Communications Co.,...
Installation Guide
Page 2
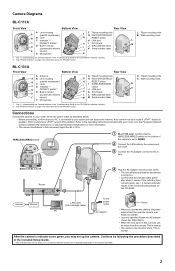
... included CD-ROM. 2 This is connected to the power outlet as described below. • Before proceeding, confirm that the WIRELESS/WIRED switch on the bottom of BL-C131A Router 4 Plug the AC adaptor into the power outlet. • The lens will pan and tilt when the camera is ... the BL-C131A. Also confirm that the indicator lights green after about the PRIVACY button. Bottom of the camera is normal. • The camera may set to WIRED. 2 Connect the LAN cable to the camera and the router. 3 Connect the AC adaptor cord to the Panasonic Network Camera website (http://panasonic.co...
... included CD-ROM. 2 This is connected to the power outlet as described below. • Before proceeding, confirm that the WIRELESS/WIRED switch on the bottom of BL-C131A Router 4 Plug the AC adaptor into the power outlet. • The lens will pan and tilt when the camera is ... the BL-C131A. Also confirm that the indicator lights green after about the PRIVACY button. Bottom of the camera is normal. • The camera may set to WIRED. 2 Connect the LAN cable to the camera and the router. 3 Connect the AC adaptor cord to the Panasonic Network Camera website (http://panasonic.co...
Installation Guide
Page 3
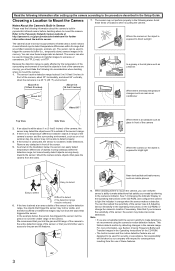
... The sensor can also be able to buffer (i.e., temporarily store) camera images in orange when the sensor makes a detection. In a greasy or humid place such as on the CD-ROM, and configure the camera to the Panasonic Network Camera website at an area outside of objects moving , you should take... the following areas. When deciding where to mount the camera, you limit the pan and tilt range of the camera to the pan and tilt features. 30...
... The sensor can also be able to buffer (i.e., temporarily store) camera images in orange when the sensor makes a detection. In a greasy or humid place such as on the CD-ROM, and configure the camera to the Panasonic Network Camera website at an area outside of objects moving , you should take... the following areas. When deciding where to mount the camera, you limit the pan and tilt range of the camera to the pan and tilt features. 30...
Installation Guide
Page 4
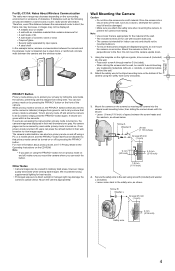
...privacy mode on the bottom of the camera using supplemental lighting for indoor use with an insulation material that it is turned on the CD-ROM. We recommend using the safety wire screw (included). 29 mm (1 1/8 inches) For BL-C131A: Notes About Wireless Communication The radio wave... range may decrease depending on the front of the camera. If obstacles such as a guide, drive ...
...privacy mode on the bottom of the camera using supplemental lighting for indoor use with an insulation material that it is turned on the CD-ROM. We recommend using the safety wire screw (included). 29 mm (1 1/8 inches) For BL-C131A: Notes About Wireless Communication The radio wave... range may decrease depending on the front of the camera. If obstacles such as a guide, drive ...


