
Operating Instructions
Page 2
... FTP or HTTP server as desired. You can also be used to trigger the camera to a UPnP™ compatible router, the camera's network settings can be used to trigger the camera to transfer images to detect temperature differences within its memory. You can play back ...then you to zoom in the camera image. Main Features On-site and remote camera monitoring Camera images can even activate the privacy mode while away from home. You can be automatically configured, making setup quick and easy. Motion detection feature The camera's motion detection feature allows you ...
... FTP or HTTP server as desired. You can also be used to trigger the camera to a UPnP™ compatible router, the camera's network settings can be used to trigger the camera to transfer images to detect temperature differences within its memory. You can play back ...then you to zoom in the camera image. Main Features On-site and remote camera monitoring Camera images can even activate the privacy mode while away from home. You can be automatically configured, making setup quick and easy. Motion detection feature The camera's motion detection feature allows you ...
Operating Instructions
Page 4
... This manual is written for "Universal Plug and Play". • The Network Camera is referred to as "the camera" in this document. • The Setup CD-ROM is referred to as "the CD-ROM" in this document depict the BL-C131A. Abbreviations • UPnP is based in part on the work of the ...Independent JPEG Group. of the camera. • The camera illustrations in the United States...
... This manual is written for "Universal Plug and Play". • The Network Camera is referred to as "the camera" in this document. • The Setup CD-ROM is referred to as "the CD-ROM" in this document depict the BL-C131A. Abbreviations • UPnP is based in part on the work of the ...Independent JPEG Group. of the camera. • The camera illustrations in the United States...
Operating Instructions
Page 6
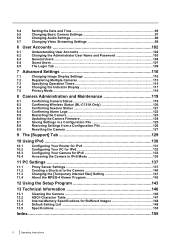
...Display 117 7.5 Privacy Mode ...118 8 Camera Administration and Maintenance 119 8.1 Confirming Camera Status 119 8.2 Confirming Wireless Status (BL-C131A Only 120 8.3 Confirming Session Status 121 8.4 Confirming Alarm Logs 122 8.5 Restarting the Camera 123 8.6 Updating the Camera Firmware 124 8.7 Saving Settings in a ...] Setting 141 11.4 About the MPEG-4 Viewer Program 142 12 Using the Setup Program 143 13 Technical Information 146 13.1 Cleaning the Camera 146 13.2 ASCII Character Table 147 13.3 Internal Memory Specifications for Buffered Images...
...Display 117 7.5 Privacy Mode ...118 8 Camera Administration and Maintenance 119 8.1 Confirming Camera Status 119 8.2 Confirming Wireless Status (BL-C131A Only 120 8.3 Confirming Session Status 121 8.4 Confirming Alarm Logs 122 8.5 Restarting the Camera 123 8.6 Updating the Camera Firmware 124 8.7 Saving Settings in a ...] Setting 141 11.4 About the MPEG-4 Viewer Program 142 12 Using the Setup Program 143 13 Technical Information 146 13.1 Cleaning the Camera 146 13.2 ASCII Character Table 147 13.3 Internal Memory Specifications for Buffered Images...

Operating Instructions
Page 7
...80. • The user name and password required to access the camera, which were set during camera setup. 1. Example: http://192.168.0.253:50001 If you are accessing the camera from outside, i.e., from a PC that accessing the camera this way may only work when you have registered with a DNS ... dialog is displayed. Example: http://bob.viewnetcam.com 3. Example: http://192.168.0.253 If the camera's port number is a port number other than 80, enter ":" and the port number after the camera's top page is not connected to the same network as Viewnetcam.com (see Page 109.
...80. • The user name and password required to access the camera, which were set during camera setup. 1. Example: http://192.168.0.253:50001 If you are accessing the camera from outside, i.e., from a PC that accessing the camera this way may only work when you have registered with a DNS ... dialog is displayed. Example: http://bob.viewnetcam.com 3. Example: http://192.168.0.253 If the camera's port number is a port number other than 80, enter ":" and the port number after the camera's top page is not connected to the same network as Viewnetcam.com (see Page 109.

Operating Instructions
Page 25
... been registered to this feature is not displayed • Confirm the settings on network conditions, PC performance, the number of people accessing the cameras, and the type of the camera image to use the click to center feature (see Page 15)*3, or use ...cameras. *3 If the camera does not support pan and tilt features, this camera using their corresponding buttons or controls will be changed directly on the multi camera page. If you want to access from displaying video images to display 4 camera images. To reduce data traffic, you may vary depending on the multi camera setup...
... been registered to this feature is not displayed • Confirm the settings on network conditions, PC performance, the number of people accessing the cameras, and the type of the camera image to use the click to center feature (see Page 15)*3, or use ...cameras. *3 If the camera does not support pan and tilt features, this camera using their corresponding buttons or controls will be changed directly on the multi camera page. If you want to access from displaying video images to display 4 camera images. To reduce data traffic, you may vary depending on the multi camera setup...

Operating Instructions
Page 27
Operating Instructions 27 On the left side of the screen under [Buffer/Transfer], click [Trigger]. 3. Click the [Setup] tab. 2. 2.1 Configuring a Timer Trigger 2.1 Configuring a Timer Trigger 1. Click a trigger number (1-5).
Operating Instructions 27 On the left side of the screen under [Buffer/Transfer], click [Trigger]. 3. Click the [Setup] tab. 2. 2.1 Configuring a Timer Trigger 2.1 Configuring a Timer Trigger 1. Click a trigger number (1-5).

Operating Instructions
Page 30
Click a trigger number (1-5). 30 Operating Instructions Click the [Setup] tab. 2. On the left side of the screen under [Buffer/Transfer], click [Trigger]. 3. 2.2 Configuring a Sensor or Motion Detection Trigger 2.2 Configuring a Sensor or Motion Detection Trigger 1.
Click a trigger number (1-5). 30 Operating Instructions Click the [Setup] tab. 2. On the left side of the screen under [Buffer/Transfer], click [Trigger]. 3. 2.2 Configuring a Sensor or Motion Detection Trigger 2.2 Configuring a Sensor or Motion Detection Trigger 1.

Operating Instructions
Page 35
Operating Instructions 35 Click the [Setup] tab. 2. 2.3 Disabling and Enabling a Trigger 2.3 Disabling and Enabling a Trigger After configuring an image buffering trigger, you can later disable the trigger to temporarily turn it ...
Operating Instructions 35 Click the [Setup] tab. 2. 2.3 Disabling and Enabling a Trigger 2.3 Disabling and Enabling a Trigger After configuring an image buffering trigger, you can later disable the trigger to temporarily turn it ...

Operating Instructions
Page 54
On the left side of the screen under [Buffer/Transfer], click [Trigger]. 3. Click the [Setup] tab. 2. 2.7 Deleting Buffered Images 2.7 Deleting Buffered Images You can delete all images buffered by a specific trigger. 1. Click a trigger number (1-5). 54 Operating Instructions
On the left side of the screen under [Buffer/Transfer], click [Trigger]. 3. Click the [Setup] tab. 2. 2.7 Deleting Buffered Images 2.7 Deleting Buffered Images You can delete all images buffered by a specific trigger. 1. Click a trigger number (1-5). 54 Operating Instructions

Operating Instructions
Page 56
...], click [Sensor Sensitivity]. 3. Click [Save]. 56 Operating Instructions 2.8 Adjusting Sensor Sensitivity 2.8 Adjusting Sensor Sensitivity If using the camera's built-in sensor to buffer or transfer camera images, you may want to heat variations. 4. Click the [Setup] tab. 2. Select the desired setting. - [Low]: The sensor is less sensitive to heat variations (default). - [Middle]: The...
...], click [Sensor Sensitivity]. 3. Click [Save]. 56 Operating Instructions 2.8 Adjusting Sensor Sensitivity 2.8 Adjusting Sensor Sensitivity If using the camera's built-in sensor to buffer or transfer camera images, you may want to heat variations. 4. Click the [Setup] tab. 2. Select the desired setting. - [Low]: The sensor is less sensitive to heat variations (default). - [Middle]: The...
Operating Instructions
Page 57
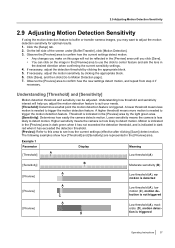
... is needed to trigger the motion detection feature. If necessary, adjust the detection threshold by the light green area. [Sensitivity]: Determines how easily the camera detects motion. Threshold is indicated in the desired direction when confirming the current sensitivity settings. 4. Example 1 Parameter Display Meaning [Threshold] A Low threshold... Motion Detection page]. 7. On the left side of the screen under [Buffer/Transfer], click [Motion Detection]. 3. Click the [Setup] tab. 2. Understanding how threshold and sensitivity interact will not be adjusted.
... is needed to trigger the motion detection feature. If necessary, adjust the detection threshold by the light green area. [Sensitivity]: Determines how easily the camera detects motion. Threshold is indicated in the desired direction when confirming the current sensitivity settings. 4. Example 1 Parameter Display Meaning [Threshold] A Low threshold... Motion Detection page]. 7. On the left side of the screen under [Buffer/Transfer], click [Motion Detection]. 3. Click the [Setup] tab. 2. Understanding how threshold and sensitivity interact will not be adjusted.

Operating Instructions
Page 59
...Click the [Setup] tab. 2. Ask your Internet Service Provider (ISP) or network administrator for the appropriate settings. 1. Operating Instructions 59 Under [Active Time], select the days and the time you to send alarm logs. This allows you want the camera to be sent only if the camera was not ...triggered]: Alarm logs will be sent if the camera was triggered. - [Send alarm logs only when the camera was not triggered. 4. Under [A setup of operation], select the desired setting. - [Never ...
...Click the [Setup] tab. 2. Ask your Internet Service Provider (ISP) or network administrator for the appropriate settings. 1. Operating Instructions 59 Under [Active Time], select the days and the time you to send alarm logs. This allows you want the camera to be sent only if the camera was not ...triggered]: Alarm logs will be sent if the camera was triggered. - [Send alarm logs only when the camera was not triggered. 4. Under [A setup of operation], select the desired setting. - [Never ...

Operating Instructions
Page 60
....) c. Enter the port number used by the server. (Port 25 is normally used for sending E-mail.) 7. Enter the settings as you by the camera (max. 44 characters). 10. Enter the destination E-mail address*2. Enter the password*2 required to access the server (max. 63 characters). b. d. Up... authentication when sending E-mail messages. - [POP before SMTP authentication when sending E-mail messages.The following settings are also necessary. Under [Notice setup of an alarm log], enter the IP address or the host name*1 of the SMTP server (outgoing mail server). • An IPv6...
....) c. Enter the port number used by the server. (Port 25 is normally used for sending E-mail.) 7. Enter the settings as you by the camera (max. 44 characters). 10. Enter the destination E-mail address*2. Enter the password*2 required to access the server (max. 63 characters). b. d. Up... authentication when sending E-mail messages. - [POP before SMTP authentication when sending E-mail messages.The following settings are also necessary. Under [Notice setup of an alarm log], enter the IP address or the host name*1 of the SMTP server (outgoing mail server). • An IPv6...
Operating Instructions
Page 71
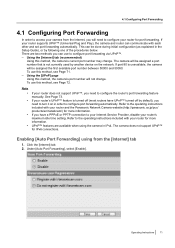
... instructions included with your router and the Panasonic Network Camera website (http://panasonic.co.jp/pcc/ products/en/netwkcam/) for port forwarding. The camera does not support UPnP™ for more information. Enabling [Auto Port Forwarding] using the camera in IPv4. 4.1 Configuring Port Forwarding 4.1...camera's port number will need to the operating instructions included with your router's maximum idle time setting. If you can communicate with each other and set port forwarding automatically. If port 80 is not currently used by another device on in the Setup...
... instructions included with your router and the Panasonic Network Camera website (http://panasonic.co.jp/pcc/ products/en/netwkcam/) for port forwarding. The camera does not support UPnP™ for more information. Enabling [Auto Port Forwarding] using the camera in IPv4. 4.1 Configuring Port Forwarding 4.1...camera's port number will need to the operating instructions included with your router's maximum idle time setting. If you can communicate with each other and set port forwarding automatically. If port 80 is not currently used by another device on in the Setup...

Operating Instructions
Page 72
...]. • [Router configuration in a new window. The Viewnetcam.com website will not be able to access any of the cameras needs to the network can be registered with Viewnetcam.com. • When [Setup completed] is configured correctly To confirm that UPnP™ port forwarding is displayed, the addresses for example, bob.viewnetcam.com...
...]. • [Router configuration in a new window. The Viewnetcam.com website will not be able to access any of the cameras needs to the network can be registered with Viewnetcam.com. • When [Setup completed] is configured correctly To confirm that UPnP™ port forwarding is displayed, the addresses for example, bob.viewnetcam.com...

Operating Instructions
Page 73
...forwarding without using UPnP™ If your router, configure the router's port forwarding feature. • When configuring port forwarding, store the camera's IP address and port number that the status is [Enabled]. • If [Enabled] is not displayed, refer to configure the ... 4. Click [Save]. 6. Operating Instructions 73 On the left side of the screen, click [Status]. 3. Click the [Setup] tab. 2. Make a note of the screen under [Basic], click [Network (IPv4)]. 3. Under [UPnP], confirm that you need to use a Dynamic DNS service, such as Viewnetcam.com (see Page...
...forwarding without using UPnP™ If your router, configure the router's port forwarding feature. • When configuring port forwarding, store the camera's IP address and port number that the status is [Enabled]. • If [Enabled] is not displayed, refer to configure the ... 4. Click [Save]. 6. Operating Instructions 73 On the left side of the screen, click [Status]. 3. Click the [Setup] tab. 2. Make a note of the screen under [Basic], click [Network (IPv4)]. 3. Under [UPnP], confirm that you need to use a Dynamic DNS service, such as Viewnetcam.com (see Page...
Operating Instructions
Page 75
....com:50000, http://bob.viewnetcam.com:50001, etc. To disable Viewnetcam.com service for details. Operating Instructions 75 When [Setup completed] is displayed. Follow the on-screen instructions to Viewnetcam.com Registration page]. • The Viewnetcam.com website is ... [UPnP] page To use this method, see Page 75. - Configuring the camera to the network can be registered with Viewnetcam.com. Under [Viewnetcam.com Registration], select [Register with Panasonic Network Cameras. For more information about Viewnetcam.com, please visit http://www.viewnetcam.com for ...
....com:50000, http://bob.viewnetcam.com:50001, etc. To disable Viewnetcam.com service for details. Operating Instructions 75 When [Setup completed] is displayed. Follow the on-screen instructions to Viewnetcam.com Registration page]. • The Viewnetcam.com website is ... [UPnP] page To use this method, see Page 75. - Configuring the camera to the network can be registered with Viewnetcam.com. Under [Viewnetcam.com Registration], select [Register with Panasonic Network Cameras. For more information about Viewnetcam.com, please visit http://www.viewnetcam.com for ...

Operating Instructions
Page 76
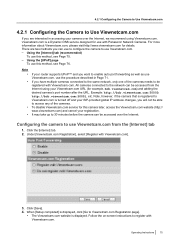
... browser's refresh button. • When registration is complete, you can access the camera using the Viewnetcam.com URL you can access the camera using this URL only from the [UPnP] page 1. 4.2.1 Configuring the Camera to Use Viewnetcam.com • When [Setup completed] is not connected to the same network (LAN) as the camera. 76 Operating Instructions
... browser's refresh button. • When registration is complete, you can access the camera using the Viewnetcam.com URL you can access the camera using this URL only from the [UPnP] page 1. 4.2.1 Configuring the Camera to Use Viewnetcam.com • When [Setup completed] is not connected to the same network (LAN) as the camera. 76 Operating Instructions

Operating Instructions
Page 78
Enter the user name*2 provided by your camera. Click the [Setup] tab. 2. Note • Certain third-party Dynamic DNS services ... a third-party Dynamic DNS service to the Dynamic DNS service provider. • After configuring the camera to use that your camera will be compatible with your Dynamic DNS service provider (max. 255 characters). 5. On the left side... of its current address. 6. Select how often the camera notifies the Dynamic DNS service of the screen under [Basic], click [DynamicDNS]. 3. We cannot guarantee that ...
Enter the user name*2 provided by your camera. Click the [Setup] tab. 2. Note • Certain third-party Dynamic DNS services ... a third-party Dynamic DNS service to the Dynamic DNS service provider. • After configuring the camera to use that your camera will be compatible with your Dynamic DNS service provider (max. 255 characters). 5. On the left side... of its current address. 6. Select how often the camera notifies the Dynamic DNS service of the screen under [Basic], click [DynamicDNS]. 3. We cannot guarantee that ...

Operating Instructions
Page 79
...Dynamic DNS service provider in order to Use a Third-party Dynamic DNS Service 8. 4.2.2 Configuring the Camera to cancel your global IP address changes. Canceling the camera's access to the Dynamic DNS service Use the following procedure to stop using the Dynamic DNS service ...altogether, you intend to stop the camera from notifying the Dynamic DNS service when your subscription. 1. Click the [Setup] tab. 2. Select [Disable], then click [Save]. Click [Save]. *1 [Space] and ["] cannot be entered...
...Dynamic DNS service provider in order to Use a Third-party Dynamic DNS Service 8. 4.2.2 Configuring the Camera to cancel your global IP address changes. Canceling the camera's access to the Dynamic DNS service Use the following procedure to stop using the Dynamic DNS service ...altogether, you intend to stop the camera from notifying the Dynamic DNS service when your subscription. 1. Click the [Setup] tab. 2. Select [Disable], then click [Save]. Click [Save]. *1 [Space] and ["] cannot be entered...


