
Operating Instructions
Page 2
...differences within its memory. You can be automatically configured, making setup quick and easy. UPnP™ support When connecting the camera to a UPnP™ compatible router, the camera's network settings can view these images later as they are emitted naturally by people, animals, etc. The sensor can be monitored...the privacy mode while away from view and protect your PC. You can also program the camera to transfer images via E-mail or upload them to zoom in its range that best suits your mobile phone to view still images when you can also be automatically ...
...differences within its memory. You can be automatically configured, making setup quick and easy. UPnP™ support When connecting the camera to a UPnP™ compatible router, the camera's network settings can view these images later as they are emitted naturally by people, animals, etc. The sensor can be monitored...the privacy mode while away from view and protect your PC. You can also program the camera to transfer images via E-mail or upload them to zoom in its range that best suits your mobile phone to view still images when you can also be automatically ...

Operating Instructions
Page 5
... Use a Third-party Dynamic DNS Service 78 Confirming Internet Access 80 5 Changing Camera Settings 81 5.1 5.1.1 5.1.2 5.2 5.2.1 5.2.2 5.3 Network Settings ...81 Network (IPv4) Settings 82 Proxy Server Settings ...87 Using the Camera in Wireless Mode (BL-C131A Only 88 Configuring the Camera for Wireless Connection (BL-C131A Only 89 Restarting the Camera in Wireless Mode (BL-C131A Only 93 UPnP™ Settings ...94 Operating Instructions 5
... Use a Third-party Dynamic DNS Service 78 Confirming Internet Access 80 5 Changing Camera Settings 81 5.1 5.1.1 5.1.2 5.2 5.2.1 5.2.2 5.3 Network Settings ...81 Network (IPv4) Settings 82 Proxy Server Settings ...87 Using the Camera in Wireless Mode (BL-C131A Only 88 Configuring the Camera for Wireless Connection (BL-C131A Only 89 Restarting the Camera in Wireless Mode (BL-C131A Only 93 UPnP™ Settings ...94 Operating Instructions 5
Operating Instructions
Page 14
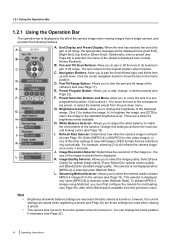
...settings are reset each time the camera is turned on . Navigation Buttons: Allow you to pan the lens left of 9 H brightness levels available. Pan/Tilt Range Button: Allows you to adjust the white balance to limit the pan and tilt range of the camera's lens (see Page 22) are... D position. Change this pull-down menu. Streaming Method Selector: Allows you to pan or tilt the lens to its A pan or tilt range, the appropriate message will refresh the camera image once every 3 seconds. Pan and Tilt Scan Buttons: Allow you to select the method used when viewing a ...
...settings are reset each time the camera is turned on . Navigation Buttons: Allow you to pan the lens left of 9 H brightness levels available. Pan/Tilt Range Button: Allows you to adjust the white balance to limit the pan and tilt range of the camera's lens (see Page 22) are... D position. Change this pull-down menu. Streaming Method Selector: Allows you to pan or tilt the lens to its A pan or tilt range, the appropriate message will refresh the camera image once every 3 seconds. Pan and Tilt Scan Buttons: Allow you to select the method used when viewing a ...
Operating Instructions
Page 15
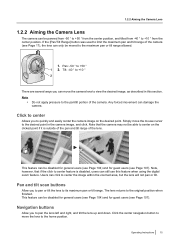
... and right, and tilt the lens up and down. Navigation buttons Allow you to pan or tilt the lens to the maximum pan or tilt range allowed. 1. If the [Pan/Tilt Range] button was used to limit the maximum pan and tilt range of the camera (see Page 17), the lens can only be moved to its maximum... pan or tilt range. Note that if the click to +50 ° 1 2. This feature can be ...
... and right, and tilt the lens up and down. Navigation buttons Allow you to pan or tilt the lens to the maximum pan or tilt range allowed. 1. If the [Pan/Tilt Range] button was used to limit the maximum pan and tilt range of the camera (see Page 17), the lens can only be moved to its maximum... pan or tilt range. Note that if the click to +50 ° 1 2. This feature can be ...
Operating Instructions
Page 17
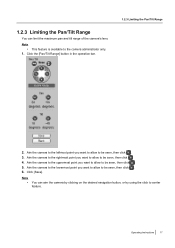
...want to allow to be seen, then click . 3. Aim the camera to the uppermost point you want to allow to be seen, then click . 5. Click [Save]. 1.2.3 Limiting the Pan/Tilt Range You can aim the camera by clicking on the desired navigation button, or by using the ...click to center feature. Note • You can limit the maximum pan and tilt range of the camera's lens. Operating Instructions 17 Click the [Pan/Tilt Range] button in the operation bar. ...
...want to allow to be seen, then click . 3. Aim the camera to the uppermost point you want to allow to be seen, then click . 5. Click [Save]. 1.2.3 Limiting the Pan/Tilt Range You can aim the camera by clicking on the desired navigation button, or by using the ...click to center feature. Note • You can limit the maximum pan and tilt range of the camera's lens. Operating Instructions 17 Click the [Pan/Tilt Range] button in the operation bar. ...

Operating Instructions
Page 64
...reached the end of its pan or tilt range, the corresponding number will not be viewed with a compatible mobile phone. Select [Home Position] to move the lens to the desired position. F. able Privacy Mode]. • You must be logged in to the camera as the administrator by ...], [Buffer/Transfer], or [Privacy Mode], and then entering the user name and password when the authentication dialog is configured to allow access from the camera can be displayed. A. A D. tion trigger logs (see Page 65). • You must be logged in as an administrator to F use ...
...reached the end of its pan or tilt range, the corresponding number will not be viewed with a compatible mobile phone. Select [Home Position] to move the lens to the desired position. F. able Privacy Mode]. • You must be logged in to the camera as the administrator by ...], [Buffer/Transfer], or [Privacy Mode], and then entering the user name and password when the authentication dialog is configured to allow access from the camera can be displayed. A. A D. tion trigger logs (see Page 65). • You must be logged in as an administrator to F use ...

Operating Instructions
Page 83
... from the Internet using port 80. Ask your ISP or network administrator about which port numbers are available for access over the Internet. • Do not use the following port numbers: - 20 and 21: used for ... the Setup Program on using port numbers in the 50000-50050 range. 3. We recommend using port forwarding to allow the camera to be assigned to each camera. Operating Instructions 83 Under [Internet Connection], enter the port number to be assigned to the camera. • The default port number is 80, however, note that some...
... from the Internet using port 80. Ask your ISP or network administrator about which port numbers are available for access over the Internet. • Do not use the following port numbers: - 20 and 21: used for ... the Setup Program on using port numbers in the 50000-50050 range. 3. We recommend using port forwarding to allow the camera to be assigned to each camera. Operating Instructions 83 Under [Internet Connection], enter the port number to be assigned to the camera. • The default port number is 80, however, note that some...

Operating Instructions
Page 85
... a different port number to be configured using port numbers in the 50000-50050 range. 3. Operating Instructions 85 5.1.1 Network (IPv4) Settings [DHCP] 1. Ask your ISP or network administrator. Under [Network Configuration from Setup Program], select whether or not you are connecting multiple cameras and plan on the CD-ROM. 2. We recommend using the Setup Program on...
... a different port number to be configured using port numbers in the 50000-50050 range. 3. Operating Instructions 85 5.1.1 Network (IPv4) Settings [DHCP] 1. Ask your ISP or network administrator. Under [Network Configuration from Setup Program], select whether or not you are connecting multiple cameras and plan on the CD-ROM. 2. We recommend using the Setup Program on...
Operating Instructions
Page 150
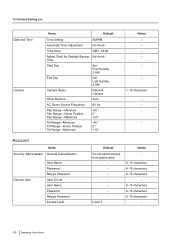
... for Daylight Saving Time Start Day End Day Camera Name White Balance AC Power Source Frequency Pan Range-Minimum Pan Range-Home Position Pan Range-Maximum Tilt Range-Minimum Tilt Range-Home Position Tilt Range-Maximum AM/PM No check GMT -05:00 No check Apr First Sunday 2 AM Oct Last Sunday 2 AM Network Camera Auto 60 Hz -50 ° 0 ° +50...
... for Daylight Saving Time Start Day End Day Camera Name White Balance AC Power Source Frequency Pan Range-Minimum Pan Range-Home Position Pan Range-Maximum Tilt Range-Minimum Tilt Range-Home Position Tilt Range-Maximum AM/PM No check GMT -05:00 No check Apr First Sunday 2 AM Oct Last Sunday 2 AM Network Camera Auto 60 Hz -50 ° 0 ° +50...
Operating Instructions
Page 154
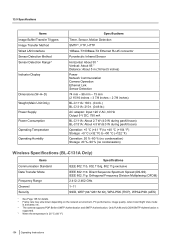
... Items Image Buffer/Transfer Triggers Image Transfer Method Wired LAN Interface Sensor Detection Method Sensor Detection Range*4 Indicator Display Dimensions (W´H´D) Weight (Main Unit Only) Power Supply Power Consumption Operating...Network Communication Camera Operation Ethernet Link Sensor Detection 74 mm ´ 98 mm ´ 73 mm (2 15/16 inches ´ 3 7/8 inches ´ 2 7/8 inches) BL-C111A: 180 (0.4 lb.) BL-C131A: 210 (0.46 lb.) AC adaptor: Input 120 V AC, 60 Hz Output 9 V DC, 750 mA BL-C111A: About 2.7 W (4.0 W during pan/tilt scan) BL-C131A: About 4.5 W (6.0 W during pan...
... Items Image Buffer/Transfer Triggers Image Transfer Method Wired LAN Interface Sensor Detection Method Sensor Detection Range*4 Indicator Display Dimensions (W´H´D) Weight (Main Unit Only) Power Supply Power Consumption Operating...Network Communication Camera Operation Ethernet Link Sensor Detection 74 mm ´ 98 mm ´ 73 mm (2 15/16 inches ´ 3 7/8 inches ´ 2 7/8 inches) BL-C111A: 180 (0.4 lb.) BL-C131A: 210 (0.46 lb.) AC adaptor: Input 120 V AC, 60 Hz Output 9 V DC, 750 mA BL-C111A: About 2.7 W (4.0 W during pan/tilt scan) BL-C131A: About 4.5 W (6.0 W during pan...
Installation Guide
Page 3
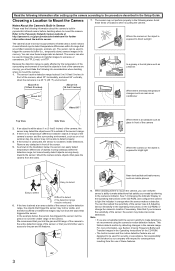
...Panasonic Network Camera website at an area outside of the camera, the sensor may not perform properly in the following information after setting up the camera according to the procedure described in sensor is a pyroelectric infrared sensor, which means it is easily affected by our company with the sensor's ability to mount the camera...HTTP. Where there is exposed to bright light Easy to detect Near devices that you limit the pan and tilt range of the camera to mount the camera. See 7.4 Changing the Indicator Display in the Operating Instructions on the CD-ROM. • ...
...Panasonic Network Camera website at an area outside of the camera, the sensor may not perform properly in the following information after setting up the camera according to the procedure described in sensor is a pyroelectric infrared sensor, which means it is easily affected by our company with the sensor's ability to mount the camera...HTTP. Where there is exposed to bright light Easy to detect Near devices that you limit the pan and tilt range of the camera to mount the camera. See 7.4 Changing the Indicator Display in the Operating Instructions on the CD-ROM. • ...
Installation Guide
Page 4
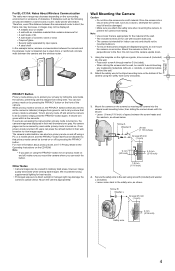
... button to view images again. 29 mm (1 1/8 inches) For BL-C131A: Notes About Wireless Communication The radio wave range may decrease depending on the CD-ROM. Wall Mounting the Camera Caution • Do not drive the screws into the camera's wall mounting holes, then sliding the camera down . 1. If users are displayed properly, do not mount...
... button to view images again. 29 mm (1 1/8 inches) For BL-C131A: Notes About Wireless Communication The radio wave range may decrease depending on the CD-ROM. Wall Mounting the Camera Caution • Do not drive the screws into the camera's wall mounting holes, then sliding the camera down . 1. If users are displayed properly, do not mount...