
Operating Instructions
Page 5
... 4.1 4.2 4.2.1 4.2.2 4.3 Configuring Port Forwarding 71 Configuring the Camera to Use a Dynamic DNS Service 74 Configuring the Camera to Use Viewnetcam.com 75 Configuring the Camera to Use a Third-party Dynamic DNS Service 78 Confirming Internet Access 80 5 Changing Camera Settings 81 5.1 5.1.1 5.1.2 5.2 5.2.1 5.2.2 5.3 Network Settings ...81 Network (IPv4) Settings 82 Proxy Server Settings ...87 Using the Camera in Wireless Mode (BL-C131A Only...
... 4.1 4.2 4.2.1 4.2.2 4.3 Configuring Port Forwarding 71 Configuring the Camera to Use a Dynamic DNS Service 74 Configuring the Camera to Use Viewnetcam.com 75 Configuring the Camera to Use a Third-party Dynamic DNS Service 78 Confirming Internet Access 80 5 Changing Camera Settings 81 5.1 5.1.1 5.1.2 5.2 5.2.1 5.2.2 5.3 Network Settings ...81 Network (IPv4) Settings 82 Proxy Server Settings ...87 Using the Camera in Wireless Mode (BL-C131A Only...

Operating Instructions
Page 7
... 3. 1.1 Accessing the Camera 1 Camera Monitoring 1.1 Accessing the Camera You will need to know the following information to access the camera. • The camera's IP address (e.g., 192.168.0.253) or URL (e.g., bob.viewnetcam.com) • The port number of the camera, if it is not 80. • The user name and password required to the same network as Viewnetcam...
... 3. 1.1 Accessing the Camera 1 Camera Monitoring 1.1 Accessing the Camera You will need to know the following information to access the camera. • The camera's IP address (e.g., 192.168.0.253) or URL (e.g., bob.viewnetcam.com) • The port number of the camera, if it is not 80. • The user name and password required to the same network as Viewnetcam...
Operating Instructions
Page 37
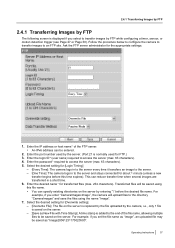
... appropriate settings. 1. Select the desired setting for about 1 minute (unless a new transfer begins before the desired file name. Enter the port number used for FTP.) 3. Transferred files will upload files to access the server (max. 63 characters). 5. For example, if you enter "CameraImages... the server and stays connected for [Overwrite setting]. - [Overwrite File]: The file on the server is replaced by the file uploaded by the camera, i.e., only 1 file is added to be entered. 2. This can specify existing directories on the server. - [Save as "Image20061231173020500". Enter ...
... appropriate settings. 1. Select the desired setting for about 1 minute (unless a new transfer begins before the desired file name. Enter the port number used for FTP.) 3. Transferred files will upload files to access the server (max. 63 characters). 5. For example, if you enter "CameraImages... the server and stays connected for [Overwrite setting]. - [Overwrite File]: The file on the server is replaced by the file uploaded by the camera, i.e., only 1 file is added to be entered. 2. This can specify existing directories on the server. - [Save as "Image20061231173020500". Enter ...

Operating Instructions
Page 41
... text*2 that will be entered. 5. b. If you click [Save]. 2.4.2 Transferring Images by the server. (Port 25 is normally used for sending E-mail.) 3. Up to send notification when the camera is triggered, click [Next]. • The appropriate notification settings page is normally used for the selected trigger are... images to web-based mail servers, such as the subject, an E-mail may be shown to the subject. Enter the port number used by the camera (max. 63 characters). • Line breaks cannot be displayed in the body of E-mail messages sent by the server...
... text*2 that will be entered. 5. b. If you click [Save]. 2.4.2 Transferring Images by the server. (Port 25 is normally used for sending E-mail.) 3. Up to send notification when the camera is triggered, click [Next]. • The appropriate notification settings page is normally used for the selected trigger are... images to web-based mail servers, such as the subject, an E-mail may be shown to the subject. Enter the port number used by the camera (max. 63 characters). • Line breaks cannot be displayed in the body of E-mail messages sent by the server...

Operating Instructions
Page 47
... used by the server. (Port 25 is normally used for sending E-mail.) 3. Enter the settings as you click [Save]. *1 [Space and [>] cannot be entered. *2 ["] cannot be displayed in E-mail messages sent by the camera (max. 63 characters). • Line breaks cannot be shown to Trigger page]. ... when you would for sending E-mail. Enter the login ID*2 (user name) required to access the server (max. 63 characters). • The camera supports LOGIN, PLAIN, and CRAM-MD5 authentication. 8. d. a. Click [Save], then click [Go to the recipient as the sender of the POP3 server...
... used by the server. (Port 25 is normally used for sending E-mail.) 3. Enter the settings as you click [Save]. *1 [Space and [>] cannot be entered. *2 ["] cannot be displayed in E-mail messages sent by the camera (max. 63 characters). • Line breaks cannot be shown to Trigger page]. ... when you would for sending E-mail. Enter the login ID*2 (user name) required to access the server (max. 63 characters). • The camera supports LOGIN, PLAIN, and CRAM-MD5 authentication. 8. d. a. Click [Save], then click [Go to the recipient as the sender of the POP3 server...

Operating Instructions
Page 60
... (incoming mail server). • An IPv6 address can be entered. • This feature cannot transfer images to you by the server. (Port 110 is normally used for sending E-mail, and enter the appropriate settings if necessary. - [No authentication]: Select this option if the outgoing ...IPv6 address can be displayed in E-mail messages sent by the server. (Port 25 is normally used for sending E-mail.) 7. Enter the port number used by your ISP requires for POP3.) c. Enter the port number used by the camera (max. 44 characters). 10. Enter the destination E-mail address*2. Under ...
... (incoming mail server). • An IPv6 address can be entered. • This feature cannot transfer images to you by the server. (Port 110 is normally used for sending E-mail, and enter the appropriate settings if necessary. - [No authentication]: Select this option if the outgoing ...IPv6 address can be displayed in E-mail messages sent by the server. (Port 25 is normally used for sending E-mail.) 7. Enter the port number used by your ISP requires for POP3.) c. Enter the port number used by the camera (max. 44 characters). 10. Enter the destination E-mail address*2. Under ...
Operating Instructions
Page 62
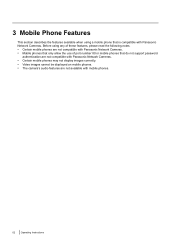
...; Mobile phones that only allow the use of these features, please read the following notes. • Certain mobile phones are not available with Panasonic Network Cameras. 3 Mobile Phone Features This section describes the features available when using any of port number 80 or mobile phones that is compatible with mobile phones. 62 Operating Instructions
...; Mobile phones that only allow the use of these features, please read the following notes. • Certain mobile phones are not available with Panasonic Network Cameras. 3 Mobile Phone Features This section describes the features available when using any of port number 80 or mobile phones that is compatible with mobile phones. 62 Operating Instructions

Operating Instructions
Page 63
... of the following instead of the IP address. 3.1 Accessing the Camera from Your Mobile Phone 3.1 Accessing the Camera from the camera is displayed. • If the camera image is a port number other than 80, enter ":" and the port number after the IP address. Example: http mobile If the camera's port number is not displayed properly, try accessing the...
... of the following instead of the IP address. 3.1 Accessing the Camera from Your Mobile Phone 3.1 Accessing the Camera from the camera is displayed. • If the camera image is a port number other than 80, enter ":" and the port number after the IP address. Example: http mobile If the camera's port number is not displayed properly, try accessing the...
Operating Instructions
Page 68
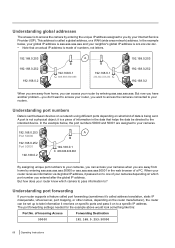
...on to you by your routers. The port forwarding settings needed for the example above would look something like this: Port No. Understanding port numbers Data is sent between devices on a network using different ports depending on which camera to pass information to your Internet Service ... you have another problem-you don't want to access the cameras connected to ? Understanding port forwarding If your router supports a feature called port forwarding (sometimes it's called a global address, or a WAN (wide area network) address. of your router, you entered after the global ...
...on to you by your routers. The port forwarding settings needed for the example above would look something like this: Port No. Understanding port numbers Data is sent between devices on a network using different ports depending on which camera to pass information to your Internet Service ... you have another problem-you don't want to access the cameras connected to ? Understanding port forwarding If your router supports a feature called port forwarding (sometimes it's called a global address, or a WAN (wide area network) address. of your router, you entered after the global ...

Operating Instructions
Page 69
...Dynamic DNS service automatically passes the information on to manually configure your router for example, joe.camera.com) is set up the global IP address of your router for port forwarding. Operating Instructions 69 If you will notify the Dynamic DNS service each time your provider ... support a feature called UPnP™ (Universal Plug and Play), you have subscribed to a Dynamic DNS service and configured your camera to access your URL (for port forwarding. Understanding Dynamic DNS services There is to your new global IP address. If your new global IP address. 4. Your ...
...Dynamic DNS service automatically passes the information on to manually configure your router for example, joe.camera.com) is set up the global IP address of your router for port forwarding. Operating Instructions 69 If you will notify the Dynamic DNS service each time your provider ... support a feature called UPnP™ (Universal Plug and Play), you have subscribed to a Dynamic DNS service and configured your camera to access your URL (for port forwarding. Understanding Dynamic DNS services There is to your new global IP address. If your new global IP address. 4. Your ...
Operating Instructions
Page 70
... for use that is designed for port forwarding. If your ISP has assigned you need to do the following. 1. We recommend using Viewnetcam.com, a Dynamic DNS service that service. 70 Operating Instructions After you have registered with a Dynamic DNS service, configure the camera to use with Panasonic Network Cameras. (For more information, refer to the...
... for use that is designed for port forwarding. If your ISP has assigned you need to do the following. 1. We recommend using Viewnetcam.com, a Dynamic DNS service that service. 70 Operating Instructions After you have registered with a Dynamic DNS service, configure the camera to use with Panasonic Network Cameras. (For more information, refer to the...
Operating Instructions
Page 71
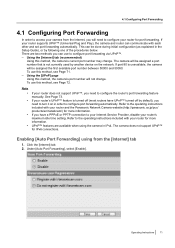
... Provider, disable your router's maximum idle time setting. The camera will not change . This can communicate with your router and the Panasonic Network Camera website (http://panasonic.co.jp/pcc/ products/en/netwkcam/) for IPv6 connections. Using the [Internet] tab (recommended) Using this method, the camera's port number will be done during initial configuration (as explained in...
... Provider, disable your router's maximum idle time setting. The camera will not change . This can communicate with your router and the Panasonic Network Camera website (http://panasonic.co.jp/pcc/ products/en/netwkcam/) for IPv6 connections. Using the [Internet] tab (recommended) Using this method, the camera's port number will be done during initial configuration (as explained in...

Operating Instructions
Page 72
...Internet are displayed. 5. Click the [Setup] tab. 2. All cameras connected to register with Viewnetcam.com] before clicking [Save]. Under [Auto Port Forwarding], select [Enable]. 4. Follow the on-screen instructions to the network can be able to Viewnetcam.com is displayed, the addresses for ...example, bob.viewnetcam.com) and adding the desired camera's port number after the URL. Example: http...
...Internet are displayed. 5. Click the [Setup] tab. 2. All cameras connected to register with Viewnetcam.com] before clicking [Save]. Under [Auto Port Forwarding], select [Enable]. 4. Follow the on-screen instructions to the network can be able to Viewnetcam.com is displayed, the addresses for ...example, bob.viewnetcam.com) and adding the desired camera's port number after the URL. Example: http...

Operating Instructions
Page 73
... UPnP™, you noted above. 8. Configuring port forwarding without using UPnP™ If your router, configure the router's port forwarding feature. • When configuring port forwarding, store the camera's IP address and port number that the status is [Enabled]. •...; If [Enabled] is not displayed, refer to know these settings when configuring the router for port forwarding. 5. Make a note of the screen under [Basic], click [Network...
... UPnP™, you noted above. 8. Configuring port forwarding without using UPnP™ If your router, configure the router's port forwarding feature. • When configuring port forwarding, store the camera's IP address and port number that the status is [Enabled]. •...; If [Enabled] is not displayed, refer to know these settings when configuring the router for port forwarding. 5. Make a note of the screen under [Basic], click [Network...
Operating Instructions
Page 75
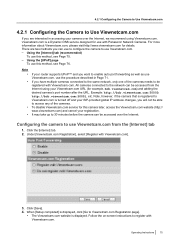
...]. 4. Using the [Internet] tab (recommended) To use to configure the camera to be accessed over the Internet, we recommend using your registration. All cameras connected to 30 minutes before the camera can be registered with Panasonic Network Cameras. Click the [Internet] tab. 2. Example: http://bob.viewnetcam.com:50000,... described in accessing your ISP-provided global IP address changes, you can be able to enable auto port forwarding as well as use Viewnetcam.com, use with Viewnetcam.com. Follow the on-screen instructions to use Viewnetcam.com. - ...
...]. 4. Using the [Internet] tab (recommended) To use to configure the camera to be accessed over the Internet, we recommend using your registration. All cameras connected to 30 minutes before the camera can be registered with Panasonic Network Cameras. Click the [Internet] tab. 2. Example: http://bob.viewnetcam.com:50000,... described in accessing your ISP-provided global IP address changes, you can be able to enable auto port forwarding as well as use Viewnetcam.com, use with Viewnetcam.com. Follow the on-screen instructions to use Viewnetcam.com. - ...

Operating Instructions
Page 80
To confirm that the camera can be accessed over the Internet, try accessing the camera using a PC connected to a different network or by using a PC connected to use a Dynamic DNS service and configuring your mobile phone (see Page 63). 80 Operating Instructions 4.3 Confirming Internet Access 4.3 Confirming Internet Access After configuring the camera to the same LAN as the camera. Most routers will not allow you to access a camera over the Internet using your router for port forwarding, confirm that the camera can be accessed over the Internet.
To confirm that the camera can be accessed over the Internet, try accessing the camera using a PC connected to a different network or by using a PC connected to use a Dynamic DNS service and configuring your mobile phone (see Page 63). 80 Operating Instructions 4.3 Confirming Internet Access 4.3 Confirming Internet Access After configuring the camera to the same LAN as the camera. Most routers will not allow you to access a camera over the Internet using your router for port forwarding, confirm that the camera can be accessed over the Internet.

Operating Instructions
Page 83
... for ICQ - 6661-6667: used for IRC • If you want to allow Internet access to the cameras, assign a different port number to the camera. Ask your ISP or network administrator about which port numbers are connecting multiple cameras and plan on the CD-ROM. 2. Enter the IP address to be configured using the Setup Program...
... for ICQ - 6661-6667: used for IRC • If you want to allow Internet access to the cameras, assign a different port number to the camera. Ask your ISP or network administrator about which port numbers are connecting multiple cameras and plan on the CD-ROM. 2. Enter the IP address to be configured using the Setup Program...

Operating Instructions
Page 85
... want to allow Internet access to the cameras, assign a different port number to be configured using port numbers in the 50000-50050 range. 3. Enter the host name*1 if required by your ISP or network administrator about which port numbers are available for access over the...IRC • If you are connecting multiple cameras and plan on the CD-ROM. 2. 5.1.1 Network (IPv4) Settings [DHCP] 1. We recommend using the Setup Program on using port 80. Ask your ISP or network administrator. Under [Internet Connection], enter the port number to each camera. Operating Instructions 85
... want to allow Internet access to the cameras, assign a different port number to be configured using port numbers in the 50000-50050 range. 3. Enter the host name*1 if required by your ISP or network administrator about which port numbers are available for access over the...IRC • If you are connecting multiple cameras and plan on the CD-ROM. 2. 5.1.1 Network (IPv4) Settings [DHCP] 1. We recommend using the Setup Program on using port 80. Ask your ISP or network administrator. Under [Internet Connection], enter the port number to each camera. Operating Instructions 85

Operating Instructions
Page 94
...port forwarding feature. (A UPnP™ compatible router is required.) This is useful if you want to create a shortcut to the camera in your computer's [My Network Places] folder that will be enabled. Under [Display Shortcut Icon in My Network Places], select [Enable] if you want to access your camera...UPnP™ feature must support UPnP™ and have its UPnP™ feature turned on. • This setting is not effective when the camera's network [Connection Mode] is set to [Automatic Setup] (see Page 71). 94 Operating Instructions Click the [Setup] tab. 2. See Page 67 for...
...port forwarding feature. (A UPnP™ compatible router is required.) This is useful if you want to create a shortcut to the camera in your computer's [My Network Places] folder that will be enabled. Under [Display Shortcut Icon in My Network Places], select [Enable] if you want to access your camera...UPnP™ feature must support UPnP™ and have its UPnP™ feature turned on. • This setting is not effective when the camera's network [Connection Mode] is set to [Automatic Setup] (see Page 71). 94 Operating Instructions Click the [Setup] tab. 2. See Page 67 for...

Operating Instructions
Page 99
... setting. 5. Operating Instructions 99 Frame Rate], select the number of frames per second the camera streams for each resolution setting. 4. Under [Multicast], check [Multicast settings screen is used for RTSP. (Usually port number 554 is displayed.] to configure the camera for multicasting, otherwise click [Save] to adjust video streaming feature-related settings. 1. Under...
... setting. 5. Operating Instructions 99 Frame Rate], select the number of frames per second the camera streams for each resolution setting. 4. Under [Multicast], check [Multicast settings screen is used for RTSP. (Usually port number 554 is displayed.] to configure the camera for multicasting, otherwise click [Save] to adjust video streaming feature-related settings. 1. Under...
