Operating Instructions
Page 4
... this documentation • This manual is written for "Universal Plug and Play". • The Network Camera is referred to as "the camera" in this document. • The Setup CD-ROM is referred to as "the CD-ROM" in this document depict the BL-C131A. Available features and operations vary slightly depending on the front of their respective owners...
... this documentation • This manual is written for "Universal Plug and Play". • The Network Camera is referred to as "the camera" in this document. • The Setup CD-ROM is referred to as "the CD-ROM" in this document depict the BL-C131A. Available features and operations vary slightly depending on the front of their respective owners...
Operating Instructions
Page 82
....] message is displayed, click [Restart]. The current network settings can leave this setting at [Auto Negotiation]. • BL-C131A only: If using the camera in this section. - [Automatic Setup]: Allows the camera to use the Setup Program on the CD-ROM to specify your network settings (if necessary), after which the camera obtains an IP address automatically from the DHCP...
....] message is displayed, click [Restart]. The current network settings can leave this setting at [Auto Negotiation]. • BL-C131A only: If using the camera in this section. - [Automatic Setup]: Allows the camera to use the Setup Program on the CD-ROM to specify your network settings (if necessary), after which the camera obtains an IP address automatically from the DHCP...

Operating Instructions
Page 83
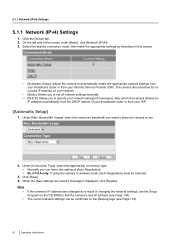
... number to be assigned to be assigned to each camera. 5.1.1 Network (IPv4) Settings [Static] 1. Operating Instructions 83 Under [Network Configuration from Setup Program], select whether or not you are connecting multiple cameras and plan on the CD-ROM. 2. Enter the IP address to be configured using the Setup Program on using port forwarding to allow access from...
... number to be assigned to be assigned to each camera. 5.1.1 Network (IPv4) Settings [Static] 1. Operating Instructions 83 Under [Network Configuration from Setup Program], select whether or not you are connecting multiple cameras and plan on the CD-ROM. 2. Enter the IP address to be configured using the Setup Program on using port forwarding to allow access from...

Operating Instructions
Page 85
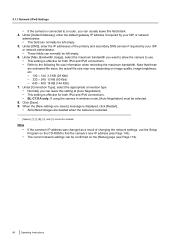
We recommend using port forwarding to allow access from Setup Program], select whether or not you are connecting multiple cameras and plan on the CD-ROM. 2. Enter the host name*1 if required by your ISP or network administrator about which port numbers are available for access over the ... number is 80, however, note that some ISPs do not allow Internet access to the cameras, assign a different port number to each camera. Under [Network Configuration from the Internet using the Setup Program on using port numbers in the 50000-50050 range. 3. Under [Internet Connection], enter...
We recommend using port forwarding to allow access from Setup Program], select whether or not you are connecting multiple cameras and plan on the CD-ROM. 2. Enter the host name*1 if required by your ISP or network administrator about which port numbers are available for access over the ... number is 80, however, note that some ISPs do not allow Internet access to the cameras, assign a different port number to each camera. Under [Network Configuration from the Internet using the Setup Program on using port numbers in the 50000-50050 range. 3. Under [Internet Connection], enter...
Operating Instructions
Page 86
..., you want to allow the camera to use the Setup Program on the CD-ROM to find the camera's new IP address (see Page 119). 86 Operating Instructions Under [Default Gateway], enter the default gateway IP address if required by your ISP or network administrator. • This field ...can usually leave this setting at [Auto Negotiation]. • This setting is effective for both IPv4 and IPv6 connections. • BL-C131A only: If using the camera in wireless mode, [Auto Negotiation] must be entered...
..., you want to allow the camera to use the Setup Program on the CD-ROM to find the camera's new IP address (see Page 119). 86 Operating Instructions Under [Default Gateway], enter the default gateway IP address if required by your ISP or network administrator. • This field ...can usually leave this setting at [Auto Negotiation]. • This setting is effective for both IPv4 and IPv6 connections. • BL-C131A only: If using the camera in wireless mode, [Auto Negotiation] must be entered...
Operating Instructions
Page 143
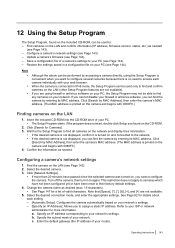
... of your PC (see Page 144). Insert the included CD-ROM into the CD-ROM drive of a camera's settings to your PC. • The Setup Program starts. Click [Search for details about each camera individually with 0080F0.) 4. Click [Network Settings]. • If more information. Refer to your...to your PC (see Page 144). - 12 Using the Setup Program The Setup Program, found on the LAN 1. When the camera is printed on the camera and begins with 0080F0.) Finding cameras on the CD-ROM. 2. b. Configure a camera's network settings (see Page 143). 2. Click [Search by MAC ...
... of your PC (see Page 144). Insert the included CD-ROM into the CD-ROM drive of a camera's settings to your PC. • The Setup Program starts. Click [Search for details about each camera individually with 0080F0.) 4. Click [Network Settings]. • If more information. Refer to your...to your PC (see Page 144). - 12 Using the Setup Program The Setup Program, found on the LAN 1. When the camera is printed on the camera and begins with 0080F0.) Finding cameras on the CD-ROM. 2. b. Configure a camera's network settings (see Page 143). 2. Click [Search by MAC ...
Operating Instructions
Page 144
... you to specify a location to your PC. • The Setup Program starts. Restoring settings from the Panasonic Network Camera website and click [Open]. 5. Enter the IP address of the DNS server(s). Refer to save the file, then click [Save]. 6. Insert the included CD-ROM into the CD-ROM drive of the firmware file. 4. A dialog prompts you...
... you to specify a location to your PC. • The Setup Program starts. Restoring settings from the Panasonic Network Camera website and click [Open]. 5. Enter the IP address of the DNS server(s). Refer to save the file, then click [Save]. 6. Insert the included CD-ROM into the CD-ROM drive of the firmware file. 4. A dialog prompts you...
Installation Guide
Page 1
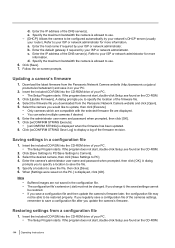
...20AFJ Used for both the BL-C111A (Wired Type) and BL-C131A (Wireless/Wired Type). PQME10080Z Used to the power outlet. Panasonic Network Camera Website: http://www.panasonic.com/netcam for customers in the USA and Puerto Rico BL-C111A Model No. (Wired Type) BL-C131A (Wireless/Wired Type) ...is referred to the wall. All steps are included in this document. • The Setup CD-ROM is the abbreviation for future reference. Setup Setting up the camera so that it . This involves configuring the camera so that it can confirm the model no . PQLV206Y Screw A (2 pcs.) Order...
...20AFJ Used for both the BL-C111A (Wired Type) and BL-C131A (Wireless/Wired Type). PQME10080Z Used to the power outlet. Panasonic Network Camera Website: http://www.panasonic.com/netcam for customers in the USA and Puerto Rico BL-C111A Model No. (Wired Type) BL-C131A (Wireless/Wired Type) ...is referred to the wall. All steps are included in this document. • The Setup CD-ROM is the abbreviation for future reference. Setup Setting up the camera so that it . This involves configuring the camera so that it can confirm the model no . PQLV206Y Screw A (2 pcs.) Order...
Installation Guide
Page 2
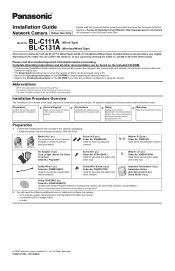
...in the included Setup Guide. • If the indicator does not turn green, see 1.2 Camera Indicator Issues in the Troubleshooting Guide on the bottom of BL-C131A Router 4 Plug the AC adaptor into the power outlet. • The lens will pan and tilt when the camera is normal.... included CD-ROM. 2 WIRELESS/WIRED switch 1 BL-C131A only: Confirm that the indicator lights green after about the PRIVACY button. Continue by default.) Refer to the operating instructions included with your router and can be near the camera and easily accessible. • Use only specified Panasonic AC ...
...in the included Setup Guide. • If the indicator does not turn green, see 1.2 Camera Indicator Issues in the Troubleshooting Guide on the bottom of BL-C131A Router 4 Plug the AC adaptor into the power outlet. • The lens will pan and tilt when the camera is normal.... included CD-ROM. 2 WIRELESS/WIRED switch 1 BL-C131A only: Confirm that the indicator lights green after about the PRIVACY button. Continue by default.) Refer to the operating instructions included with your router and can be near the camera and easily accessible. • Use only specified Panasonic AC ...
Installation Guide
Page 3
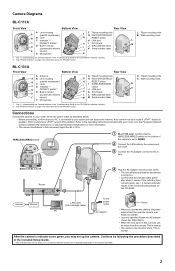
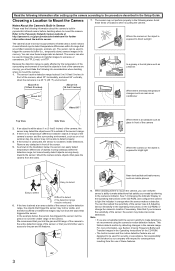
...camera, you are not designed to the pan and tilt features. 30° 8. You can be used to trigger the camera...CD-ROM) or change the camera's location if necessary. If the lens is no temperature difference between objects in range of the camera...camera images in its range that trigger the sensor may not be visible, and therefore buffered or transferred images may not perform properly in a 20 °C (68 °F) environment. See 7.4 Changing the Indicator Display in the Setup... infrared sensor before deciding where to the Panasonic Network Camera website at an area outside of the...
...camera, you are not designed to the pan and tilt features. 30° 8. You can be used to trigger the camera...CD-ROM) or change the camera's location if necessary. If the lens is no temperature difference between objects in range of the camera...camera images in its range that trigger the sensor may not be visible, and therefore buffered or transferred images may not perform properly in a 20 °C (68 °F) environment. See 7.4 Changing the Indicator Display in the Setup... infrared sensor before deciding where to the Panasonic Network Camera website at an area outside of the...


