Operating Instructions
Page 71
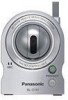
... feature is turned off (most routers have a PPPoE or PPTP connection to your Internet Service Provider, disable your router and the Panasonic Network Camera website (http://panasonic.co.jp/pcc/ products/en/netwkcam/) for more information. UPnP™ features are two methods you can use this method, see... See Page 73. If your router does not support UPnP™, you need to turn it on the network. Enabling [Auto Port Forwarding] using the camera in the Setup Guide), or by following one of the procedures below. There are available when using from the Internet, you have...
... feature is turned off (most routers have a PPPoE or PPTP connection to your Internet Service Provider, disable your router and the Panasonic Network Camera website (http://panasonic.co.jp/pcc/ products/en/netwkcam/) for more information. UPnP™ features are two methods you can use this method, see... See Page 73. If your router does not support UPnP™, you need to turn it on the network. Enabling [Auto Port Forwarding] using the camera in the Setup Guide), or by following one of the procedures below. There are available when using from the Internet, you have...

Operating Instructions
Page 73
...] is not displayed, refer to the UPnP™ related items in 1.3 Camera Setup Issues and 1.5 Camera Access Issues in the Troubleshooting Guide. On the left side of the screen under [Basic], click [Network (IPv4)]. 3. Click [Save]. 6. Under [Connection Mode], click [Static]. 4. Register the camera to know these settings when configuring the router for port forwarding. 5. Click...
...] is not displayed, refer to the UPnP™ related items in 1.3 Camera Setup Issues and 1.5 Camera Access Issues in the Troubleshooting Guide. On the left side of the screen under [Basic], click [Network (IPv4)]. 3. Click [Save]. 6. Under [Connection Mode], click [Static]. 4. Register the camera to know these settings when configuring the router for port forwarding. 5. Click...

Operating Instructions
Page 81
... to change these settings. After changing network settings and clicking [Save], the camera must log in to the camera as explained in the Setup Guide. You can change these settings later if necessary using the procedures described in this section. 5.1 Network Settings 5 Changing Camera Settings 5.1 Network Settings The camera's network settings are deleted when the camera is restarted. Note • •...
... to change these settings. After changing network settings and clicking [Save], the camera must log in to the camera as explained in the Setup Guide. You can change these settings later if necessary using the procedures described in this section. 5.1 Network Settings 5 Changing Camera Settings 5.1 Network Settings The camera's network settings are deleted when the camera is restarted. Note • •...

Operating Instructions
Page 88
Refer to the camera. c. Configure the camera for wired connection. In order to use the camera wirelessly, you have not done this case, there is no need to connect a LAN cable to the included Installation Guide and Setup Guide if you must: a. Configure the camera's wireless settings (see Page 93). 88 Operating Instructions Restart the camera in Wireless Mode (BL-C131A Only) The BL-C131A can be used wirelessly. b. In this . 5.2 Using the Camera in Wireless Mode (BL-C131A Only) 5.2 Using the Camera in wireless mode (see Page 89).
Refer to the camera. c. Configure the camera for wired connection. In order to use the camera wirelessly, you have not done this case, there is no need to connect a LAN cable to the included Installation Guide and Setup Guide if you must: a. Configure the camera's wireless settings (see Page 93). 88 Operating Instructions Restart the camera in Wireless Mode (BL-C131A Only) The BL-C131A can be used wirelessly. b. In this . 5.2 Using the Camera in Wireless Mode (BL-C131A Only) 5.2 Using the Camera in wireless mode (see Page 89).
Operating Instructions
Page 117
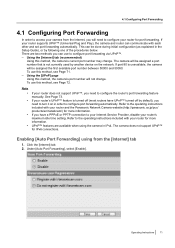
...the screen under [Advanced], click [Indicator Control]. 3. Operating Instructions 117 Always off during normal operation - On (orange) only when the camera's built-in sensor is being triggered This setting is being accessed, however you to a more appropriate location if necessary. - Select the... any color other than green, refer to 1.2 Camera Indicator Issues in sensor has been triggered, allowing you can be used to mount the camera, because the indicator will indicate when the built-in the Troubleshooting Guide. Click the [Setup] tab. 2. 7.4 Changing the Indicator Display 7.4...
...the screen under [Advanced], click [Indicator Control]. 3. Operating Instructions 117 Always off during normal operation - On (orange) only when the camera's built-in sensor is being triggered This setting is being accessed, however you to a more appropriate location if necessary. - Select the... any color other than green, refer to 1.2 Camera Indicator Issues in sensor has been triggered, allowing you can be used to mount the camera, because the indicator will indicate when the built-in the Troubleshooting Guide. Click the [Setup] tab. 2. 7.4 Changing the Indicator Display 7.4...

Operating Instructions
Page 127
..., IP address, subnet mask etc.) The network connection mode changes to AM/PM mode. Operating Instructions 127 When the camera is safe to turn off for a list of the camera's default settings. All buffered images - Reconfigure the camera by referring to their factory default settings. ...the Camera 8.9 Resetting the Camera You can reset all of the camera's settings to the [Setup Guide]. Change the setting if necessary (see Page 95). All alarm logs - On the left side of the screen under [Maintenance], click [Reset To Factory Default]. 3. When the lens finishes panning ...
..., IP address, subnet mask etc.) The network connection mode changes to AM/PM mode. Operating Instructions 127 When the camera is safe to turn off for a list of the camera's default settings. All buffered images - Reconfigure the camera by referring to their factory default settings. ...the Camera 8.9 Resetting the Camera You can reset all of the camera's settings to the [Setup Guide]. Change the setting if necessary (see Page 95). All alarm logs - On the left side of the screen under [Maintenance], click [Reset To Factory Default]. 3. When the lens finishes panning ...
Installation Guide
Page 1
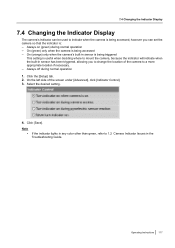
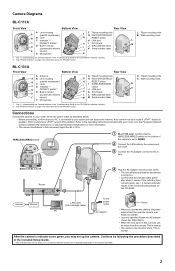
... Model No. (Wired Type) BL-C131A (Wireless/Wired Type) This manual is referred to as "the camera" in the included Setup Guide). PQQX15707ZA KK1106MH0 Installation Procedure Overview The following additional items to install and setup the camera. Important Information (1 pc.) Installation Guide (this document) (1 pc.) Setup Guide (1 pc.) Setup CD-ROM (1 pc.) Order No. Panasonic Network Camera Website: http://www.panasonic.com/netcam for customers...
... Model No. (Wired Type) BL-C131A (Wireless/Wired Type) This manual is referred to as "the camera" in the included Setup Guide). PQQX15707ZA KK1106MH0 Installation Procedure Overview The following additional items to install and setup the camera. Important Information (1 pc.) Installation Guide (this document) (1 pc.) Setup Guide (1 pc.) Setup CD-ROM (1 pc.) Order No. Panasonic Network Camera Website: http://www.panasonic.com/netcam for customers...
Installation Guide
Page 2
... your router or to the Panasonic Network Camera website (http://panasonic.co.jp/pcc/products/en/netwkcam/) for more information. • The camera illustrations in this document depict the BL-C131A. This is normal. This is normal. • The camera may set to WIRED. ...BL-C131A Router 4 Plug the AC adaptor into the power outlet. • The lens will pan and tilt when the camera is turned on. • Confirm that the WIRELESS/WIRED switch on the bottom of the camera is enabled. (Most routers have UPnP™ turned off by following the procedure described in the included Setup Guide...
... your router or to the Panasonic Network Camera website (http://panasonic.co.jp/pcc/products/en/netwkcam/) for more information. • The camera illustrations in this document depict the BL-C131A. This is normal. This is normal. • The camera may set to WIRED. ...BL-C131A Router 4 Plug the AC adaptor into the power outlet. • The lens will pan and tilt when the camera is turned on. • Confirm that the WIRELESS/WIRED switch on the bottom of the camera is enabled. (Most routers have UPnP™ turned off by following the procedure described in the included Setup Guide...
Installation Guide
Page 3
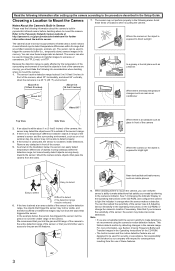
...hot summer day, the sensor may not be used for further information about the camera's built-in sensor. 7. Note • If you limit other user's access to the pan and tilt features. 30° 8. For more information, see 2.8 Adjusting Sensor ...camera. 1. Refer to the Panasonic Network Camera website at an area outside of the camera Where the camera or the object is a pyroelectric infrared sensor, which means it is not able to make inaccurate detections. No responsibility will be used to trigger the camera to buffer (i.e., temporarily store) camera images in the Setup Guide...
...hot summer day, the sensor may not be used for further information about the camera's built-in sensor. 7. Note • If you limit other user's access to the pan and tilt features. 30° 8. For more information, see 2.8 Adjusting Sensor ...camera. 1. Refer to the Panasonic Network Camera website at an area outside of the camera Where the camera or the object is a pyroelectric infrared sensor, which means it is not able to make inaccurate detections. No responsibility will be used to trigger the camera to buffer (i.e., temporarily store) camera images in the Setup Guide...


