Installation Guide
Page 3
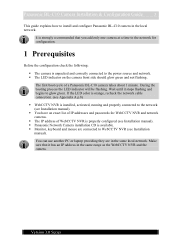
... is unpacked and correctly connected to the power source and network. It is properly configured (see Installation manual). You have an exact list of a Panasonic BL-C10 camera takes about 1 minute. The IP address of WebCCTV NVR is strongly recommended that it stops flashing and begins to glow green. Monitor, keyboard ...process the LED indicator will be flashing. If the LED color is orange, recheck the network cable connection. (see Appendix A p.8) WebCCTV NVR is available. Panasonic BL-C10 Camera Installation & Configuration Guide 3 This guide explains how to install and configure...
... is unpacked and correctly connected to the power source and network. It is properly configured (see Installation manual). You have an exact list of a Panasonic BL-C10 camera takes about 1 minute. The IP address of WebCCTV NVR is strongly recommended that it stops flashing and begins to glow green. Monitor, keyboard ...process the LED indicator will be flashing. If the LED color is orange, recheck the network cable connection. (see Appendix A p.8) WebCCTV NVR is available. Panasonic BL-C10 Camera Installation & Configuration Guide 3 This guide explains how to install and configure...
Installation Guide
Page 4
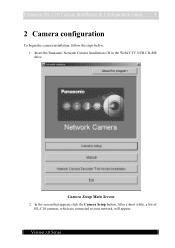
After a short while, a list of BL-C10 cameras, which are connected to your network, will appear. In the screen that appears click the Camera Setup button. Camera Setup Main Screen 2. Panasonic BL-C10 Camera Installation & Configuration Guide 4 2 Camera configuration To begin the camera installation, follow the steps below: 1. Insert the Panasonic Network Camera installation CD in the WebCCTV NVR CD-RW drive. Version 3.0 Series
After a short while, a list of BL-C10 cameras, which are connected to your network, will appear. In the screen that appears click the Camera Setup button. Camera Setup Main Screen 2. Panasonic BL-C10 Camera Installation & Configuration Guide 4 2 Camera configuration To begin the camera installation, follow the steps below: 1. Insert the Panasonic Network Camera installation CD in the WebCCTV NVR CD-RW drive. Version 3.0 Series
Installation Guide
Page 5
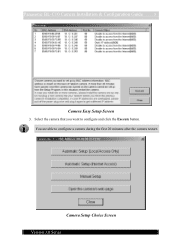
Panasonic BL-C10 Camera Installation & Configuration Guide 5 Camera Easy Setup Screen 3. You are able to configure and click the Execute button. Camera Setup Choice Screen Version 3.0 Series Select the camera that you want to configure a camera during the first 20 minutes after the camera restart.
Panasonic BL-C10 Camera Installation & Configuration Guide 5 Camera Easy Setup Screen 3. You are able to configure and click the Execute button. Camera Setup Choice Screen Version 3.0 Series Select the camera that you want to configure a camera during the first 20 minutes after the camera restart.

Installation Guide
Page 6
... get to the camera web page. 8. Click Next to the camera. Manual Setup is necessary to assign a static IP address to enter the advanced setup. Panasonic BL-C10 Camera Installation & Configuration Guide 6 4. In the window that informs you about setup completion. Specify the correct IP address and subnet mask and click OK. 6. As...
... get to the camera web page. 8. Click Next to the camera. Manual Setup is necessary to assign a static IP address to enter the advanced setup. Panasonic BL-C10 Camera Installation & Configuration Guide 6 4. In the window that informs you about setup completion. Specify the correct IP address and subnet mask and click OK. 6. As...
Installation Guide
Page 7
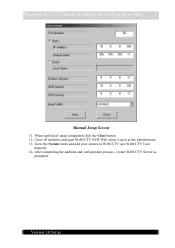
Log in as prompted. Version 3.0 Series restart WebCCTV Server as the administrator. 13. Go to the System menu and add your camera to WebCCTV (see WebCCTV User manual). 14. When notified of setup completion click the Close button. 12. After completing the addition and configuration process - Panasonic BL-C10 Camera Installation & Configuration Guide 7 Manual Setup Screen 11. Close all windows and open WebCCTV NVR Web client.
Log in as prompted. Version 3.0 Series restart WebCCTV Server as the administrator. 13. Go to the System menu and add your camera to WebCCTV (see WebCCTV User manual). 14. When notified of setup completion click the Close button. 12. After completing the addition and configuration process - Panasonic BL-C10 Camera Installation & Configuration Guide 7 Manual Setup Screen 11. Close all windows and open WebCCTV NVR Web client.
Installation Guide
Page 8
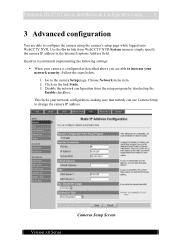
... the link Static. 3. Disable the network configuration from WebCCTV NVR System menu or simply specify the camera IP address in the Internet Explorer Address field. Panasonic BL-C10 Camera Installation & Configuration Guide 8 3 Advanced configuration You are able to increase your network security.
... the link Static. 3. Disable the network configuration from WebCCTV NVR System menu or simply specify the camera IP address in the Internet Explorer Address field. Panasonic BL-C10 Camera Installation & Configuration Guide 8 3 Advanced configuration You are able to increase your network security.
Installation Guide
Page 9
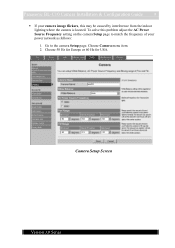
Choose 50 Hz for Europe or 60 Hz for USA. Go to match the frequency of your power network as follows: 1. Camera Setup Screen Version 3.0 Series To solve this may be caused by interference from the indoor lighting where the camera is located. Choose Camera menu item. 2. Panasonic BL-C10 Camera Installation & Configuration Guide 9 If your camera image flickers, this problem adjust the AC Power Source Frequency setting on the camera Setup page to the camera Setup page.
Choose 50 Hz for Europe or 60 Hz for USA. Go to match the frequency of your power network as follows: 1. Camera Setup Screen Version 3.0 Series To solve this may be caused by interference from the indoor lighting where the camera is located. Choose Camera menu item. 2. Panasonic BL-C10 Camera Installation & Configuration Guide 9 If your camera image flickers, this problem adjust the AC Power Source Frequency setting on the camera Setup page to the camera Setup page.
Installation Guide
Page 10
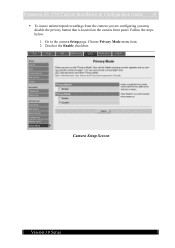
Camera Setup Screen Version 3.0 Series Go to the camera Setup page. Follow the steps below: 1. Deselect the Enable checkbox. Choose Privacy Mode menu item. 2. Panasonic BL-C10 Camera Installation & Configuration Guide 10 To insure uninterrupted recordings from the camera you are configuring you may disable the privacy button that is located on the camera front panel.
Camera Setup Screen Version 3.0 Series Go to the camera Setup page. Follow the steps below: 1. Deselect the Enable checkbox. Choose Privacy Mode menu item. 2. Panasonic BL-C10 Camera Installation & Configuration Guide 10 To insure uninterrupted recordings from the camera you are configuring you may disable the privacy button that is located on the camera front panel.
Installation Guide
Page 11
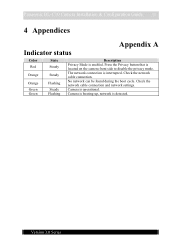
... can be found during the boot cycle. Version 3.0 Series Camera is detected. Check the network cable connection and network settings. The network connection is enabled. Panasonic BL-C10 Camera Installation & Configuration Guide 11 4 Appendices Appendix A Indicator status Color Red Orange Orange Green Green State Steady Steady Flashing Steady Flashing Description Privacy Mode is...
... can be found during the boot cycle. Version 3.0 Series Camera is detected. Check the network cable connection and network settings. The network connection is enabled. Panasonic BL-C10 Camera Installation & Configuration Guide 11 4 Appendices Appendix A Indicator status Color Red Orange Orange Green Green State Steady Steady Flashing Steady Flashing Description Privacy Mode is...

