

Pro-line Network Cam
Page 1
Panasonic Network Camera Website: http://www.panasonic.com/netcam for future reference. BB-HCM381A (AC Adaptor Type) BB-HCE481A (PoE Type) Please read this manual before using, and save this manual for customers in the USA or Puerto Rico Operating Instructions Network Camera Indoor Use Only Model No.
Panasonic Network Camera Website: http://www.panasonic.com/netcam for future reference. BB-HCM381A (AC Adaptor Type) BB-HCE481A (PoE Type) Please read this manual before using, and save this manual for customers in the USA or Puerto Rico Operating Instructions Network Camera Indoor Use Only Model No.
Pro-line Network Cam
Page 2
IPv6*1 Network Camera Your Panasonic Network Camera supports IPv6 (Internet Protocol Version 6). IPv6 was created to address the additional IP addresses that under certain circumstances, audio/video recording may be powered up . *4 The speaker connected to your Network Camera and PC. The Talk... using an Ethernet cable without the AC adaptor. Read this manual carefully and use the Network Camera properly. By connecting a user-supplied microphone and speaker*4 to both BB-HCM381A (AC Adaptor Type) and BB-HCE481A (PoE Type). Audio 2-way Communication*3 (Walkie-talkie Type...
IPv6*1 Network Camera Your Panasonic Network Camera supports IPv6 (Internet Protocol Version 6). IPv6 was created to address the additional IP addresses that under certain circumstances, audio/video recording may be powered up . *4 The speaker connected to your Network Camera and PC. The Talk... using an Ethernet cable without the AC adaptor. Read this manual carefully and use the Network Camera properly. By connecting a user-supplied microphone and speaker*4 to both BB-HCM381A (AC Adaptor Type) and BB-HCE481A (PoE Type). Audio 2-way Communication*3 (Walkie-talkie Type...

Pro-line Network Cam
Page 3
... record about 58,000 images (320 x 240 resolution and standard quality) for about 41 days. *1 The camera supports 2 GB, 1 GB, 512 MB, 256 MB, 128 MB or 64 MB Panasonic SD memory card (customer-provided). 3 If you can move the lens horizontally from -175° to +...control external devices (Open or Short to easily and quickly monitor the camera. Video Output Network Camera has an analog composite output terminal. If you enable alarm buffer/transfer, you with detailed and distinct images. Automatic and Manual Focusing features provide you can monitor live video (Motion JPEG) that ...
... record about 58,000 images (320 x 240 resolution and standard quality) for about 41 days. *1 The camera supports 2 GB, 1 GB, 512 MB, 256 MB, 128 MB or 64 MB Panasonic SD memory card (customer-provided). 3 If you can move the lens horizontally from -175° to +...control external devices (Open or Short to easily and quickly monitor the camera. Video Output Network Camera has an analog composite output terminal. If you enable alarm buffer/transfer, you with detailed and distinct images. Automatic and Manual Focusing features provide you can monitor live video (Motion JPEG) that ...
Pro-line Network Cam
Page 4
... based in Simplified Chinese, English or Japanese. Abbreviations • UPnP is the abbreviation for Universal Plug and Play. • "Network Camera" is called "Camera" in this manual. DynamicDNS Service Support DynamicDNS service allows you to 4 cameras, while supporting audio 2-way communication with each. The Setup, Maintenance and Support pages are either registered trademarks or trademarks...
... based in Simplified Chinese, English or Japanese. Abbreviations • UPnP is the abbreviation for Universal Plug and Play. • "Network Camera" is called "Camera" in this manual. DynamicDNS Service Support DynamicDNS service allows you to 4 cameras, while supporting audio 2-way communication with each. The Setup, Maintenance and Support pages are either registered trademarks or trademarks...

Pro-line Network Cam
Page 5
Operating Instructions Table of Contents 1 Camera Monitoring 8 1.1 1.1.1 1.1.2 1.1.3 1.2 1.2.1 1.2.2 1.2.3 1.3 BB-HCM381A Feature Locations 8 Front View 8 Rear View 9 Bottom View 9 BB-HCE481A Feature Locations 10 Front View 10 Rear View 11 Bottom View 11 How to Turn on the Camera 12 1.4 1.4.1 1.5 1.5.1 1.5.2 1.5.3 1.5.4 1.5.5 1.5.6 1.5.7 1.6 Accessing the Camera 13 To Access the Camera in IPv6 15 Viewing the Single Camera page 17 Displaying the Banner 20...
Operating Instructions Table of Contents 1 Camera Monitoring 8 1.1 1.1.1 1.1.2 1.1.3 1.2 1.2.1 1.2.2 1.2.3 1.3 BB-HCM381A Feature Locations 8 Front View 8 Rear View 9 Bottom View 9 BB-HCE481A Feature Locations 10 Front View 10 Rear View 11 Bottom View 11 How to Turn on the Camera 12 1.4 1.4.1 1.5 1.5.1 1.5.2 1.5.3 1.5.4 1.5.5 1.5.6 1.5.7 1.6 Accessing the Camera 13 To Access the Camera in IPv6 15 Viewing the Single Camera page 17 Displaying the Banner 20...

Pro-line Network Cam
Page 25
... moves the lens Up, Down, Right, Left, and the home position button moves it to stop scanning. If you accidentally pan or tilt the camera manually, restart the camera. 25 Pan/Tilt Operation The pan scan and tilt scan buttons automatically move the lens horizontally from -175° to +175° and vertically... from -120° to 0° in mounting on the table and from 0° to +90° in mounting on , do not manually pan or tilt the camera. Doing so may damage the Pan/Tilt operation, or cause the Preset buttons to pan or tilt the...
... moves the lens Up, Down, Right, Left, and the home position button moves it to stop scanning. If you accidentally pan or tilt the camera manually, restart the camera. 25 Pan/Tilt Operation The pan scan and tilt scan buttons automatically move the lens horizontally from -175° to +175° and vertically... from -120° to 0° in mounting on the table and from 0° to +90° in mounting on , do not manually pan or tilt the camera. Doing so may damage the Pan/Tilt operation, or cause the Preset buttons to pan or tilt the...

Pro-line Network Cam
Page 28
...pressing Near or Far button. When the objects are difficult to focus on, or may not focus on objects. Manual focusing starts by auto focusing. Network Camera has Automatic and Manual Focusing features. AF (Automatic Focus) button automatically allows the lens to "Macro" (page 80). 28 Near button ...to view, set the Automatic Focus Range setting to "Normal" (page 80). • When positioning the camera within 1 m (3 feet 3 inches) of focus, adjust the focus using manual focusing, or change the objects using Pan/Tilt operation or Zooming features. Press the AF button and put it...
...pressing Near or Far button. When the objects are difficult to focus on, or may not focus on objects. Manual focusing starts by auto focusing. Network Camera has Automatic and Manual Focusing features. AF (Automatic Focus) button automatically allows the lens to "Macro" (page 80). 28 Near button ...to view, set the Automatic Focus Range setting to "Normal" (page 80). • When positioning the camera within 1 m (3 feet 3 inches) of focus, adjust the focus using manual focusing, or change the objects using Pan/Tilt operation or Zooming features. Press the AF button and put it...
Pro-line Network Cam
Page 67
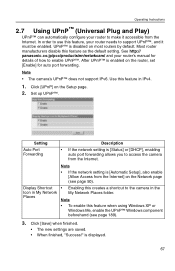
...] on the Network page (see page 189). 3. UPnP™ is [Status] or [DHCP], enabling auto port forwarding allows you to access the camera from the Internet] on the Setup page. 2. Use this creates a shortcut to enable UPnP™. See http:// panasonic.co.jp/pcc/products/en/netwkcam/ and your router's manual for auto port...
...] on the Network page (see page 189). 3. UPnP™ is [Status] or [DHCP], enabling auto port forwarding allows you to access the camera from the Internet] on the Setup page. 2. Use this creates a shortcut to enable UPnP™. See http:// panasonic.co.jp/pcc/products/en/netwkcam/ and your router's manual for auto port...
Pro-line Network Cam
Page 68
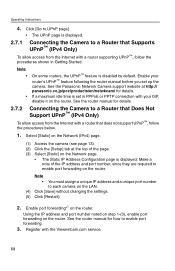
... the router manual for details. 2.7.2 Connecting the Camera to a Router that Does Not Support UPnP™ (IPv4 Only) To allow access from the Internet with a router that Supports UPnP™ (IPv4 Only) To allow access from the Internet with a router supporting UPnP™, follow the procedures below. 1. See the Panasonic Network Camera support website at...
... the router manual for details. 2.7.2 Connecting the Camera to a Router that Does Not Support UPnP™ (IPv4 Only) To allow access from the Internet with a router that Supports UPnP™ (IPv4 Only) To allow access from the Internet with a router supporting UPnP™, follow the procedures below. 1. See the Panasonic Network Camera support website at...

Pro-line Network Cam
Page 180
... does not have Adobe® Acrobat® Reader®, install it from the Adobe Reader website. Installs the Network Camera Recorder Single Camera Version. Sets up the camera name manually. Finding the camera 1. If your PC. • If the Panasonic Network Camera Setup window does not appear, click "setup.exe" on the CD-ROM. 2. Also, setting up to your...
... does not have Adobe® Acrobat® Reader®, install it from the Adobe Reader website. Installs the Network Camera Recorder Single Camera Version. Sets up the camera name manually. Finding the camera 1. If your PC. • If the Panasonic Network Camera Setup window does not appear, click "setup.exe" on the CD-ROM. 2. Also, setting up to your...

Pro-line Network Cam
Page 182
...Internet access setup. Manually sets up the camera to the camera. Displays the Setup page (see page 45). Manual Setup window Set up each parameter referring to page 50-page 52. • If more than 20 minutes have passed since the camera was turned on, the camera cannot be set... up from the Setup Program. If the camera cannot be set up, restart the camera. 182 Sets up the camera. If disabled, the button is displayed gray. Operating Instructions Automatic Setup (Local or Internet Access) or Manual Setup 1. Click [Execute] on the Camera List window shown on the LAN. Click the...
...Internet access setup. Manually sets up the camera to the camera. Displays the Setup page (see page 45). Manual Setup window Set up each parameter referring to page 50-page 52. • If more than 20 minutes have passed since the camera was turned on, the camera cannot be set... up from the Setup Program. If the camera cannot be set up, restart the camera. 182 Sets up the camera. If disabled, the button is displayed gray. Operating Instructions Automatic Setup (Local or Internet Access) or Manual Setup 1. Click [Execute] on the Camera List window shown on the LAN. Click the...

Pro-line Network Cam
Page 183
... address in the data field, and click [Set up the camera using the camera MAC address as shown below. 1. After confirming the network settings, click [OK]. • After about a minute, the Security: Administrator page is displayed, click [Close] to your firewall or ...the bottom of the camera (see page 9 for BB-HCM381A or page 11 for BB-HCE481A). 2. Operating Instructions • If "Camera setup completed" is displayed. 183 Setting up the Camera Using the MAC Address on the Setup Program The Setup Program may not list any cameras due to finish the Manual Setup. 3. Close...
... address in the data field, and click [Set up the camera using the camera MAC address as shown below. 1. After confirming the network settings, click [OK]. • After about a minute, the Security: Administrator page is displayed, click [Close] to your firewall or ...the bottom of the camera (see page 9 for BB-HCM381A or page 11 for BB-HCE481A). 2. Operating Instructions • If "Camera setup completed" is displayed. 183 Setting up the Camera Using the MAC Address on the Setup Program The Setup Program may not list any cameras due to finish the Manual Setup. 3. Close...
Pro-line Network Cam
Page 193
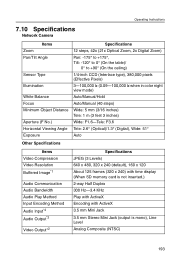
Operating Instructions 7.10 Specifications Network Camera Items Zoom Pan/Tilt Angle Sensor Type Illumination White Balance Focus Minimum Object Distance Aperture (F No.) Horizontal Viewing Angle Exposure Specifications 12 steps, 42x (21x ... ceiling) 1/4-inch CCD (Interlace type), 380,000 pixels (Effective Pixels) 3-100,000 lx (0.09-100,000 lx when in color night view mode) Auto/Manual/Hold Auto/Manual (40 steps) Wide: 5 mm (3/16 inches) Tele: 1 m (3 feet 3 inches) Wide: F1.6-Tele: F3.6 Tele: 2.6° (Optical)/1.3° (Digital), Wide: 51° Auto Other Specifications...
Operating Instructions 7.10 Specifications Network Camera Items Zoom Pan/Tilt Angle Sensor Type Illumination White Balance Focus Minimum Object Distance Aperture (F No.) Horizontal Viewing Angle Exposure Specifications 12 steps, 42x (21x ... ceiling) 1/4-inch CCD (Interlace type), 380,000 pixels (Effective Pixels) 3-100,000 lx (0.09-100,000 lx when in color night view mode) Auto/Manual/Hold Auto/Manual (40 steps) Wide: 5 mm (3/16 inches) Tele: 1 m (3 feet 3 inches) Wide: F1.6-Tele: F3.6 Tele: 2.6° (Optical)/1.3° (Digital), Wide: 51° Auto Other Specifications...

