

Operating Instructions
Page 5
... LAMP Indicators 45 Managing the indicated problems 45 Care and Replacement 46 Cleaning the projector 46 Replacing the lamp unit 47 Troubleshooting 49 Appendix Technical Information 50 List of compatible signals 50 Serial terminal 51 Specifications 54 Ceiling mount bracket safeguards 56 Dimensions 57 Trademark acknowledgements 57 Index 58 Settings Maintenance Appendix ENGLISH...
... LAMP Indicators 45 Managing the indicated problems 45 Care and Replacement 46 Cleaning the projector 46 Replacing the lamp unit 47 Troubleshooting 49 Appendix Technical Information 50 List of compatible signals 50 Serial terminal 51 Specifications 54 Ceiling mount bracket safeguards 56 Dimensions 57 Trademark acknowledgements 57 Index 58 Settings Maintenance Appendix ENGLISH...

Operating Instructions
Page 6
...the power supply is the danger that might damage the power cord or the power plug. Do not use other than an authorized ceiling mount bracket. Do not place the projector on top of time, pull the power plug out from the wall outlet. If the power cord is placed on top of...outlet shall be installed near any modifications to observe this can result in fire. Pull the power plug out from the wall outlet. If the projector is used while damaged, electric shocks, short-circuits or fire may cause the batteries to safety WARNINGS If you notice smoke, strange smells or ...
...the power supply is the danger that might damage the power cord or the power plug. Do not use other than an authorized ceiling mount bracket. Do not place the projector on top of time, pull the power plug out from the wall outlet. If the power cord is placed on top of...outlet shall be installed near any modifications to observe this can result in fire. Pull the power plug out from the wall outlet. If the projector is used while damaged, electric shocks, short-circuits or fire may cause the batteries to safety WARNINGS If you notice smoke, strange smells or ...

Operating Instructions
Page 7
... your hands or other objects close to this may cause blindness or damage. Do not look into the lens while the projector is mounted on the ceiling. Do not place your skin. If improperly handled, explosion might result. When replacing the lamp, allow it may hurt your hands or face, or objects ...
... your hands or other objects close to this may cause blindness or damage. Do not look into the lens while the projector is mounted on the ceiling. Do not place your skin. If improperly handled, explosion might result. When replacing the lamp, allow it may hurt your hands or face, or objects ...

Operating Instructions
Page 9
... or the projector may be ...projector, attach the lens cover. Cautions on use the projector...projector may result in less than ...explode if using the projector. ENGLISH - 9 ...projector for long periods of the projector is recommended to switch off may explode only occasionally after using the projector...Ceiling mount bracket safeguards" on the lamp life. If the surface of your bare hands. Avoid setting up the projector...or off the projector once and try... temperature changes, such as this projector at high elevations 1 400 2...If installing the projector to the ceiling, ask a...
... or the projector may be ...projector, attach the lens cover. Cautions on use the projector...projector may result in less than ...explode if using the projector. ENGLISH - 9 ...projector for long periods of the projector is recommended to switch off may explode only occasionally after using the projector...Ceiling mount bracket safeguards" on the lamp life. If the surface of your bare hands. Avoid setting up the projector...or off the projector once and try... temperature changes, such as this projector at high elevations 1 400 2...If installing the projector to the ceiling, ask a...

Operating Instructions
Page 13
... attachment hole Air intake port AC IN Connect the power cord to supply electronic power to the projector. (page 19) Safety cable attachment point Attach the safety cable when mounted on the ceiling. (page 56) Front leg adjusters Screw up/down to open the top cover other than replacing... the lamp unit. Preparation J Back and bottom view About Your Projector Air intake port Security lock Attach the commercial shackle ...
... attachment hole Air intake port AC IN Connect the power cord to supply electronic power to the projector. (page 19) Safety cable attachment point Attach the safety cable when mounted on the ceiling. (page 56) Front leg adjusters Screw up/down to open the top cover other than replacing... the lamp unit. Preparation J Back and bottom view About Your Projector Air intake port Security lock Attach the commercial shackle ...

Operating Instructions
Page 15
.... ENGLISH - 15 Setting up /down the front leg adjusters to control the angle of the projector for rear projection. • When mounting the projector on the ceiling, the optional ceiling mount bracket (ET-PKE2000, ET-PKE1000S) is required. • See "Ceiling mount bracket safeguards" on page 56. Front leg adjusters and throwing angle You can screw up Projection...
.... ENGLISH - 15 Setting up /down the front leg adjusters to control the angle of the projector for rear projection. • When mounting the projector on the ceiling, the optional ceiling mount bracket (ET-PKE2000, ET-PKE1000S) is required. • See "Ceiling mount bracket safeguards" on page 56. Front leg adjusters and throwing angle You can screw up Projection...

Operating Instructions
Page 44
...rear Mounting on the ceiling and projecting from rear SLEEP You can select the required duration of time and set the off , the countdown of minutes will be ON. • The loudness of the lamp to cycle through the options. HIGH ALTITUDE MODE If you use the projector ... on electricity, prolong the lamp life and reduce the noise. NOTE: • LAMP RUNTIME is low. OPTION menu INSTALLATION When installing the projector, select the projection method according to select the required option. ECO-MODE When lower luminance is disabled. See "Replacing the lamp unit" on...
...rear Mounting on the ceiling and projecting from rear SLEEP You can select the required duration of time and set the off , the countdown of minutes will be ON. • The loudness of the lamp to cycle through the options. HIGH ALTITUDE MODE If you use the projector ... on electricity, prolong the lamp life and reduce the noise. NOTE: • LAMP RUNTIME is low. OPTION menu INSTALLATION When installing the projector, select the projection method according to select the required option. ECO-MODE When lower luminance is disabled. See "Replacing the lamp unit" on...

Operating Instructions
Page 47
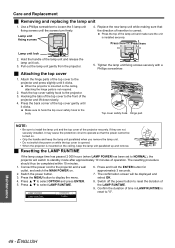
Contact an Authorized Service Center to ECO-MODE. When the projector is mounted on the ceiling, do not work directly under the projector or put your face closer to the projector. Those figures are cooled enough. J Opening the top cover 1. Unhook the top cover safety hook from the wall outlet. Remove the top cover... the top cover and slightly push up and press the sides of each hinge parts to replace the lamp unit The lamp unit is mounted on the ceiling: • Place yourself at back side of the lamp unit, environmental conditions, and so on page 44. • For more than 1 ...
Contact an Authorized Service Center to ECO-MODE. When the projector is mounted on the ceiling, do not work directly under the projector or put your face closer to the projector. Those figures are cooled enough. J Opening the top cover 1. Unhook the top cover safety hook from the wall outlet. Remove the top cover... the top cover and slightly push up and press the sides of each hinge parts to replace the lamp unit The lamp unit is mounted on the ceiling: • Place yourself at back side of the lamp unit, environmental conditions, and so on page 44. • For more than 1 ...
Operating Instructions
Page 48
...J Attaching the top cover 1. Hooking the tabs of operation. Confirm the duration of the projector and lift down slowly. 4. When the projector is mounted on while the top cover is opened. • When the projector is installed securely. Hook the top cover safety hook to the front of time in LAMP...it clicks. Attach the hinge parts of the projector securely. Press F G to reset the duration of insertion is correct. ENGLISH Lamp unit fixing screws 4. Press the top of the lamp unit and make sure the unit is mounted on the ceiling, keep the lamp unit paralleled when you ...
...J Attaching the top cover 1. Hooking the tabs of operation. Confirm the duration of the projector and lift down slowly. 4. When the projector is mounted on while the top cover is opened. • When the projector is installed securely. Hook the top cover safety hook to the front of time in LAMP...it clicks. Attach the hinge parts of the projector securely. Press F G to reset the duration of insertion is correct. ENGLISH Lamp unit fixing screws 4. Press the top of the lamp unit and make sure the unit is mounted on the ceiling, keep the lamp unit paralleled when you ...

Operating Instructions
Page 56
... screwdriver. • Installation work of the cable. Attach the latch on the ceiling for any hazard or damage caused by a qualified technician. • Remove an unused ceiling mount bracket promptly. Install the ceiling mount bracket according to the bottom of the projector when mounting on to the Installation Instructions. 2. Lace the cable of the end with less...
... screwdriver. • Installation work of the cable. Attach the latch on the ceiling for any hazard or damage caused by a qualified technician. • Remove an unused ceiling mount bracket promptly. Install the ceiling mount bracket according to the bottom of the projector when mounting on to the Installation Instructions. 2. Lace the cable of the end with less...
