A-55 Quick Installation Guide
Page 1
... + Monitor • RJ-45 Network cable (1 for each device + 1 for PC) • Network Switch • Power Adapter with your Network Switch with terminal block. If it is no need to search. Automatic IP Setup (With Router/DHCP server) 1. You can power cameras directly without adapter. There is NOT a PoE enabled Switch, you will need to change device IPs. (See image below) Go to Start -> My Computer and select "Network" to use this method A-Series Quick Installation Guide I. Accessing Your Camera...
... + Monitor • RJ-45 Network cable (1 for each device + 1 for PC) • Network Switch • Power Adapter with your Network Switch with terminal block. If it is no need to search. Automatic IP Setup (With Router/DHCP server) 1. You can power cameras directly without adapter. There is NOT a PoE enabled Switch, you will need to change device IPs. (See image below) Go to Start -> My Computer and select "Network" to use this method A-Series Quick Installation Guide I. Accessing Your Camera...

A-55 Quick Installation Guide
Page 2
... normally. Manual IP Setup (Without Router/DHCP server) 1. If it is a PoE enabled Switch, then the device is NOT a PoE enabled Switch, you assign the same IP to each camera. To change your PC's IP to your network scheme. Wait for 30 seconds and test the new IP with the RJ-45 cable, and change the IP address, navigate to update the Subnet Mask and Default Gateway as...
... normally. Manual IP Setup (Without Router/DHCP server) 1. If it is a PoE enabled Switch, then the device is NOT a PoE enabled Switch, you assign the same IP to each camera. To change your PC's IP to your network scheme. Wait for 30 seconds and test the new IP with the RJ-45 cable, and change the IP address, navigate to update the Subnet Mask and Default Gateway as...

A-55 Quick Installation Guide
Page 3
Continue instructions on Configuration: Go to Image: And set EPTZ to do this, log into the camera and click on following page. To do is turn off a Feature called EPTZ. You will see a message in the lower right that says Save Succeeded. A-44/A-44-IR/A-45 Auto Focus/Remote Focus The first thing we need to Close.
Continue instructions on Configuration: Go to Image: And set EPTZ to do this, log into the camera and click on following page. To do is turn off a Feature called EPTZ. You will see a message in the lower right that says Save Succeeded. A-44/A-44-IR/A-45 Auto Focus/Remote Focus The first thing we need to Close.

A-55 Quick Installation Guide
Page 4
Once EPTZ has been disabled, we will need to tighten up and clean up the image. If you want to disable these controls once you have found the correct focal point, you close and then use the One Touch Focus button to get you can use the Focus and Zoom controls to focus the camera, click on Live View and click on the PTZ control button: From here you can go back in and enable EPTZ.
Once EPTZ has been disabled, we will need to tighten up and clean up the image. If you want to disable these controls once you have found the correct focal point, you close and then use the One Touch Focus button to get you can use the Focus and Zoom controls to focus the camera, click on Live View and click on the PTZ control button: From here you can go back in and enable EPTZ.
A-55 Quick Start Guide
Page 2
... not installed and 1 About This Document This manual applies to part 15 of this product. DISCLAIMER STATEMENT "Underwriters Laboratories Inc. ("UL") has not tested the performance or reliability of the security or signaling aspects of the FCC Rules. A-55·Quick Start Guide Thank you for a digital device, pursuant to the A-55 network camera. This manual may contain technical inaccuracies or printing errors...
... not installed and 1 About This Document This manual applies to part 15 of this product. DISCLAIMER STATEMENT "Underwriters Laboratories Inc. ("UL") has not tested the performance or reliability of the security or signaling aspects of the FCC Rules. A-55·Quick Start Guide Thank you for a digital device, pursuant to the A-55 network camera. This manual may contain technical inaccuracies or printing errors...
A-55 Quick Start Guide
Page 3
...subject to radio communications. FCC Conditions This device complies with part 15 of it at his own expense. This device must accept any interference received, including interference that may not cause harmful interference. 2. Operation is likely to your local supplier upon the purchase of... or dispose of the FCC Rules. Operation of this product to cause harmful interference in which case the user will be disposed of as unsorted municipal waste in the European Union. A-55·Quick Start Guide used in accordance with the instruction manual, may cause harmful interference to the ...
...subject to radio communications. FCC Conditions This device complies with part 15 of it at his own expense. This device must accept any interference received, including interference that may not cause harmful interference. 2. Operation is likely to your local supplier upon the purchase of... or dispose of the FCC Rules. Operation of this product to cause harmful interference in which case the user will be disposed of as unsorted municipal waste in the European Union. A-55·Quick Start Guide used in accordance with the instruction manual, may cause harmful interference to the ...

A-55 Quick Start Guide
Page 5
... meet both the SELV (Safety Extra Low Voltage) and the Limited Power Source with the electrical safety regulations of the nation and region. Please refer to technical specifications for detailed information. 4 A-55·Quick Start Guide Safety Instruction These instructions are intended to ensure that user can use of the product, you must be in strict compliance with 24...
... meet both the SELV (Safety Extra Low Voltage) and the Limited Power Source with the electrical safety regulations of the nation and region. Please refer to technical specifications for detailed information. 4 A-55·Quick Start Guide Safety Instruction These instructions are intended to ensure that user can use of the product, you must be in strict compliance with 24...
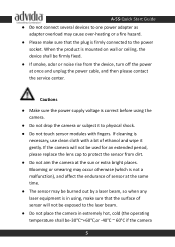
A-55 Quick Start Guide
Page 6
... place the camera in using the camera. ● Do not drop the camera or subject it to physical shock. ● Do not touch sensor modules with a bit of ethanol and wipe it gently. A-55·Quick Start Guide ● Do not connect several devices to one power adapter as adapter overload may cause...;C if the camera 5 When the product is mounted on wall or ceiling, the device shall be used for an extended period, please replace the lens cap to protect the sensor from the device, turn off the power at once and unplug the power cable, and then please contact the service center. Blooming ...
... place the camera in using the camera. ● Do not drop the camera or subject it to physical shock. ● Do not touch sensor modules with a bit of ethanol and wipe it gently. A-55·Quick Start Guide ● Do not connect several devices to one power adapter as adapter overload may cause...;C if the camera 5 When the product is mounted on wall or ceiling, the device shall be used for an extended period, please replace the lens cap to protect the sensor from the device, turn off the power at once and unplug the power cable, and then please contact the service center. Blooming ...
A-55 Quick Start Guide
Page 7
... ventilation is recommended for problems caused by the battery manufacturer. ● If the product does not work properly, please contact your dealer for more details. ● Improper use . ● While in delivery, the camera shall be replaced regularly according to their average enduring time. Replace with your dealer or the nearest service center. A-55·Quick Start Guide model has an "H" in...
... ventilation is recommended for problems caused by the battery manufacturer. ● If the product does not work properly, please contact your dealer for more details. ● Improper use . ● While in delivery, the camera shall be replaced regularly according to their average enduring time. Replace with your dealer or the nearest service center. A-55·Quick Start Guide model has an "H" in...

A-55 Quick Start Guide
Page 8
A-55·Quick Start Guide Table of Contents 1 Appearance Description 8 1.1 Camera Description 8 1.2 Wiring 9 2 Installation 11 3 Setting the Network Camera over the LAN 17 4 Accessing via Web Browser 22 7
A-55·Quick Start Guide Table of Contents 1 Appearance Description 8 1.1 Camera Description 8 1.2 Wiring 9 2 Installation 11 3 Setting the Network Camera over the LAN 17 4 Accessing via Web Browser 22 7
A-55 Quick Start Guide
Page 12
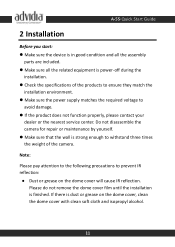
... the camera for repair or maintenance by yourself. Make sure that the wall is power-off during the installation. Check the specifications of the camera. Note: Please pay attention to the following precautions to avoid damage. If the product does not function properly, please contact your dealer or the nearest service center. A-55·Quick Start Guide 2 Installation Before...
... the camera for repair or maintenance by yourself. Make sure that the wall is power-off during the installation. Check the specifications of the camera. Note: Please pay attention to the following precautions to avoid damage. If the product does not function properly, please contact your dealer or the nearest service center. A-55·Quick Start Guide 2 Installation Before...

A-55 Quick Start Guide
Page 16
A-55·Quick Start Guide Pan Adjust Nut Tilt Adjust Nut Figure 2-4 Adjust Monitoring Angle Note: Please loosen the screws slightly until you can adjust the camera without removing the screws from the PTZ control interface found on the top header of the device, and adjusting it from the bracket. 8. This product has an electronic lens, so adjust the camera to the proper surveillance angle via 3-axis adjustment, then adjust the zoom and focus by logging into the web interface of the Live View Image 15
A-55·Quick Start Guide Pan Adjust Nut Tilt Adjust Nut Figure 2-4 Adjust Monitoring Angle Note: Please loosen the screws slightly until you can adjust the camera without removing the screws from the PTZ control interface found on the top header of the device, and adjusting it from the bracket. 8. This product has an electronic lens, so adjust the camera to the proper surveillance angle via 3-axis adjustment, then adjust the zoom and focus by logging into the web interface of the Live View Image 15
A-55 Quick Start Guide
Page 18
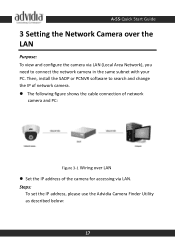
A-55·Quick Start Guide 3 Setting the Network Camera over LAN Set the IP address of network camera and PC: Figure 3-1 Wiring over the LAN Purpose: To view and configure the camera via LAN. Steps: To set the IP address, please use the Advidia Camera Finder Utility as described below: 17 Then, install the SADP or PCNVR software to search and change the IP of network camera. The following figure shows the cable connection of the camera for accessing via LAN (Local Area Network), you need to connect the network camera in the same subnet with your PC.
A-55·Quick Start Guide 3 Setting the Network Camera over LAN Set the IP address of network camera and PC: Figure 3-1 Wiring over the LAN Purpose: To view and configure the camera via LAN. Steps: To set the IP address, please use the Advidia Camera Finder Utility as described below: 17 Then, install the SADP or PCNVR software to search and change the IP of network camera. The following figure shows the cable connection of the camera for accessing via LAN (Local Area Network), you need to connect the network camera in the same subnet with your PC.
A-55 Quick Start Guide
Page 19
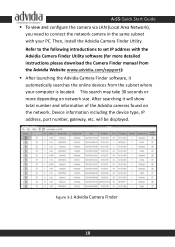
... Advidia Camera Finder software, it will be displayed. Figure 3-2 Advidia Camera Finder 18 A-55·Quick Start Guide To view and configure the camera via LAN (Local Area Network), you need to set IP address with your computer is located. Then, install the Advidia Camera Finder Utility. will show total number and information of the Advidia cameras found on network size. Refer to the following introductions to connect the network camera...
... Advidia Camera Finder software, it will be displayed. Figure 3-2 Advidia Camera Finder 18 A-55·Quick Start Guide To view and configure the camera via LAN (Local Area Network), you need to set IP address with your computer is located. Then, install the Advidia Camera Finder Utility. will show total number and information of the Advidia cameras found on network size. Refer to the following introductions to connect the network camera...

A-55 Quick Start Guide
Page 22
Enter the desired IP address (or range if changing the IP address of more than one device) of the network camera in the address field of the IP address is "12345". 21 You can also select "Dynamic IP" if you would prefer to have an IP address assigned by your network router. The default value of the edit table and click Apply Network Changes. The default user name is "admin", and password is "192.0.0.64". A-55·Quick Start Guide Figure 3-5 Modify Network Parameters Figure 3-6 Edit Table 5).
Enter the desired IP address (or range if changing the IP address of more than one device) of the network camera in the address field of the IP address is "12345". 21 You can also select "Dynamic IP" if you would prefer to have an IP address assigned by your network router. The default value of the edit table and click Apply Network Changes. The default user name is "admin", and password is "192.0.0.64". A-55·Quick Start Guide Figure 3-5 Modify Network Parameters Figure 3-6 Edit Table 5).
A-55 Quick Start Guide
Page 23
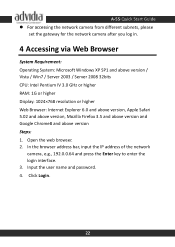
... and password. 4. A-55·Quick Start Guide For accessing the network camera from different subnets, please set the gateway for the network camera after you log in. 4 Accessing via Web Browser System Requirement: Operating System: Microsoft Windows XP SP1 and above version / Vista / Win7 / Server 2003 / Server 2008 32bits CPU: Intel Pentium IV 3.0 GHz or higher RAM: 1G or higher Display: 1024×768 resolution or higher Web Browser: Internet Explorer 6.0 and above version...
... and password. 4. A-55·Quick Start Guide For accessing the network camera from different subnets, please set the gateway for the network camera after you log in. 4 Accessing via Web Browser System Requirement: Operating System: Microsoft Windows XP SP1 and above version / Vista / Win7 / Server 2003 / Server 2008 32bits CPU: Intel Pentium IV 3.0 GHz or higher RAM: 1G or higher Display: 1024×768 resolution or higher Web Browser: Internet Explorer 6.0 and above version...

A-55 Quick Start Guide
Page 24
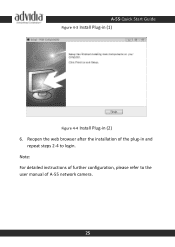
Note: You may have to close the web browser to install the plug-in . 23 Please follow the installation prompts to finish the installation of the plug-in . A-55·Quick Start Guide Figure 4-1 Login Interface 5. Install the plug-in before viewing the live video and managing the camera.
Note: You may have to close the web browser to install the plug-in . 23 Please follow the installation prompts to finish the installation of the plug-in . A-55·Quick Start Guide Figure 4-1 Login Interface 5. Install the plug-in before viewing the live video and managing the camera.
A-55 Quick Start Guide
Page 26
Reopen the web browser after the installation of the plug-in (2) 6. Note: For detailed instructions of A-55 network camera. 25 A-55·Quick Start Guide Figure 4-3 Install Plug-in (1) Figure 4-4 Install Plug-in and repeat steps 2-4 to the user manual of further configuration, please refer to login.
Reopen the web browser after the installation of the plug-in (2) 6. Note: For detailed instructions of A-55 network camera. 25 A-55·Quick Start Guide Figure 4-3 Install Plug-in (1) Figure 4-4 Install Plug-in and repeat steps 2-4 to the user manual of further configuration, please refer to login.

A-55 Spec Sheet
Page 1
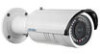
... Time: Lens: Auto Iris: Slow Shutter: Lens Mount: Digital Noise Reduction: WDR Range: Day/Night: Compression Standard Video Compression: Bit Rate: H.264 Type: Audio Compression: Audio Bit Rate: Image Max. A-55 Bullet Camera Overview • Up to 50Hz: 20fps (2048 × 1536) 60Hz: 20fps (2048 × 1536) Yes Yes Yes Yes Auto/Schedule/Triggered by alarm in Image Resolution: Frame Rate: Third Stream: EIS (Electronic Image Stabilization: BLC (Back Light...
... Time: Lens: Auto Iris: Slow Shutter: Lens Mount: Digital Noise Reduction: WDR Range: Day/Night: Compression Standard Video Compression: Bit Rate: H.264 Type: Audio Compression: Audio Bit Rate: Image Max. A-55 Bullet Camera Overview • Up to 50Hz: 20fps (2048 × 1536) 60Hz: 20fps (2048 × 1536) Yes Yes Yes Yes Auto/Schedule/Triggered by alarm in Image Resolution: Frame Rate: Third Stream: EIS (Electronic Image Stabilization: BLC (Back Light...
A-55 Spec Sheet
Page 2
... Picture Overlay: Image Setting: Network Alarm Trigger: Protocols: Security: System Compatibility: On-board Storage: Communication Interface: Reset Button: General Operating Conditions: Power Supply: Power Consumption: IP Range: Dimensions: Ingress Protection Level: Weight: Software: LOGO picture can be overlaid on video with 128 x 128 24 bit bmp format Rotate mode, Saturation, Brightness, Contrast adjustable by web browser Line crossing Detection, Intrusion detection, Scene change detection, Defocus detection, audio exception detection, Motion detection, Face detection, Dynamic analysis...
... Picture Overlay: Image Setting: Network Alarm Trigger: Protocols: Security: System Compatibility: On-board Storage: Communication Interface: Reset Button: General Operating Conditions: Power Supply: Power Consumption: IP Range: Dimensions: Ingress Protection Level: Weight: Software: LOGO picture can be overlaid on video with 128 x 128 24 bit bmp format Rotate mode, Saturation, Brightness, Contrast adjustable by web browser Line crossing Detection, Intrusion detection, Scene change detection, Defocus detection, audio exception detection, Motion detection, Face detection, Dynamic analysis...


