User's Manual
Page 1
... 14 Warning Indicator 14 Adjusting the Projected Image 15 Adjusting the Projector's Height 15 Adjusting the Projector's Zoom / Focus 16 Adjusting Projected Image Size 16 User Controls 17 Control Panel & Remote Control 17 Control Panel...17 Remote Control...18 On-screen Display Menus 20 How to operate ...20 Menu Tree...21 Image...22 Display...26 Setup...29 Options...36 Appendices 39 Troubleshooting 39 Projector Status Indication 42 Remote Control 43 Replacing the Lamp 44 Compatibility Modes 46 RS232 Commands and Protocol Function List 48 Ceiling Mount Installation 52 Optoma...
... 14 Warning Indicator 14 Adjusting the Projected Image 15 Adjusting the Projector's Height 15 Adjusting the Projector's Zoom / Focus 16 Adjusting Projected Image Size 16 User Controls 17 Control Panel & Remote Control 17 Control Panel...17 Remote Control...18 On-screen Display Menus 20 How to operate ...20 Menu Tree...21 Image...22 Display...26 Setup...29 Options...36 Appendices 39 Troubleshooting 39 Projector Status Indication 42 Remote Control 43 Replacing the Lamp 44 Compatibility Modes 46 RS232 Commands and Protocol Function List 48 Ceiling Mount Installation 52 Optoma...
User's Manual
Page 2
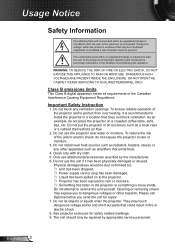
... intended to alert the user to install the projector in a location that does not block ventilation. See projector enclosure for repair. 7. English 2 Class B emissions limits This Class B digital apparatus meets all requirements of fire and/or electric shock, do not place the projector on to the projector. Projector has been exposed to service the unit yourself. Opening or removing covers may touch dangerous...
... intended to alert the user to install the projector in a location that does not block ventilation. See projector enclosure for repair. 7. English 2 Class B emissions limits This Class B digital apparatus meets all requirements of fire and/or electric shock, do not place the projector on to the projector. Projector has been exposed to service the unit yourself. Opening or removing covers may touch dangerous...
User's Manual
Page 3
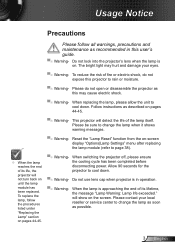
..., the message "Lamp Warning: Lamp life exceeded." When the lamp is on. When switching the projector off, please ensure the cooling cycle has been completed before disconnecting power. To reduce the risk of its life, the projector will not turn back on until the lamp module has been replaced. Reset the "Lamp Reset" function from the on-screen display "Options|Lamp Settings" menu after replacing the lamp module (refer to change the lamp when it shows warning messages...
..., the message "Lamp Warning: Lamp life exceeded." When the lamp is on. When switching the projector off, please ensure the cooling cycle has been completed before disconnecting power. To reduce the risk of its life, the projector will not turn back on until the lamp module has been replaced. Reset the "Lamp Reset" function from the on-screen display "Options|Lamp Settings" menu after replacing the lamp module (refer to change the lamp when it shows warning messages...

User's Manual
Page 13
... source automatically. Remove the lens cap. 2. Turn on the remote control to display on the screen (computer, notebook, video player, etc). Make sure that the "Source Lock" has been set to "Off". If you connect multiple sources at the same time, press the "SOURCE" button on the control panel or direct source keys on and connect the source that you will be de-activated during standby mode. Securely connect the power cord and signal cable. The ON/STANDBY LED...
... source automatically. Remove the lens cap. 2. Turn on the remote control to display on the screen (computer, notebook, video player, etc). Make sure that the "Source Lock" has been set to "Off". If you connect multiple sources at the same time, press the "SOURCE" button on the control panel or direct source keys on and connect the source that you will be de-activated during standby mode. Securely connect the power cord and signal cable. The ON/STANDBY LED...

User's Manual
Page 14
... to turn off the projector 1. Unplug the power cord from the electrical outlet and the projector. 4. Press the " " button on the remote control or on the control panel to turn on . "TEMP" LED indicator flashes red and if "On/Standby" indicator flashes amber. Once in standby mode, simply press " " button to operate for about 10 seconds for 30 seconds and try again. Press the " " button again to confirm otherwise the message will be switched back...
... to turn off the projector 1. Unplug the power cord from the electrical outlet and the projector. 4. Press the " " button on the remote control or on the control panel to turn on . "TEMP" LED indicator flashes red and if "On/Standby" indicator flashes amber. Once in standby mode, simply press " " button to operate for about 10 seconds for 30 seconds and try again. Press the " " button again to confirm otherwise the message will be switched back...

User's Manual
Page 17
... User Controls Control Panel & Remote Control Control Panel AV MUTE POWER Using the Control Panel Power Refer to your item selection. RE-SYNC Automatically synchronize the projector to launch the on the audio and video. Enter Confirm your selection. Menu Press "Menu" to the input source. SOURCE Press "SOURCE" to adjust image distortion caused by tilting the projector. (±40 degrees) Indicate the projector's lamp status. AV MUTE Momentarily turns off/on -screen display (OSD) menu. Use to select an input signal. To exit OSD, Press "Menu" again. Temp LED Indicate...
... User Controls Control Panel & Remote Control Control Panel AV MUTE POWER Using the Control Panel Power Refer to your item selection. RE-SYNC Automatically synchronize the projector to launch the on the audio and video. Enter Confirm your selection. Menu Press "Menu" to the input source. SOURCE Press "SOURCE" to adjust image distortion caused by tilting the projector. (±40 degrees) Indicate the projector's lamp status. AV MUTE Momentarily turns off/on -screen display (OSD) menu. Use to select an input signal. To exit OSD, Press "Menu" again. Temp LED Indicate...

User's Manual
Page 30
The image is the default selection. User Controls SETUP Projection Rear-Desktop and Rear-Ceiling are to be used with a translucent screen. Front-Desktop This is projected straight on the screen. Rear-Desktop When selected, the image will appear reversed. Front-Ceiling When selected, the image will turn upside down. Rear-Ceiling When selected, the image will appear reversed in upside down position. English 30
The image is the default selection. User Controls SETUP Projection Rear-Desktop and Rear-Ceiling are to be used with a translucent screen. Front-Desktop This is projected straight on the screen. Rear-Desktop When selected, the image will appear reversed. Front-Ceiling When selected, the image will turn upside down. Rear-Ceiling When selected, the image will appear reversed in upside down position. English 30

User's Manual
Page 33
Security Timer Can be select the time (Month/Day/Hour) function to set the number of hours the projector can be requested to switch on the projector. Off: Choose "Off" to be able to enter your password again. 33 English Once this time has elapsed you will be used. User Controls SETUP | Security Security On: Choose "On" to use security verification when the turning on the projector without password verification.
Security Timer Can be select the time (Month/Day/Hour) function to set the number of hours the projector can be requested to switch on the projector. Off: Choose "Off" to be able to enter your password again. 33 English Once this time has elapsed you will be used. User Controls SETUP | Security Security On: Choose "On" to use security verification when the turning on the projector without password verification.
User's Manual
Page 34
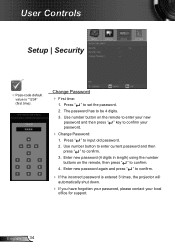
... local office for support. Enter new password (4 digits in length) using the number buttons on the remote to enter your new password and then press " " key to confirm. 3. Enter new password again and press " " to confirm. 4. English 34 Press " " to be 4 digits. 3. The password has to set the password. 2. Change Password First time: 1. Press " " to input old password. 2. User Controls Setup | Security Pass-code default value is entered 3 times, the projector will automatically shut down. If...
... local office for support. Enter new password (4 digits in length) using the number buttons on the remote to enter your new password and then press " " key to confirm. 3. Enter new password again and press " " to confirm. 4. English 34 Press " " to be 4 digits. 3. The password has to set the password. 2. Change Password First time: 1. Press " " to input old password. 2. User Controls Setup | Security Pass-code default value is entered 3 times, the projector will automatically shut down. If...

User's Manual
Page 38
... replacing the lamp. Brightness Mode STD: Choose "STD" to dim the projector lamp which will lower power consumption and extend the lamp life. BRIGHT: Choose "BRIGHT" to hide the warning message when the changing lamp message is over 35°C in operating, the projector will appear 30 hours before suggested replacement of lamp. User Controls OPTIONS | Lamp Settings When ambient temperature is displayed. The message will switch to STD automatically. English 38 Lamp Hours Display the projection time...
... replacing the lamp. Brightness Mode STD: Choose "STD" to dim the projector lamp which will lower power consumption and extend the lamp life. BRIGHT: Choose "BRIGHT" to hide the warning message when the changing lamp message is over 35°C in operating, the projector will appear 30 hours before suggested replacement of lamp. User Controls OPTIONS | Lamp Settings When ambient temperature is displayed. The message will switch to STD automatically. English 38 Lamp Hours Display the projection time...

User's Manual
Page 39
.... Verify the resolution setting is still not projecting the whole image, you will also need to change the monitor display you are not bent or broken. Check if the projection lamp has been securely installed. No image appears on the "Display" icon. 2. Open the "My Computer" icon, the "Control Panel" folder, and then double click on -screen Ensure all the cables and power connections are correctly and...
.... Verify the resolution setting is still not projecting the whole image, you will also need to change the monitor display you are not bent or broken. Check if the projection lamp has been securely installed. No image appears on the "Display" icon. 2. Open the "My Computer" icon, the "Control Panel" folder, and then double click on -screen Ensure all the cables and power connections are correctly and...
User's Manual
Page 41
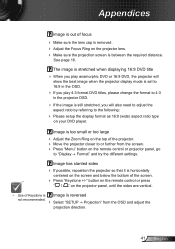
.... Use of Keystone is Image is reversed not recommended. Select "SETUP Projection" from the screen. Press "Menu" button on the projector lens. Make sure the projection screen is between the required distance. Appendices Image is out of focus Make sure the lens cap is removed. Adjust the Focus Ring on the remote control or projector panel, go to "Display Format" and try the different settings. Image is too...
.... Use of Keystone is Image is reversed not recommended. Select "SETUP Projection" from the screen. Press "Menu" button on the projector lens. Make sure the projection screen is between the required distance. Appendices Image is out of focus Make sure the lens cap is removed. Adjust the Focus Ring on the remote control or projector panel, go to "Display Format" and try the different settings. Image is too...

User's Manual
Page 42
...; Projector Status Indication LED lighting message Message ON/STANDBY LED (Green/Amber) Standby State (Input power cord) Amber Power on (Warming) Flashing Green Temp-LED (Red) Lamp-LED (Red) Lamp lighting Green Power off the projector, then unplug the power cord and wait at least 60 seconds before reconnecting power. Check that "Keypad Lock" is not activated by trying to all controls If possible, turn on until the lamp module has been replaced. Lamp burns out or makes a popping sound When the lamp reaches its end of life...
...; Projector Status Indication LED lighting message Message ON/STANDBY LED (Green/Amber) Standby State (Input power cord) Amber Power on (Warming) Flashing Green Temp-LED (Red) Lamp-LED (Red) Lamp lighting Green Power off the projector, then unplug the power cord and wait at least 60 seconds before reconnecting power. Check that "Keypad Lock" is not activated by trying to all controls If possible, turn on until the lamp module has been replaced. Lamp burns out or makes a popping sound When the lamp reaches its end of life...

User's Manual
Page 43
... Screen Messages Temperature warning: Fan failed: Lamp warming: Out of display range: Remote Control If the remote control does not work Check the operating angle of the remote control is within 7 m (±0°) of the IR receivers on the projector. Make sure there are exhausted. 43 English Move to within ±15° both horizontally and vertically of one of the projector...
... Screen Messages Temperature warning: Fan failed: Lamp warming: Out of display range: Remote Control If the remote control does not work Check the operating angle of the remote control is within 7 m (±0°) of the IR receivers on the projector. Make sure there are exhausted. 43 English Move to within ±15° both horizontally and vertically of one of the projector...

User's Manual
Page 45
...; (iii) Select "Lamp Settings" (iv) Select "Lamp Reset" (v) Select "Yes". 45 English Disconnect the power cord. 4. Appendices 1 The screws on the lamp cover and the lamp cannot be removed. The projector cannot be turned on if the lamp cover has not been placed back on the projector and use "Lamp Reset" after the lamp module is replaced. Hand oil can cause the lamp to clean the lamp module if it...
...; (iii) Select "Lamp Settings" (iv) Select "Lamp Reset" (v) Select "Yes". 45 English Disconnect the power cord. 4. Appendices 1 The screws on the lamp cover and the lamp cannot be removed. The projector cannot be turned on if the lamp cover has not been placed back on the projector and use "Lamp Reset" after the lamp module is replaced. Hand oil can cause the lamp to clean the lamp module if it...

User's Manual
Page 51
Appendices ~XX105 1 7E 30 30 31 30 35 20 31 0D Advanced Direct Power On On ~XX105 0 7E 30 30 31 30 35 20 30 0D Off (0/2 for backward compatible) ~XX106 n 7E 30 30 31 30 36 20 a 0D Auto Power Off (min) n = 0 (a=30) ~ 180 (a=31 38 30) step:5 ~XX107 n 7E 30 30 31 30 37 20 a 0D Sleep Timer (min) n = 0 (a=30) ~ 995 (a=39 39 39) step:5 ~XX114 1 7E 30 30 31 31 34 20 31 0D Power Mode(Standby) Eco.(
Appendices ~XX105 1 7E 30 30 31 30 35 20 31 0D Advanced Direct Power On On ~XX105 0 7E 30 30 31 30 35 20 30 0D Off (0/2 for backward compatible) ~XX106 n 7E 30 30 31 30 36 20 a 0D Auto Power Off (min) n = 0 (a=30) ~ 180 (a=31 38 30) step:5 ~XX107 n 7E 30 30 31 30 37 20 a 0D Sleep Timer (min) n = 0 (a=30) ~ 995 (a=39 39 39) step:5 ~XX114 1 7E 30 30 31 31 34 20 31 0D Power Mode(Standby) Eco.(

Datasheet
Page 1
...; Standby VGA and audio pass-thru feature reduces power consumption Wireless connectivity with optional dongle Rapid power-on ! control panel lock and password protection allow you to customize security settings NO FILTER REQUIRED Specifications Display Technology Single 0.55" DMD DLP® Technology by Texas Instruments Resolution Native XGA (1024 x 768) Maximum Resolution UXGA (1600 x 1200) Brightness (Typical) 3500 ANSI Lumens Contrast Ratio 3000:1 (Full On/Full Off) Lamp Life and...
...; Standby VGA and audio pass-thru feature reduces power consumption Wireless connectivity with optional dongle Rapid power-on ! control panel lock and password protection allow you to customize security settings NO FILTER REQUIRED Specifications Display Technology Single 0.55" DMD DLP® Technology by Texas Instruments Resolution Native XGA (1024 x 768) Maximum Resolution UXGA (1600 x 1200) Brightness (Typical) 3500 ANSI Lumens Contrast Ratio 3000:1 (Full On/Full Off) Lamp Life and...
Brochure
Page 1
... lumens and 3000:1 high contrast ratio ❏ Standby VGA and audio pass-thru feature reduces power consumption ❏ Wireless connectivity with optional dongle ❏ Rapid power-on ! TX612 | Multimedia Projector High Brightness Multimedia Projector USB Composite Stereo VGA-Out Video Stereo Audio-In VGA1-In S-Video Audio-Out Power/Standby Source Keystone Correction Brightness Contrast S-Video Freeze VGA Re-Sync Select Volume Zoom AV Mute Video Menu AC Power VGA2-In RS232 KenLsoincgktonSeBcaurrity The Optoma TX612 delivers dazzling, vibrant images even in challenging...
... lumens and 3000:1 high contrast ratio ❏ Standby VGA and audio pass-thru feature reduces power consumption ❏ Wireless connectivity with optional dongle ❏ Rapid power-on ! TX612 | Multimedia Projector High Brightness Multimedia Projector USB Composite Stereo VGA-Out Video Stereo Audio-In VGA1-In S-Video Audio-Out Power/Standby Source Keystone Correction Brightness Contrast S-Video Freeze VGA Re-Sync Select Volume Zoom AV Mute Video Menu AC Power VGA2-In RS232 KenLsoincgktonSeBcaurrity The Optoma TX612 delivers dazzling, vibrant images even in challenging...
Brochure
Page 2
... Distance/Image Size Projection Distance (Feet) Maximum Diagonal (Inches) Minimum Diagonal (Inches) 6 46 42 8 62 56 10 77 70 12 92 84 14 108 98 16 123 112 18 138 126 Control Panel Keystone + Source Re-Sync Help Menu Power/ Standby Select Four Directional Keys Power Keystone - LED Lamp LED Temp LED Optional Accessories Lamp: Remote: WIreless Dongle: Power Cord (1m): Power Cord (11m): S-Video Cable (1.8m): Composite Cable (1.8m): VGA Cable (5m): VGA to Component Cable (5m): VGA to Component Adapter: Ceiling Mount: Carrying Case: 100" Manual Pull-Down Screen...
... Distance/Image Size Projection Distance (Feet) Maximum Diagonal (Inches) Minimum Diagonal (Inches) 6 46 42 8 62 56 10 77 70 12 92 84 14 108 98 16 123 112 18 138 126 Control Panel Keystone + Source Re-Sync Help Menu Power/ Standby Select Four Directional Keys Power Keystone - LED Lamp LED Temp LED Optional Accessories Lamp: Remote: WIreless Dongle: Power Cord (1m): Power Cord (11m): S-Video Cable (1.8m): Composite Cable (1.8m): VGA Cable (5m): VGA to Component Cable (5m): VGA to Component Adapter: Ceiling Mount: Carrying Case: 100" Manual Pull-Down Screen...

Protocol Functions
Page 4
Appendices ~XX105 1 7E 30 30 31 30 35 20 31 0D Advanced Direct Power On On ~XX105 0 7E 30 30 31 30 35 20 30 0D Off (0/2 for backward compatible) ~XX106 n 7E 30 30 31 30 36 20 a 0D Auto Power Off (min) n = 0 (a=30) ~ 180 (a=31 38 30) step:5 ~XX107 n 7E 30 30 31 30 37 20 a 0D Sleep Timer (min) n = 0 (a=30) ~ 995 (a=39 39 39) step:5 ~XX114 1 7E 30 30 31 31 34 20 31 0D Power Mode(Standby) Eco.(
Appendices ~XX105 1 7E 30 30 31 30 35 20 31 0D Advanced Direct Power On On ~XX105 0 7E 30 30 31 30 35 20 30 0D Off (0/2 for backward compatible) ~XX106 n 7E 30 30 31 30 36 20 a 0D Auto Power Off (min) n = 0 (a=30) ~ 180 (a=31 38 30) step:5 ~XX107 n 7E 30 30 31 30 37 20 a 0D Sleep Timer (min) n = 0 (a=30) ~ 995 (a=39 39 39) step:5 ~XX114 1 7E 30 30 31 31 34 20 31 0D Power Mode(Standby) Eco.(


