Owner Manual
Page 1
...read this manual for purchasing an Onkyo AV Receiver/ AV Amplifier. Following the instructions in the unit. Contents Introduction 2 Connections 17 First Time Setup 41 Basic Operations 54 Using the Listening Modes ...........62 Advanced Setup 72 Zone 2 97 Controlling Other Components .....102 Others 113 En Please retain this manual thoroughly before making connections and plugging in this manual will enable you for future reference. AV Receiver TX-SR706 AV Amplifier TX-SA706 Instruction Manual Thank ...
...read this manual for purchasing an Onkyo AV Receiver/ AV Amplifier. Following the instructions in the unit. Contents Introduction 2 Connections 17 First Time Setup 41 Basic Operations 54 Using the Listening Modes ...........62 Advanced Setup 72 Zone 2 97 Controlling Other Components .....102 Others 113 En Please retain this manual thoroughly before making connections and plugging in this manual will enable you for future reference. AV Receiver TX-SR706 AV Amplifier TX-SA706 Instruction Manual Thank ...

Owner Manual
Page 5
Use this adapter if your AC outlet does not match with the plug on the AV receiver/AV amplifier's power cord (adapter varies from country to mount the AC plug: AM loop antenna (TX-SR706 only) * In catalogs and on packaging, the letter at the end of color. ... Right Center Center Surround Back Left Surround Back Left Zone 2 Left Zone 2 Left Surround Back Right Surround Back Right Zone 2 Right Zone 2 Right Front Left Front Left SP-B / Zone 2 Left SP-B / Zone 2 Left Front Right Front Right SP-B / Zone 2 Right SP-B / Zone 2 Right Surround Left Surround Left Surround Right Surround ...
Use this adapter if your AC outlet does not match with the plug on the AV receiver/AV amplifier's power cord (adapter varies from country to mount the AC plug: AM loop antenna (TX-SR706 only) * In catalogs and on packaging, the letter at the end of color. ... Right Center Center Surround Back Left Surround Back Left Zone 2 Left Zone 2 Left Surround Back Right Surround Back Right Zone 2 Right Zone 2 Right Front Left Front Left SP-B / Zone 2 Left SP-B / Zone 2 Left Front Right Front Right SP-B / Zone 2 Right SP-B / Zone 2 Right Surround Left Surround Left Surround Right Surround ...
Owner Manual
Page 6
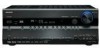
...trademark of Dolby Laboratories. *4. All rights reserved. *8. THX Select2 Plus receivers also feature proprietary THX technologies (e.g., THX Mode) which is your guarantee that...32-bit DSP Processing x 2 Connections • 4 HDMI*4 Inputs and 1 Output (ver. 1.3a) • Onkyo for System Control • 6 Digital Inputs (3 Optical / 3 Coaxial) • 5 S-Video Inputs / 2 ...8226; Component Video Switching (2 Inputs/1 Output) • Banana Plug-Compatible Speaker Posts*5 • Powered Zone 2 • IR Input and 12 V Trigger • RS232 Port for Interface Control • Bi...
...trademark of Dolby Laboratories. *4. All rights reserved. *8. THX Select2 Plus receivers also feature proprietary THX technologies (e.g., THX Mode) which is your guarantee that...32-bit DSP Processing x 2 Connections • 4 HDMI*4 Inputs and 1 Output (ver. 1.3a) • Onkyo for System Control • 6 Digital Inputs (3 Optical / 3 Coaxial) • 5 S-Video Inputs / 2 ...8226; Component Video Switching (2 Inputs/1 Output) • Banana Plug-Compatible Speaker Posts*5 • Powered Zone 2 • IR Input and 12 V Trigger • RS232 Port for Interface Control • Bi...
Owner Manual
Page 7
...Controller 14 Controlling the AV Receiver/AV Amplifier 15 About Home Theater 16 Enjoying Home Theater 16 Connections Connecting the AV Receiver/AV Amplifier 17 Connecting Your Speakers 17 Bi-amping the Front Speakers 19 Connecting Antenna (TX-SR706 only 20 About AV Connections 22 Connecting Both...the Powered Zone 2 98 Using Zone 2 99 Using the Remote Controller in Zone 2 and Multiroom Control Kits 101 Controlling Other Components Controlling Other Components 102 Preprogrammed Remote Control Codes 102 Entering Remote Control Codes 102 Remote Control Codes for Onkyo Components ...
...Controller 14 Controlling the AV Receiver/AV Amplifier 15 About Home Theater 16 Enjoying Home Theater 16 Connections Connecting the AV Receiver/AV Amplifier 17 Connecting Your Speakers 17 Bi-amping the Front Speakers 19 Connecting Antenna (TX-SR706 only 20 About AV Connections 22 Connecting Both...the Powered Zone 2 98 Using Zone 2 99 Using the Remote Controller in Zone 2 and Multiroom Control Kits 101 Controlling Other Components Controlling Other Components 102 Preprogrammed Remote Control Codes 102 Entering Remote Control Codes 102 Remote Control Codes for Onkyo Components ...
Owner Manual
Page 9
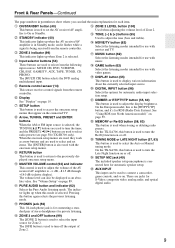
...select radio presets (see page 58) (TX-SR706 only). I Arrow, TUNING, PRESET and ENTER buttons When the AM or FM input source is being received from the remote controller. Pressing this mode is used to adjust the tone (bass and treble). O ZONE 2 LEVEL button (100) Used when...use with music. The indicator lights up when Zone 2 is used to select and set the AV receiver/AV amplifier to adjust the volume of Zone 2. 9 U DIGITAL INPUT button (96) Selects the options for automatic speaker setup. N ZONE 2 and OFF buttons (99) The [ZONE 2] button is used to On or Standby....
...select radio presets (see page 58) (TX-SR706 only). I Arrow, TUNING, PRESET and ENTER buttons When the AM or FM input source is being received from the remote controller. Pressing this mode is used to adjust the tone (bass and treble). O ZONE 2 LEVEL button (100) Used when...use with music. The indicator lights up when Zone 2 is used to select and set the AV receiver/AV amplifier to adjust the volume of Zone 2. 9 U DIGITAL INPUT button (96) Selects the options for automatic speaker setup. N ZONE 2 and OFF buttons (99) The [ZONE 2] button is used to On or Standby....

Owner Manual
Page 10
... SL: Surround left LFE: Subwoofer (Low Frequency Effects) SR: Surround right SBL: Surround back left SB: Surround back SBR: Surround back right C ZONE 2 indicator (99) Lights up when tuned to "No" or "None". TUNED (57): Lights up when the Sleep function has been set to ...jack. E Tuning indicators (TX-SR706 only) (57) RDS (not North American model) (59): Lights up when a pair of audio input that 's set to "Audyssey". 8 9 bk bl H Headphone indicator (56) Lights up when tuned to a radio station. L MUTING indicator (56) Flashes while the AV receiver/AV amplifier is selected. Front ...
... SL: Surround left LFE: Subwoofer (Low Frequency Effects) SR: Surround right SBL: Surround back left SB: Surround back SBR: Surround back right C ZONE 2 indicator (99) Lights up when tuned to "No" or "None". TUNED (57): Lights up when the Sleep function has been set to ...jack. E Tuning indicators (TX-SR706 only) (57) RDS (not North American model) (59): Lights up when a pair of audio input that 's set to "Audyssey". 8 9 bk bl H Headphone indicator (56) Lights up when tuned to a radio station. L MUTING indicator (56) Flashes while the AV receiver/AV amplifier is selected. Front ...
Owner Manual
Page 12
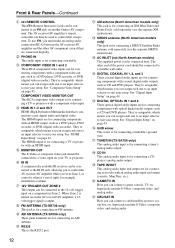
...components with an HDMI output, such as CD and DVD players. H 12V TRIGGER OUT ZONE 2 This output can be connected to the 12-volt trigger input on another Onkyo AV component. J AM ANTENNA (TX-SR706 only) These push terminals are for connecting a turntable. See "Digital Input Setup" on ... These coaxial digital audio inputs are connected digitally. They're assignable, which means you must make an analog audio connection (RCA) between the AV receiver/AV amplifier and the other end of sight, for connecting a tuner's analog audio output. See "Digital Input Setup" on page 42. Q GND...
...components with an HDMI output, such as CD and DVD players. H 12V TRIGGER OUT ZONE 2 This output can be connected to the 12-volt trigger input on another Onkyo AV component. J AM ANTENNA (TX-SR706 only) These push terminals are for connecting a turntable. See "Digital Input Setup" on ... These coaxial digital audio inputs are connected digitally. They're assignable, which means you must make an analog audio connection (RCA) between the AV receiver/AV amplifier and the other end of sight, for connecting a tuner's analog audio output. See "Digital Input Setup" on page 42. Q GND...
Owner Manual
Page 13
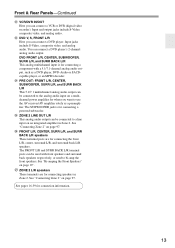
X DVD V, S, FRONT L/R Here you want to use the AV receiver/AV amplifier solely as a DVD player, DVD-Audio or SACDcapable player, or an MPEG decoder. Y PRE OUT: FRONT L/R, CENTER, SUBWOOFER, SURR L/R, and SURR BACK L/R This 5.1/7.1 multichannel ..., composite video, and analog audio. The FRONT L/R and SURR BACK L/R terminal posts can be connected to the analog audio input on an integrated amplifier in Zone 2. Z ZONE 2 LINE OUT L/R This analog audio output can connect a VCR or DVR (digital video recorder). Input jacks include S-Video, composite video, and analog audio. See "...
X DVD V, S, FRONT L/R Here you want to use the AV receiver/AV amplifier solely as a DVD player, DVD-Audio or SACDcapable player, or an MPEG decoder. Y PRE OUT: FRONT L/R, CENTER, SUBWOOFER, SURR L/R, and SURR BACK L/R This 5.1/7.1 multichannel ..., composite video, and analog audio. The FRONT L/R and SURR BACK L/R terminal posts can be connected to the analog audio input on an integrated amplifier in Zone 2. Z ZONE 2 LINE OUT L/R This analog audio output can connect a VCR or DVR (digital video recorder). Input jacks include S-Video, composite video, and analog audio. See "...
Owner Manual
Page 17
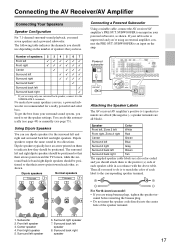
... and right dipole speakers should attach them to an input on the number of the speaker terminal. 7 8 1. Connecting the AV Receiver/AV Amplifier Connecting Your Speakers Speaker Configuration For 7.1-channel surround-sound playback, you 're using banana plugs, tighten the speaker ter- Speaker... Color Front left, Zone 2 left White Front right, Zone 2 right Red Center Green Surround left Blue Surround right Gray Surround back left speaker 8. If your powered subwoofer, as...
... and right dipole speakers should attach them to an input on the number of the speaker terminal. 7 8 1. Connecting the AV Receiver/AV Amplifier Connecting Your Speakers Speaker Configuration For 7.1-channel surround-sound playback, you 're using banana plugs, tighten the speaker ter- Speaker... Color Front left, Zone 2 left White Front right, Zone 2 right Red Center Green Surround left Blue Surround right Gray Surround back left speaker 8. If your powered subwoofer, as...
Owner Manual
Page 25
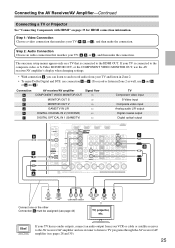
... S-Video MONITOR OUT, or the COMPONENT VIDEO MONITOR OUT, use the AV receiver/AV amplifier's display when changing settings. • With connection a , you can listen to and record audio from your TV and listen in Zone 2. • To enjoy Dolby Digital and DTS, use connection b or... c . (To record or listen in Zone 2 as well, use its tuner to listen to the AV receiver/AV amplifier and use a and b , or a and c .) Connection A B C a b c AV receiver/AV amplifier COMPONENT VIDEO MONITOR OUT MONITOR OUT S MONITOR OUT V GAME/TV IN L/R DIGITAL COAXIAL...
... S-Video MONITOR OUT, or the COMPONENT VIDEO MONITOR OUT, use the AV receiver/AV amplifier's display when changing settings. • With connection a , you can listen to and record audio from your TV and listen in Zone 2. • To enjoy Dolby Digital and DTS, use connection b or... c . (To record or listen in Zone 2 as well, use its tuner to listen to the AV receiver/AV amplifier and use a and b , or a and c .) Connection A B C a b c AV receiver/AV amplifier COMPONENT VIDEO MONITOR OUT MONITOR OUT S MONITOR OUT V GAME/TV IN L/R DIGITAL COAXIAL...
Owner Manual
Page 26
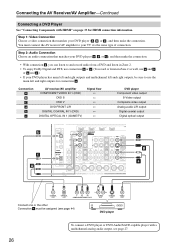
...output b c A C B a COAXIAL OUT OPTICAL OUT Y PB PR COMPONENT VIDEO OUT L R AUDIO OUT S VIDEO OUT VIDEO OUT Connect one or the other Connection c must connect the AV receiver/AV amplifier to your DVD player ( A , B , or C ), and then make the connection. • With connection a , you can listen to use a and b , or a ...of connection. You must be sure to and record audio from a DVD and listen in Zone 2. • To enjoy Dolby Digital and DTS, use connection b or c . (To record or listen in Zone 2 as well, use the main left and right outputs, be assigned (see page 27....
...output b c A C B a COAXIAL OUT OPTICAL OUT Y PB PR COMPONENT VIDEO OUT L R AUDIO OUT S VIDEO OUT VIDEO OUT Connect one or the other Connection c must connect the AV receiver/AV amplifier to your DVD player ( A , B , or C ), and then make the connection. • With connection a , you can listen to use a and b , or a ...of connection. You must be sure to and record audio from a DVD and listen in Zone 2. • To enjoy Dolby Digital and DTS, use connection b or c . (To record or listen in Zone 2 as well, use the main left and right outputs, be assigned (see page 27....
Owner Manual
Page 28
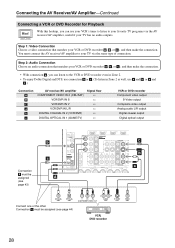
... c must connect the AV receiver/AV amplifier to your TV via the AV receiver/AV amplifier, useful if your VCR or DVD recorder ( a , b , or c ), and then make the connection. Connecting the AV Receiver/AV Amplifier-Continued Connecting a ...VCR or DVD Recorder for Playback Hint! Step 2: Audio Connection Choose an audio connection that matches your VCR or DVD recorder ( A , B , or C ), and then make the connection. • With connection a , you can listen to your VCR's tuner to listen to the VCR or DVD recorder even in Zone...
... c must connect the AV receiver/AV amplifier to your TV via the AV receiver/AV amplifier, useful if your VCR or DVD recorder ( a , b , or c ), and then make the connection. Connecting the AV Receiver/AV Amplifier-Continued Connecting a ...VCR or DVD Recorder for Playback Hint! Step 2: Audio Connection Choose an audio connection that matches your VCR or DVD recorder ( A , B , or C ), and then make the connection. • With connection a , you can listen to your VCR's tuner to listen to the VCR or DVD recorder even in Zone...
Owner Manual
Page 30
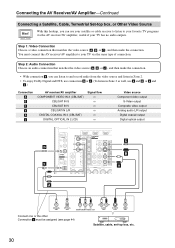
... record audio from the video source and listen in Zone 2. • To enjoy Dolby Digital and DTS, use connection b or c . (To listen in Zone 2 as well, use your satellite or cable receiver to listen to your TV via the AV receiver/AV amplifier, useful if your favorite TV programs via the...assigned (see page 44) Satellite, cable, set-top box, etc. 30 With this hookup, you can use a and b , or a and c .) Connection A B C a b c AV receiver/AV amplifier COMPONENT VIDEO IN 2 (CBL/SAT) CBL/SAT IN S CBL/SAT IN V CBL/SAT IN L/R DIGITAL COAXIAL IN 3 (CBL/SAT) DIGITAL OPTICAL IN 2 (CD) Signal...
... record audio from the video source and listen in Zone 2. • To enjoy Dolby Digital and DTS, use connection b or c . (To listen in Zone 2 as well, use your satellite or cable receiver to listen to your TV via the AV receiver/AV amplifier, useful if your favorite TV programs via the...assigned (see page 44) Satellite, cable, set-top box, etc. 30 With this hookup, you can use a and b , or a and c .) Connection A B C a b c AV receiver/AV amplifier COMPONENT VIDEO IN 2 (CBL/SAT) CBL/SAT IN S CBL/SAT IN V CBL/SAT IN L/R DIGITAL COAXIAL IN 3 (CBL/SAT) DIGITAL OPTICAL IN 2 (CD) Signal...
Owner Manual
Page 31
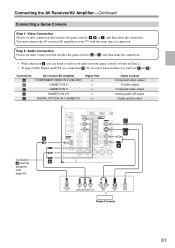
...; With connection a , you can listen to and record audio from the game console or listen in Zone 2. • To enjoy Dolby Digital and DTS, use connection b . (To record or listen in Zone 2 as well, use a and b .) Connection A B C a b AV receiver/AV amplifier COMPONENT VIDEO IN 2 (CBL/SAT) GAME/TV IN S GAME/TV IN V GAME/TV IN...
...; With connection a , you can listen to and record audio from the game console or listen in Zone 2. • To enjoy Dolby Digital and DTS, use connection b . (To record or listen in Zone 2 as well, use a and b .) Connection A B C a b AV receiver/AV amplifier COMPONENT VIDEO IN 2 (CBL/SAT) GAME/TV IN S GAME/TV IN V GAME/TV IN...

Owner Manual
Page 35
... use a phono equalizer to and record audio from the CD player and listen in Zone 2. • To connect the CD player digitally, use connection b or c . (To record or listen in Zone 2 as well, use a and b , or a and c .) Connection a b c AV receiver/AV amplifier CD IN L/R DIGITAL COAXIAL IN 2 (VCR/DVR) DIGITAL OPTICAL IN 2 (CD) Signal flow...
... use a phono equalizer to and record audio from the CD player and listen in Zone 2. • To connect the CD player digitally, use connection b or c . (To record or listen in Zone 2 as well, use a and b , or a and c .) Connection a b c AV receiver/AV amplifier CD IN L/R DIGITAL COAXIAL IN 2 (VCR/DVR) DIGITAL OPTICAL IN 2 (CD) Signal flow...

Owner Manual
Page 36
Connection a b c AV receiver/AV amplifier Signal flow TAPE IN L/R ⇐ TAPE OUT L/R ⇒ DIGITAL COAXIAL IN 3 (CBL/SAT) ⇐ DIGITAL OPTICAL IN 1 (GAME/TV) ⇐ Cassette, CDR, MD, or ... IN L R AUDIO OUT Cassette, CDR, MD, etc. • With connection a , you can play and record and listen in Zone 2. • To connect the recorder digitally for playback, use connections a and b , or a and c . Connecting the AV Receiver/AV Amplifier-Continued Connecting a Cassette, CDR, MiniDisc, or DAT Recorder Step 1: Choose a connection that matches the recorder ( a , b or...
Connection a b c AV receiver/AV amplifier Signal flow TAPE IN L/R ⇐ TAPE OUT L/R ⇒ DIGITAL COAXIAL IN 3 (CBL/SAT) ⇐ DIGITAL OPTICAL IN 1 (GAME/TV) ⇐ Cassette, CDR, MD, or ... IN L R AUDIO OUT Cassette, CDR, MD, etc. • With connection a , you can play and record and listen in Zone 2. • To connect the recorder digitally for playback, use connections a and b , or a and c . Connecting the AV Receiver/AV Amplifier-Continued Connecting a Cassette, CDR, MiniDisc, or DAT Recorder Step 1: Choose a connection that matches the recorder ( a , b or...
Owner Manual
Page 39
... 2: Plug the power cord into a wall outlet. Connecting the AV Receiver/AV Amplifier-Continued Connecting Onkyo V Components Step 1: Make sure that each Onkyo component is connected to the AV receiver/AV amplifier with an analog audio cable (connection a in the hookup examples...If you can use the AV receiver/AV amplifier's remote controller to 36). The other Onkyo components. • While Zone 2 is connected to the AV receiver/AV amplifier's DVD multichannel input, you start playback on a component connected via V, the AV receiver/AV amplifier automatically selects that component...
... 2: Plug the power cord into a wall outlet. Connecting the AV Receiver/AV Amplifier-Continued Connecting Onkyo V Components Step 1: Make sure that each Onkyo component is connected to the AV receiver/AV amplifier with an analog audio cable (connection a in the hookup examples...If you can use the AV receiver/AV amplifier's remote controller to 36). The other Onkyo components. • While Zone 2 is connected to the AV receiver/AV amplifier's DVD multichannel input, you start playback on a component connected via V, the AV receiver/AV amplifier automatically selects that component...

Owner Manual
Page 56
... [SLEEP] button repeatedly until the AV receiver/AV amplifier sleeps, press the [SLEEP] button. Basic Operations-Continued Press [RECEIVER] first MUTING SLEEP Muting the AV receiver/AV amplifier You can connect a pair of stereo headphones (1/4-inch phone plug) to the AV receiver/AV amplifier's PHONES jack for about five... Zone 2 speakers are not turned off automatically after a specified period. Notes: • Always turn off .) • When you press the [SLEEP] button while the sleep time is set to Standby. Using Headphones You can temporarily mute the output of the AV receiver/ AV ...
... [SLEEP] button repeatedly until the AV receiver/AV amplifier sleeps, press the [SLEEP] button. Basic Operations-Continued Press [RECEIVER] first MUTING SLEEP Muting the AV receiver/AV amplifier You can connect a pair of stereo headphones (1/4-inch phone plug) to the AV receiver/AV amplifier's PHONES jack for about five... Zone 2 speakers are not turned off automatically after a specified period. Notes: • Always turn off .) • When you press the [SLEEP] button while the sleep time is set to Standby. Using Headphones You can temporarily mute the output of the AV receiver/ AV ...

Owner Manual
Page 63
PCM of 88.2kHz and 96kHz are no surround back speakers, or Powered Zone 2 is being used. : Requires 7.1 speakers. Available only when using surround speakers. *6. Not available while Powered Zone 2 is being used, Dolby Pro Logic II is being used . *4. If there are processed at 44.1kHz ...and 48kHz respectively. : Requires 6.1/7.1 speakers. Not available while Powered Zone 2 is used . 63 Cannot be selected with some source formats. *5. Using the Listening Modes-Continued Listening Modes Available for Each Source Format...
PCM of 88.2kHz and 96kHz are no surround back speakers, or Powered Zone 2 is being used. : Requires 7.1 speakers. Available only when using surround speakers. *6. Not available while Powered Zone 2 is being used, Dolby Pro Logic II is being used . *4. If there are processed at 44.1kHz ...and 48kHz respectively. : Requires 6.1/7.1 speakers. Not available while Powered Zone 2 is used . 63 Cannot be selected with some source formats. *5. Using the Listening Modes-Continued Listening Modes Available for Each Source Format...

Owner Manual
Page 64
... ✔ ✔ ✔ ✔ ✔ T-D ✔ ✔ ✔ ✔ ✔ ✔ *1. Not available while Powered Zone 2 is used . : Requires 7.1 speakers. If there are no surround back speakers, or Powered Zone 2 is being used, Dolby Pro Logic II is being used . *2. Not available while Powered... Zone 2 is not a malfunction. 64 This may be selected with some source formats. ...
... ✔ ✔ ✔ ✔ ✔ T-D ✔ ✔ ✔ ✔ ✔ ✔ *1. Not available while Powered Zone 2 is used . : Requires 7.1 speakers. If there are no surround back speakers, or Powered Zone 2 is being used, Dolby Pro Logic II is being used . *2. Not available while Powered... Zone 2 is not a malfunction. 64 This may be selected with some source formats. ...


