
Owner Manual
Page 2
... apparatus near any ventilation openings. If the apparatus has been dropped or damaged in any way, and F. Don't put candles or other controls may be set 10 cm (4") away from the appara- REFER SERVICING TO QUALIFIED SERVICE PERSONNEL. The exclamation point within the product's enclosure that are pro- Keep these instructions...
... apparatus near any ventilation openings. If the apparatus has been dropped or damaged in any way, and F. Don't put candles or other controls may be set 10 cm (4") away from the appara- REFER SERVICING TO QUALIFIED SERVICE PERSONNEL. The exclamation point within the product's enclosure that are pro- Keep these instructions...

Owner Manual
Page 5
... 15 Enjoying Home Theater 15 Connecting the AV receiver 16 Connecting Your Speakers 16 Using Dipole Speakers 16 Bi-amping Front Speakers (TX-SR577 only)....... 19 Connecting Antenna 20 About AV Connections 22 Connecting Audio and Video Signals to the AV receiver 23 Which Connections Should I Use 23 ... Port connector 34 Connecting Onkyo V Components 35 Connecting the Power Cord 35 Turning On & First Time Setup Turning On the AV receiver 36 Turning On and Standby 36 First Time Setup 37 Audyssey 2EQ™ Room Correction and Speaker Setup 37 Speaker Settings 40 HDMI Input Setup...
... 15 Enjoying Home Theater 15 Connecting the AV receiver 16 Connecting Your Speakers 16 Using Dipole Speakers 16 Bi-amping Front Speakers (TX-SR577 only)....... 19 Connecting Antenna 20 About AV Connections 22 Connecting Audio and Video Signals to the AV receiver 23 Which Connections Should I Use 23 ... Port connector 34 Connecting Onkyo V Components 35 Connecting the Power Cord 35 Turning On & First Time Setup Turning On the AV receiver 36 Turning On and Standby 36 First Time Setup 37 Audyssey 2EQ™ Room Correction and Speaker Setup 37 Speaker Settings 40 HDMI Input Setup...

Owner Manual
Page 9
.... C STANDBY indicator (36) Lights up when Zone 2 is on Standby and flashes while a signal is on . Lights up when the AV receiver is being set items. The [ENTER] button is the [RT/PTY/TP] button, and it's used with music. On the European modes, this mode is...52) Used when storing or deleting radio presets. T MUSIC OPTIMIZER button (48) Turns the Music Optimizer on page 10. B ON/STANDBY button (36) Sets the AV receiver to connect a portable Audio Player. TONE button (47) Used to select the input source for private listening. D ZONE 2 indicator (82) Flashes when Zone...
.... C STANDBY indicator (36) Lights up when Zone 2 is on Standby and flashes while a signal is on . Lights up when the AV receiver is being set items. The [ENTER] button is the [RT/PTY/TP] button, and it's used with music. On the European modes, this mode is...52) Used when storing or deleting radio presets. T MUSIC OPTIMIZER button (48) Turns the Music Optimizer on page 10. B ON/STANDBY button (36) Sets the AV receiver to connect a portable Audio Player. TONE button (47) Used to select the input source for private listening. D ZONE 2 indicator (82) Flashes when Zone...

Owner Manual
Page 10
...muted. Goes off when Manual Tuning mode is selected for AM or FM radio. RDS (53): Lights up when the Sleep function has been set to a radio station that 's selected as the audio source: PCM, MULTI CH, or HDMI. D Listening mode and format indicators (59) ...input signal format. G Audio input indicators Indicate the type of audio input that supports RDS (Radio Data System). C MUTING indicator (46) Flashes while the AV receiver is set . H Audyssey indicator (38, 70) Flashes during Audyssey 2EQ™ Room Correction and Speaker Setup. E Tuning indicators (50) FM STEREO (50): ...
...muted. Goes off when Manual Tuning mode is selected for AM or FM radio. RDS (53): Lights up when the Sleep function has been set to a radio station that 's selected as the audio source: PCM, MULTI CH, or HDMI. D Listening mode and format indicators (59) ...input signal format. G Audio input indicators Indicate the type of audio input that supports RDS (Radio Data System). C MUTING indicator (46) Flashes while the AV receiver is set . H Audyssey indicator (38, 70) Flashes during Audyssey 2EQ™ Room Correction and Speaker Setup. E Tuning indicators (50) FM STEREO (50): ...

Owner Manual
Page 12
...used to a video input on another V-capable Onkyo component for connecting components with front high speakers respectively,...Settings" on page 19. The FRONT HIGH L/R terminal can be used to a powered subwoofer. The HDMI inputs are analog audio input jacks for connecting a CD player's analog audio output. There is for connecting the audio signal. R PRE OUT: SURR BACK L/R (TX-SR507...TX-SR577 only) These terminal posts are for connecting the front high L/R speakers. They're assignable, which means you must make an analog audio connection (RCA) between the AV receiver...
...used to a video input on another V-capable Onkyo component for connecting components with front high speakers respectively,...Settings" on page 19. The FRONT HIGH L/R terminal can be used to a powered subwoofer. The HDMI inputs are analog audio input jacks for connecting a CD player's analog audio output. There is for connecting the audio signal. R PRE OUT: SURR BACK L/R (TX-SR507...TX-SR577 only) These terminal posts are for connecting the front high L/R speakers. They're assignable, which means you must make an analog audio connection (RCA) between the AV receiver...

Owner Manual
Page 13
...change audio settings. When the "AudioTVOut" setting is set to the previous display when changing settings. B C * RECEIVER 1D E H3 TUNER I MUTING button (46) Mutes or unmutes the AV receiver. E SETUP button Used to change settings. F ...AV receiver to select the listening modes. See page 84 for a different component, see the pages in the Direct tuning mode. H DISPLAY button (47) Displays information about the band, frequency, preset number, and so on entering a remote control code for more details. Also you must first enter remote control code. Note: An Onkyo...
...change audio settings. When the "AudioTVOut" setting is set to the previous display when changing settings. B C * RECEIVER 1D E H3 TUNER I MUTING button (46) Mutes or unmutes the AV receiver. E SETUP button Used to change settings. F ...AV receiver to select the listening modes. See page 84 for a different component, see the pages in the Direct tuning mode. H DISPLAY button (47) Displays information about the band, frequency, preset number, and so on entering a remote control code for more details. Also you must first enter remote control code. Note: An Onkyo...
Owner Manual
Page 16
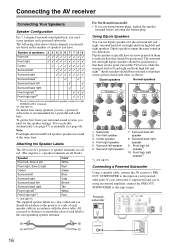
...Red *1 (TX-SR577) The supplied speaker labels are using banana plugs, tighten the speaker terminal before inserting the banana plug. Front right speaker 5. Note: Front high and surround back speakers produce no sound at the same time. Attaching the Speaker Labels The AV receiver's positive ...shown. To get the best from your powered subwoofer. You can use , a powered subwoofer is to the amp's input. All you must set the speaker settings. Dipole speakers typically have . The surround left *2 Front high right*2 ✓ ✓ ✓✓✓ ✓✓✓ ...
...Red *1 (TX-SR577) The supplied speaker labels are using banana plugs, tighten the speaker terminal before inserting the banana plug. Front right speaker 5. Note: Front high and surround back speakers produce no sound at the same time. Attaching the Speaker Labels The AV receiver's positive ...shown. To get the best from your powered subwoofer. You can use , a powered subwoofer is to the amp's input. All you must set the speaker settings. Dipole speakers typically have . The surround left *2 Front high right*2 ✓ ✓ ✓✓✓ ✓✓✓ ...

Owner Manual
Page 17
... shown. 3/8"-1/2" (10-12mm) 2 While pressing the lever, insert the wire into the hole, and then release the lever. Doing so may damage the AV receiver. • Don't connect more , but less than one cable to each speaker terminal. If you use speakers with a lower impedance, and use the amplifier... impedance of between 4 and 16 ohms. If the impedance of any of the connected speakers is 4 ohms or more than 6 ohms, be sure to set the minimum speaker impedance to "4 ohms" (see page 40). Connect positive (+) terminals to only positive (+) terminals, and negative (-) terminals to short the...
... shown. 3/8"-1/2" (10-12mm) 2 While pressing the lever, insert the wire into the hole, and then release the lever. Doing so may damage the AV receiver. • Don't connect more , but less than one cable to each speaker terminal. If you use speakers with a lower impedance, and use the amplifier... impedance of between 4 and 16 ohms. If the impedance of any of the connected speakers is 4 ohms or more than 6 ohms, be sure to set the minimum speaker impedance to "4 ohms" (see page 40). Connect positive (+) terminals to only positive (+) terminals, and negative (-) terminals to short the...

Owner Manual
Page 18
... speaker should be connected to each pair of terminals for 7.1-channel playback . If you 're using the "Speaker Settings" on page 40 and "Speaker Setup" on page 66. 18 Connecting the AV receiver-Continued ■ TX-SR507 The following illustration shows which speaker should be connected to each pair of terminals for up to the...
... speaker should be connected to each pair of terminals for 7.1-channel playback . If you 're using the "Speaker Settings" on page 40 and "Speaker Setup" on page 66. 18 Connecting the AV receiver-Continued ■ TX-SR507 The following illustration shows which speaker should be connected to each pair of terminals for up to the...
Owner Manual
Page 19
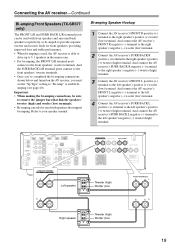
...you've completed the bi-amping connections shown below and turned on the AV receiver, you must set the "Sp Type" setting to "Bi-Amp" to the right speaker's positive (+) tweeter (high) terminal. And connect the AV receiver's FRONT R negative (-) terminal to the right speaker's negative (-) woofer...Hookup 1 Connect the AV receiver's FRONT R positive (+) terminal to the left speaker's positive (+) woofer (low) terminal. Connecting the AV receiver-Continued Bi-amping Front Speakers (TX-SR577 only) The FRONT L/R and SURR BACK L/R terminal posts can only be used , the AV receiver is able to ...
...you've completed the bi-amping connections shown below and turned on the AV receiver, you must set the "Sp Type" setting to "Bi-Amp" to the right speaker's positive (+) tweeter (high) terminal. And connect the AV receiver's FRONT R negative (-) terminal to the right speaker's negative (-) woofer...Hookup 1 Connect the AV receiver's FRONT R positive (+) terminal to the left speaker's positive (+) woofer (low) terminal. Connecting the AV receiver-Continued Bi-amping Front Speakers (TX-SR577 only) The FRONT L/R and SURR BACK L/R terminal posts can only be used , the AV receiver is able to ...

Owner Manual
Page 24
... component more than the following standard: Repeater System, Deep Color, x.v. Connecting the AV receiver-Continued Connecting Components with CEC (Consumer Electronics Control), which stands for digital video signals. The AV receiver's HDMI interface is based on Onkyo components. The AV receiver can be guaranteed. • Set "HDMI Ctrl (RIHD)" to meet the increased demands of digital TV, HDMI...
... component more than the following standard: Repeater System, Deep Color, x.v. Connecting the AV receiver-Continued Connecting Components with CEC (Consumer Electronics Control), which stands for digital video signals. The AV receiver's HDMI interface is based on Onkyo components. The AV receiver can be guaranteed. • Set "HDMI Ctrl (RIHD)" to meet the increased demands of digital TV, HDMI...

Owner Manual
Page 25
... to an HDMI component through your TV's speakers, set the "AudioTVOut" setting to "On" (see page 76). Refer to the AV receiver). In addition, video signals from the AV receiver or the sound may be cut off or the TV is set to another input source, this may result in the... the connected component's instruction manual for details. 25 To stop the AV receiver's speakers producing sound, change the settings, change your TV's speakers, if you 're listening through your TV's settings, or turn up the AV receiver volume control, the sound will be connected by using an HDMI-to...
... to an HDMI component through your TV's speakers, set the "AudioTVOut" setting to "On" (see page 76). Refer to the AV receiver). In addition, video signals from the AV receiver or the sound may be cut off or the TV is set to another input source, this may result in the... the connected component's instruction manual for details. 25 To stop the AV receiver's speakers producing sound, change the settings, change your TV's speakers, if you 're listening through your TV's settings, or turn up the AV receiver volume control, the sound will be connected by using an HDMI-to...

Owner Manual
Page 30
... L R AUDIO OUT VIDEO OUT Satellite, cable, set-top box, etc. 30 Connecting the AV receiver-Continued Connecting a Satellite, Cable, Terrestrial Set-top box, or Other Video Source Hint! With this hookup, you can use a and b , or a and c .) Connection A B a b c AV receiver COMPONENT VIDEO IN 2 (CBL/SAT) CBL/SAT ... Digital optical output c CB b a A OPTICAL OUT Connect one or the other Connection c must connect the AV receiver to your favorite TV programs via the AV receiver, which is useful if your TV with the same type of connection. Step 2: Audio Connection Choose an audio...
... L R AUDIO OUT VIDEO OUT Satellite, cable, set-top box, etc. 30 Connecting the AV receiver-Continued Connecting a Satellite, Cable, Terrestrial Set-top box, or Other Video Source Hint! With this hookup, you can use a and b , or a and c .) Connection A B a b c AV receiver COMPONENT VIDEO IN 2 (CBL/SAT) CBL/SAT ... Digital optical output c CB b a A OPTICAL OUT Connect one or the other Connection c must connect the AV receiver to your favorite TV programs via the AV receiver, which is useful if your TV with the same type of connection. Step 2: Audio Connection Choose an audio...

Owner Manual
Page 34
... increases. 34 Connecting a Dock with an V cable (see page 35). • Set the RI Dock's RI MODE switch to "HDD" or "HDD/DOCK". • Set the AV receiver's Input Display to the AV receiver's CBL/SAT IN or VCR/DVR IN V jack. Connecting the AV receiver-Continued Connecting an RI Dock Not all iPod models output video. For...
... increases. 34 Connecting a Dock with an V cable (see page 35). • Set the RI Dock's RI MODE switch to "HDD" or "HDD/DOCK". • Set the AV receiver's Input Display to the AV receiver's CBL/SAT IN or VCR/DVR IN V jack. Connecting the AV receiver-Continued Connecting an RI Dock Not all iPod models output video. For...

Owner Manual
Page 35
... (see page 85). Notes: • Use only V cables for connecting additional V-capable components. • Connect only Onkyo components to V jacks. Similarly, when the AV receiver is set to Standby, all V functions. Step 3: If you can use the AV receiver's remote controller to control your other manufacturer's components may cause a malfunction. • Some components may cause a momentary...
... (see page 85). Notes: • Use only V cables for connecting additional V-capable components. • Connect only Onkyo components to V jacks. Similarly, when the AV receiver is set to Standby, all V functions. Step 3: If you can use the AV receiver's remote controller to control your other manufacturer's components may cause a malfunction. • Some components may cause a momentary...

Owner Manual
Page 36
... Input Setup" on the AV receiver, turn down the volume before you connect an Onkyo MD recorder, CD recorder, or RI Dock? The AV receiver will enter Standby mode. On the remote controller, press the [RECEIVER] button, followed by the [ON/STANDBY] button. These settings only need to help you configure the AV receiver before you turn it for...
... Input Setup" on the AV receiver, turn down the volume before you connect an Onkyo MD recorder, CD recorder, or RI Dock? The AV receiver will enter Standby mode. On the remote controller, press the [RECEIVER] button, followed by the [ON/STANDBY] button. These settings only need to help you configure the AV receiver before you turn it for...

Owner Manual
Page 37
... before using this function, connect and position all of your home theater simultaneously, Audyssey 2EQ takes measurements at any user-selected volume setting. The result is bass response, tonal balance, and surround impression that remain constant despite changes in the room, a prerequisite for the...passages of movies. Dynamic Volume looks at any volume level. (See page 72) Before using the AV receiver for delivering a loudness correction solution. Audyssey Dynamic EQ is set to maintain the desired playback volume level while optimizing the dynamic range. If Audyssey Dynanic EQ is...
... before using this function, connect and position all of your home theater simultaneously, Audyssey 2EQ takes measurements at any user-selected volume setting. The result is bass response, tonal balance, and surround impression that remain constant despite changes in the room, a prerequisite for the...passages of movies. Dynamic Volume looks at any volume level. (See page 72) Before using the AV receiver for delivering a loudness correction solution. Audyssey Dynamic EQ is set to maintain the desired playback volume level while optimizing the dynamic range. If Audyssey Dynanic EQ is...

Owner Manual
Page 38
... running the Audyssey 2EQ Room Correction and speaker setup (see page 40). • If the AV receiver is muted, it to steps 5-6 on "Speaker Settings" (page 40) or step 5 on "Setting the Powered Zone 2" (page 81). Do not hold the microphone in use). 3 Press [ENTER]. Note: You can.... 4 When the following display appears, move the speaker setup microphone to measurement point C (page 37), and then press [ENTER]. (TX-SR577) The speaker setting menu appears. This takes a few minutes. First Time Setup-Continued Using Audyssey 2EQ™ Notes: • If any of your hand...
... running the Audyssey 2EQ Room Correction and speaker setup (see page 40). • If the AV receiver is muted, it to steps 5-6 on "Speaker Settings" (page 40) or step 5 on "Setting the Powered Zone 2" (page 81). Do not hold the microphone in use). 3 Press [ENTER]. Note: You can.... 4 When the following display appears, move the speaker setup microphone to measurement point C (page 37), and then press [ENTER]. (TX-SR577) The speaker setting menu appears. This takes a few minutes. First Time Setup-Continued Using Audyssey 2EQ™ Notes: • If any of your hand...

Owner Manual
Page 39
...Errors This message appears if saving fails. ❏ Mismatch Error This message appears if a speaker that cannot be performed properly. Changing the Speaker Settings Manually If you 're using a powered subwoofer, as it outputs very low-frequency sound and its highest crossover frequency, and then try again. ... usually low down, it may not be detected, so use an appropriate volume level. If the subwoofer has a low-pass filter switch, set too high and the sound distorts, it may not be detected by disconnecting the setup microphone. If this case, increase the subwoofer's volume...
...Errors This message appears if saving fails. ❏ Mismatch Error This message appears if a speaker that cannot be performed properly. Changing the Speaker Settings Manually If you 're using a powered subwoofer, as it outputs very low-frequency sound and its highest crossover frequency, and then try again. ... usually low down, it may not be detected, so use an appropriate volume level. If the subwoofer has a low-pass filter switch, set too high and the sound distorts, it may not be detected by disconnecting the setup microphone. If this case, increase the subwoofer's volume...

Owner Manual
Page 40
... front high speakers to the SURR BACK L/R terminal posts. Note: Powered Zone2 cannot be used , the AV receiver is 4 ohms or more but less than 6. 6 ohms: Select if the impedances of less than 6, set to "Bi-Amp". Speaker Setup", and then press [ENTER]. 6 3 Use the Up and Down [R]/[X]...select (TX-SR577 only): Normal: Select this if you 've connected your front speakers for bi-amped operation. For hookup information, see page 37). Notes: • When bi-amping is used if "Sp Type" is set to "Not Act" (page 81), this setting cannot be performed on the AV receiver by the...
... front high speakers to the SURR BACK L/R terminal posts. Note: Powered Zone2 cannot be used , the AV receiver is 4 ohms or more but less than 6. 6 ohms: Select if the impedances of less than 6, set to "Bi-Amp". Speaker Setup", and then press [ENTER]. 6 3 Use the Up and Down [R]/[X]...select (TX-SR577 only): Normal: Select this if you 've connected your front speakers for bi-amped operation. For hookup information, see page 37). Notes: • When bi-amping is used if "Sp Type" is set to "Not Act" (page 81), this setting cannot be performed on the AV receiver by the...


