
Owner Manual
Page 1
... for purchasing an Onkyo AV Receiver. Please retain this manual will enable you for future reference. Following the instructions in the unit. Contents Introduction 2 Connections 15 Turning On & First Time Setup ...36 Basic Operations 45 Using the Listening Modes ........59 Advanced Setup 66 Zone 2 80 Controlling Other Components...84 Others 93 En AV Receiver TX-SR507 TX-SR577 Instruction...
... for purchasing an Onkyo AV Receiver. Please retain this manual will enable you for future reference. Following the instructions in the unit. Contents Introduction 2 Connections 15 Turning On & First Time Setup ...36 Basic Operations 45 Using the Listening Modes ........59 Advanced Setup 66 Zone 2 80 Controlling Other Components...84 Others 93 En AV Receiver TX-SR507 TX-SR577 Instruction...

Owner Manual
Page 5
...AV receiver 16 Connecting Your Speakers 16 Using Dipole Speakers 16 Bi-amping Front Speakers (TX-SR577 only)....... 19 Connecting Antenna 20 About AV Connections 22 Connecting Audio and Video Signals to the AV receiver...Universal Port connector 34 Connecting Onkyo V Components 35 Connecting the Power Cord 35 Turning On & First Time Setup Turning On the AV receiver 36 Turning On and Standby ... 75 Hardware Setup 76 Using the Audio Settings 78 Zone 2 Zone 2 80 Connecting Zone 2 80 Powered Zone 2 Setting 81 Using Zone 2 82 Controlling Other Components Controlling Other Components 84 ...
...AV receiver 16 Connecting Your Speakers 16 Using Dipole Speakers 16 Bi-amping Front Speakers (TX-SR577 only)....... 19 Connecting Antenna 20 About AV Connections 22 Connecting Audio and Video Signals to the AV receiver...Universal Port connector 34 Connecting Onkyo V Components 35 Connecting the Power Cord 35 Turning On & First Time Setup Turning On the AV receiver 36 Turning On and Standby ... 75 Hardware Setup 76 Using the Audio Settings 78 Zone 2 Zone 2 80 Connecting Zone 2 80 Powered Zone 2 Setting 81 Using Zone 2 82 Controlling Other Components Controlling Other Components 84 ...

Owner Manual
Page 6
...Sync, DTS-HD Master Audio, DTS-HD High Resolution Audio, Dolby TrueHD, Dolby Digital Plus, SA-CD and Multichannel PCM) • Onkyo for System Control • HDTV-Ready Component Video Switching (2 Inputs/1 Output) • Front "Portable" Input for iPod* and MP3 ... 4 Digital Inputs (2 Optical/2 Coaxial) • Powered Zone 2 • Color-Coded Banana Plug Speaker Posts*6 • Surround Back and Subwoofer Pre Out (TX-SR507) / Subwoofer Pre Out (TX-SR577) • Bi-Amp Capability for Music and Movie Sound Effects (TX-SR577) Miscellaneous • 40 AM/FM Presets • ...
...Sync, DTS-HD Master Audio, DTS-HD High Resolution Audio, Dolby TrueHD, Dolby Digital Plus, SA-CD and Multichannel PCM) • Onkyo for System Control • HDTV-Ready Component Video Switching (2 Inputs/1 Output) • Front "Portable" Input for iPod* and MP3 ... 4 Digital Inputs (2 Optical/2 Coaxial) • Powered Zone 2 • Color-Coded Banana Plug Speaker Posts*6 • Surround Back and Subwoofer Pre Out (TX-SR507) / Subwoofer Pre Out (TX-SR577) • Bi-Amp Capability for Music and Movie Sound Effects (TX-SR577) Miscellaneous • 40 AM/FM Presets • ...

Owner Manual
Page 7
...can enjoy up to 7.1-channel playback (see page 80). * The listening modes cannot be used with this AV receiver-a surround-sound speaker system (up to 7.1 channels) in your Zone 2 room, you can select a different audio source for each room. Front left and right speakers Surround back...reduced to 5.1-channels (see page 80). Left and right stereo speakers 7 Zone 2: In your main listening room, a stereo speaker system in a second room, or Zone 2, as Dolby and DTS (pages 59-65). (TX-SR507) * While Powered Zone 2 is being used , nothing is output by these speakers (page 81)....
...can enjoy up to 7.1-channel playback (see page 80). * The listening modes cannot be used with this AV receiver-a surround-sound speaker system (up to 7.1 channels) in your Zone 2 room, you can select a different audio source for each room. Front left and right speakers Surround back...reduced to 5.1-channels (see page 80). Left and right stereo speakers 7 Zone 2: In your main listening room, a stereo speaker system in a second room, or Zone 2, as Dolby and DTS (pages 59-65). (TX-SR507) * While Powered Zone 2 is being used , nothing is output by these speakers (page 81)....

Owner Manual
Page 9
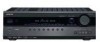
...Used to connect a camcorder, game console, and so on or off the output of Zone 2. [-] & [+] buttons (83) Used to adjust the tone (bass and treble) and the volume level of the AV receiver to select the input source for private listening. J GAME button (59) Selects the ...K DIMMER (RT/PTY/TP) button (46, 54) Adjusts the display brightness. R MASTER VOLUME control (45) Sets the volume of Zone 2. The indicator lights up when the AV receiver is on . PORTABLE (31): Used to On or Standby. N DISPLAY button (47) Displays various information about the currently selected input...
...Used to connect a camcorder, game console, and so on or off the output of Zone 2. [-] & [+] buttons (83) Used to adjust the tone (bass and treble) and the volume level of the AV receiver to select the input source for private listening. J GAME button (59) Selects the ...K DIMMER (RT/PTY/TP) button (46, 54) Adjusts the display brightness. R MASTER VOLUME control (45) Sets the volume of Zone 2. The indicator lights up when the AV receiver is on . PORTABLE (31): Used to On or Standby. N DISPLAY button (47) Displays various information about the currently selected input...

Owner Manual
Page 12
...must make an analog audio connection (RCA) between the AV receiver and the other component, even if they are for connecting an AM antenna. Q ZONE 2 LINE OUT L/R These analog audio outputs can be ... satellite receiver can be connected here. See "Speaker Settings" on page 41. There is for remote and system control. The SURR BACK L/R terminals can be used to a video input on another V-capable Onkyo component...connecting the video signal. R PRE OUT: SURR BACK L/R (TX-SR507 only) This analog audio output can be connected to connect the front high L/R speakers. See "...
...must make an analog audio connection (RCA) between the AV receiver and the other component, even if they are for connecting an AM antenna. Q ZONE 2 LINE OUT L/R These analog audio outputs can be ... satellite receiver can be connected here. See "Speaker Settings" on page 41. There is for remote and system control. The SURR BACK L/R terminals can be used to a video input on another V-capable Onkyo component...connecting the video signal. R PRE OUT: SURR BACK L/R (TX-SR507 only) This analog audio output can be connected to connect the front high L/R speakers. See "...
Owner Manual
Page 16
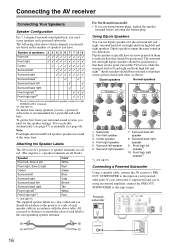
... cable in two directions. Attaching the Speaker Labels The AV receiver's positive (+) speaker terminals are all red. (The negative (-) speaker terminals are all black.) Speaker Color Front left, Zone 2 left White Front right, Zone 2 right Red Center Green Surround left Blue Surround right... right speaker 9. You can use based on the number of each other, as shown. Front right speaker 5. Surround right speaker *1 (TX-SR577) 7 8 7. Front high left speaker 3. Front left speaker*1 10. Surround back left speaker 6. Powered subwoofer LINE INPUT LINE ...
... cable in two directions. Attaching the Speaker Labels The AV receiver's positive (+) speaker terminals are all red. (The negative (-) speaker terminals are all black.) Speaker Color Front left, Zone 2 left White Front right, Zone 2 right Red Center Green Surround left Blue Surround right... right speaker 9. You can use based on the number of each other, as shown. Front right speaker 5. Surround right speaker *1 (TX-SR577) 7 8 7. Front high left speaker 3. Front left speaker*1 10. Surround back left speaker 6. Powered subwoofer LINE INPUT LINE ...

Owner Manual
Page 26
...; To enjoy Dolby Digital and DTS, use connection b or c . (To record or listen in Zone 2 as well, use its tuner to listen to the AV receiver and use a and b , or a and c .) Connection A B a b c AV receiver COMPONENT VIDEO OUT MONITOR OUT V TV/TAPE IN L/R DIGITAL IN COAXIAL 2 (CBL/SAT) DIGITAL IN OPTICAL 1... make the connection. • With connection a , you can listen to and record audio from your VCR or cable or satellite receiver to TV programs through the AV receiver (see page 43) TV, projector, etc. VIDEO IN Hint! If your TV has no audio outputs, connect an audio output ...
...; To enjoy Dolby Digital and DTS, use connection b or c . (To record or listen in Zone 2 as well, use its tuner to listen to the AV receiver and use a and b , or a and c .) Connection A B a b c AV receiver COMPONENT VIDEO OUT MONITOR OUT V TV/TAPE IN L/R DIGITAL IN COAXIAL 2 (CBL/SAT) DIGITAL IN OPTICAL 1... make the connection. • With connection a , you can listen to and record audio from your VCR or cable or satellite receiver to TV programs through the AV receiver (see page 43) TV, projector, etc. VIDEO IN Hint! If your TV has no audio outputs, connect an audio output ...

Owner Manual
Page 27
...Step 1: Video Connection Choose a video connection that matches your DVD/BD player ( a , b , or c ), and then make the connection. Connection A B a b c AV receiver COMPONENT VIDEO IN 1 (DVD/BD) DVD/BD IN V DVD/BD IN L/R DIGITAL IN COAXIAL 1 (DVD/BD) DIGITAL IN OPTICAL 1 (TV/TAPE) Signal flow DVD/BD ... R AUDIO OUT Connect one or the other Connection c must connect the AV receiver to and record audio from a DVD or listen in Zone 2. • To enjoy Dolby Digital and DTS, use connection b or c . (To record or listen in Zone 2 as well, use the main left and right outputs, be assigned ...
...Step 1: Video Connection Choose a video connection that matches your DVD/BD player ( a , b , or c ), and then make the connection. Connection A B a b c AV receiver COMPONENT VIDEO IN 1 (DVD/BD) DVD/BD IN V DVD/BD IN L/R DIGITAL IN COAXIAL 1 (DVD/BD) DIGITAL IN OPTICAL 1 (TV/TAPE) Signal flow DVD/BD ... R AUDIO OUT Connect one or the other Connection c must connect the AV receiver to and record audio from a DVD or listen in Zone 2. • To enjoy Dolby Digital and DTS, use connection b or c . (To record or listen in Zone 2 as well, use the main left and right outputs, be assigned ...

Owner Manual
Page 28
...Digital coaxial output Digital optical output c CB b a A OPTICAL OUT COAXIAL OUT Connect one or the other Connection must connect the AV receiver to your favorite TV programs via the AV receiver, useful if your TV has no audio outputs. You must be assigned (see page 43) Y PB PR COMPONENT VIDEO OUT ...the VCR or DVR even in Zone 2. • To enjoy Dolby Digital and DTS, use connection b or c . (To listen in Zone 2 as well, use your VCR's tuner to listen to your VCR or DVR ( A or B ), and then make the connection. Connecting the AV receiver-Continued Connecting a VCR or DVR...
...Digital coaxial output Digital optical output c CB b a A OPTICAL OUT COAXIAL OUT Connect one or the other Connection must connect the AV receiver to your favorite TV programs via the AV receiver, useful if your TV has no audio outputs. You must be assigned (see page 43) Y PB PR COMPONENT VIDEO OUT ...the VCR or DVR even in Zone 2. • To enjoy Dolby Digital and DTS, use connection b or c . (To listen in Zone 2 as well, use your VCR's tuner to listen to your VCR or DVR ( A or B ), and then make the connection. Connecting the AV receiver-Continued Connecting a VCR or DVR...

Owner Manual
Page 30
...you can listen to and record audio from the video source or listen in Zone 2. • To enjoy Dolby Digital and DTS, use connection b or c . (To record or listen in Zone 2 as well, use your satellite or cable receiver to listen to your TV has no audio outputs. Step 1: Video Connection ... R AUDIO OUT VIDEO OUT Satellite, cable, set-top box, etc. 30 With this hookup, you can use a and b , or a and c .) Connection A B a b c AV receiver COMPONENT VIDEO IN 2 (CBL/SAT) CBL/SAT IN V CBL/SAT IN L/R DIGITAL IN COAXIAL 2 (CBL/SAT) DIGITAL IN OPTICAL 1 (TV/TAPE) Signal flow Video source...
...you can listen to and record audio from the video source or listen in Zone 2. • To enjoy Dolby Digital and DTS, use connection b or c . (To record or listen in Zone 2 as well, use your satellite or cable receiver to listen to your TV has no audio outputs. Step 1: Video Connection ... R AUDIO OUT VIDEO OUT Satellite, cable, set-top box, etc. 30 With this hookup, you can use a and b , or a and c .) Connection A B a b c AV receiver COMPONENT VIDEO IN 2 (CBL/SAT) CBL/SAT IN V CBL/SAT IN L/R DIGITAL IN COAXIAL 2 (CBL/SAT) DIGITAL IN OPTICAL 1 (TV/TAPE) Signal flow Video source...

Owner Manual
Page 32
...you can listen to and record audio from the CD player or listen in Zone 2. • To connect the CD player digitally, use connection b or c . (To record or listen in Zone 2 as well, use a and b , or a and c .) Connection a b c AV receiver CD IN L/R DIGITAL IN COAXIAL 2 (CBL/SAT) DIGITAL IN OPTICAL .... ■ Turntable with Built-in Phono Preamp Step 1: Choose a connection that doesn't have a phono preamp built-in phono preamp. Connecting the AV receiver-Continued Connecting a CD Player or Turntable ■ CD Player or Turntable (MM) with an MC (Moving Coil) Cartridge An MC head amp and...
...you can listen to and record audio from the CD player or listen in Zone 2. • To connect the CD player digitally, use connection b or c . (To record or listen in Zone 2 as well, use a and b , or a and c .) Connection a b c AV receiver CD IN L/R DIGITAL IN COAXIAL 2 (CBL/SAT) DIGITAL IN OPTICAL .... ■ Turntable with Built-in Phono Preamp Step 1: Choose a connection that doesn't have a phono preamp built-in phono preamp. Connecting the AV receiver-Continued Connecting a CD Player or Turntable ■ CD Player or Turntable (MM) with an MC (Moving Coil) Cartridge An MC head amp and...

Owner Manual
Page 33
..., MD, etc. • With connection a , you can play and record or listen in Zone 2. • To connect the recorder digitally for playback, use connections a and b , or a and c . Connection a b c AV receiver TV/TAPE IN L/R TV/TAPE OUT L/R DIGITAL IN COAXIAL 2 (CBL/SAT) DIGITAL IN OPTICAL...CDR, MD, or DAT recorder Analog audio L/R output Analog audio L/R input Digital coaxial output Digital optical output 33 Connecting the AV receiver-Continued Connecting a Cassette, CDR, MiniDisc, or DAT Recorder Step 1: Choose a connection that matches your recorder ( a , b , or c ), and ...
..., MD, etc. • With connection a , you can play and record or listen in Zone 2. • To connect the recorder digitally for playback, use connections a and b , or a and c . Connection a b c AV receiver TV/TAPE IN L/R TV/TAPE OUT L/R DIGITAL IN COAXIAL 2 (CBL/SAT) DIGITAL IN OPTICAL...CDR, MD, or DAT recorder Analog audio L/R output Analog audio L/R input Digital coaxial output Digital optical output 33 Connecting the AV receiver-Continued Connecting a Cassette, CDR, MiniDisc, or DAT Recorder Step 1: Choose a connection that matches your recorder ( a , b , or c ), and ...

Owner Manual
Page 35
...AV receiver and not the other V-capable Onkyo components. And remember to V jacks. You can use the following special functions: ■ Auto Power On/Standby When you 're using an MD, CDR, or RI DOCK component, change the Input Display (see page 44). Connecting other Onkyo components. • While Zone...other jack is connected to Standby, all components connected via V, the AV receiver automatically selects that each Onkyo component is for V connections. Connecting the AV receiver-Continued Connecting Onkyo V Components Step 1: Make sure that component as the input source....
...AV receiver and not the other V-capable Onkyo components. And remember to V jacks. You can use the following special functions: ■ Auto Power On/Standby When you 're using an MD, CDR, or RI DOCK component, change the Input Display (see page 44). Connecting other Onkyo components. • While Zone...other jack is connected to Standby, all components connected via V, the AV receiver automatically selects that each Onkyo component is for V connections. Connecting the AV receiver-Continued Connecting Onkyo V Components Step 1: Make sure that component as the input source....

Owner Manual
Page 38
...room as quiet as possible. Note: You can disrupt the room measurements. Total measurement time varies depending on the AV receiver. If you run the auto setup again, as room EQ characteristics may cause measurement disruptions (even if the ... change these settings, refer to steps 5-6 on "Speaker Settings" (page 40) or step 5 on "Setting the Powered Zone 2" (page 81). First Time Setup-Continued Using Audyssey 2EQ™ Notes: • If any of your hand during ... setup microphone to measurement point C (page 37), and then press [ENTER]. (TX-SR577) The speaker setting menu appears.
...room as quiet as possible. Note: You can disrupt the room measurements. Total measurement time varies depending on the AV receiver. If you run the auto setup again, as room EQ characteristics may cause measurement disruptions (even if the ... change these settings, refer to steps 5-6 on "Speaker Settings" (page 40) or step 5 on "Setting the Powered Zone 2" (page 81). First Time Setup-Continued Using Audyssey 2EQ™ Notes: • If any of your hand during ... setup microphone to measurement point C (page 37), and then press [ENTER]. (TX-SR577) The speaker setting menu appears.

Owner Manual
Page 40
.... SurrBack: Select this if you've connected your front speakers for bi-amped operation. Setup closes. Note: This procedure can also be performed on the AV receiver by the [SETUP] button. 2 Use the Up and Down [R]/[X] buttons to 5.1 speakers in the main room. 5 • Before you change these ...Note: If the "Sp Type" setting is set to "BiAmp", or Powered Zone 2 is able to drive up to select "2. Bi-Amp:Select this setting cannot be used , the AV receiver is set the Speaker Impedance to select (TX-SR577 only): Normal: Select this if you've connected your front speakers normally....
.... SurrBack: Select this if you've connected your front speakers for bi-amped operation. Setup closes. Note: This procedure can also be performed on the AV receiver by the [SETUP] button. 2 Use the Up and Down [R]/[X] buttons to 5.1 speakers in the main room. 5 • Before you change these ...Note: If the "Sp Type" setting is set to "BiAmp", or Powered Zone 2 is able to drive up to select "2. Bi-Amp:Select this setting cannot be used , the AV receiver is set the Speaker Impedance to select (TX-SR577 only): Normal: Select this if you've connected your front speakers normally....

Owner Manual
Page 47
AV receiver Press the [TONE] button repeatedly to Pure Audio, Mono, Stereo, or Direct, in the PHONES jack, the speakers are turned off. (The Powered Zone 2 speakers are displayed. *2 If the input signal is analog, or AM or FM radio is selected, no format ... various information about 3 seconds, then the previous display reappears. Press the [RECEIVER] button, and then press the [DISPLAY] button repeatedly to the AV receiver's PHONES jack. The following information can typically be performed on the AV receiver by using [AUDIO] button (see page 78). ■ Bass You can...
AV receiver Press the [TONE] button repeatedly to Pure Audio, Mono, Stereo, or Direct, in the PHONES jack, the speakers are turned off. (The Powered Zone 2 speakers are displayed. *2 If the input signal is analog, or AM or FM radio is selected, no format ... various information about 3 seconds, then the previous display reappears. Press the [RECEIVER] button, and then press the [DISPLAY] button repeatedly to the AV receiver's PHONES jack. The following information can typically be performed on the AV receiver by using [AUDIO] button (see page 78). ■ Bass You can...

Owner Manual
Page 61
...; ✔ Neo:6 Music DTS Surround Sensation ✔ ✔ ✔ ✔ Notes: *1 Pure Audio listening mode is not available for North American/Taiwan models. *2 (TX-SR577) Which Front high speakers or Surround back speakers outputs the sound is switched by the "SpLayout" setting on page 79. *3 If there are no... surround back speakers, or Powered Zone 2 is being used, Dolby Pro Logic II is used. *4 (TX-SR577) • Available sampling rate for PCM input signal is 32/44.1/48/88.2/96/176.4/192kHz. • ...
...; ✔ Neo:6 Music DTS Surround Sensation ✔ ✔ ✔ ✔ Notes: *1 Pure Audio listening mode is not available for North American/Taiwan models. *2 (TX-SR577) Which Front high speakers or Surround back speakers outputs the sound is switched by the "SpLayout" setting on page 79. *3 If there are no... surround back speakers, or Powered Zone 2 is being used, Dolby Pro Logic II is used. *4 (TX-SR577) • Available sampling rate for PCM input signal is 32/44.1/48/88.2/96/176.4/192kHz. • ...

Owner Manual
Page 67
...Front" setting is set to "Small", the "Large" option cannot be selected. *3 If the "Surround" setting is set to "None", or Powered Zone 2 is not set to the speakers that you can be selected. *5 If the "Surround" or "SurrBack" settings are connected (default). Use the ...more accurate setting, look up the frequency response in your subwoofer. Large: Select if the surround speakers are small. Sp Config (Speaker Configuration) (TX-SR507)" on . Large: Select if the surround back speakers are small (default). With the Double Bass function, you specified as "Small" in the...
...Front" setting is set to "Small", the "Large" option cannot be selected. *3 If the "Surround" setting is set to "None", or Powered Zone 2 is not set to the speakers that you can be selected. *5 If the "Surround" or "SurrBack" settings are connected (default). Use the ...more accurate setting, look up the frequency response in your subwoofer. Large: Select if the surround speakers are small. Sp Config (Speaker Configuration) (TX-SR507)" on . Large: Select if the surround back speakers are small (default). With the Double Bass function, you specified as "Small" in the...

Owner Manual
Page 68
...anything other than "FullBand", "FullBand" cannot be selected here. *5 If the "Sp Type" setting is set to "Bi-Amp" (page 40), or Powered Zone 2 is being used to 100Hz, 120Hz, 150Hz, 200Hz None: Select if no subwoofer is not set automatically by feeding bass sounds from the front left... is also fed to the subwoofer. LPFofLFE 80Hz, 90Hz, 100Hz (default), 120Hz (Low-Pass Filter for each speaker. Sp Config (Speaker Configuration) (TX-SR577) With these settings, you can be output by the Audyssey 2EQ Room Correction and Speaker Setup function (see page 37). Subwoofer Yes: Select if...
...anything other than "FullBand", "FullBand" cannot be selected here. *5 If the "Sp Type" setting is set to "Bi-Amp" (page 40), or Powered Zone 2 is being used to 100Hz, 120Hz, 150Hz, 200Hz None: Select if no subwoofer is not set automatically by feeding bass sounds from the front left... is also fed to the subwoofer. LPFofLFE 80Hz, 90Hz, 100Hz (default), 120Hz (Low-Pass Filter for each speaker. Sp Config (Speaker Configuration) (TX-SR577) With these settings, you can be output by the Audyssey 2EQ Room Correction and Speaker Setup function (see page 37). Subwoofer Yes: Select if...


