Owner Manual
Page 52
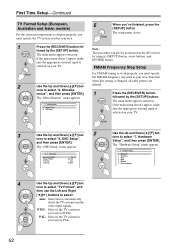
...- If the main menu doesn't appear, make sure the appropriate external input is PAL. 52 The main menu appears onscreen. Firmware Update 4 Use the Up and Down [R]/[X] but - 2 Use the Up and Down [R]/[X] buttons to select "7. NTSC: ...Up and Down [R]/[X] but- Miscellaneous 1. Note: This procedure can also be performed on your area is selected on the AV receiver by using its [SETUP] button, arrow buttons, and [ENTER] button. The main menu appears onscreen. Miscella- The setup... the [SETUP] button. PAL: Select if the TV system in your area. Network 6.
...- If the main menu doesn't appear, make sure the appropriate external input is PAL. 52 The main menu appears onscreen. Firmware Update 4 Use the Up and Down [R]/[X] but - 2 Use the Up and Down [R]/[X] buttons to select "7. NTSC: ...Up and Down [R]/[X] but- Miscellaneous 1. Note: This procedure can also be performed on your area is selected on the AV receiver by using its [SETUP] button, arrow buttons, and [ENTER] button. The main menu appears onscreen. Miscella- The setup... the [SETUP] button. PAL: Select if the TV system in your area. Network 6.
Owner Manual
Page 84
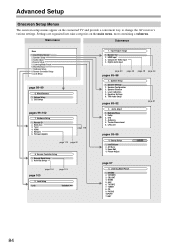
...Assign 2. Remote Controller Setup 9. Miscellaneous 1. HDMI 5. Network 6. Speaker Setup 1. Equalizer Settings 6. Dolby 3. Picture Adjust DVD/BD page 97 5. CD 9. Lock Setup page 98-99 6. OSD Setup pages 99-102 7. Multi Zone 3. Firmware Update page 119 page 113 page 52 8. Input/Output...46 2. TV/TAPE 7. Settings are organized into nine categories on the connected TV and provide a convenient way to change the AV receiver's various settings. Source Setup 5. Activities Setup page 134 page 103 9. Level Calibration 5. Multiplex/Mono 2. LFE Level pages 93-...
...Assign 2. Remote Controller Setup 9. Miscellaneous 1. HDMI 5. Network 6. Speaker Setup 1. Equalizer Settings 6. Dolby 3. Picture Adjust DVD/BD page 97 5. CD 9. Lock Setup page 98-99 6. OSD Setup pages 99-102 7. Multi Zone 3. Firmware Update page 119 page 113 page 52 8. Input/Output...46 2. TV/TAPE 7. Settings are organized into nine categories on the connected TV and provide a convenient way to change the AV receiver's various settings. Source Setup 5. Activities Setup page 134 page 103 9. Level Calibration 5. Multiplex/Mono 2. LFE Level pages 93-...
Owner Manual
Page 99
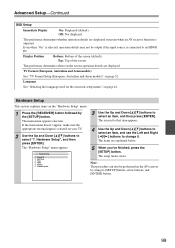
...on the screen operation details are displayed onscreen when an AV receiver function is adjusted. This preference determines where on the AV receiver by the [SETUP] button. TV Format (European,...RECEIVER] button followed by using its [SETUP] button, arrow buttons, and [ENTER] button. 99 If the main menu doesn't appear, make sure the appropriate external input is connected to change it. Remote ID 2. Network... Bottom: Bottom of the screen. Tuner 4. Top: Top of the screen (default). Firmware Update 3 Use the Up and Down [R]/[X] buttons to select "7. The main menu appears...
...on the screen operation details are displayed onscreen when an AV receiver function is adjusted. This preference determines where on the AV receiver by the [SETUP] button. TV Format (European,...RECEIVER] button followed by using its [SETUP] button, arrow buttons, and [ENTER] button. 99 If the main menu doesn't appear, make sure the appropriate external input is connected to change it. Remote ID 2. Network... Bottom: Bottom of the screen. Tuner 4. Top: Top of the screen (default). Firmware Update 3 Use the Up and Down [R]/[X] buttons to select "7. The main menu appears...
Owner Manual
Page 102
...only works with -compatible components that 's connected to the HDMI OUT. • Refer to "On". Receiver via NET You can update the Onkyo dock's firmware. Check the network connection before update. Note: • This update shall not be set only when the above "HDMI ...Control (RIHD)" and "Power Control" settings are both audio and video received by the HDMI OUT for the first time. To link the power functions of whether the AV receiver...
...only works with -compatible components that 's connected to the HDMI OUT. • Refer to "On". Receiver via NET You can update the Onkyo dock's firmware. Check the network connection before update. Note: • This update shall not be set only when the above "HDMI ...Control (RIHD)" and "Power Control" settings are both audio and video received by the HDMI OUT for the first time. To link the power functions of whether the AV receiver...
Owner Manual
Page 113
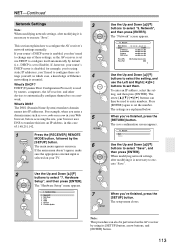
...to select "5. If your TV. 2 Use the Up and Down [R]/[X] buttons to select "Save", and then press [ENTER]. Hardware Setup 1. Firmware Update Use the Up and Down [R]/[X] buttons to execute "Save". To enter an IP address, select the setting, and then press [ENTER].... is set - When you 've finished, press the [RETURN] button. Multi Zone 3. The "Network" screen appears. 7-5. Tuner 4. If, however, your browser uses 5 DNS to configure the AV receiver's network settings manually. The DNS (Domain Name System) translates domain names into an IP address, in this ...
...to select "5. If your TV. 2 Use the Up and Down [R]/[X] buttons to select "Save", and then press [ENTER]. Hardware Setup 1. Firmware Update Use the Up and Down [R]/[X] buttons to execute "Save". To enter an IP address, select the setting, and then press [ENTER].... is set - When you 've finished, press the [RETURN] button. Multi Zone 3. The "Network" screen appears. 7-5. Tuner 4. If, however, your browser uses 5 DNS to configure the AV receiver's network settings manually. The DNS (Domain Name System) translates domain names into an IP address, in this ...
Owner Manual
Page 119
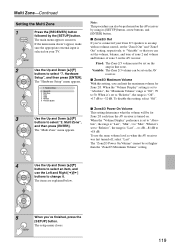
...the range is "Off", +17 dB to "Variable" so that zone. Remote ID 2. Network 6. The "Multi Zone" menu appears. Fixed: The Zone 2/3 volume must be performed on the AV receiver by the [SETUP] button. Firmware Update 3 Use the Up and Down [R]/[X] buttons to change it 's set to "Relative...", the range is "Last", -2 dB, -81 dB to 50. Variable: The Zone 2/3 volume can be set on the AV receiver. ■ Zone2/3 Maximum...
...the range is "Off", +17 dB to "Variable" so that zone. Remote ID 2. Network 6. The "Multi Zone" menu appears. Fixed: The Zone 2/3 volume must be performed on the AV receiver by the [SETUP] button. Firmware Update 3 Use the Up and Down [R]/[X] buttons to change it 's set to "Relative...", the range is "Last", -2 dB, -81 dB to 50. Variable: The Zone 2/3 volume can be set on the AV receiver. ■ Zone2/3 Maximum...

