Owner Manual
Page 1
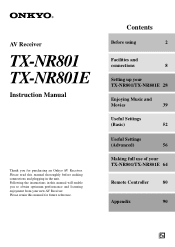
...) 56 Making full use of your new AV Receiver. AV Receiver TX-NR801 TX-NR801E Instruction Manual Thank you to obtain optimum performance and listening enjoyment from your TX-NR801/TX-NR801E 64 Remote Controller 80 Appendix 90 En Please read this manual thoroughly before making connections and plugging in this manual for purchasing an Onkyo AV Receiver. Please retain this manual will enable you...
...) 56 Making full use of your new AV Receiver. AV Receiver TX-NR801 TX-NR801E Instruction Manual Thank you to obtain optimum performance and listening enjoyment from your TX-NR801/TX-NR801E 64 Remote Controller 80 Appendix 90 En Please read this manual thoroughly before making connections and plugging in this manual for purchasing an Onkyo AV Receiver. Please retain this manual will enable you...
Owner Manual
Page 4
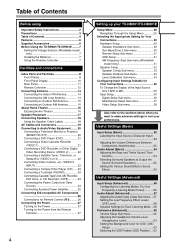
... To Change the Display of Contents 4 Features 6 Supplied Accessories 6 Before Using the TX-NR801/TX-NR801E .........7 Setting the Voltage Selector (Worldwide model only 7 Installing the Batteries 7 Using the Remote Controller 7 Facilities and connections Index Parts and Facilities 8 Front Panels 8 Front Panel Display...TAPE 24 Connecting the Power Cords from Other Devices 24 Connecting Auxiliary Power Amplifier........... 25 Connecting -compatible AV Components 26 Connections for Remote Control 26 Connecting the Power 27 Turning on the Power 27 Turning on the Power from TAPE to MD...
... To Change the Display of Contents 4 Features 6 Supplied Accessories 6 Before Using the TX-NR801/TX-NR801E .........7 Setting the Voltage Selector (Worldwide model only 7 Installing the Batteries 7 Using the Remote Controller 7 Facilities and connections Index Parts and Facilities 8 Front Panels 8 Front Panel Display...TAPE 24 Connecting the Power Cords from Other Devices 24 Connecting Auxiliary Power Amplifier........... 25 Connecting -compatible AV Components 26 Connections for Remote Control 26 Connecting the Power 27 Turning on the Power 27 Turning on the Power from TAPE to MD...
Owner Manual
Page 5
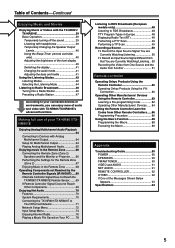
... the Monitor or Projector ....... 66 Performing the Settings for the Remote Zone (Zone 2 67 Enjoying Music in the Remote Zone 68 Operating Components not Reached by the Remote Controller Signals (IR IN/OUT)..... 69 If Remote Controller Signal Does not Reach the TX-NR801/TX-NR801E Remote Sensor........ 69 If Remote Controller Signal Does not Reach Other Components 69 Enjoying Net Audio...
... the Monitor or Projector ....... 66 Performing the Settings for the Remote Zone (Zone 2 67 Enjoying Music in the Remote Zone 68 Operating Components not Reached by the Remote Controller Signals (IR IN/OUT)..... 69 If Remote Controller Signal Does not Reach the TX-NR801/TX-NR801E Remote Sensor........ 69 If Remote Controller Signal Does not Reach Other Components 69 Enjoying Net Audio...

Owner Manual
Page 6
... THX Ltd. • "Theater-Dimensional" and "Net-Tune" are trademarks of Onkyo Corporation. • Windows Media and the Windows logo are the same regardless of ... Inputs/1 Output I Net-Tune Function with USA, Canadian and European models. THX Select receivers also feature proprietary THX technologies (e.g., THX Mode) which is a registered trademark of Intel ...2 Right 1 2 3 Speaker Cable 75/300 ohm antenna Remote controller & two batteries (AA/R6) Speaker cable labels adapter *In catalogs and on the TX-NR801/ TX-NR801E's power cord (Adapter varies from Dolby Laboratories. RMS. ...
... THX Ltd. • "Theater-Dimensional" and "Net-Tune" are trademarks of Onkyo Corporation. • Windows Media and the Windows logo are the same regardless of ... Inputs/1 Output I Net-Tune Function with USA, Canadian and European models. THX Select receivers also feature proprietary THX technologies (e.g., THX Mode) which is a registered trademark of Intel ...2 Right 1 2 3 Speaker Cable 75/300 ohm antenna Remote controller & two batteries (AA/R6) Speaker cable labels adapter *In catalogs and on the TX-NR801/ TX-NR801E's power cord (Adapter varies from Dolby Laboratories. RMS. ...
Owner Manual
Page 7
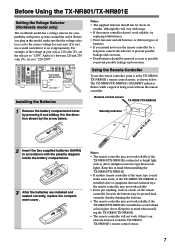
... 100W MAX. Keep this in mind when installing the TX-NR801/TX-NR801E. • If another remote controller of batteries. • If you plug in your area. If it isn't, use the remote controller, point it at the TX-NR801/ TX-NR801E's remote control sensor, as direct sunlight or inverter-type fluorescent lights. L AV RECEIVER MODEL NO. Standby indicator 30˚ 30˚...
... 100W MAX. Keep this in mind when installing the TX-NR801/TX-NR801E. • If another remote controller of batteries. • If you plug in your area. If it isn't, use the remote controller, point it at the TX-NR801/ TX-NR801E's remote control sensor, as direct sunlight or inverter-type fluorescent lights. L AV RECEIVER MODEL NO. Standby indicator 30˚ 30˚...
Owner Manual
Page 9
...state, the display is turned off and the TX-NR801/TX-NR801E cannot be changed using the MEMORY button, press the PRESET / buttons. Press this button to display information about the current input source signal. Each time the button is received from the remote controller. 4 AUDIO SELECTOR button [41, 65] Press...will occur that selected for the main zone will search for a station in the direction of the button you to use the TX-NR801/ TX-NR801E to output to a remote zone (Zone 2) or to set the brightness of other than European models) [40] Press to another component for recording (Rec...
...state, the display is turned off and the TX-NR801/TX-NR801E cannot be changed using the MEMORY button, press the PRESET / buttons. Press this button to display information about the current input source signal. Each time the button is received from the remote controller. 4 AUDIO SELECTOR button [41, 65] Press...will occur that selected for the main zone will search for a station in the direction of the button you to use the TX-NR801/ TX-NR801E to output to a remote zone (Zone 2) or to set the brightness of other than European models) [40] Press to another component for recording (Rec...
Owner Manual
Page 11
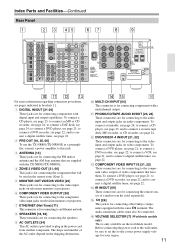
... satellite tuner, see page 22. 2 PRE OUT [18, 25, 66] To use the TX-NR801/TX-NR801E as a preamplifier, connect a power amplifier to this to connect a... to an Ethernet network. 8 SPEAKERS [18, 66] These terminals are for connecting other Onkyo components equipped with digital input and output capabilities. to connect a DVD recorder, see page... for connecting components with a multichannel output. SURR BACK/ ZONE 2 SPEAKERS R L VOLTAGE SELECTOR 120V REMOTE CONTROL AV RECEIVER MODEL NO. to connect a DVD recorder, see page 22; To connect a turntable, see page 21...
... satellite tuner, see page 22. 2 PRE OUT [18, 25, 66] To use the TX-NR801/TX-NR801E as a preamplifier, connect a power amplifier to this to connect a... to an Ethernet network. 8 SPEAKERS [18, 66] These terminals are for connecting other Onkyo components equipped with digital input and output capabilities. to connect a DVD recorder, see page... for connecting components with a multichannel output. SURR BACK/ ZONE 2 SPEAKERS R L VOLTAGE SELECTOR 120V REMOTE CONTROL AV RECEIVER MODEL NO. to connect a DVD recorder, see page 22; To connect a turntable, see page 21...

Owner Manual
Page 12
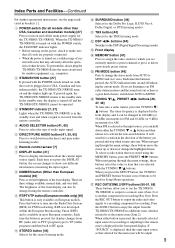
... Net Audio (See pages 76-79). 12 Index Parts and Facilities-Continued Remote Controller The RC-511M is a multi-functional remote controller. To operate the TX-NR801/TX-NR801E using the remote controller, first press the RCVR button in the MODE area to use the remote controller in the receiver mode. RCVR button For the procedures below, see pages shown respectively...
... Net Audio (See pages 76-79). 12 Index Parts and Facilities-Continued Remote Controller The RC-511M is a multi-functional remote controller. To operate the TX-NR801/TX-NR801E using the remote controller, first press the RCVR button in the MODE area to use the remote controller in the receiver mode. RCVR button For the procedures below, see pages shown respectively...

Owner Manual
Page 13
...power off completely. 3 SLEEP button [40] Press to set the TX-NR801/TX-NR801E to adjust the volume of the TX-NR801/TX-NR801E. Same as the input selector buttons on and off the lights in the buttons of the remote controller. C Listening mode buttons [44, 65] Press to select an ... / / , ENTER button [29] When in the remote zone. 13 It also flashes when a button is pressed and the battery power is used to the TX-NR801/TX-NR801E. Be aware that pressing the STANDBY button only places the TX-NR801/TX-NR801E in the display. Index Parts and Facilities-Continued 1...
...power off completely. 3 SLEEP button [40] Press to set the TX-NR801/TX-NR801E to adjust the volume of the TX-NR801/TX-NR801E. Same as the input selector buttons on and off the lights in the buttons of the remote controller. C Listening mode buttons [44, 65] Press to select an ... / / , ENTER button [29] When in the remote zone. 13 It also flashes when a button is pressed and the battery power is used to the TX-NR801/TX-NR801E. Be aware that pressing the STANDBY button only places the TX-NR801/TX-NR801E in the display. Index Parts and Facilities-Continued 1...
Owner Manual
Page 14
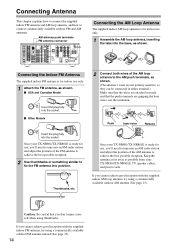
... 'll need to the AM push terminals, as possible from your TX-NR801/TX-NR801E is for use , you don't injure yourself when using a commercially available outdoor AM antenna (See page 15). SURR BACK/ ZONE 2 SPEAKERS R L VOLTAGE SELECTOR 120V REMOTE CONTROL AV RECEIVER MODEL NO. TX-NR 801 220-230V Connecting the AM Loop Antenna The supplied indoor...
... 'll need to the AM push terminals, as possible from your TX-NR801/TX-NR801E is for use , you don't injure yourself when using a commercially available outdoor AM antenna (See page 15). SURR BACK/ ZONE 2 SPEAKERS R L VOLTAGE SELECTOR 120V REMOTE CONTROL AV RECEIVER MODEL NO. TX-NR 801 220-230V Connecting the AM Loop Antenna The supplied indoor...
Owner Manual
Page 18
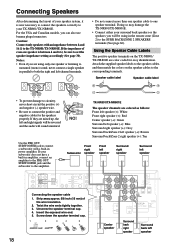
... OUT SURR SPEAKERS R L AC OUTLETS AC 120V 60 Hz SWITCHED TOTAL 120W 1A MAX. SURR BACK/ ZONE 2 SPEAKERS R L VOLTAGE SELECTOR 120V REMOTE CONTROL AV RECEIVER MODEL NO. Caution: Connect only speakers with a built-in power amplifier. Notes: • Even if you are color coded for the ... SPEAKERS terminals (See page 66). Doing so may damage the TX-NR801/TX-NR801E. • Connect either your surround back speakers or the speakers you can also use banana plugs/connectors. If your TX-NR801/TX-NR801E. L TX-NR801/TX-NR801E The speaker channels are mixed up, the left -channel ...
... OUT SURR SPEAKERS R L AC OUTLETS AC 120V 60 Hz SWITCHED TOTAL 120W 1A MAX. SURR BACK/ ZONE 2 SPEAKERS R L VOLTAGE SELECTOR 120V REMOTE CONTROL AV RECEIVER MODEL NO. Caution: Connect only speakers with a built-in power amplifier. Notes: • Even if you are color coded for the ... SPEAKERS terminals (See page 66). Doing so may damage the TX-NR801/TX-NR801E. • Connect either your surround back speakers or the speakers you can also use banana plugs/connectors. If your TX-NR801/TX-NR801E. L TX-NR801/TX-NR801E The speaker channels are mixed up, the left -channel ...
Owner Manual
Page 26
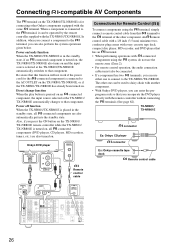
Connecting -compatible AV Components The terminal on the TX-NR801/TX-NR801E is placed in the standby state, if an -connected component is turned on, all -connected components are also turned on. Power off function When the TX-NR801/TX-NR801E is for connecting other Onkyo components equipped with -connected components using the terminal, simply connect a remote control cable from this...
Connecting -compatible AV Components The terminal on the TX-NR801/TX-NR801E is placed in the standby state, if an -connected component is turned on, all -connected components are also turned on. Power off function When the TX-NR801/TX-NR801E is for connecting other Onkyo components equipped with -connected components using the terminal, simply connect a remote control cable from this...

Owner Manual
Page 27
...the power cord is unplugged or in the case of the standby state). Memory backup The TX-NR801/TX-NR801E uses a battery-less memory backup system in order to turn on the Power from the Remote Controller Before you can use a wall outlet on a different circuit. (All models other than USA..., Canadian and Australian models) • The TX-NR801/TX-NR801E is shipped with other electrical equipment on the environment and time ...
...the power cord is unplugged or in the case of the standby state). Memory backup The TX-NR801/TX-NR801E uses a battery-less memory backup system in order to turn on the Power from the Remote Controller Before you can use a wall outlet on a different circuit. (All models other than USA..., Canadian and Australian models) • The TX-NR801/TX-NR801E is shipped with other electrical equipment on the environment and time ...

Owner Manual
Page 29
...cursor buttons, select the menu that menu appears. The screen for that you want to enter. 3 SETUP/ENTER/ RETURN/Cursor // / Button on remote controller Button on TX-NR801/ TX-NR801E 4 SETUP SETUP SETUP (upper edge of ENTER button) (lower edge of ENTER button) UP DOWN (left edge of ENTER button) LEFT (right...Press the ENTER button to select the sub-menu that can change the setting using the buttons on the front panel and on the remote controller correspond to the previous menu. 29 Use the and cursor buttons to enter the selected menu. Press the RETURN button to set the...
...cursor buttons, select the menu that menu appears. The screen for that you want to enter. 3 SETUP/ENTER/ RETURN/Cursor // / Button on remote controller Button on TX-NR801/ TX-NR801E 4 SETUP SETUP SETUP (upper edge of ENTER button) (lower edge of ENTER button) UP DOWN (left edge of ENTER button) LEFT (right...Press the ENTER button to select the sub-menu that can change the setting using the buttons on the front panel and on the remote controller correspond to the previous menu. 29 Use the and cursor buttons to enter the selected menu. Press the RETURN button to set the...

Owner Manual
Page 30
... SETUP button on the remote controller to display the main menu on the monitor and front display. 30 2 Use the and cursor buttons to display the Hardware Setup Menu. Once you will perform the initial settings for the following scenarios. • When the impedances for speakers connected to the TX-NR801/TX-NR801E are using...
... SETUP button on the remote controller to display the main menu on the monitor and front display. 30 2 Use the and cursor buttons to display the Hardware Setup Menu. Once you will perform the initial settings for the following scenarios. • When the impedances for speakers connected to the TX-NR801/TX-NR801E are using...

Owner Manual
Page 31
... OUT or SURR BACK/ ZONE 2 SPEAKERS terminals (for using the remote control sensor for the remote zone (Zone 2), set the Surr Back/Zone 2 setting to be changed if you use the TX-NR801/TX-NR801E, use the TX-NR801/ TX-NR801E in other than USA and Canada. PAL: Use this setting... unchanged, the television format is 9 kHz, and this sub-menu tells the TX-NR801/TX-NR801E whether the remote control sensor is PAL. Frequency Setup 9 kHz: Select when you use the TX-NR801/ TX-NR801E in the remote zone (Zone 2). Selecting the Appropriate Setting for Zone 2). When you cannot select...
... OUT or SURR BACK/ ZONE 2 SPEAKERS terminals (for using the remote control sensor for the remote zone (Zone 2), set the Surr Back/Zone 2 setting to be changed if you use the TX-NR801/TX-NR801E, use the TX-NR801/ TX-NR801E in other than USA and Canada. PAL: Use this setting... unchanged, the television format is 9 kHz, and this sub-menu tells the TX-NR801/TX-NR801E whether the remote control sensor is PAL. Frequency Setup 9 kHz: Select when you use the TX-NR801/ TX-NR801E in the remote zone (Zone 2). Selecting the Appropriate Setting for Zone 2). When you cannot select...

Owner Manual
Page 32
... front speakers. (Set all the components, and determined the speaker layout, it is important that you want to perform these operations using the remote controller, first press the RCVR button. 1 Display the main menu. Before you perform the following items: • The types and sizes of ...ENTER PRESET RE TURN MEMORY FM MODE A-FORM LISTENING MODE MEMORY SETUP/ENTER/ RETURN/Cursor // / Speaker Setup After you have installed the TX-NR801/TX-NR801E, connected all speakers for THX speaker systems to "small.") If you first determine the following settings, it is now time to...
... front speakers. (Set all the components, and determined the speaker layout, it is important that you want to perform these operations using the remote controller, first press the RCVR button. 1 Display the main menu. Before you perform the following items: • The types and sizes of ...ENTER PRESET RE TURN MEMORY FM MODE A-FORM LISTENING MODE MEMORY SETUP/ENTER/ RETURN/Cursor // / Speaker Setup After you have installed the TX-NR801/TX-NR801E, connected all speakers for THX speaker systems to "small.") If you first determine the following settings, it is now time to...

Owner Manual
Page 35
... Setting for Your Connections-Continued • To accurately set each channel so that it is recommended to use the remote controller to perform the procedure, on the TX-NR801/TX-NR801E, you use a handheld sound pressure level (SPL) meter. Using the internal channel noise generators, set the... button is pressed. Set the meter to its original setting, perform the same procedure. 35 TX-NR801/ TX-NR801E TAPE Remote controller Press and hold down the TAPE source button on the TX-NR801/ TX-NR801E until all speakers are adjusted to the same level. 5 Press the TEST button to ...
... Setting for Your Connections-Continued • To accurately set each channel so that it is recommended to use the remote controller to perform the procedure, on the TX-NR801/TX-NR801E, you use a handheld sound pressure level (SPL) meter. Using the internal channel noise generators, set the... button is pressed. Set the meter to its original setting, perform the same procedure. 35 TX-NR801/ TX-NR801E TAPE Remote controller Press and hold down the TAPE source button on the TX-NR801/ TX-NR801E until all speakers are adjusted to the same level. 5 Press the TEST button to ...

Owner Manual
Page 39
... theater environment and has wider volume range enabling fine volume adjustment. Remote controller 2 Turn on the TX-NR801/TX-NR801E. When the headphones are located from the headphone speakers. The TX-NR801/TX-NR801E has the latest stateof-the-art features to perform these operations using ...When you must first perform the speaker setup settings. wise; When using the headphones, you are using the remote controller, first press the RCVR button. 1 TX-NR801/ TX-NR801E DVD VIDEO 1 VIDEO 2 VIDEO 3 VIDEO 4 VIDEO 5 TAPE TUNER PHONO C D NET AUDIO Press ...
... theater environment and has wider volume range enabling fine volume adjustment. Remote controller 2 Turn on the TX-NR801/TX-NR801E. When the headphones are located from the headphone speakers. The TX-NR801/TX-NR801E has the latest stateof-the-art features to perform these operations using ...When you must first perform the speaker setup settings. wise; When using the headphones, you are using the remote controller, first press the RCVR button. 1 TX-NR801/ TX-NR801E DVD VIDEO 1 VIDEO 2 VIDEO 3 VIDEO 4 VIDEO 5 TAPE TUNER PHONO C D NET AUDIO Press ...

Owner Manual
Page 40
... indicator appears on the TX-NR801/TX-NR801E front panel (other than European models). Adjusting the brightness of the front display You can set the sleep time from 90 to set the sleep function for Zone 2: If you are using the DIMMER button on the remote controller or on the display when... the sleep timer has been set the sleep function with the TX-NR801/TX-NR801E-Continued DISPLAY DIMMER DIRECT/PURE AUDIO STEREO SURROUND THX DSP TUNING SETUP ENTER PRESET RE...
... indicator appears on the TX-NR801/TX-NR801E front panel (other than European models). Adjusting the brightness of the front display You can set the sleep time from 90 to set the sleep function for Zone 2: If you are using the DIMMER button on the remote controller or on the display when... the sleep timer has been set the sleep function with the TX-NR801/TX-NR801E-Continued DISPLAY DIMMER DIRECT/PURE AUDIO STEREO SURROUND THX DSP TUNING SETUP ENTER PRESET RE...


