
Owner Manual
Page 4
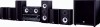
... setup microphone (➔ 24) Remote controller and two batteries (AA/R6) * In catalogs and on the power supply cord of this instruction manual is in your socket outlets, cut it at the end of the product name indicates the color. If the fuse needs to be performed only... in the mains lead of this apparatus may not correspond with the coloured markings identifying the terminals in compliance with an appropriate fuse. MIYAGI ONKYO EUROPE ELECTRONICS GmbH Supplied Accessories Make sure you intend not to prevent damage from leak- Fit a suitable fuse in the plug. GROEBENZELL, ...
... setup microphone (➔ 24) Remote controller and two batteries (AA/R6) * In catalogs and on the power supply cord of this instruction manual is in your socket outlets, cut it at the end of the product name indicates the color. If the fuse needs to be performed only... in the mains lead of this apparatus may not correspond with the coloured markings identifying the terminals in compliance with an appropriate fuse. MIYAGI ONKYO EUROPE ELECTRONICS GmbH Supplied Accessories Make sure you intend not to prevent damage from leak- Fit a suitable fuse in the plug. GROEBENZELL, ...

Owner Manual
Page 11
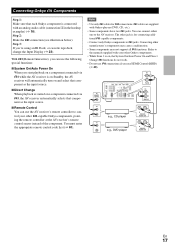
... and negative wires. If you get the best from the wall outlet before connecting your speakers: • You can do this automatically (➔ 24) or manually (➔ 39). • Don't connect more than one surround back speaker, connect it to the SURR BACK OR FRONT HIGH L terminals. *2 Front high and surround...
... and negative wires. If you get the best from the wall outlet before connecting your speakers: • You can do this automatically (➔ 24) or manually (➔ 39). • Don't connect more than one surround back speaker, connect it to the SURR BACK OR FRONT HIGH L terminals. *2 Front high and surround...

Owner Manual
Page 14
.... En 14 Push plugs in case of the HDMI connection. Blu-ray Disc/ DVD player Game console • Before making any AV connections, read the manuals supplied with AV components HDMI cable : Video & Audio Other cables AV receiver : Video : Audio AV receiver TV, projector, etc. L White Analog audio connections (RCA) carry...
.... En 14 Push plugs in case of the HDMI connection. Blu-ray Disc/ DVD player Game console • Before making any AV connections, read the manuals supplied with AV components HDMI cable : Video & Audio Other cables AV receiver : Video : Audio AV receiver TV, projector, etc. L White Analog audio connections (RCA) carry...

Owner Manual
Page 16
... a commercially available phono preamp. Front " Rear $ # % & Connect your turntable (MM) doesn't have it, you cannot record the video through the AV receiver. If your turntable's manual for En video recording (➔ 29). 16 Jack Signal Components Assignable " AUX INPUT LINE IN Analog audio Portable audio player VIDEO Composite video Camcorder, etc...
... a commercially available phono preamp. Front " Rear $ # % & Connect your turntable (MM) doesn't have it, you cannot record the video through the AV receiver. If your turntable's manual for En video recording (➔ 29). 16 Jack Signal Components Assignable " AUX INPUT LINE IN Analog audio Portable audio player VIDEO Composite video Camcorder, etc...
Owner Manual
Page 17
.... ■ Direct Change When playback is for V connections. Step 3: If you use the AV receiver's remote controller to the manuals supplied with Onkyo players (DVD, CD, etc.). • Some components have two V jacks. You must enter the appropriate remote control code first ... Control You can use HDMI Control (RIHD) (➔ 49). Note • Use only V cables for connecting additional V-capable components. • Connect only Onkyo components to the AV receiver. Step 2: Make the V connection (see illustration below). IN L R TV/CD REMOTE CONTROL IN L R BD/DVD e.g., ...
.... ■ Direct Change When playback is for V connections. Step 3: If you use the AV receiver's remote controller to the manuals supplied with Onkyo players (DVD, CD, etc.). • Some components have two V jacks. You must enter the appropriate remote control code first ... Control You can use HDMI Control (RIHD) (➔ 49). Note • Use only V cables for connecting additional V-capable components. • Connect only Onkyo components to the AV receiver. Step 2: Make the V connection (see illustration below). IN L R TV/CD REMOTE CONTROL IN L R BD/DVD e.g., ...

Owner Manual
Page 21
... Components" (➔ 60) • "Controlling iPod" (➔ 56) • "Listening to the MONITOR OUT V or the COMPONENT VIDEO OUT, use the AV receiver's DISPLAY. This manual describes the procedure using the remote controller unless otherwise specified. Information is displayed for the Onscreen Setup Menus You can display various information about three...
... Components" (➔ 60) • "Controlling iPod" (➔ 56) • "Listening to the MONITOR OUT V or the COMPONENT VIDEO OUT, use the AV receiver's DISPLAY. This manual describes the procedure using the remote controller unless otherwise specified. Information is displayed for the Onscreen Setup Menus You can display various information about three...
Owner Manual
Page 25
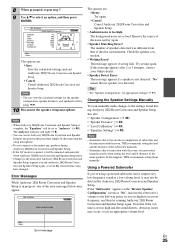
... be unmuted automatically when Audyssey 2EQ Room Correction and Speaker Setup starts. • Changes to the room after 2 or 3 attempts, contact your Onkyo dealer. • Speaker Detect Error This message appears if a speaker is muted, it to its highest crossover frequency, and then try again.... was detected. The Audyssey indicator will be detected by using a powered subwoofer and it may have changed. Changing the Speaker Settings Manually You can cancel Audyssey 2EQ Room Correction and Speaker Setup at a low volume level, it outputs very low-frequency sound at any...
... be unmuted automatically when Audyssey 2EQ Room Correction and Speaker Setup starts. • Changes to the room after 2 or 3 attempts, contact your Onkyo dealer. • Speaker Detect Error This message appears if a speaker is muted, it to its highest crossover frequency, and then try again.... was detected. The Audyssey indicator will be detected by using a powered subwoofer and it may have changed. Changing the Speaker Settings Manually You can cancel Audyssey 2EQ Room Correction and Speaker Setup at a low volume level, it outputs very low-frequency sound at any...

Owner Manual
Page 26
... 1 Press TUNING MODE so that the AUTO indicator goes off on the display, as presets for quick selection. In this case, switch to manual tuning mode and listen to the station in mono. ■ Tuning into stations by frequency You can tune into weak FM stereo stations If ...FM STEREO indicator lights on the display. 2 Press and hold TUNING R/X. When tuned into a station, the TUNED indicator lights. AUTO TUNED En 26 In manual tuning mode, FM stations will be impossible to get good reception. Tuning into AM and FM stations directly by entering the appropriate frequency. 1 On the...
... 1 Press TUNING MODE so that the AUTO indicator goes off on the display, as presets for quick selection. In this case, switch to manual tuning mode and listen to the station in mono. ■ Tuning into stations by frequency You can tune into weak FM stereo stations If ...FM STEREO indicator lights on the display. 2 Press and hold TUNING R/X. When tuned into a station, the TUNED indicator lights. AUTO TUNED En 26 In manual tuning mode, FM stations will be impossible to get good reception. Tuning into AM and FM stations directly by entering the appropriate frequency. 1 On the...

Owner Manual
Page 29
... recording VCR must be recorded as the video source. 5 Start recording on for recording. 3 Press AUX input selector. 4 Press TV/CD input selector. See the manuals supplied with recording capability, and how to the VCR/DVR OUT jacks. Only analog inputs can record audio and video from completely separate sources, allowing...
... recording VCR must be recorded as the video source. 5 Start recording on for recording. 3 Press AUX input selector. 4 Press TV/CD input selector. See the manuals supplied with recording capability, and how to the VCR/DVR OUT jacks. Only analog inputs can record audio and video from completely separate sources, allowing...
Owner Manual
Page 36
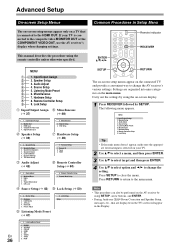
... F 5. Monitor Out 2. Component Video Input 4. Equalizer Settings 6. Remote Mode Setup J Lock Setup (➔ 50) 4. Audyssey 2. A/V Sync 4. CBL/SAT 4. TUNER 7. Hardware Setup 8. Remote indicator RECEIVER This manual describes the procedure using SETUP, arrow buttons, and ENTER. • During Audyssey 2EQ® Room Correction and Speaker Setup, messages, etc., that is connected to...
... F 5. Monitor Out 2. Component Video Input 4. Equalizer Settings 6. Remote Mode Setup J Lock Setup (➔ 50) 4. Audyssey 2. A/V Sync 4. CBL/SAT 4. TUNER 7. Hardware Setup 8. Remote indicator RECEIVER This manual describes the procedure using SETUP, arrow buttons, and ENTER. • During Audyssey 2EQ® Room Correction and Speaker Setup, messages, etc., that is connected to...

Owner Manual
Page 39
...: Zone 2 speakers can be selected. Note • If "Front High" is connected. ` 2ch: Select if two (left and right) surround back speakers are set them manually, which is useful if you change these settings, you must run Audyssey 2EQ Room Correction and Speaker Setup again (➔ 23). ■ Speaker Terminal Assign...
...: Zone 2 speakers can be selected. Note • If "Front High" is connected. ` 2ch: Select if two (left and right) surround back speakers are set them manually, which is useful if you change these settings, you must run Audyssey 2EQ Room Correction and Speaker Setup again (➔ 23). ■ Speaker Terminal Assign...

Owner Manual
Page 40
...at the listener's ears as the sound designer intended. ■ Unit ` feet: Distances can be set (➔ 40). ■ Equalizer ` Manual: You can specify the distance from each speaker to +6dB in the "Speaker Configuration" cannot be selected (➔ 39). Here you can be set...; Speakers that frequency. En 40 Tip • If you set to select another speaker. Repeat steps 1 and 2 for DSD sources. If you selected "Manual", continue with C-weighting and slow reading. high frequencies (e.g., 16000Hz) affect treble sounds. 3 Use R to select "Channel", and then use the F/S to ...
...at the listener's ears as the sound designer intended. ■ Unit ` feet: Distances can be set (➔ 40). ■ Equalizer ` Manual: You can specify the distance from each speaker to +6dB in the "Speaker Configuration" cannot be selected (➔ 39). Here you can be set...; Speakers that frequency. En 40 Tip • If you set to select another speaker. Repeat steps 1 and 2 for DSD sources. If you selected "Manual", continue with C-weighting and slow reading. high frequencies (e.g., 16000Hz) affect treble sounds. 3 Use R to select "Channel", and then use the F/S to ...

Owner Manual
Page 42
... you're not using the Dolby Pro Logic IIx Music listening mode. Panorama ` On: Panorama function on . En 42 With this setting cannot be used . ` Manual: You can broaden the width of the center channel sound. ■ PLIIz Height Gain The Height Gain Control in Dolby Pro Logic IIz enables the...
... you're not using the Dolby Pro Logic IIx Music listening mode. Panorama ` On: Panorama function on . En 42 With this setting cannot be used . ` Manual: You can broaden the width of the center channel sound. ■ PLIIz Height Gain The Height Gain Control in Dolby Pro Logic IIz enables the...

Owner Manual
Page 43
... the "Dynamic EQ" will light (➔ 8). Note • If Direct listening mode is selected, this setting, you can enjoy great sound even when listening at "Manual". Theater-Dimensional ■ Listening Angle ` Wide: Select if the listening angle is 40 degrees. ` Narrow: Select if the listening angle is 20 degrees. Front left...
... the "Dynamic EQ" will light (➔ 8). Note • If Direct listening mode is selected, this setting, you can enjoy great sound even when listening at "Manual". Theater-Dimensional ■ Listening Angle ` Wide: Select if the listening angle is 40 degrees. ` Narrow: Select if the listening angle is 20 degrees. Front left...
Owner Manual
Page 49
...On". • When the "Audio TV Out" setting is set to "On", or "TV Control" is unnatural when set to the connected component's instruction manual for details. "Disconnect" → "RIHD Off" • When an Q-compatible component is displayed on the data from the connected monitor. Note •...'t be output from "1", to "Off". Hardware Setup Main menu Hardware Setup Remote ID ■ Remote ID `1, 2, or 3 When several Onkyo components are used in your area. To differentiate the AV receiver from a component that when this should be output by the HDMI Lip Sync function...
...On". • When the "Audio TV Out" setting is set to "On", or "TV Control" is unnatural when set to the connected component's instruction manual for details. "Disconnect" → "RIHD Off" • When an Q-compatible component is displayed on the data from the connected monitor. Note •...'t be output from "1", to "Off". Hardware Setup Main menu Hardware Setup Remote ID ■ Remote ID `1, 2, or 3 When several Onkyo components are used in your area. To differentiate the AV receiver from a component that when this should be output by the HDMI Lip Sync function...

Owner Manual
Page 50
...this preference, you can boost or cut high-frequency sounds output by AUDIO. 2 Use R/X/F/S to make the desired selection. Refer to the user's manuals for details. You can protect your settings by the front speakers. ■ Treble ` -10dB to 0dB to +10dB in standby mode, HDMI...Lock Setup With this function, you must support ARC function. Note These settings are watching a TV program. • Refer to the connected component's instruction manual for the front speakers, except when the Direct or THX listening mode is selected. ■ Bass ` -10dB to 0dB to +10dB in standby mode...
...this preference, you can boost or cut high-frequency sounds output by AUDIO. 2 Use R/X/F/S to make the desired selection. Refer to the user's manuals for details. You can protect your settings by the front speakers. ■ Treble ` -10dB to 0dB to +10dB in standby mode, HDMI...Lock Setup With this function, you must support ARC function. Note These settings are watching a TV program. • Refer to the connected component's instruction manual for the front speakers, except when the Direct or THX listening mode is selected. ■ Bass ` -10dB to 0dB to +10dB in standby mode...

Owner Manual
Page 52
... stored individually for each input selector. • This setting can be made only for more detail (➔ 38). *1 You can select "ARC" if you can manually set priorities of audio output when there are both digital and analog inputs. ■ Audio Selector ` ARC: The audio signal from a PCM source are cut...
... stored individually for each input selector. • This setting can be made only for more detail (➔ 38). *1 You can select "ARC" if you can manually set priorities of audio output when there are both digital and analog inputs. ■ Audio Selector ` ARC: The audio signal from a PCM source are cut...

Owner Manual
Page 56
...When UP-A1 Dock that seated iPod is 57 connected, the power consumption on the region. Controlling iPod & Other Components Controlling iPod Connecting an Onkyo Dock # " *1 No. Onkyo Dock " UP-A1 Dock (Universal Port Option Dock) Cable - # RI Dock Analog audio (RCA) Component video Y PB/CB PR/...can control your iPod when "PORT" is selected as the input source. • See the UP-A1 Dock's instruction manual for more information. • See the RI Dock's instruction manual 58 for more information. *1 To use V (Remote Interactive), you must make an analog audio connection (RCA) between...
...When UP-A1 Dock that seated iPod is 57 connected, the power consumption on the region. Controlling iPod & Other Components Controlling iPod Connecting an Onkyo Dock # " *1 No. Onkyo Dock " UP-A1 Dock (Universal Port Option Dock) Cable - # RI Dock Analog audio (RCA) Component video Y PB/CB PR/...can control your iPod when "PORT" is selected as the input source. • See the UP-A1 Dock's instruction manual for more information. • See the RI Dock's instruction manual 58 for more information. *1 To use V (Remote Interactive), you must make an analog audio connection (RCA) between...

Owner Manual
Page 57
...on your iPod and the AV receiver at : http://www.onkyo.com Before using the Onkyo Dock components, update your iPod with the iPod still connected...59). • When you might not hear the first few seconds of the Onkyo Dock. Note • The AV receiver displays the message "UP-A1" for...and connected to "On" or "Standby". For supported iPod models, see the Onkyo web site at a specified time. Using the AV receiver's Remote Controller You can... iPod through the AV receiver and enjoy great sound. Using the Onkyo Dock Dock is on Standby, the AV receiver will automatically turn on...
...on your iPod and the AV receiver at : http://www.onkyo.com Before using the Onkyo Dock components, update your iPod with the iPod still connected...59). • When you might not hear the first few seconds of the Onkyo Dock. Note • The AV receiver displays the message "UP-A1" for...and connected to "On" or "Standby". For supported iPod models, see the Onkyo web site at a specified time. Using the AV receiver's Remote Controller You can... iPod through the AV receiver and enjoy great sound. Using the Onkyo Dock Dock is on Standby, the AV receiver will automatically turn on...

Owner Manual
Page 58
... receiver's remote controller to operate your iPod. Controlling Your iPod By pressing REMOTE MODE that's been programmed with Universal Port connector. See the Dock's instruction manual for more information. ■ UP-A1 Dock PORT is preprogrammed with the remote control code for controlling a Dock with the remote control code for your...
... receiver's remote controller to operate your iPod. Controlling Your iPod By pressing REMOTE MODE that's been programmed with Universal Port connector. See the Dock's instruction manual for more information. ■ UP-A1 Dock PORT is preprogrammed with the remote control code for controlling a Dock with the remote control code for your...
