
Owner Manual
Page 1
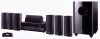
.........24 Advanced Operations 38 Controlling iPod & Other Components 56 Others 64 En 7.1ch Home Theater System HT-S7300 AV Receiver (HT-R680) Speaker Package (HTP-780) Universal Port Option Dock for iPod® (UP-A1) HT-S6300 AV Receiver (HT-R680) Speaker Package (HTP-680) Universal Port Option Dock for iPod® (UP-A1) Instruction.... Following the instructions in this manual thoroughly before making connections and plugging in the unit. Please retain this manual for purchasing an Onkyo 7.1ch Home Theater System. Please read this manual will enable you for future reference.
.........24 Advanced Operations 38 Controlling iPod & Other Components 56 Others 64 En 7.1ch Home Theater System HT-S7300 AV Receiver (HT-R680) Speaker Package (HTP-780) Universal Port Option Dock for iPod® (UP-A1) HT-S6300 AV Receiver (HT-R680) Speaker Package (HTP-680) Universal Port Option Dock for iPod® (UP-A1) Instruction.... Following the instructions in this manual thoroughly before making connections and plugging in the unit. Please retain this manual for purchasing an Onkyo 7.1ch Home Theater System. Please read this manual will enable you for future reference.
Owner Manual
Page 3
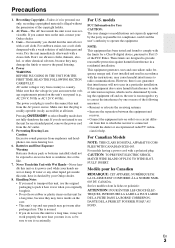
...If you originally bought it on , the user is encouraged to try to radio or television reception, which the receiver is no guarantee that the plug is readily operable (easily accessible) at all over with the limits for compliance could...Onkyo dealer. 8. AC outlet voltages vary from earphones and headphones can cause hearing loss. 6. Batteries and Heat Exposure Warning Batteries (battery pack or batteries installed) shall not be determined by the party responsible for a Class B digital device, pursuant to Part 15 of the following measures: • Reorient or relocate the receiving...
...If you originally bought it on , the user is encouraged to try to radio or television reception, which the receiver is no guarantee that the plug is readily operable (easily accessible) at all over with the limits for compliance could...Onkyo dealer. 8. AC outlet voltages vary from earphones and headphones can cause hearing loss. 6. Batteries and Heat Exposure Warning Batteries (battery pack or batteries installed) shall not be determined by the party responsible for a Class B digital device, pursuant to Part 15 of the following measures: • Reorient or relocate the receiving...
Owner Manual
Page 4
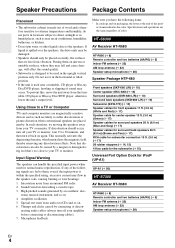
...before connecting or disconnecting cables). 7. If any discoloration effects. To prevent this, move the unit away from fast-forwarding a cassette tape. 3. HT-S6300 AV Receiver HT-R680 HT-R680 (➔ 8) Remote controller and two batteries (AA/R6) (➔ 5) Indoor FM antenna (➔ 22) AM loop antenna (➔... the horizontal or tilted position. • If the unit is used for iPod® (UP-A1) UP-A1 (➔ 56) HT-S7300 AV Receiver HT-R680 HT-R680 (➔ 8) Remote controller and two batteries (AA/R6) (➔ 5) Indoor FM antenna (➔ 22) AM loop antenna ...
...before connecting or disconnecting cables). 7. If any discoloration effects. To prevent this, move the unit away from fast-forwarding a cassette tape. 3. HT-S6300 AV Receiver HT-R680 HT-R680 (➔ 8) Remote controller and two batteries (AA/R6) (➔ 5) Indoor FM antenna (➔ 22) AM loop antenna (➔... the horizontal or tilted position. • If the unit is used for iPod® (UP-A1) UP-A1 (➔ 56) HT-S7300 AV Receiver HT-R680 HT-R680 (➔ 8) Remote controller and two batteries (AA/R6) (➔ 5) Indoor FM antenna (➔ 22) AM loop antenna ...
Owner Manual
Page 5
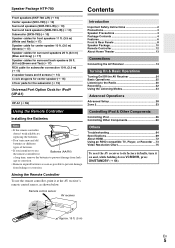
... Front & Rear Panels 8 Speaker Package 10 Remote Controller 12 About Home Theater 13 Connections Connecting the AV Receiver 14 Turning On & Basic Operations Turning On/Off the AV Receiver 24 Basic Operations 25 Listening to the Radio 30 Recording 32 Using the Listening Modes 33 Advanced Operations Advanced...Specifications 69 About HDMI 72 Using an RIHD-compatible TV, Player, or Recorder ... 73 Video Resolution Chart 75 To reset the AV receiver to prevent damage from leakage or corrosion. age or corrosion. • Remove expired batteries as soon as shown below. Aiming the Remote...
... Front & Rear Panels 8 Speaker Package 10 Remote Controller 12 About Home Theater 13 Connections Connecting the AV Receiver 14 Turning On & Basic Operations Turning On/Off the AV Receiver 24 Basic Operations 25 Listening to the Radio 30 Recording 32 Using the Listening Modes 33 Advanced Operations Advanced...Specifications 69 About HDMI 72 Using an RIHD-compatible TV, Player, or Recorder ... 73 Video Resolution Chart 75 To reset the AV receiver to prevent damage from leakage or corrosion. age or corrosion. • Remove expired batteries as soon as shown below. Aiming the Remote...
Owner Manual
Page 6
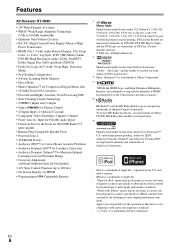
..."Dolby", "Pro Logic" and the double-D symbol are trademarks of Dolby Laboratories. *3 Music Optimizer™ is a trademark of Onkyo Corporation. *4 "HDMI, the HDMI Logo, and High-Definition Multimedia Interface are trademarks or registered trademarks of HDMI Licensing LLC in the... developer to meet Apple performance standards. and other U.S. En 6 All Rights Reserved. *2 Manufactured under license from Dolby Laboratories. Features AV Receiver HT-R680 • 130 Watts/Channel @ 6 ohms • WRAT-Wide Range Amplifier Technology (5 Hz to 100 kHz bandwidth) • Optimum...
..."Dolby", "Pro Logic" and the double-D symbol are trademarks of Dolby Laboratories. *3 Music Optimizer™ is a trademark of Onkyo Corporation. *4 "HDMI, the HDMI Logo, and High-Definition Multimedia Interface are trademarks or registered trademarks of HDMI Licensing LLC in the... developer to meet Apple performance standards. and other U.S. En 6 All Rights Reserved. *2 Manufactured under license from Dolby Laboratories. Features AV Receiver HT-R680 • 130 Watts/Channel @ 6 ohms • WRAT-Wide Range Amplifier Technology (5 Hz to 100 kHz bandwidth) • Optimum...
Owner Manual
Page 9
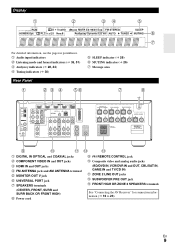
... M SUBWOOFER PRE OUT jack N FRONT HIGH OR ZONE 2 SPEAKERS terminals (CENTER, FRONT, SURR and SURR BACK OR FRONT HIGH) I Power cord See "Connecting the AV Receiver" for connection information (➔ 16 to 23). Display B C DE For detailed information, see the pages in parentheses.
... M SUBWOOFER PRE OUT jack N FRONT HIGH OR ZONE 2 SPEAKERS terminals (CENTER, FRONT, SURR and SURR BACK OR FRONT HIGH) I Power cord See "Connecting the AV Receiver" for connection information (➔ 16 to 23). Display B C DE For detailed information, see the pages in parentheses.

Owner Manual
Page 10
...'s no input signal for a while, the SKW-770/780 automatically enters Standby mode. Note • The Auto Standby function turns the subwoofer on the AV receiver (➔ 42). C OUTPUT LEVEL control (➔ 25) This control is used to the SUBWOOFER PRE OUT on when an input signal is detected in Standby... C D B Standby/On indicator Red: Subwoofer in standby mode Blue: Subwoofer on With the Auto Standby function, the SKW-770/780 automatically turns on the AV receiver with supplied RCA cable.
...'s no input signal for a while, the SKW-770/780 automatically enters Standby mode. Note • The Auto Standby function turns the subwoofer on the AV receiver (➔ 42). C OUTPUT LEVEL control (➔ 25) This control is used to the SUBWOOFER PRE OUT on when an input signal is detected in Standby... C D B Standby/On indicator Red: Subwoofer in standby mode Blue: Subwoofer on With the Auto Standby function, the SKW-770/780 automatically turns on the AV receiver with supplied RCA cable.
Owner Manual
Page 12
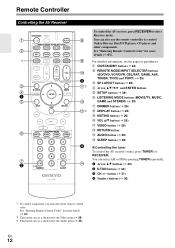
..., MUSIC, GAME and STEREO) (➔ 33) H DIMMER button (➔ 26) I J K D L*2 M N*3 E O To control the AV receiver, press RECEIVER to control Onkyo Blu-ray Disc/DVD player, CD player and other components. B Arrow R/X buttons (➔ 30) C D.TUN button (➔ 30) D CH +/- ...; 26). En 12 button (➔ 31) E Number buttons (➔ 30) *1 To control component, you must first enter remote control code. Remote Controller Controlling the AV Receiver B C *1 D E B F G H C I DISPLAY button (➔ 25) J MUTING button (➔ 26) K VOL R/X button (➔ 25) L VIDEO ...
..., MUSIC, GAME and STEREO) (➔ 33) H DIMMER button (➔ 26) I J K D L*2 M N*3 E O To control the AV receiver, press RECEIVER to control Onkyo Blu-ray Disc/DVD player, CD player and other components. B Arrow R/X buttons (➔ 30) C D.TUN button (➔ 30) D CH +/- ...; 26). En 12 button (➔ 31) E Number buttons (➔ 30) *1 To control component, you must first enter remote control code. Remote Controller Controlling the AV Receiver B C *1 D E B F G H C I DISPLAY button (➔ 25) J MUTING button (➔ 26) K VOL R/X button (➔ 25) L VIDEO ...
Owner Manual
Page 13
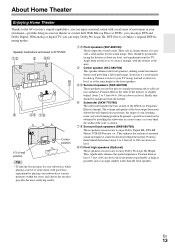
...create a triangle, with the listener at the apex. With Blu-ray Discs or DVDs, you can enjoy Dolby Pro Logic IIx, DTS Neo:6, or Onkyo's original DSP listening modes. They should be equidistant from the listener. Position it 's used for the sound image. They enhance the realism of the ...-ES Matrix, DTS-ES Discrete, etc. In general, a good bass sound can be positioned facing the listener at the same height as to the AV receiver's superb capabilities, you can enjoy DTS and Dolby Digital. H I Surround back speakers (SKB-680/780) These speakers are used mainly for your subwoofer, ...
...create a triangle, with the listener at the apex. With Blu-ray Discs or DVDs, you can enjoy Dolby Pro Logic IIx, DTS Neo:6, or Onkyo's original DSP listening modes. They should be equidistant from the listener. Position it 's used for the sound image. They enhance the realism of the ...-ES Matrix, DTS-ES Discrete, etc. In general, a good bass sound can be positioned facing the listener at the same height as to the AV receiver's superb capabilities, you can enjoy DTS and Dolby Digital. H I Surround back speakers (SKB-680/780) These speakers are used mainly for your subwoofer, ...

Owner Manual
Page 14
... mark Speaker base Bottom of SKF-780 Wall Mounting The speakers can easily be wall mounted by using the supplied screws. Connections Connecting the AV Receiver Attaching the Speaker Bases ■ SKF-780 Before you attach the speaker bases, make sure that the speakers stand upright and are securely screwed into...
... mark Speaker base Bottom of SKF-780 Wall Mounting The speakers can easily be wall mounted by using the supplied screws. Connections Connecting the AV Receiver Attaching the Speaker Bases ■ SKF-780 Before you attach the speaker bases, make sure that the speakers stand upright and are securely screwed into...
Owner Manual
Page 16
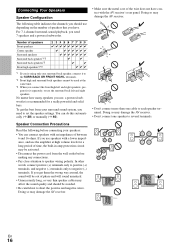
... the front high left and right speakers. Doing so may damage the AV receiver. • Don't connect more than one cable to short the positive and negative wires. Doing so may ...damage the AV receiver. • Don't connect one surround back speaker, connect it separately, or use , a powered... an impedance of between 6 and 16 ohms. If you use speakers with the AV receiver's rear panel. Doing so may damage the AV receiver. • Make sure the metal core of phase and will be activated. •...
... the front high left and right speakers. Doing so may damage the AV receiver. • Don't connect more than one cable to short the positive and negative wires. Doing so may ...damage the AV receiver. • Don't connect one surround back speaker, connect it separately, or use , a powered... an impedance of between 6 and 16 ohms. If you use speakers with the AV receiver's rear panel. Doing so may damage the AV receiver. • Make sure the metal core of phase and will be activated. •...
Owner Manual
Page 17
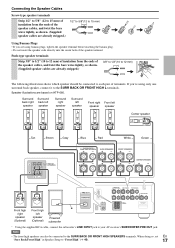
When doing so, set En "Surr Back/Front High" in Speaker Setup to your AV receiver's SUBWOOFER PRE OUT jack. Push-type speaker terminals Strip 3/8" to 1/2" (10 to 12 mm) of insulation from the ends of the speaker cables, and twist ...
When doing so, set En "Surr Back/Front High" in Speaker Setup to your AV receiver's SUBWOOFER PRE OUT jack. Push-type speaker terminals Strip 3/8" to 1/2" (10 to 12 mm) of insulation from the ends of the speaker cables, and twist ...
Owner Manual
Page 18
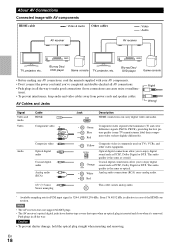
...console • Before making any AV connections, read the manuals supplied with AV components HDMI cable : Video & Audio Other cables AV receiver : Video : Audio AV receiver TV, projector, etc. AV Cables and Jacks Right! Wrong! R Red This cable carries analog audio. * Available sampling rate for ... interference, keep audio and video cables away from power cords and speaker cables. Note • The AV receiver does not support SCART plugs. • The AV receiver's optical digital jacks have shutter-type covers that open when an optical plug is effective in all the way...
...console • Before making any AV connections, read the manuals supplied with AV components HDMI cable : Video & Audio Other cables AV receiver : Video : Audio AV receiver TV, projector, etc. AV Cables and Jacks Right! Wrong! R Red This cable carries analog audio. * Available sampling rate for ... interference, keep audio and video cables away from power cords and speaker cables. Note • The AV receiver does not support SCART plugs. • The AV receiver's optical digital jacks have shutter-type covers that open when an optical plug is effective in all the way...
Owner Manual
Page 19
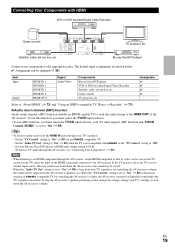
...Digital Video Recorder Satellite, cable, set -top box, etc. En 19 Blu-ray Disc/DVD player Connect your TV's speakers, by controlling the AV receiver's volume, the sound will be changed (➔ 39). Set your TV must support ARC function and "HDMI Control (RIHD)" is set to "On... • To listen to "On" (➔ 50) for an Q-compatible TV. - Set the "TV Control" setting to audio received by controlling the AV receiver's volume, the AV receiver's speakers will produce sound while the TV's speakers are shown below. ✔: Assignment can be seen on the TV screen (on the...
...Digital Video Recorder Satellite, cable, set -top box, etc. En 19 Blu-ray Disc/DVD player Connect your TV's speakers, by controlling the AV receiver's volume, the sound will be changed (➔ 39). Set your TV must support ARC function and "HDMI Control (RIHD)" is set to "On... • To listen to "On" (➔ 50) for an Q-compatible TV. - Set the "TV Control" setting to audio received by controlling the AV receiver's volume, the AV receiver's speakers will produce sound while the TV's speakers are shown below. ✔: Assignment can be seen on the TV screen (on the...
Owner Manual
Page 20
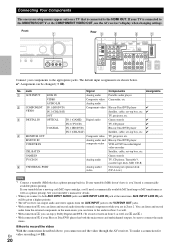
...video With the connections described above, you 'll need a commercially available MC head amp or MC transformer as well as well, use the AV receiver's display when changing settings. GAME IN Game console TV/CD IN Analog audio TV, CD player, Turntable*1, cassette tape deck, MD, CD-R...10004; % MONITOR OUT Composite video TV, projector, etc. See your turntable (MM) doesn't have it, you cannot record the video through the AV receiver. If your components to the audio in Zone 2 as well. • With connection $, you are shown below. ✔: Assignment can listen and record...
...video With the connections described above, you 'll need a commercially available MC head amp or MC transformer as well as well, use the AV receiver's display when changing settings. GAME IN Game console TV/CD IN Analog audio TV, CD player, Turntable*1, cassette tape deck, MD, CD-R...10004; % MONITOR OUT Composite video TV, projector, etc. See your turntable (MM) doesn't have it, you cannot record the video through the AV receiver. If your components to the audio in Zone 2 as well. • With connection $, you are shown below. ✔: Assignment can listen and record...
Owner Manual
Page 21
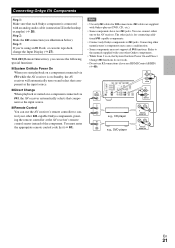
...: ■ System On/Auto Power On When you start playback on a component connected via V, the AV receiver automatically selects that each Onkyo component is connected with an analog audio cable (connection % in the hookup examples) (➔ 20). Refer to control...functions. Note • Use only V cables for connecting additional V-capable components. • Connect only Onkyo components to the AV receiver. Step 2: Make the V connection (see illustration below). Connecting Onkyo V Components Step 1: Make sure that component as the input source. ■ Direct Change When ...
...: ■ System On/Auto Power On When you start playback on a component connected via V, the AV receiver automatically selects that each Onkyo component is connected with an analog audio cable (connection % in the hookup examples) (➔ 20). Refer to control...functions. Note • Use only V cables for connecting additional V-capable components. • Connect only Onkyo components to the AV receiver. Step 2: Make the V connection (see illustration below). Connecting Onkyo V Components Step 1: Make sure that component as the input source. ■ Direct Change When ...
Owner Manual
Page 22
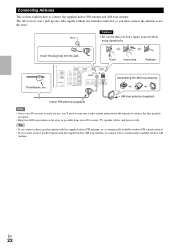
Indoor FM antenna (supplied) AM loop antenna (supplied) Note • Once your AV receiver is ready for use the tuner. Release. Assembling the AM loop antenna. En 22 Insert wire. Thumbtacks, etc. Connecting Antenna This section explains how to ... antenna to achieve the best possible reception. • Keep the AM loop antenna as far away as possible from your AV receiver, TV, speaker cables, and power cords. The AV receiver won't pick up any radio signals without any antenna connected, so you must connect the antenna to use , you'll need...
Indoor FM antenna (supplied) AM loop antenna (supplied) Note • Once your AV receiver is ready for use the tuner. Release. Assembling the AM loop antenna. En 22 Insert wire. Thumbtacks, etc. Connecting Antenna This section explains how to ... antenna to achieve the best possible reception. • Keep the AM loop antenna as far away as possible from your AV receiver, TV, speaker cables, and power cords. The AV receiver won't pick up any radio signals without any antenna connected, so you must connect the antenna to use , you'll need...
Owner Manual
Page 23
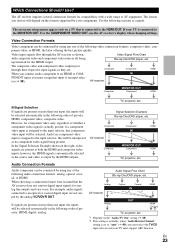
... or coaxial digital input are not output by the analog VCR/DVR OUT. For example, audio signals connected to an HDMI or COM- Analog AV receiver *1 Optical Coaxial IN *1 *1 HDMI Analog OUT HDMI *1 *2 TV, projector, etc. *1 Depends on the right, video signals are . The ...analog. Video input signals flow through their respective input signals as a guide. The composite video and component video outputs pass through the AV receiver as no component video input is output by using any of priority: HDMI, component video, composite video. IN PONENT input, you choose ...
... or coaxial digital input are not output by the analog VCR/DVR OUT. For example, audio signals connected to an HDMI or COM- Analog AV receiver *1 Optical Coaxial IN *1 *1 HDMI Analog OUT HDMI *1 *2 TV, projector, etc. *1 Depends on the right, video signals are . The ...analog. Video input signals flow through their respective input signals as a guide. The composite video and component video outputs pass through the AV receiver as no component video input is output by using any of priority: HDMI, component video, composite video. IN PONENT input, you choose ...
Owner Manual
Page 24
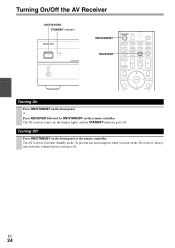
En 24 or Press RECEIVER followed by ON/STANDBY on the front panel or the remote controller. The AV receiver will enter Standby mode. Turning Off Press ON/STANDBY on the remote controller. The AV receiver comes on the AV receiver, always turn down the volume before you turn it off . To prevent any loud surprises when you turn on , the display lights, and the STANDBY indicator goes off . Turning On & Basic Operations Turning On/Off the AV Receiver ON/STANDBY STANDBY indicator ON/STANDBY RECEIVER Turning On Press ON/STANDBY on the front panel.
En 24 or Press RECEIVER followed by ON/STANDBY on the front panel or the remote controller. The AV receiver will enter Standby mode. Turning Off Press ON/STANDBY on the remote controller. The AV receiver comes on the AV receiver, always turn down the volume before you turn it off . To prevent any loud surprises when you turn on , the display lights, and the STANDBY indicator goes off . Turning On & Basic Operations Turning On/Off the AV Receiver ON/STANDBY STANDBY indicator ON/STANDBY RECEIVER Turning On Press ON/STANDBY on the front panel.
Owner Manual
Page 25
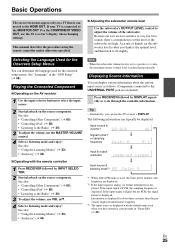
... information about three seconds, then the previously displayed information reappears. *3 The input source is displayed with the remote controller 1 Press RECEIVER followed by DISPLAY repeatedly to select the input source. 2 Start playback on the source component. See also: • "Controlling ... mode and enjoy! Information is displayed for the onscreen setup menus. Playing the Connected Component ■ Operating on the AV receiver 1 Use the input selector buttons to cycle through the available information. Displaying Source Information You can determine the language used ,...
... information about three seconds, then the previously displayed information reappears. *3 The input source is displayed with the remote controller 1 Press RECEIVER followed by DISPLAY repeatedly to select the input source. 2 Start playback on the source component. See also: • "Controlling ... mode and enjoy! Information is displayed for the onscreen setup menus. Playing the Connected Component ■ Operating on the AV receiver 1 Use the input selector buttons to cycle through the available information. Displaying Source Information You can determine the language used ,...


