
Owner Manual
Page 1
...Onkyo 7.1ch Home Theater System. Contents Introduction 2 Connections 14 Turning On & Basic Operations ......24 Advanced Operations 38 Controlling iPod & Other Components 56 Others 64 En Please read this manual thoroughly before making connections and plugging in this manual for future reference. 7.1ch Home Theater System HT-S7300 AV Receiver (HT...-R680) Speaker Package (HTP-780) Universal Port Option Dock for iPod® (UP-A1) HT-S6300 AV Receiver (HT-R680) Speaker Package (HTP-680) Universal Port Option...
...Onkyo 7.1ch Home Theater System. Contents Introduction 2 Connections 14 Turning On & Basic Operations ......24 Advanced Operations 38 Controlling iPod & Other Components 56 Others 64 En Please read this manual thoroughly before making connections and plugging in this manual for future reference. 7.1ch Home Theater System HT-S7300 AV Receiver (HT...-R680) Speaker Package (HTP-780) Universal Port Option Dock for iPod® (UP-A1) HT-S6300 AV Receiver (HT-R680) Speaker Package (HTP-680) Universal Port Option...
Owner Manual
Page 3
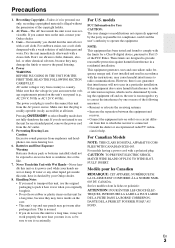
... FOND. Precautions 1. AC Fuse-The AC fuse inside this equipment does cause harmful interference to radio or television reception, which the receiver is encouraged to try to correct the interference by your hands are designed to disconnect this unit from that the voltage in a ...CAREFULLY. AC outlet voltages vary from earphones and headphones can be exposed to country. Make sure that interference will not occur in your Onkyo dealer. 3. Preventing Hearing Loss Caution Excessive sound pressure from country to excessive heat as sunshine, fire or the like. 7. This is...
... FOND. Precautions 1. AC Fuse-The AC fuse inside this equipment does cause harmful interference to radio or television reception, which the receiver is encouraged to try to correct the interference by your hands are designed to disconnect this unit from that the voltage in a ...CAREFULLY. AC outlet voltages vary from earphones and headphones can be exposed to country. Make sure that interference will not occur in your Onkyo dealer. 3. Preventing Hearing Loss Caution Excessive sound pressure from country to excessive heat as sunshine, fire or the like. 7. This is...
Owner Manual
Page 4
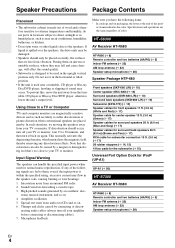
... from audio test CDs and so on sturdy, flat surfaces that 's too close to 30 minutes, and then turn off your TV or monitor. HT-S6300 AV Receiver HT-R680 HT-R680 (➔ 8) Remote controller and two batteries (AA/R6) (➔ 5) Indoor FM antenna (➔ 22) AM loop antenna (➔ 22... on . 6. Using Close to them on . 4. If discoloration should only be used for iPod® (UP-A1) UP-A1 (➔ 56) HT-S7300 AV Receiver HT-R680 HT-R680 (➔ 8) Remote controller and two batteries (AA/R6) (➔ 5) Indoor FM antenna (➔ 22) AM loop antenna (➔ 22) ...
... from audio test CDs and so on sturdy, flat surfaces that 's too close to 30 minutes, and then turn off your TV or monitor. HT-S6300 AV Receiver HT-R680 HT-R680 (➔ 8) Remote controller and two batteries (AA/R6) (➔ 5) Indoor FM antenna (➔ 22) AM loop antenna (➔ 22... on . 6. Using Close to them on . 4. If discoloration should only be used for iPod® (UP-A1) UP-A1 (➔ 56) HT-S7300 AV Receiver HT-R680 HT-R680 (➔ 8) Remote controller and two batteries (AA/R6) (➔ 5) Indoor FM antenna (➔ 22) AM loop antenna (➔ 22) ...
Owner Manual
Page 5
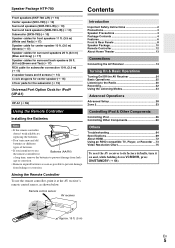
...old batteries or different types of batteries. • If you intend not to use the remote controller, point it at the AV receiver's remote control sensor, as possible to its factory defaults, turn it on and, while holding down VCR/DVR, press ON/STANDBY ...the remote controller for Batteries (AA/R6) a long time, remove the batteries to prevent damage from leakage or corrosion. Remote control sensor AV receiver Introduction Important Safety Instructions 2 Precautions 3 Speaker Precautions 4 Package Contents 4 Features 6 Front & Rear Panels 8 Speaker Package 10 Remote Controller ...
...old batteries or different types of batteries. • If you intend not to use the remote controller, point it at the AV receiver's remote control sensor, as possible to its factory defaults, turn it on and, while holding down VCR/DVR, press ON/STANDBY ...the remote controller for Batteries (AA/R6) a long time, remove the batteries to prevent damage from leakage or corrosion. Remote control sensor AV receiver Introduction Important Safety Instructions 2 Precautions 3 Speaker Precautions 4 Package Contents 4 Features 6 Front & Rear Panels 8 Speaker Package 10 Remote Controller ...
Owner Manual
Page 6
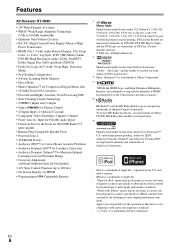
... Apple is not responsible for the operation of this device or its compliance with Audio Return Channel, 3D), Deep- En 6 Features AV Receiver HT-R680 • 130 Watts/Channel @ 6 ohms • WRAT-Wide Range Amplifier Technology (5 Hz to 100 kHz bandwidth) • Optimum...bit D/A Converters • Powerful and Highly Accurate 32-bit Processing DSP • Jitter Cleaning Circuit Technology • 4 HDMI*4 Inputs and 1 Output • Onkyo Q for System Control • 4 Digital Inputs (2 Optical/2 Coaxial) • Component Video Switching (2 Inputs/1 Output) • Front "Line in the U.S....
... Apple is not responsible for the operation of this device or its compliance with Audio Return Channel, 3D), Deep- En 6 Features AV Receiver HT-R680 • 130 Watts/Channel @ 6 ohms • WRAT-Wide Range Amplifier Technology (5 Hz to 100 kHz bandwidth) • Optimum...bit D/A Converters • Powerful and Highly Accurate 32-bit Processing DSP • Jitter Cleaning Circuit Technology • 4 HDMI*4 Inputs and 1 Output • Onkyo Q for System Control • 4 Digital Inputs (2 Optical/2 Coaxial) • Component Video Switching (2 Inputs/1 Output) • Front "Line in the U.S....
Owner Manual
Page 9
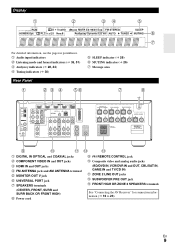
... M SUBWOOFER PRE OUT jack N FRONT HIGH OR ZONE 2 SPEAKERS terminals (CENTER, FRONT, SURR and SURR BACK OR FRONT HIGH) I Power cord See "Connecting the AV Receiver" for connection information (➔ 16 to 23). Display B C DE For detailed information, see the pages in parentheses. En 9
... M SUBWOOFER PRE OUT jack N FRONT HIGH OR ZONE 2 SPEAKERS terminals (CENTER, FRONT, SURR and SURR BACK OR FRONT HIGH) I Power cord See "Connecting the AV Receiver" for connection information (➔ 16 to 23). Display B C DE For detailed information, see the pages in parentheses. En 9

Owner Manual
Page 10
... SKR-680/SKB-680 B Front B CB Rear Front C B Rear En 10 Note • The Auto Standby function turns the subwoofer on the AV receiver with supplied RCA cable. If the Auto Standby function does not work reliably, try slightly increasing or decreasing the subwoofer output level on the AV... receiver (➔ 42). When there's no input signal for a while, the SKW-770/780 automatically enters Standby mode. Speaker Package Subwoofer (SKW-...
... SKR-680/SKB-680 B Front B CB Rear Front C B Rear En 10 Note • The Auto Standby function turns the subwoofer on the AV receiver with supplied RCA cable. If the Auto Standby function does not work reliably, try slightly increasing or decreasing the subwoofer output level on the AV... receiver (➔ 42). When there's no input signal for a while, the SKW-770/780 automatically enters Standby mode. Speaker Package Subwoofer (SKW-...
Owner Manual
Page 12
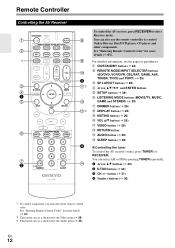
...MOVIE/TV, MUSIC, GAME and STEREO) (➔ 33) H DIMMER button (➔ 26) I J K D L*2 M N*3 E O To control the AV receiver, press RECEIVER to control Onkyo Blu-ray Disc/DVD player, CD player and other components. You can also use the remote controller to select... Receiver mode. Remote Controller Controlling the AV Receiver B C *1 D E B F G H C I DISPLAY button (➔ 25) J MUTING button (➔ 26) K VOL R/X button (➔ 25) L VIDEO button (&#...
...MOVIE/TV, MUSIC, GAME and STEREO) (➔ 33) H DIMMER button (➔ 26) I J K D L*2 M N*3 E O To control the AV receiver, press RECEIVER to control Onkyo Blu-ray Disc/DVD player, CD player and other components. You can also use the remote controller to select... Receiver mode. Remote Controller Controlling the AV Receiver B C *1 D E B F G H C I DISPLAY button (➔ 25) J MUTING button (➔ 26) K VOL R/X button (➔ 25) L VIDEO button (&#...
Owner Manual
Page 13
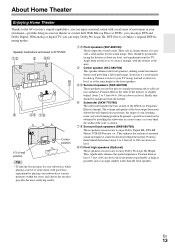
... speakers. In movies it close to add realistic ambience. About Home Theater Enjoying Home Theater Thanks to the AV receiver's superb capabilities, you can enjoy Dolby Pro Logic IIx, DTS Neo:6, or Onkyo's original DSP listening modes. Speaker illustrations are necessary to enjoy Dolby Digital EX, DTS-ES Matrix, DTS-ES Discrete...
... speakers. In movies it close to add realistic ambience. About Home Theater Enjoying Home Theater Thanks to the AV receiver's superb capabilities, you can enjoy Dolby Pro Logic IIx, DTS Neo:6, or Onkyo's original DSP listening modes. Speaker illustrations are necessary to enjoy Dolby Digital EX, DTS-ES Matrix, DTS-ES Discrete...

Owner Manual
Page 14
Connections Connecting the AV Receiver Attaching the Speaker Bases ■ SKF-780 Before you connect the speakers, attach the supplied speaker base to tip over the speaker. 4. Front, Surround and ...
Connections Connecting the AV Receiver Attaching the Speaker Bases ■ SKF-780 Before you connect the speakers, attach the supplied speaker base to tip over the speaker. 4. Front, Surround and ...
Owner Manual
Page 16
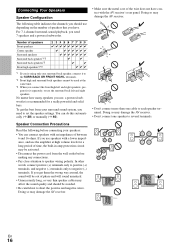
... the sound will be out of phase and will sound unnatural. • Unnecessarily long, or very thin speaker cables may damage the AV receiver. • Make sure the metal core of the wire does not have contact with a lower impedance, and use depending on the number ... to set the speaker settings. If you need 7 speakers and a powered subwoofer. For 7.1-channel surround-sound playback, you use speakers with the AV receiver's rear panel. In other words, connect positive (+) terminals only to positive (+) terminals, and negative (-) terminals only to negative (-) terminals. En 16...
... the sound will be out of phase and will sound unnatural. • Unnecessarily long, or very thin speaker cables may damage the AV receiver. • Make sure the metal core of the wire does not have contact with a lower impedance, and use depending on the number ... to set the speaker settings. If you need 7 speakers and a powered subwoofer. For 7.1-channel surround-sound playback, you use speakers with the AV receiver's rear panel. In other words, connect positive (+) terminals only to positive (+) terminals, and negative (-) terminals only to negative (-) terminals. En 16...
Owner Manual
Page 17
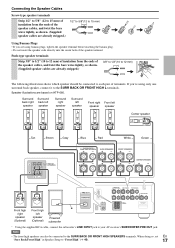
..., as shown. (Supplied speaker cables are already stripped.) 3/8" to 1/2"(10 to 12 mm) The following illustration shows which speaker should be connected to your AV receiver's SUBWOOFER PRE OUT jack. If you are using only one surround back speaker, connect it to the SURR BACK OR FRONT HIGH L terminals. Connecting the...
..., as shown. (Supplied speaker cables are already stripped.) 3/8" to 1/2"(10 to 12 mm) The following illustration shows which speaker should be connected to your AV receiver's SUBWOOFER PRE OUT jack. If you are using only one surround back speaker, connect it to the SURR BACK OR FRONT HIGH L terminals. Connecting the...
Owner Manual
Page 18
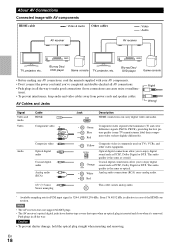
... • Before making any AV connections, read the manuals supplied with AV components HDMI cable : Video & Audio Other cables AV receiver : Video : Audio AV receiver TV, projector, etc. Green Blue Red Component video separates the luminance (Y) and color difference signals (PB/CB, PR/CR), providing...prevent interference, keep audio and video cables away from power cords and speaker cables. Note • The AV receiver does not support SCART plugs. • The AV receiver's optical digital jacks have shutter-type covers that open when an optical plug is effective in all the way...
... • Before making any AV connections, read the manuals supplied with AV components HDMI cable : Video & Audio Other cables AV receiver : Video : Audio AV receiver TV, projector, etc. Green Blue Red Component video separates the luminance (Y) and color difference signals (PB/CB, PR/CR), providing...prevent interference, keep audio and video cables away from power cords and speaker cables. Note • The AV receiver does not support SCART plugs. • The AV receiver's optical digital jacks have shutter-type covers that open when an optical plug is effective in all the way...
Owner Manual
Page 19
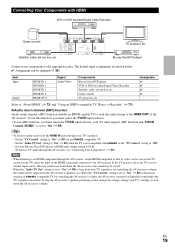
... are muted. To listen to "On" (➔ 50) for an Q-compatible TV. - En 19 Tip • To listen to audio received by controlling the AV receiver's volume, the AV receiver's speakers will be seen on the TV screen (on the TV, select the input of the HDMI component connected to the AV... setting to PCM. - Set the "TV Control" setting to TV audio through your TV's speakers: - Set your TV's settings, or turn down the AV receiver's volume. Blu-ray Disc/DVD player Connect your TV must support ARC function and "HDMI Control (RIHD)" is set to "On"(➔ 49). When the...
... are muted. To listen to "On" (➔ 50) for an Q-compatible TV. - En 19 Tip • To listen to audio received by controlling the AV receiver's volume, the AV receiver's speakers will be seen on the TV screen (on the TV, select the input of the HDMI component connected to the AV... setting to PCM. - Set the "TV Control" setting to TV audio through your TV's speakers: - Set your TV's settings, or turn down the AV receiver's volume. Blu-ray Disc/DVD player Connect your TV must support ARC function and "HDMI Control (RIHD)" is set to "On"(➔ 49). When the...
Owner Manual
Page 20
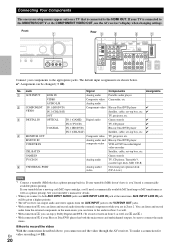
...If your turntable (MM) doesn't have it, you are shown below. ✔: Assignment can be given a higher priority. • The AV receiver can output audio and video signals from the AUX INPUT jacks to the HDMI OUT. Connecting Your Components The on-screen setup menus appear only... record audio from the external components while you 'll need a commercially available MC head amp or MC transformer as well as well, use the AV receiver's display when changing settings. Front " Rear $ # % & Connect your components to the MONITOR OUT V or the COMPONENT VIDEO OUT, use $ and %.) ...
...If your turntable (MM) doesn't have it, you are shown below. ✔: Assignment can be given a higher priority. • The AV receiver can output audio and video signals from the AUX INPUT jacks to the HDMI OUT. Connecting Your Components The on-screen setup menus appear only... record audio from the external components while you 'll need a commercially available MC head amp or MC transformer as well as well, use the AV receiver's display when changing settings. Front " Rear $ # % & Connect your components to the MONITOR OUT V or the COMPONENT VIDEO OUT, use $ and %.) ...
Owner Manual
Page 21
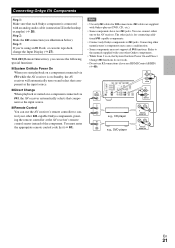
... on a component connected via V, the AV receiver automatically selects that each Onkyo component is for V connections. Step 3: If you start playback on a component connected via V while the AV receiver is on Standby, the AV receiver will automatically turn on and select that component ....). • Some components have two V jacks. You can use the AV receiver's remote controller to the AV receiver. The other V-capable Onkyo components, pointing the remote controller at the AV receiver's remote control sensor instead of the component. With V (Remote Interactive), you ...
... on a component connected via V, the AV receiver automatically selects that each Onkyo component is for V connections. Step 3: If you start playback on a component connected via V while the AV receiver is on Standby, the AV receiver will automatically turn on and select that component ....). • Some components have two V jacks. You can use the AV receiver's remote controller to the AV receiver. The other V-capable Onkyo components, pointing the remote controller at the AV receiver's remote control sensor instead of the component. With V (Remote Interactive), you ...
Owner Manual
Page 22
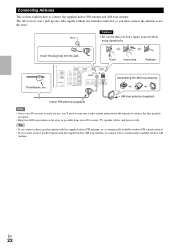
...wire. En 22 Push. Assembling the AM loop antenna. Indoor FM antenna (supplied) AM loop antenna (supplied) Note • Once your AV receiver, TV, speaker cables, and power cords. Thumbtacks, etc. Caution • Be careful that you cannot achieve good reception with the supplied indoor AM...available outdoor FM antenna instead. • If you don't injure yourself when using it with a commercially available outdoor AM antenna. The AV receiver won't pick up any radio signals without any antenna connected, so you 'll need to connect the supplied indoor FM antenna and AM loop ...
...wire. En 22 Push. Assembling the AM loop antenna. Indoor FM antenna (supplied) AM loop antenna (supplied) Note • Once your AV receiver, TV, speaker cables, and power cords. Thumbtacks, etc. Caution • Be careful that you cannot achieve good reception with the supplied indoor AM...available outdoor FM antenna instead. • If you don't injure yourself when using it with a commercially available outdoor AM antenna. The AV receiver won't pick up any radio signals without any antenna connected, so you 'll need to connect the supplied indoor FM antenna and AM loop ...
Owner Manual
Page 23
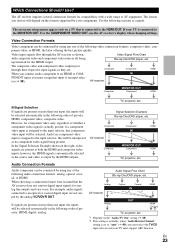
...Formats Audio component can be connected by the HDMI outputs. Audio Signal Flow Chart Blu-ray Disc/DVD player, etc. The AV receiver supports several connection formats for compatibility with composite video and component video sources all being present. ponent video, or HDMI, the ... of the following audio connection formats: analog, optical, coaxial, or HDMI. However, for analog line outputs and vice versa. Composite AV receiver Composite Component IN MONITOR OUT Component HDMI HDMI TV, projector, etc. Which Connections Should I Use? If your TV must assign that input...
...Formats Audio component can be connected by the HDMI outputs. Audio Signal Flow Chart Blu-ray Disc/DVD player, etc. The AV receiver supports several connection formats for compatibility with composite video and component video sources all being present. ponent video, or HDMI, the ... of the following audio connection formats: analog, optical, coaxial, or HDMI. However, for analog line outputs and vice versa. Composite AV receiver Composite Component IN MONITOR OUT Component HDMI HDMI TV, projector, etc. Which Connections Should I Use? If your TV must assign that input...
Owner Manual
Page 24
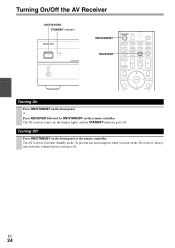
The AV receiver comes on the front panel. Turning On & Basic Operations Turning On/Off the AV Receiver ON/STANDBY STANDBY indicator ON/STANDBY RECEIVER Turning On Press ON/STANDBY on , the display lights, and the STANDBY indicator goes off . The AV receiver will enter Standby mode. Turning Off Press ON/STANDBY on the remote controller. En 24 or Press RECEIVER followed by ON/STANDBY on the front panel or the remote controller. To prevent any loud surprises when you turn on the AV receiver, always turn down the volume before you turn it off .
The AV receiver comes on the front panel. Turning On & Basic Operations Turning On/Off the AV Receiver ON/STANDBY STANDBY indicator ON/STANDBY RECEIVER Turning On Press ON/STANDBY on , the display lights, and the STANDBY indicator goes off . The AV receiver will enter Standby mode. Turning Off Press ON/STANDBY on the remote controller. En 24 or Press RECEIVER followed by ON/STANDBY on the front panel or the remote controller. To prevent any loud surprises when you turn on the AV receiver, always turn down the volume before you turn it off .
Owner Manual
Page 25
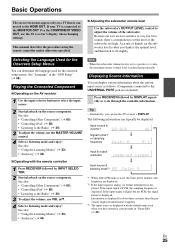
...Components" (➔ 60) • "Controlling iPod" (➔ 56) • "Listening to the UNIVERSAL PORT jack are excluded.) Press RECEIVER followed by INPUT SELECTOR. 2 Start playback on the source component. En 25 Displaying Source Information You can determine the language used , the band...reappears. *3 The input source is reduced proportionally. See "Language" in "Name Edit" (➔ 45). The following information can use the AV receiver's display when changing settings. See also: • "Using the Listening Modes" (➔ 33) • "Audyssey" (➔ 44) &#...
...Components" (➔ 60) • "Controlling iPod" (➔ 56) • "Listening to the UNIVERSAL PORT jack are excluded.) Press RECEIVER followed by INPUT SELECTOR. 2 Start playback on the source component. En 25 Displaying Source Information You can determine the language used , the band...reappears. *3 The input source is reduced proportionally. See "Language" in "Name Edit" (➔ 45). The following information can use the AV receiver's display when changing settings. See also: • "Using the Listening Modes" (➔ 33) • "Audyssey" (➔ 44) &#...


