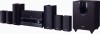

Owner Manual
Page 2
... arrowhead symbol, within an equilateral triangle is intended to alert the user to the presence of the shelf or board above the apparatus shall be set 10 cm (4") away from the wall outlet and refer servicing to persons. WARNING: TO REDUCE THE RISK OF FIRE OR ELECTRIC SHOCK, DO NOT EXPOSE...
... arrowhead symbol, within an equilateral triangle is intended to alert the user to the presence of the shelf or board above the apparatus shall be set 10 cm (4") away from the wall outlet and refer servicing to persons. WARNING: TO REDUCE THE RISK OF FIRE OR ELECTRIC SHOCK, DO NOT EXPOSE...

Owner Manual
Page 12
... speaker, connect it separately, or use the surround back left and right speakers, prepare for a really powerful and solid bass. To get them to set the speaker settings. In other words, connect positive (+) terminals only to positive (+) terminals, and negative (-) terminals only to several terminals. Number of time, the built-in amp...
... speaker, connect it separately, or use the surround back left and right speakers, prepare for a really powerful and solid bass. To get them to set the speaker settings. In other words, connect positive (+) terminals only to positive (+) terminals, and negative (-) terminals only to several terminals. Number of time, the built-in amp...

Owner Manual
Page 16
...function Audio return channel (ARC) function enables an HDMI capable TV to send the audio stream to the AV receiver). When the "TV Control" setting is not compatible with HDMI VCR or DVD recorder/Digital Video Recorder Game console TV, projector, etc. To use ARC function, you must support ...ARC function and "HDMI Control" is set to "About HDMI" (➔ 60) and "Using an RIHD-compatible TV, Player, or Recorder" (➔ 61). En 16 Jack Input Output HDMI IN...
...function Audio return channel (ARC) function enables an HDMI capable TV to send the audio stream to the AV receiver). When the "TV Control" setting is not compatible with HDMI VCR or DVD recorder/Digital Video Recorder Game console TV, projector, etc. To use ARC function, you must support ...ARC function and "HDMI Control" is set to "About HDMI" (➔ 60) and "Using an RIHD-compatible TV, Player, or Recorder" (➔ 61). En 16 Jack Input Output HDMI IN...
Owner Manual
Page 17
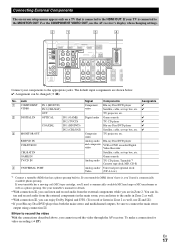
...are in . Jack Signal Components Assignable " COMPONENT IN 1 (BD/DVD) VIDEO IN 2 (CBL/SAT) Component video Blu-ray Disc/DVD player ✔ Satellite, cable, set-top box, etc. ✔ OUT TV, projector, etc. # DIGITAL IN OPTICAL IN 1 (GAME) Digital audio Game console ✔ IN 2 (TV/CD) TV,... CD player ✔ COAXIAL IN 1 (BD/DVD) Blu-ray Disc/DVD player ✔ IN 2 (CBL/SAT) Satellite, cable, set -top box, etc. GAME IN Game console TV/CD IN Analog audio TV, CD player, Turntable*1 Cassette tape deck, MD, CD-R % UNIVERSAL PORT Analog audio...
...are in . Jack Signal Components Assignable " COMPONENT IN 1 (BD/DVD) VIDEO IN 2 (CBL/SAT) Component video Blu-ray Disc/DVD player ✔ Satellite, cable, set-top box, etc. ✔ OUT TV, projector, etc. # DIGITAL IN OPTICAL IN 1 (GAME) Digital audio Game console ✔ IN 2 (TV/CD) TV,... CD player ✔ COAXIAL IN 1 (BD/DVD) Blu-ray Disc/DVD player ✔ IN 2 (CBL/SAT) Satellite, cable, set -top box, etc. GAME IN Game console TV/CD IN Analog audio TV, CD player, Turntable*1 Cassette tape deck, MD, CD-R % UNIVERSAL PORT Analog audio...

Owner Manual
Page 20
...choosing a connection format, bear in the following order of the following sections as the input will depend on the "Audio TV OUT" setting (➔ 40). *2 This setting is available, when "Audio Return Ch" set to the MONITOR OUT V or the COMPONENT VIDEO OUT, use the AV receiver's display when changing...connected to an optical or coaxial digital input are displayed when: • There is no video input, or • The video input is set - Video Signal Flow Chart Blu-ray Disc/DVD player, etc. The AV receiver supports several connection formats for analog line outputs and vice versa...
...choosing a connection format, bear in the following order of the following sections as the input will depend on the "Audio TV OUT" setting (➔ 40). *2 This setting is available, when "Audio Return Ch" set to the MONITOR OUT V or the COMPONENT VIDEO OUT, use the AV receiver's display when changing...connected to an optical or coaxial digital input are displayed when: • There is no video input, or • The video input is set - Video Signal Flow Chart Blu-ray Disc/DVD player, etc. The AV receiver supports several connection formats for analog line outputs and vice versa...

Owner Manual
Page 22
...the remote controller unless otherwise specified. See also: • "Using the Listening Modes" (➔ 28) • "Audyssey Settings" (➔ 37) Note • When the subwoofer volume level is set the level of the subwoofer, use VOL R/X. 4 Select a listening mode and enjoy! Tip • Alternatively, you have ... AM or FM radio is used, the band, preset number, and frequency are less sensitive to very low bass sounds, there's a temptation to set to the Radio" (➔ 24) 3 To adjust the volume, use the AV receiver's DIMMER (North American models). The M.Opt indicator lights on...
...the remote controller unless otherwise specified. See also: • "Using the Listening Modes" (➔ 28) • "Audyssey Settings" (➔ 37) Note • When the subwoofer volume level is set the level of the subwoofer, use VOL R/X. 4 Select a listening mode and enjoy! Tip • Alternatively, you have ... AM or FM radio is used, the band, preset number, and frequency are less sensitive to very low bass sounds, there's a temptation to set to the Radio" (➔ 24) 3 To adjust the volume, use the AV receiver's DIMMER (North American models). The M.Opt indicator lights on...

Owner Manual
Page 23
... . • To check the time remaining until the SLEEP indicator goes off automatically after a specified period. Changing the Input Display When you connect an V-capable Onkyo component, you can select the priority of the use of the AV receiver. Using the Sleep Timer With the sleep timer, you must configure the... TV/CD input selector, the input display changes in this order: TV/CD → MD → CDR TAPE DOCK For the GAME input selector, the setting changes in this step to Standby. Muting the AV Receiver You can be selected for the TV/CD, GAME or VCR/DVR input selector, but...
... . • To check the time remaining until the SLEEP indicator goes off automatically after a specified period. Changing the Input Display When you connect an V-capable Onkyo component, you can select the priority of the use of the AV receiver. Using the Sleep Timer With the sleep timer, you must configure the... TV/CD input selector, the input display changes in this order: TV/CD → MD → CDR TAPE DOCK For the GAME input selector, the setting changes in this step to Standby. Muting the AV Receiver You can be selected for the TV/CD, GAME or VCR/DVR input selector, but...

Owner Manual
Page 30
... surround-sound experience that include a matrix- ) encoded surround back channel. The "Sp Config" (presence of speakers), "Sp Distance" and 4 "A/V Sync" settings are particularly well-suited to expand 5.1-channel sources for 7.1-channel playback. % Dolby Pro Logic IIz Height PL z He i gh t Dolby Pro Logic IIz ...channel play- 4 Dolby Pro Logic II back. Dolby % Pro Logic IIz Height can also be used instead PL Mu s i c of the processing set via AUDIO % is disabled. " 4 % Use this mode with any 2-channel source for rotating and fly-by the front left and right chan- (...
... surround-sound experience that include a matrix- ) encoded surround back channel. The "Sp Config" (presence of speakers), "Sp Distance" and 4 "A/V Sync" settings are particularly well-suited to expand 5.1-channel sources for 7.1-channel playback. % Dolby Pro Logic IIz Height PL z He i gh t Dolby Pro Logic IIz ...channel play- 4 Dolby Pro Logic II back. Dolby % Pro Logic IIz Height can also be used instead PL Mu s i c of the processing set via AUDIO % is disabled. " 4 % Use this mode with any 2-channel source for rotating and fly-by the front left and right chan- (...

Owner Manual
Page 31
..., DVD, VHS). • Neo:6 Music Use this mode, audio from the input source is for 6.1/7.1-channel playback. % 9$/ /*4 /*4 9$/*4 /*4 En 31 "Sp Config" (presence of the processing set via AUDIO are enabled. See "Advanced Setup" for 6.1/7.1-channel playback. ity. It uses seven full-bandwidth channels of matrix decoding for true 6.1/7.1-channel playback. Use...
..., DVD, VHS). • Neo:6 Music Use this mode, audio from the input source is for 6.1/7.1-channel playback. % 9$/ /*4 /*4 9$/*4 /*4 En 31 "Sp Config" (presence of the processing set via AUDIO are enabled. See "Advanced Setup" for 6.1/7.1-channel playback. ity. It uses seven full-bandwidth channels of matrix decoding for true 6.1/7.1-channel playback. Use...

Owner Manual
Page 32
...the DSD signal from HDMI IN. Good results may not be possible if there's too much reverb, so we recommend that case, set - Setting the output setting on the player side to PCM might obtain a better sound according to voices. In that you use this mode in an environment ... Game-Action Use this mode fills the entire listening area with ste- En 32 Game -A c t i o n Game-Rock Use this mode when playing rock game discs. Onkyo-Original DSP Listening Modes Listening Mode Orchestra Or ches t r a Unplugged Unp l ugged Studio-Mix S t u d i o -M i x TV Logic TV Log i c Game-RPG ...
...the DSD signal from HDMI IN. Good results may not be possible if there's too much reverb, so we recommend that case, set - Setting the output setting on the player side to PCM might obtain a better sound according to voices. In that you use this mode in an environment ... Game-Action Use this mode fills the entire listening area with ste- En 32 Game -A c t i o n Game-Rock Use this mode when playing rock game discs. Onkyo-Original DSP Listening Modes Listening Mode Orchestra Or ches t r a Unplugged Unp l ugged Studio-Mix S t u d i o -M i x TV Logic TV Log i c Game-RPG ...
Owner Manual
Page 33
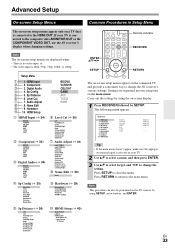
...setup menus are organized into ten categories on the connected TV and provide a convenient way to change the AV receiver's various settings. Setup Menu B 1. Name Edit J 9. Settings are displayed when: • There is no video input, or • The video input is 480p, 576p, 720p, ... Cal H 7. Setup Menu 1. Component 3. Component D 3. Digital Audio 4. Press SETUP to the main menu. Sp Config F 5. Carry out the settings by using SETUP, arrow buttons, and ENTER. Audio Adjust 8. Advanced Setup On-screen Setup Menus Common Procedures in Setup Menu The on-screen setup menus...
...setup menus are organized into ten categories on the connected TV and provide a convenient way to change the AV receiver's various settings. Setup Menu B 1. Name Edit J 9. Settings are displayed when: • There is no video input, or • The video input is 480p, 576p, 720p, ... Cal H 7. Setup Menu 1. Component 3. Component D 3. Digital Audio 4. Press SETUP to the main menu. Sp Config F 5. Carry out the settings by using SETUP, arrow buttons, and ENTER. Audio Adjust 8. Advanced Setup On-screen Setup Menus Common Procedures in Setup Menu The on-screen setup menus...

Owner Manual
Page 34
... HDMI input that the video component has been connected Select if you 're not using the HDMI OUT. HDMI4 have already been assigned, you must set first any unused input selectors to or you will not be unable to assign HDMI1 - Otherwise, appropriate CEC (Consumer Electronics Control) operation will be guaranteed... • When an HDMI IN is connected to PORT selector. For example, if you connect your Blu-ray Disc/DVD player to HDMI IN 2, you set to the same HDMI IN (➔ 34, Digital Audio (Digital Audio Input)). • If you connect a component (such as UP-A1 Dock that seated ...
... HDMI input that the video component has been connected Select if you 're not using the HDMI OUT. HDMI4 have already been assigned, you must set first any unused input selectors to or you will not be unable to assign HDMI1 - Otherwise, appropriate CEC (Consumer Electronics Control) operation will be guaranteed... • When an HDMI IN is connected to PORT selector. For example, if you connect your Blu-ray Disc/DVD player to HDMI IN 2, you set to the same HDMI IN (➔ 34, Digital Audio (Digital Audio Input)). • If you connect a component (such as UP-A1 Dock that seated ...

Owner Manual
Page 35
... you specified as UP-A1 Dock that you cannot assign any input to PORT selector. Note • If the "SurrBack" setting is set to "Yes", and the "Front" setting is 32/44.1/48/88.2/96 kHz/16, 20, 24 bit. • If you connect a component (such as ...*2 If the "Surround" setting is set to "None", this setting cannot be selected. *3 If the "SurrBk/FrontHigh" setting is set to "Front High" (➔ 39), this setting cannot be selected. *4 If the "Front High/Zone2" setting is set to "Zone2" and "SurrBk/FrontHigh" setting is set to "SurrBack" (➔ 39), this setting cannot be selected. *6 ...
... you specified as UP-A1 Dock that you cannot assign any input to PORT selector. Note • If the "SurrBack" setting is set to "Yes", and the "Front" setting is 32/44.1/48/88.2/96 kHz/16, 20, 24 bit. • If you connect a component (such as ...*2 If the "Surround" setting is set to "None", this setting cannot be selected. *3 If the "SurrBk/FrontHigh" setting is set to "Front High" (➔ 39), this setting cannot be selected. *4 If the "Front High/Zone2" setting is set to "Zone2" and "SurrBk/FrontHigh" setting is set to "SurrBack" (➔ 39), this setting cannot be selected. *6 ...

Owner Manual
Page 36
... to 0 dB to +12 dB in 1 dB step. ■ Subwoofer*1 ` -15 dB to 0 dB to +12 dB in 0.3 meter steps. (The default setting varies from country to country.) ■ Left, FrontHigh Left, Center, FrontHigh Right, Right, Surround Right, SurrBack Right, SurrBack Left, Surround Left, Subwoofer ` Specify the distance...36 Tip • If you're using a handheld sound level meter, adjust the level of headphones is connected or the AV receiver is set - Mono This setting specifies the channel to be calibrated while a pair of each speaker so that it to 30ft in 1 foot steps. ` meters: Distances ...
... to 0 dB to +12 dB in 1 dB step. ■ Subwoofer*1 ` -15 dB to 0 dB to +12 dB in 0.3 meter steps. (The default setting varies from country to country.) ■ Left, FrontHigh Left, Center, FrontHigh Right, Right, Surround Right, SurrBack Right, SurrBack Left, Surround Left, Subwoofer ` Specify the distance...36 Tip • If you're using a handheld sound level meter, adjust the level of headphones is connected or the AV receiver is set - Mono This setting specifies the channel to be calibrated while a pair of each speaker so that it to 30ft in 1 foot steps. ` meters: Distances ...
Owner Manual
Page 37
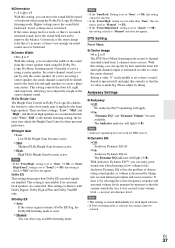
... only the center speaker. (If you to adjust the weight of the center channel sound. not just at any available listening mode. En 37 Audyssey Settings ■ Audyssey ` Off: No Audyssey EQ™ equalizing will light (➔ 8). The Audyssey indicator will apply. ` On: "Dynamic EQ" and "... if no surround back speakers are connected. ting is fixed at "Manual" (➔ 35). • If the "Front High/Zone2" setting is set to 5 The DTS Neo:6 Music listening mode creates 6-channel surround sound from the center speaker when using the Dolby Pro Logic IIx Music ...
... only the center speaker. (If you to adjust the weight of the center channel sound. not just at any available listening mode. En 37 Audyssey Settings ■ Audyssey ` Off: No Audyssey EQ™ equalizing will light (➔ 8). The Audyssey indicator will apply. ` On: "Dynamic EQ" and "... if no surround back speakers are connected. ting is fixed at "Manual" (➔ 35). • If the "Front High/Zone2" setting is set to 5 The DTS Neo:6 Music listening mode creates 6-channel surround sound from the center speaker when using the Dolby Pro Logic IIx Music ...

Owner Manual
Page 38
...The result is bass response, tonal balance, and surround impression that is stored individually for delivering a loudness correction solution. Theater-Dimensional Setting ■ Listening Angle ` Wide: Select if the listening angle is 40 degrees. ` Narrow: Select if the listening angle is .... ■ Reference Level Audyssey Dynamic EQ™ Reference Level Offset ` 0 dB: It should be of equal loudness. Movies are set to decide whether an adjustment is adjusted automatically, the perceived bass response, tonal balance, surround impression, and dialog clarity remain the same ...
...The result is bass response, tonal balance, and surround impression that is stored individually for delivering a loudness correction solution. Theater-Dimensional Setting ■ Listening Angle ` Wide: Select if the listening angle is 40 degrees. ` Narrow: Select if the listening angle is .... ■ Reference Level Audyssey Dynamic EQ™ Reference Level Offset ` 0 dB: It should be of equal loudness. Movies are set to decide whether an adjustment is adjusted automatically, the perceived bass response, tonal balance, surround impression, and dialog clarity remain the same ...

Owner Manual
Page 39
... CableSTB, SAT STB, PS3, Wii, Xbox, PC, TV, CD, TAPE, iPod: To reset to "2" or "3". Remote Control Settings ■ Remote ID ` 1, 2, or 3 When several Onkyo components are used . To differentiate the AV receiver from the other components, you do change the AV receiver's remote ID, be sure... to change these settings, turn down SETUP until the remote indicator lights (about 3 seconds). 2 Use the number buttons to ...
... CableSTB, SAT STB, PS3, Wii, Xbox, PC, TV, CD, TAPE, iPod: To reset to "2" or "3". Remote Control Settings ■ Remote ID ` 1, 2, or 3 When several Onkyo components are used . To differentiate the AV receiver from the other components, you do change the AV receiver's remote ID, be sure... to change these settings, turn down SETUP until the remote indicator lights (about 3 seconds). 2 Use the number buttons to ...

Owner Manual
Page 40
...sync disabled. ` Enable: HDMI lip sync enabled. This function allows Q-compatible components connected via HDMI to be set only when the above "HDMI Control" setting is set to "On". • This setting is set to "Auto" automatically when the above "HDMI Control" is displayed as "Player*" or "Recorder*", etc ... this should be sent to the HDMI OUT of two or more component). To stop the AV receiver's speakers producing sound, change the settings, change the setting to "Off". • Refer to the connected component's instruction manual for details. ■ Audio Return Ch (ARC) ` Off: ...
...sync disabled. ` Enable: HDMI lip sync enabled. This function allows Q-compatible components connected via HDMI to be set only when the above "HDMI Control" setting is set to "On". • This setting is set to "Auto" automatically when the above "HDMI Control" is displayed as "Player*" or "Recorder*", etc ... this should be sent to the HDMI OUT of two or more component). To stop the AV receiver's speakers producing sound, change the settings, change the setting to "Off". • Refer to the connected component's instruction manual for details. ■ Audio Return Ch (ARC) ` Off: ...

Owner Manual
Page 41
..."TV Control", turn them on the AV receiver by pressing AUDIO. When the HDMI pass through function activates in standby mode. 2. Note These settings are watching a TV program. • Refer to the connected component's instruction manual for the other than HDMI is selected. 1 Press RECEIVER followed... circuits, select the Direct lis- Note • Do not assign the component connected with some components due to their settings or compatibility. • When set to the TV or other components via HDMI connection (HDMI pass through function; tening mode. • This procedure can...
..."TV Control", turn them on the AV receiver by pressing AUDIO. When the HDMI pass through function activates in standby mode. 2. Note These settings are watching a TV program. • Refer to the connected component's instruction manual for the other than HDMI is selected. 1 Press RECEIVER followed... circuits, select the Direct lis- Note • Do not assign the component connected with some components due to their settings or compatibility. • When set to the TV or other components via HDMI connection (HDMI pass through function; tening mode. • This procedure can...

Owner Manual
Page 42
.... ■ M.Optimizer ` Off: Music Optimizer off . ` Low: Small reduction in dynamic range. ` High: Large reduction in the "Audio Return Ch" setting (➔ 40). To select the digital audio input, see "Digital Audio (Digital Audio Input)" (➔ 34). *1 You can select "ARC" if you ... ` Off: CinemaFILTER off . ` On: Late Night function on . En 42 CinemaFILTER With the CinemaFILTER, you select the TV/CD input selector. Audyssey Settings ■ Dynamic EQ ■ Dyn Vol (Dynamic Volume) See "Dynamic EQ" and "Dynamic Volume" of compressed music files. If both digital and analog...
.... ■ M.Optimizer ` Off: Music Optimizer off . ` Low: Small reduction in dynamic range. ` High: Large reduction in the "Audio Return Ch" setting (➔ 40). To select the digital audio input, see "Digital Audio (Digital Audio Input)" (➔ 34). *1 You can select "ARC" if you ... ` Off: CinemaFILTER off . ` On: Late Night function on . En 42 CinemaFILTER With the CinemaFILTER, you select the TV/CD input selector. Audyssey Settings ■ Dynamic EQ ■ Dyn Vol (Dynamic Volume) See "Dynamic EQ" and "Dynamic Volume" of compressed music files. If both digital and analog...


