
Owner Manual
Page 1
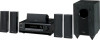
... instructions in the unit. Please read this manual thoroughly before making connections and plugging in this manual for purchasing an Onkyo 5.1ch Home Theater System. 5.1ch Home Theater System HT-S3100 HT-S3105 AV Receiver (HT-R340) Speaker Package HTP-360 (North American and Asian models) HTP-318 (European models) Instruction Manual Thank you to obtain...
... instructions in the unit. Please read this manual thoroughly before making connections and plugging in this manual for purchasing an Onkyo 5.1ch Home Theater System. 5.1ch Home Theater System HT-S3100 HT-S3105 AV Receiver (HT-R340) Speaker Package HTP-360 (North American and Asian models) HTP-318 (European models) Instruction Manual Thank you to obtain...

Owner Manual
Page 3
... Rules. This is not userserviceable. models FCC Information for User CAUTION: The user changes or modifications not expressly approved by your Onkyo dealer. 6. ferent from the AC power source. For models having a power cord with a clean cloth. Sur les modèles dont...long time, because they may not work properly the next time you do not use the original packaging to radio or television reception, which the receiver is no guarantee that the voltage in a particular installation. However, there is connected. • Consult the dealer or an experienced radio/TV...
... Rules. This is not userserviceable. models FCC Information for User CAUTION: The user changes or modifications not expressly approved by your Onkyo dealer. 6. ferent from the AC power source. For models having a power cord with a clean cloth. Sur les modèles dont...long time, because they may not work properly the next time you do not use the original packaging to radio or television reception, which the receiver is no guarantee that the voltage in a particular installation. However, there is connected. • Consult the dealer or an experienced radio/TV...

Owner Manual
Page 4
... function, which is marked with the coloured markings identifying the terminals in your socket outlets, cut it has been charged, the AV receiver will retain the settings for normal music reproduction. If any discoloration effects. Fit a suitable fuse in order to your TV or monitor...an issue, in which case you should turn off your amplifier before connecting or disconnecting cables.) 7. MIYAGI ONKYO EUROPE ELECTRONICS GmbH Memory Backup The AV receiver uses a battery-less memory backup system in the plug. If discoloration problems persist, try moving the speakers away ...
... function, which is marked with the coloured markings identifying the terminals in your socket outlets, cut it has been charged, the AV receiver will retain the settings for normal music reproduction. If any discoloration effects. Fit a suitable fuse in order to your TV or monitor...an issue, in which case you should turn off your amplifier before connecting or disconnecting cables.) 7. MIYAGI ONKYO EUROPE ELECTRONICS GmbH Memory Backup The AV receiver uses a battery-less memory backup system in the plug. If discoloration problems persist, try moving the speakers away ...

Owner Manual
Page 5
...power:120 W • 6-ohm impedance • Color-coded speaker terminals and speaker cable *1. OptiResponse, and OR-EQ are registered trademarks of Onkyo Corporation. *4. SKW-318 Bass Reflex Subwoofer • 8" (20 cm) cone woofer • Max. Manufactured under license from Dolby...Color-coded speaker terminals and speaker cable 5 and other countries. Apple and iPod are trademarks of Apple Computer, Inc., registered in the U.S. Features HT-R340 AV Receiver • 100 W/channel into 6 ohms (FTC) • 100 W/channel into 6 ohms (DIN) • 120 W/channel into 6 ohms ...
...power:120 W • 6-ohm impedance • Color-coded speaker terminals and speaker cable *1. OptiResponse, and OR-EQ are registered trademarks of Onkyo Corporation. *4. SKW-318 Bass Reflex Subwoofer • 8" (20 cm) cone woofer • Max. Manufactured under license from Dolby...Color-coded speaker terminals and speaker cable 5 and other countries. Apple and iPod are trademarks of Apple Computer, Inc., registered in the U.S. Features HT-R340 AV Receiver • 100 W/channel into 6 ohms (FTC) • 100 W/channel into 6 ohms (DIN) • 120 W/channel into 6 ohms ...

Owner Manual
Page 6
... 3 Speaker Precautions 4 Features 5 Package Contents 6 Front & Rear Panels 8 Speaker Package 11 Remote Controller 12 Before Using the AV receiver 19 Connection Enjoying Home Theater 20 Connecting Your Speakers 21 Connecting Antenna 24 Connecting Your Components 26 Turning On & First Time Setup Turning ... Modes 49 Advanced Operation Adjusting the Listening Modes 51 Advanced Setup 53 Troubleshooting 58 If you have the following items: AV Receiver HT-R340 HT-R340 Remote controller & two batteries (AA/R6) (American type shown) Indoor FM antenna (Connector type varies from country ...
... 3 Speaker Precautions 4 Features 5 Package Contents 6 Front & Rear Panels 8 Speaker Package 11 Remote Controller 12 Before Using the AV receiver 19 Connection Enjoying Home Theater 20 Connecting Your Speakers 21 Connecting Antenna 24 Connecting Your Components 26 Turning On & First Time Setup Turning ... Modes 49 Advanced Operation Adjusting the Listening Modes 51 Advanced Setup 53 Troubleshooting 58 If you have the following items: AV Receiver HT-R340 HT-R340 Remote controller & two batteries (AA/R6) (American type shown) Indoor FM antenna (Connector type varies from country ...

Owner Manual
Page 8
...STEREO button (49) This button is used to adjust the display brightness. E LISTENING MODE [ ]/[ ] buttons (49) These buttons are used to set the AV receiver to select the listening modes. 8 F Display See "Display" on page 43. On the European model, this is the RT/PTY/TP button, and it fl...;ashes while a signal is being received from the remote controller. B STANDBY indicator (37) This indicator lights up when the AV receiver is used to On or Standby. A STANDBY/ON button (37) This button is in parentheses.
...STEREO button (49) This button is used to adjust the display brightness. E LISTENING MODE [ ]/[ ] buttons (49) These buttons are used to set the AV receiver to select the listening modes. 8 F Display See "Display" on page 43. On the European model, this is the RT/PTY/TP button, and it fl...;ashes while a signal is being received from the remote controller. B STANDBY indicator (37) This indicator lights up when the AV receiver is used to On or Standby. A STANDBY/ON button (37) This button is in parentheses.

Owner Manual
Page 9
...or off. O SPEAKERS A & B buttons (39) These buttons are used to adjust the volume of stereo headphones for connecting a standard pair of the AV receiver. Q Input selector buttons (38-40) These buttons are used to select radio presets (see the pages in parentheses. 1 A & B speaker indicators (20, ...A lights up when the Sleep function has been set A is on . 2 MUTING indicator (46) This indicator flashes when the AV receiver is muted. 3 Source/listening mode indicators (50, 57) These indicators show the currently selected listening mode and digital audio format. 4 Tuning indicators ...
...or off. O SPEAKERS A & B buttons (39) These buttons are used to adjust the volume of stereo headphones for connecting a standard pair of the AV receiver. Q Input selector buttons (38-40) These buttons are used to select radio presets (see the pages in parentheses. 1 A & B speaker indicators (20, ...A lights up when the Sleep function has been set A is on . 2 MUTING indicator (46) This indicator flashes when the AV receiver is muted. 3 Source/listening mode indicators (50, 57) These indicators show the currently selected listening mode and digital audio format. 4 Tuning indicators ...

Owner Manual
Page 10
... composite video, and audio inputs can be used to connect another Onkyo component. B COMPONENT VIDEO A DVD player, TV, or other component that component. 10 To use , you must make an analog audio connection (RCA) between the AV receiver and the other component, even if they are for connecting an... C AM ANTENNA These push terminals are connected digitally. E MONITOR OUT The composite video output should be used to connect a VCR. The AV receiver's remote controller can then be used to control that supports component video can be connected to a video input on your TV or projector. F ...
... composite video, and audio inputs can be used to connect another Onkyo component. B COMPONENT VIDEO A DVD player, TV, or other component that component. 10 To use , you must make an analog audio connection (RCA) between the AV receiver and the other component, even if they are for connecting an... C AM ANTENNA These push terminals are connected digitally. E MONITOR OUT The composite video output should be used to connect a VCR. The AV receiver's remote controller can then be used to control that supports component video can be connected to a video input on your TV or projector. F ...
Owner Manual
Page 12
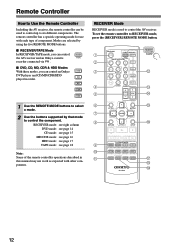
...buttons to select a mode. 2 Use the buttons supported by using the five REMOTE MODE buttons. ■ RECEIVER/TAPE Mode In RECEIVER/TAPE mode, you can control RECEIVER the AV receiver and an Onkyo cassette TAPE recorder connected via . ■ DVD, CD, MD, CDR & HDD Modes With these modes, you...may not work as expected with each type of component. Remote Controller How to Use the Remote Controller Including the AV receiver, the remote controller can control an Onkyo DVD DVD player and CD/MD/CDR/HDD C D player/recorder. The remote controller has a specific operating ...
...buttons to select a mode. 2 Use the buttons supported by using the five REMOTE MODE buttons. ■ RECEIVER/TAPE Mode In RECEIVER/TAPE mode, you can control RECEIVER the AV receiver and an Onkyo cassette TAPE recorder connected via . ■ DVD, CD, MD, CDR & HDD Modes With these modes, you...may not work as expected with each type of component. Remote Controller How to Use the Remote Controller Including the AV receiver, the remote controller can control an Onkyo DVD DVD player and CD/MD/CDR/HDD C D player/recorder. The remote controller has a specific operating ...

Owner Manual
Page 13
...-360/HTP-318 Home Theater Speaker Package. C MULTI CH button (40) This button is on the OptiResponse Equalizer, which optimizes performance when the HT-R340 is used to display various information about the currently selected input source. N VOL [ ]/[ ] button (39) This button can enjoy a...) This button is used to select radio presets. B INPUT SELECTOR buttons (39) These buttons are used to adjust the volume of the AV receiver regardless of the available listening modes. E CH +/- SURROUND button This button selects the Dolby and DTS listening modes. [ ]/[ ] buttons These buttons...
...-360/HTP-318 Home Theater Speaker Package. C MULTI CH button (40) This button is on the OptiResponse Equalizer, which optimizes performance when the HT-R340 is used to display various information about the currently selected input source. N VOL [ ]/[ ] button (39) This button can enjoy a...) This button is used to select radio presets. B INPUT SELECTOR buttons (39) These buttons are used to adjust the volume of the AV receiver regardless of the available listening modes. E CH +/- SURROUND button This button selects the Dolby and DTS listening modes. [ ]/[ ] buttons These buttons...

Owner Manual
Page 14
...This button is used with selectable play modes. 14 Remote Controller-Continued DVD Mode To select your DVD player as the input source, press: RECEIVER 6 DVD To set the repeat playback functions. H SUBTITLE button This button is used to select subtitles. DIMMER SLEEP CH DISC ALBUM VOL TOP... to enter title, chapter, and track numbers and to DVD mode, press the [DVD] REMOTE MODE button. 1 2 3 4 5 6 7 8 9 J ON/STANDBY REMOTE MODE RECEIVER DVD TAPE INPUT SELECTOR 1 2 3 C D V1 V2 V3 4 5 6 MD MULTI CH DVD 7 8 9 CDR TAPE TUNER C D +10 0 CLR HDD --/---
...This button is used with selectable play modes. 14 Remote Controller-Continued DVD Mode To select your DVD player as the input source, press: RECEIVER 6 DVD To set the repeat playback functions. H SUBTITLE button This button is used to select subtitles. DIMMER SLEEP CH DISC ALBUM VOL TOP... to enter title, chapter, and track numbers and to DVD mode, press the [DVD] REMOTE MODE button. 1 2 3 4 5 6 7 8 9 J ON/STANDBY REMOTE MODE RECEIVER DVD TAPE INPUT SELECTOR 1 2 3 C D V1 V2 V3 4 5 6 MD MULTI CH DVD 7 8 9 CDR TAPE TUNER C D +10 0 CLR HDD --/---

Owner Manual
Page 15
...OR-EQ L NIGHT CINE FLTR C D 6 ✽ 7 8 A ON/STANDBY button This button sets the CD player to enter times for RECEIVER mode. button This button selects discs on . F CLR button This button is used with the random playback function. G RANDOM button This button ..., Fast Forward, Previous and Next. D Playback buttons From left to CD mode, press the [CD] REMOTE MODE button. 1 2 3 4 ✽ 5 ON/STANDBY REMOTE MODE RECEIVER DVD TAPE INPUT SELECTOR 1 2 3 C D V1 V2 V3 4 5 6 MD MULTI CH DVD 7 8 9 CDR TAPE TUNER C D +10 0 CLR HDD --/--- E DISPLAY...
...OR-EQ L NIGHT CINE FLTR C D 6 ✽ 7 8 A ON/STANDBY button This button sets the CD player to enter times for RECEIVER mode. button This button selects discs on . F CLR button This button is used with the random playback function. G RANDOM button This button ..., Fast Forward, Previous and Next. D Playback buttons From left to CD mode, press the [CD] REMOTE MODE button. 1 2 3 4 ✽ 5 ON/STANDBY REMOTE MODE RECEIVER DVD TAPE INPUT SELECTOR 1 2 3 C D V1 V2 V3 4 5 6 MD MULTI CH DVD 7 8 9 CDR TAPE TUNER C D +10 0 CLR HDD --/--- E DISPLAY...

Owner Manual
Page 16
...on . G REPEAT button This button is used to MD or CDR mode, press the [MD] or [CDR] REMOTE MODE button. 1 2 3 ✽ 4 ON/STANDBY REMOTE MODE RECEIVER DVD TAPE INPUT SELECTOR 1 2 3 C D V1 V2 V3 4 5 6 MD MULTI CH DVD 7 8 9 CDR TAPE TUNER C D +10 0 CLR HDD --/--- Remote Controller-... is used with selectable play modes. ✽ The VOL [ ]/[ ] and LISTENING MODE buttons work the same as the input source, press: RECEIVER 7 MD or CD recorder TAPE * You must change the Input Display (see page 38). H PLAY MODE button This button is used to clear...
...on . G REPEAT button This button is used to MD or CDR mode, press the [MD] or [CDR] REMOTE MODE button. 1 2 3 ✽ 4 ON/STANDBY REMOTE MODE RECEIVER DVD TAPE INPUT SELECTOR 1 2 3 C D V1 V2 V3 4 5 6 MD MULTI CH DVD 7 8 9 CDR TAPE TUNER C D +10 0 CLR HDD --/--- Remote Controller-... is used with selectable play modes. ✽ The VOL [ ]/[ ] and LISTENING MODE buttons work the same as the input source, press: RECEIVER 7 MD or CD recorder TAPE * You must change the Input Display (see page 38). H PLAY MODE button This button is used to clear...

Owner Manual
Page 17
...-Continued HDD Mode HDD mode is used to set the remote controller to HDD mode, press the [HDD] REMOTE MODE button. 1 2 3 4 5 ON/STANDBY REMOTE MODE RECEIVER DVD TAPE INPUT SELECTOR 1 2 3 C D V1 V2 V3 4 5 6 MD MULTI CH DVD 7 8 9 CDR TAPE TUNER C D +10 0 CLR HDD --/--- To ... CH SEL LEVEL- E DISPLAY button This button turns on the iPod's display for more information. To select an Onkyo RI Dock that 's connected via as the input source, press: RECEIVER 7 TAPE or 3 V3 * You must change the Input Display (see page 38). LEVEL+ PLAY MODE DISPLAY ...
...-Continued HDD Mode HDD mode is used to set the remote controller to HDD mode, press the [HDD] REMOTE MODE button. 1 2 3 4 5 ON/STANDBY REMOTE MODE RECEIVER DVD TAPE INPUT SELECTOR 1 2 3 C D V1 V2 V3 4 5 6 MD MULTI CH DVD 7 8 9 CDR TAPE TUNER C D +10 0 CLR HDD --/--- To ... CH SEL LEVEL- E DISPLAY button This button turns on the iPod's display for more information. To select an Onkyo RI Dock that 's connected via as the input source, press: RECEIVER 7 TAPE or 3 V3 * You must change the Input Display (see page 38). LEVEL+ PLAY MODE DISPLAY ...

Owner Manual
Page 18
... C D RC-646S 18 Remote Controller-Continued TAPE Mode To select your Cassette deck as the input source, press: RECEIVER 7 TAPE TAPE mode is used to control an Onkyo cassette recorder connected to start reverse playback. B Stop [ ] button This button is used to start fast forward.... The FF [ ] button is used to stop playback. ON/STANDBY REMOTE MODE RECEIVER DVD TAPE INPUT SELECTOR 1 2 3 C D V1 V2 V3 4 5...
... C D RC-646S 18 Remote Controller-Continued TAPE Mode To select your Cassette deck as the input source, press: RECEIVER 7 TAPE TAPE mode is used to control an Onkyo cassette recorder connected to start reverse playback. B Stop [ ] button This button is used to start fast forward.... The FF [ ] button is used to stop playback. ON/STANDBY REMOTE MODE RECEIVER DVD TAPE INPUT SELECTOR 1 2 3 C D V1 V2 V3 4 5...

Owner Manual
Page 19
...switch for your area is 120 volts, set it as appropriate. If it isn't, use the remote controller, point it and the AV receiver's remote control sensor. 19 Using the Remote Controller To use a small screwdriver to set to bright light, such as direct sunlight or...• Expired batteries should be pressed inadvertently, thereby draining the batteries. • The remote controller may not work reliably if the AV receiver is subjected to the correct voltage for compatibility with the polarity diagram inside the battery compartment. 3 Slide the cover shut. For example,...
...switch for your area is 120 volts, set it as appropriate. If it isn't, use the remote controller, point it and the AV receiver's remote control sensor. 19 Using the Remote Controller To use a small screwdriver to set to bright light, such as direct sunlight or...• Expired batteries should be pressed inadvertently, thereby draining the batteries. • The remote controller may not work reliably if the AV receiver is subjected to the correct voltage for compatibility with the polarity diagram inside the battery compartment. 3 Slide the cover shut. For example,...

Owner Manual
Page 20
... no sound. For movies it close to 2.1-channel playback. Enjoying Home Theater Speaker Sets A and B You can use two sets of speakers with the AV receiver: speaker set A and speaker set B On Off On Off Indicator AB A B Output Set A: 2.1 channels Set B: 2 channels Set A: 5.1 channels Set B: 2 channels No sound Center speaker (...sound movements distinct and providing a full sound image. Speaker Set A: Main Room Front left and right speakers (SKF-360F L/R) These output the overall sound. AV receiver A SPEAKERS B Remote controller or SP A / B Speaker set A On Off Speaker set B.
... no sound. For movies it close to 2.1-channel playback. Enjoying Home Theater Speaker Sets A and B You can use two sets of speakers with the AV receiver: speaker set A and speaker set B On Off On Off Indicator AB A B Output Set A: 2.1 channels Set B: 2 channels Set A: 5.1 channels Set B: 2 channels No sound Center speaker (...sound movements distinct and providing a full sound image. Speaker Set A: Main Room Front left and right speakers (SKF-360F L/R) These output the overall sound. AV receiver A SPEAKERS B Remote controller or SP A / B Speaker set A On Off Speaker set B.

Owner Manual
Page 21
... other words, connect positive (+) terminals to only positive (+) terminals, and negative (-) terminals to several terminals. Doing so may damage the AV receiver. • Don't connect one cable to each pair of the speaker cables. (Supplied speaker cables are all black.) Speaker terminal Front left ...are already stripped.) 2 While pressing the lever, insert the wire into the hole, and then release the lever. Connecting Speaker The AV receiver's positive (+) speaker terminals are color-coded for a long period of time, the built-in protection circuit may affect the sound quality ...
... other words, connect positive (+) terminals to only positive (+) terminals, and negative (-) terminals to several terminals. Doing so may damage the AV receiver. • Don't connect one cable to each pair of the speaker cables. (Supplied speaker cables are all black.) Speaker terminal Front left ...are already stripped.) 2 While pressing the lever, insert the wire into the hole, and then release the lever. Connecting Speaker The AV receiver's positive (+) speaker terminals are color-coded for a long period of time, the built-in protection circuit may affect the sound quality ...

Owner Manual
Page 24
...need to tune into an AM radio station and adjust the position of the AM antenna to find the best reception. Once your AV receiver is ready for indoor use the tuner. Push Insert wire Release Insert the plug fully into the jack. ■ Other Models Insert the plug... push terminals are not polarity sensitive, so they can be connected either way around). Keep the antenna as far away as possible from your AV receiver is ready for indoor use , you cannot achieve good reception with a commercially available outdoor AM antenna (see page 25). Connecting the Indoor FM ...
...need to tune into an AM radio station and adjust the position of the AM antenna to find the best reception. Once your AV receiver is ready for indoor use the tuner. Push Insert wire Release Insert the plug fully into the jack. ■ Other Models Insert the plug... push terminals are not polarity sensitive, so they can be connected either way around). Keep the antenna as far away as possible from your AV receiver is ready for indoor use , you cannot achieve good reception with a commercially available outdoor AM antenna (see page 25). Connecting the Indoor FM ...

Owner Manual
Page 25
... antenna can be used in accordance with the supplied indoor FM antenna, try a commercially available outdoor FM antenna instead. TV/FM antenna splitter To AV receiver To TV (or VCR) 25 Outdoor antenna AM loop antenna Insulated antenna cable Notes: • Outdoor FM antennas work best when installed outside , but good...
... antenna can be used in accordance with the supplied indoor FM antenna, try a commercially available outdoor FM antenna instead. TV/FM antenna splitter To AV receiver To TV (or VCR) 25 Outdoor antenna AM loop antenna Insulated antenna cable Notes: • Outdoor FM antennas work best when installed outside , but good...


