
Owner Manual
Page 5
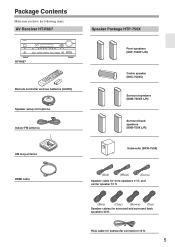
RCA cable for front speakers 11 ft. Package Contents Make sure you have the following items: AV Receiver HT-R667 HT-R667 Remote controller and two batteries (AA/R6) Speaker setup microphone Indoor FM antenna AM loop antenna HDMI cable Speaker Package HTP-750X Front speakers (SKF-750XF L/R) Center ...
RCA cable for front speakers 11 ft. Package Contents Make sure you have the following items: AV Receiver HT-R667 HT-R667 Remote controller and two batteries (AA/R6) Speaker setup microphone Indoor FM antenna AM loop antenna HDMI cable Speaker Package HTP-750X Front speakers (SKF-750XF L/R) Center ...
Owner Manual
Page 8
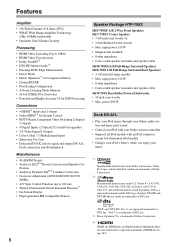
... • 10 inch cone woofer • Max. power:290 W Dock DS-A1L • Play your iPod music through your Onkyo audio system and enjoy great sound • Control your iPod with your Onkyo remote controller • Supports all iPod models with an iPod connector, except 3rd Generation iPod models • Charges your iPod's battery while...
... • 10 inch cone woofer • Max. power:290 W Dock DS-A1L • Play your iPod music through your Onkyo audio system and enjoy great sound • Control your iPod with your Onkyo remote controller • Supports all iPod models with an iPod connector, except 3rd Generation iPod models • Charges your iPod's battery while...
Owner Manual
Page 10
... Important Safety Instructions 2 Precautions 3 Speaker Precautions 4 Package Contents 5 AV Receiver HT-R667 5 Speaker Package HTP-750X 5 Dock for iPod DS-A1L 6 Using Two ...back speakers (SKF-750XF, SKC-750XC, SKM-750XS 16 Remote Controller 17 Installing the Batteries 17 Using the Remote Controller 17 Controlling the AV Receiver 18 Controlling a Dock DS-A1L 19 Connecting Your Speakers 20 Enjoying ...Player or Turntable 38 Connecting a Cassette, CDR, MiniDisc, or DAT Recorder 39 Connecting Onkyo Components 40 Connecting the Power Cord 40 Turning On the AV Receiver 41 Turning On...
... Important Safety Instructions 2 Precautions 3 Speaker Precautions 4 Package Contents 5 AV Receiver HT-R667 5 Speaker Package HTP-750X 5 Dock for iPod DS-A1L 6 Using Two ...back speakers (SKF-750XF, SKC-750XC, SKM-750XS 16 Remote Controller 17 Installing the Batteries 17 Using the Remote Controller 17 Controlling the AV Receiver 18 Controlling a Dock DS-A1L 19 Connecting Your Speakers 20 Enjoying ...Player or Turntable 38 Connecting a Cassette, CDR, MiniDisc, or DAT Recorder 39 Connecting Onkyo Components 40 Connecting the Power Cord 40 Turning On the AV Receiver 41 Turning On...
Owner Manual
Page 11
Contents-Continued Controlling Other Components 84 Preprogrammed Remote Control Codes 84 Entering Remote Control Codes 84 Resetting the Remote Controller 85 Controlling a DVD Player, or DVD Recorder ......86 Controlling a VCR, or PVR 87 Controlling a Satellite Receiver or Cable Receiver 88 Controlling a CD Player, CD Recorder, or MD Player 89 Controlling a Cassette Recorder 90 Controlling a TV 91 Troubleshooting 92 Specifications 96 7.1ch Home Theater Speaker...
Contents-Continued Controlling Other Components 84 Preprogrammed Remote Control Codes 84 Entering Remote Control Codes 84 Resetting the Remote Controller 85 Controlling a DVD Player, or DVD Recorder ......86 Controlling a VCR, or PVR 87 Controlling a Satellite Receiver or Cable Receiver 88 Controlling a CD Player, CD Recorder, or MD Player 89 Controlling a Cassette Recorder 90 Controlling a TV 91 Troubleshooting 92 Specifications 96 7.1ch Home Theater Speaker...
Owner Manual
Page 12
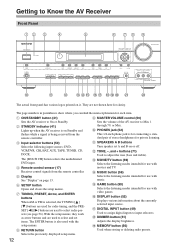
...through 79, or Max. Selects the previously displayed setup menu. 12 VCR/DVR, CBL/SAT, AUX, TAPE, TUNER, CD, DOCK. Receives control signals from the remote controller. They are not shown here for each item. L TONE, -, and + buttons (71) Used to input selectors. N MUSIC button (...RECEIVER HT-R667 J K L MNO PQ RST U V The actual front panel has various logos printed on page 13. J PHONES jack (52) This 1/4-inch phone jack is selected, the TUNING [ ] [ ] buttons are used for radio tuning, and the PRESET [ ] [ ] buttons are used to On or Standby. D Remote-control ...
...through 79, or Max. Selects the previously displayed setup menu. 12 VCR/DVR, CBL/SAT, AUX, TAPE, TUNER, CD, DOCK. Receives control signals from the remote controller. They are not shown here for each item. L TONE, -, and + buttons (71) Used to input selectors. N MUSIC button (...RECEIVER HT-R667 J K L MNO PQ RST U V The actual front panel has various logos printed on page 13. J PHONES jack (52) This 1/4-inch phone jack is selected, the TUNING [ ] [ ] buttons are used for radio tuning, and the PRESET [ ] [ ] buttons are used to On or Standby. D Remote-control ...
Owner Manual
Page 14
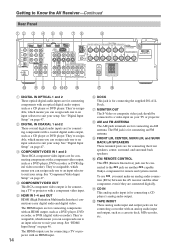
...must make an analog audio connection (RCA) between the AV receiver and the other component, even if they are connected digitally. J REMOTE CONTROL This (Remote Interactive) jack can assign each one to an input selector to suit your TV or projector. D COMPONENT VIDEO OUT This RCA component...jack is for connecting the supplied DS-A1L Dock. To use , you can be connected to a video input on another -capable Onkyo component for remote and system control. The HDMI inputs are for connecting components with a component video output, such as a CD player or DVD player. L TAPE ...
...must make an analog audio connection (RCA) between the AV receiver and the other component, even if they are connected digitally. J REMOTE CONTROL This (Remote Interactive) jack can assign each one to an input selector to suit your TV or projector. D COMPONENT VIDEO OUT This RCA component...jack is for connecting the supplied DS-A1L Dock. To use , you can be connected to a video input on another -capable Onkyo component for remote and system control. The HDMI inputs are for connecting components with a component video output, such as a CD player or DVD player. L TAPE ...
Owner Manual
Page 17
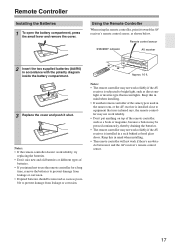
... the battery compartment. 3 Replace the cover and push it shut. Keep this in mind when installing. • If another remote controller of the remote controller, such as possible to equipment that uses infrared rays, the remote controller may not work reliably if the AV receiver is installed close to prevent damage from leakage or corrosion. •...
... the battery compartment. 3 Replace the cover and push it shut. Keep this in mind when installing. • If another remote controller of the remote controller, such as possible to equipment that uses infrared rays, the remote controller may not work reliably if the AV receiver is installed close to prevent damage from leakage or corrosion. •...
Owner Manual
Page 18
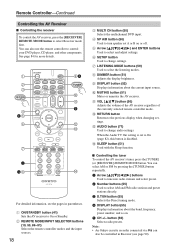
...set A or B on . 5 CH +/- When the Audio TV Out setting is disabled. Note: • An Onkyo cassette recorder connected via can also be controlled in Receiver (see the pages in parentheses. J MUTING button (51) Mutes or unmutes the AV receiver. E Arrow ...of the AV receiver regardless of the currently selected remote controller mode. button (56) Selects radio presets. Remote Controller-Continued Controlling the AV Receiver ■ Controlling the receiver To control the AV receiver, press the [RECEIVER] REMOTE MODE button to control your DVD player, CD player, and other components....
...set A or B on . 5 CH +/- When the Audio TV Out setting is disabled. Note: • An Onkyo cassette recorder connected via can also be controlled in Receiver (see the pages in parentheses. J MUTING button (51) Mutes or unmutes the AV receiver. E Arrow ...of the AV receiver regardless of the currently selected remote controller mode. button (56) Selects radio presets. Remote Controller-Continued Controlling the AV Receiver ■ Controlling the receiver To control the AV receiver, press the [RECEIVER] REMOTE MODE button to control your DVD player, CD player, and other components....
Owner Manual
Page 19
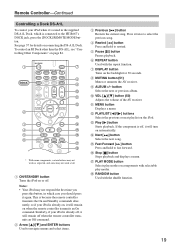
... on the backlight for details on when the remote controller transmits an On command. K MENU button Displays a menu. A 7 8 DOCK 9 J K L 2 M 3 N 4 O 5 P 6 Q R * With some may not respond the first time you should press it again. D Rewind [ ] button Press and hold to the HT-R667's DOCK jack, press the [DOCK] REMOTE MODE button. Q PLAY MODE button Selects play...
... on the backlight for details on when the remote controller transmits an On command. K MENU button Displays a menu. A 7 8 DOCK 9 J K L 2 M 3 N 4 O 5 P 6 Q R * With some may not respond the first time you should press it again. D Rewind [ ] button Press and hold to the HT-R667's DOCK jack, press the [DOCK] REMOTE MODE button. Q PLAY MODE button Selects play...
Owner Manual
Page 29
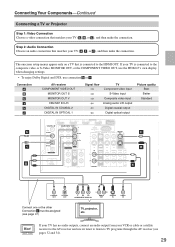
...Audio Connection Choose an audio connection that is connected to the composite video or S-Video MONITOR OUT, or the COMPONENT VIDEO OUT, use the HT-R667's own display when changing settings. • To enjoy Dolby Digital and DTS, use its tuner to listen to the HDMI OUT. If your ... IN B 2 (CD) IN OUT IN IN OUT IN FRONT SURR CENTER SURR BACK ZONE 2 LINE OUT PRE OU ASSIGNABLE L L SUB L L WOOFE R R R R A REMOTE CONTROL a SUB WOOFER CD TAPE CBL/SAT VCR/DVR DVD COAXIAL OUT OPTICAL OUT Y PB PR COMPONENT VIDEO IN L R AUDIO OUT S VIDEO IN VIDEO IN Connect...
...Audio Connection Choose an audio connection that is connected to the composite video or S-Video MONITOR OUT, or the COMPONENT VIDEO OUT, use the HT-R667's own display when changing settings. • To enjoy Dolby Digital and DTS, use its tuner to listen to the HDMI OUT. If your ... IN B 2 (CD) IN OUT IN IN OUT IN FRONT SURR CENTER SURR BACK ZONE 2 LINE OUT PRE OU ASSIGNABLE L L SUB L L WOOFE R R R R A REMOTE CONTROL a SUB WOOFER CD TAPE CBL/SAT VCR/DVR DVD COAXIAL OUT OPTICAL OUT Y PB PR COMPONENT VIDEO IN L R AUDIO OUT S VIDEO IN VIDEO IN Connect...
Owner Manual
Page 30
...) OUT ASSIGNABLE IN OUT IN ASSIGNABLE L IN IN L OUT OUT IN IN IN FRONT SURR CENTER SURR BACK B ZONE 2 LINE OUT L L PRE OUT SUB WOOFER A R R a R R REMOTE CONTROL CD TAPE CBL/SAT VCR/DVR SUB WOOFER DVD COAXIAL OUT OPTICAL OUT Y PB PR COMPONENT VIDEO OUT L R AUDIO OUT S VIDEO OUT VIDEO OUT Connect...
...) OUT ASSIGNABLE IN OUT IN ASSIGNABLE L IN IN L OUT OUT IN IN IN FRONT SURR CENTER SURR BACK B ZONE 2 LINE OUT L L PRE OUT SUB WOOFER A R R a R R REMOTE CONTROL CD TAPE CBL/SAT VCR/DVR SUB WOOFER DVD COAXIAL OUT OPTICAL OUT Y PB PR COMPONENT VIDEO OUT L R AUDIO OUT S VIDEO OUT VIDEO OUT Connect...
Owner Manual
Page 31
... the Audio Adjust Settings" on page 50. To adjust the subwoofer sensitivity for FRONT SPEAKERS L SURR SPEAKERS R PRE OUT L SUB WOOFER FRONT SPEAKERS L CENTER SPEAKER R REMOTE CONTROL R CD TAPE R CBL/SAT VCR/DVR R SUB WOOFER DVD R ZONE 2 SPEAKERS 7.1 ch 5.1 ch FRONT L R SURR DVD CENTER SURR BACK L R SUB WOOFER L R FRONT L R SURROUND CENTER L R SUB...
... the Audio Adjust Settings" on page 50. To adjust the subwoofer sensitivity for FRONT SPEAKERS L SURR SPEAKERS R PRE OUT L SUB WOOFER FRONT SPEAKERS L CENTER SPEAKER R REMOTE CONTROL R CD TAPE R CBL/SAT VCR/DVR R SUB WOOFER DVD R ZONE 2 SPEAKERS 7.1 ch 5.1 ch FRONT L R SURR DVD CENTER SURR BACK L R SUB WOOFER L R FRONT L R SURROUND CENTER L R SUB...
Owner Manual
Page 32
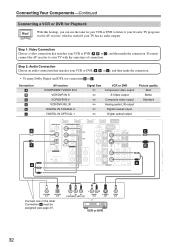
... a VCR or DVR for FRONT SPEAKERS L AM DVD MONITOR OUT V C R ANTENNA FM 75 S IN FRONT SURR CENTER SURR BACK B ZONE 2 LINE OUT L L PRE O SUB WOOF R R R R A REMOTE CONTROL CD TAPE CBL/SAT VCR/DVR a SUB WOOFER DVD COAXIAL OUT OPTICAL OUT Connect one or the other Connection b must connect the AV receiver to...
... a VCR or DVR for FRONT SPEAKERS L AM DVD MONITOR OUT V C R ANTENNA FM 75 S IN FRONT SURR CENTER SURR BACK B ZONE 2 LINE OUT L L PRE O SUB WOOF R R R R A REMOTE CONTROL CD TAPE CBL/SAT VCR/DVR a SUB WOOFER DVD COAXIAL OUT OPTICAL OUT Connect one or the other Connection b must connect the AV receiver to...
Owner Manual
Page 33
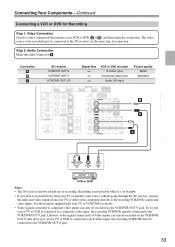
... OUT IN IN IN FRONT SURR CENTER SURR BACK L SURR BACK SPEAKERS Bi-AMP for FRONT SPEAKERS L SURR B R A ZONE 2 LINE OUT L PRE OUT SUB WOOFER REMOTE CONTROL R CD TAPE R CBL/SAT VCR/DVR R R SUB WOOFER a DVD L R AUDIO IN S VIDEO IN VIDEO IN VCR or DVR Notes: • The AV receiver must be...
... OUT IN IN IN FRONT SURR CENTER SURR BACK L SURR BACK SPEAKERS Bi-AMP for FRONT SPEAKERS L SURR B R A ZONE 2 LINE OUT L PRE OUT SUB WOOFER REMOTE CONTROL R CD TAPE R CBL/SAT VCR/DVR R R SUB WOOFER a DVD L R AUDIO IN S VIDEO IN VIDEO IN VCR or DVR Notes: • The AV receiver must be...
Owner Manual
Page 34
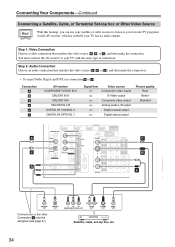
... ASSIGNABLE IN OUT IN IN B 2 (CD) IN OUT IN IN OUT IN FRONT SURR CENTER SURR BACK ZONE 2 LINE OUT PRE OU ASSIGNABLE L L SUB L L WOOFE A R R R R REMOTE CONTROL CD TAPE CBL/SAT VCR/DVR SUB WOOFER a DVD COAXIAL OUT OPTICAL OUT Connect one or the other Connection c must connect the AV receiver to...
... ASSIGNABLE IN OUT IN IN B 2 (CD) IN OUT IN IN OUT IN FRONT SURR CENTER SURR BACK ZONE 2 LINE OUT PRE OU ASSIGNABLE L L SUB L L WOOFE A R R R R REMOTE CONTROL CD TAPE CBL/SAT VCR/DVR SUB WOOFER a DVD COAXIAL OUT OPTICAL OUT Connect one or the other Connection c must connect the AV receiver to...
Owner Manual
Page 36
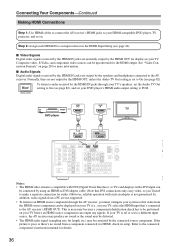
... IN IN L OUT OUT IN IN IN FRONT SURR CENTER SURR BACK L SURR BACK SPEAKERS L SURR SPEAKERS R PRE OUT L SUB WOOFER FRONT SPEAKERS A L CENTER SPEAKER R REMOTE CONTROL R CD TAPE R CBL/SAT VCR/DVR R SUB WOOFER DVD R FRONT SPEAKERS B Notes: • The HDMI video stream is poor or there's no sound or the...
... IN IN L OUT OUT IN IN IN FRONT SURR CENTER SURR BACK L SURR BACK SPEAKERS L SURR SPEAKERS R PRE OUT L SUB WOOFER FRONT SPEAKERS A L CENTER SPEAKER R REMOTE CONTROL R CD TAPE R CBL/SAT VCR/DVR R SUB WOOFER DVD R FRONT SPEAKERS B Notes: • The HDMI video stream is poor or there's no sound or the...
Owner Manual
Page 37
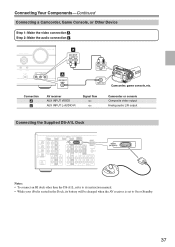
... DS-A1L) CBL/SAT VCR/DVR V S IN OUT IN IN OUT IN L AM DVD MONITOR OUT IN FRONT V ANTENNA FM 75 S SURR CENTER SURR BACK L REMOTE CONTROL R CD TAPE R CBL/SAT VCR/DVR R SUB WOOFER DVD DOCK (for DS-A1L) Notes: • To connect an RI dock other than the DS-A1L...
... DS-A1L) CBL/SAT VCR/DVR V S IN OUT IN IN OUT IN L AM DVD MONITOR OUT IN FRONT V ANTENNA FM 75 S SURR CENTER SURR BACK L REMOTE CONTROL R CD TAPE R CBL/SAT VCR/DVR R SUB WOOFER DVD DOCK (for DS-A1L) Notes: • To connect an RI dock other than the DS-A1L...

Owner Manual
Page 38
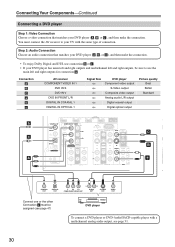
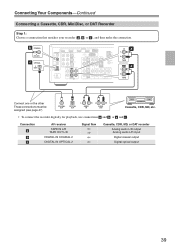
... page 47) b COAXIAL 2 (CBL/SAT) c OPTICAL 2 (CD) IN L R CD DIGITAL IN 1 (DVD) COAXIAL 2 (CBL/SAT) 1 (VCR/DVR) OPTICAL 2 (CD) ASSIGNABLE REMOTE CONTROL IN 4 IN 3 (CBL/SAT) IN 2 HDMI ASSIGNABLE (VCR/DVR) IN 1 (DVD) OUT COMPONENT VIDEO Y CB/ PB CR/ PR IN 2 (CBL/SAT) IN 1(DVD) OUT ASSIGNABLE...DS-A1L) CBL/SAT VCR/DVR V S IN OUT IN IN OUT IN L AM DVD MONITOR OUT IN FRONT V ANTENNA FM 75 S SURR CENTER SURR BACK L REMOTE CONTROL R CD TAPE R CBL/SAT VCR/DVR R DVD SUB WOOFER IN L R CD AUDIO OUTPUT L R Phono preamp AUDIO OUTPUT L R AUDIO INPUT L R ■...
... page 47) b COAXIAL 2 (CBL/SAT) c OPTICAL 2 (CD) IN L R CD DIGITAL IN 1 (DVD) COAXIAL 2 (CBL/SAT) 1 (VCR/DVR) OPTICAL 2 (CD) ASSIGNABLE REMOTE CONTROL IN 4 IN 3 (CBL/SAT) IN 2 HDMI ASSIGNABLE (VCR/DVR) IN 1 (DVD) OUT COMPONENT VIDEO Y CB/ PB CR/ PR IN 2 (CBL/SAT) IN 1(DVD) OUT ASSIGNABLE...DS-A1L) CBL/SAT VCR/DVR V S IN OUT IN IN OUT IN L AM DVD MONITOR OUT IN FRONT V ANTENNA FM 75 S SURR CENTER SURR BACK L REMOTE CONTROL R CD TAPE R CBL/SAT VCR/DVR R DVD SUB WOOFER IN L R CD AUDIO OUTPUT L R Phono preamp AUDIO OUTPUT L R AUDIO INPUT L R ■...
Owner Manual
Page 39
... DS-A1L) CBL/SAT VCR/DVR V S IN OUT IN IN OUT IN L DVD MONITOR OUT V S AM ANTENNA FM 75 IN FRONT SURR CENTER SURR BACK L REMOTE CONTROL R CD TAPE R CBL/SAT VCR/DVR R SUB WOOFER DVD IN a L R TAPE a L R TAPE Connect one or the other These connections must be assigned (see page 47...
... DS-A1L) CBL/SAT VCR/DVR V S IN OUT IN IN OUT IN L DVD MONITOR OUT V S AM ANTENNA FM 75 IN FRONT SURR CENTER SURR BACK L REMOTE CONTROL R CD TAPE R CBL/SAT VCR/DVR R SUB WOOFER DVD IN a L R TAPE a L R TAPE Connect one or the other These connections must be assigned (see page 47...
Owner Manual
Page 40
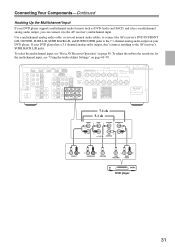
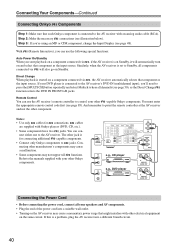
...when the AV receiver is connected to the AV receiver's DVD IN (multichannel input), you can use the AV receiver's remote controller to the AV receiver with other -capable Onkyo components. Connecting other jack is a problem, plug the AV receiver into a suitable wall outlet. • Turning on ... Notes: • Use only cables for connecting additional -capable components. • Connect only Onkyo components to point the remote controller at the AV receiver and not the other Onkyo components. Step 2: Make the necessary connections (see page 85). If your DVD player is set...
...when the AV receiver is connected to the AV receiver's DVD IN (multichannel input), you can use the AV receiver's remote controller to the AV receiver with other -capable Onkyo components. Connecting other jack is a problem, plug the AV receiver into a suitable wall outlet. • Turning on ... Notes: • Use only cables for connecting additional -capable components. • Connect only Onkyo components to point the remote controller at the AV receiver and not the other Onkyo components. Step 2: Make the necessary connections (see page 85). If your DVD player is set...


