

Owner Manual
Page 7
... B You can be used in your source component with the AV receiver: speaker set A and speaker set B. Connect your main listening room for up to 7.1-channel playback. *While speaker set B is reduced to 5.1-channel playback. Using Two Sets of speakers with an analog connection. 7...CLEAR SETUP MIC MASTER VOLUME or AUX INPUT VIDEO L AUDIO R AV RECEIVER HT-R667 Speaker set A On Off Speaker set B On Off On Off Indicator AB A B Output Set A: 5.1 channels Set B: 2 channels Set A: 7.1 channels Set B: 2 channels No sound Main Room (speaker set A) Front left speaker Subwoofer Center ...
... B You can be used in your source component with the AV receiver: speaker set A and speaker set B. Connect your main listening room for up to 7.1-channel playback. *While speaker set B is reduced to 5.1-channel playback. Using Two Sets of speakers with an analog connection. 7...CLEAR SETUP MIC MASTER VOLUME or AUX INPUT VIDEO L AUDIO R AV RECEIVER HT-R667 Speaker set A On Off Speaker set B On Off On Off Indicator AB A B Output Set A: 5.1 channels Set B: 2 channels Set A: 7.1 channels Set B: 2 channels No sound Main Room (speaker set A) Front left speaker Subwoofer Center ...
Owner Manual
Page 15
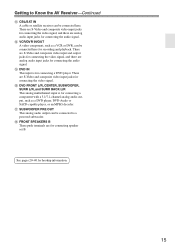
...a DVD player, DVD-Audio or SACD-capable player, or an MPEG decoder. O DVD IN This input is for connecting a component with a 5.1/7.1-channel analog audio output, such as a VCR or DVR, can be connected here for recording and playback. There are S-Video and composite video input and ...FRONT SPEAKERS B These push terminals are analog audio input jacks for connecting the video signal. Getting to Know the AV Receiver-Continued M CBL/SAT IN A cable or satellite receiver can be connected to a powered subwoofer. There are S-Video and composite video input jacks for connecting the video signal...
...a DVD player, DVD-Audio or SACD-capable player, or an MPEG decoder. O DVD IN This input is for connecting a component with a 5.1/7.1-channel analog audio output, such as a VCR or DVR, can be connected here for recording and playback. There are S-Video and composite video input and ...FRONT SPEAKERS B These push terminals are analog audio input jacks for connecting the video signal. Getting to Know the AV Receiver-Continued M CBL/SAT IN A cable or satellite receiver can be connected to a powered subwoofer. There are S-Video and composite video input jacks for connecting the video signal...
Owner Manual
Page 20
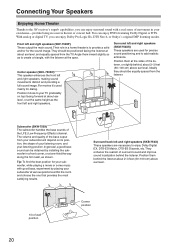
...and equally spaced from the listener. Connecting Your Speakers Enjoying Home Theater Thanks to the AV receiver's superb capabilities, you can enjoy surround sound with the listener at one that provides the ...about 2-3 feet (60-100 cm) above ear level. 1/3 of the LFE (Low-Frequency Effects) channel. Center speaker (SKC-750XC) This speaker enhances the front left and right speakers (SKF-750XF) These ... analog or digital TV, you can enjoy Dolby Pro Logic IIx, DTS Neo:6, or Onkyo's original DSP listening modes. You can be obtained by placing your own home-just like being in...
...and equally spaced from the listener. Connecting Your Speakers Enjoying Home Theater Thanks to the AV receiver's superb capabilities, you can enjoy surround sound with the listener at one that provides the ...about 2-3 feet (60-100 cm) above ear level. 1/3 of the LFE (Low-Frequency Effects) channel. Center speaker (SKC-750XC) This speaker enhances the front left and right speakers (SKF-750XF) These ... analog or digital TV, you can enjoy Dolby Pro Logic IIx, DTS Neo:6, or Onkyo's original DSP listening modes. You can be obtained by placing your own home-just like being in...
Owner Manual
Page 21
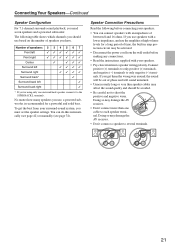
...you must set the speaker settings. Doing so may damage the AV receiver. • Don't connect a speaker to short the positive and negative wires. Speaker Connection Precautions Read the following table shows which channels you need seven speakers and a powered subwoofer. Doing so may ...damage the AV receiver. • Don't connect more than one surround back speaker, connect it to speaker wiring ...
...you must set the speaker settings. Doing so may damage the AV receiver. • Don't connect a speaker to short the positive and negative wires. Speaker Connection Precautions Read the following table shows which channels you need seven speakers and a powered subwoofer. Doing so may ...damage the AV receiver. • Don't connect more than one surround back speaker, connect it to speaker wiring ...
Owner Manual
Page 26
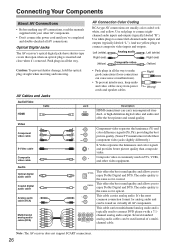
... slightly differently.) S-Video separates the luminance and color signals and provides better picture quality than composite video. Note: The AV receiver does not support SCART connections. 26 Use red plugs to connect composite video inputs and outputs. Right! This cable carries multichannel... COAXIAL L R FRONT CENTER SURR SURR BACK SUBWOOFER MULTI CH This offers the best sound quality and allows you to connect left-channel audio inputs and outputs (typically labeled "L"). The audio quality is commonly used to enjoy Dolby Digital and DTS. AV Connection Color...
... slightly differently.) S-Video separates the luminance and color signals and provides better picture quality than composite video. Note: The AV receiver does not support SCART connections. 26 Use red plugs to connect composite video inputs and outputs. Right! This cable carries multichannel... COAXIAL L R FRONT CENTER SURR SURR BACK SUBWOOFER MULTI CH This offers the best sound quality and allows you to connect left-channel audio inputs and outputs (typically labeled "L"). The audio quality is commonly used to enjoy Dolby Digital and DTS. AV Connection Color...
Owner Manual
Page 31
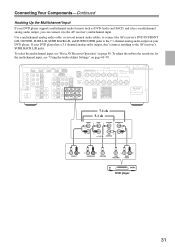
... input. Use a multichannel analog audio cable, or several normal audio cables, to connect the AV receiver's DVD IN FRONT L/R, CENTER, SURR L/R, SURR BACK L/R, and SUBWOOFER jacks to the 7.1-channel analog audio output on page 50. To select the multichannel input, see "Using the Audio Adjust Settings" on page 69-70....MONITOR OUT V S AM ANTENNA FM 75 IN FRONT SURR CENTER SURR BACK L SURR BACK SPEAKERS Bi-AMP for the multichannel input, see "Basic AV Receiver Operation" on your DVD player. Connecting Your Components-Continued Hooking Up the Multichannel Input If your DVD player has...
... input. Use a multichannel analog audio cable, or several normal audio cables, to connect the AV receiver's DVD IN FRONT L/R, CENTER, SURR L/R, SURR BACK L/R, and SUBWOOFER jacks to the 7.1-channel analog audio output on page 50. To select the multichannel input, see "Using the Audio Adjust Settings" on page 69-70....MONITOR OUT V S AM ANTENNA FM 75 IN FRONT SURR CENTER SURR BACK L SURR BACK SPEAKERS Bi-AMP for the multichannel input, see "Basic AV Receiver Operation" on your DVD player. Connecting Your Components-Continued Hooking Up the Multichannel Input If your DVD player has...
Owner Manual
Page 35
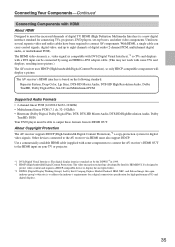
...standard set -top boxes, and other video components. Connecting Your Components-Continued Connecting Components with some components) to connect the AV receiver's HDMI OUT to the HDMI input on the following standard: Repeater System, Deep Color, Lip Sync, DTS-HD Master Audio, ... carry control signals, digital video, and up to meet the increased demands of digital audio (2-channel PCM, multichannel digital audio, or multichannel PCM). About Copyright Protection The AV receiver supports HDCP (High-bandwidth Digital Content Protection),*2 a copy-protection system for HDMI/DVI. Other ...
...standard set -top boxes, and other video components. Connecting Your Components-Continued Connecting Components with some components) to connect the AV receiver's HDMI OUT to the HDMI input on the following standard: Repeater System, Deep Color, Lip Sync, DTS-HD Master Audio, ... carry control signals, digital video, and up to meet the increased demands of digital audio (2-channel PCM, multichannel digital audio, or multichannel PCM). About Copyright Protection The AV receiver supports HDCP (High-bandwidth Digital Content Protection),*2 a copy-protection system for HDMI/DVI. Other ...
Owner Manual
Page 40
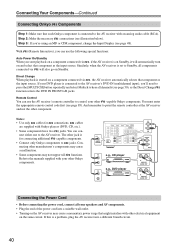
... started on a component connected via , if the AV receiver is on Standby, it will also go on the same circuit. The other electrical equipment on Standby. Connecting Your Components-Continued Connecting Onkyo Components Step 1: Make sure that each Onkyo component is connected to hear all channels (see page 50), as the Direct Change function...
... started on a component connected via , if the AV receiver is on Standby, it will also go on the same circuit. The other electrical equipment on Standby. Connecting Your Components-Continued Connecting Onkyo Components Step 1: Make sure that each Onkyo component is connected to hear all channels (see page 50), as the Direct Change function...
Owner Manual
Page 50
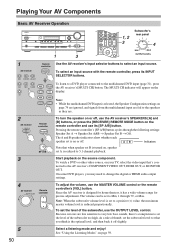
Note: • While the multichannel DVD input is reduced to 5.1-channel playback. To watch a DVD or other video source, on page 59. Pressing the remote controller's [SP A/B] button cycles through 79, or Max. On some DVD ... DISPLAY DIGITAL INPUT DIMMER MEMORY TUNING MODE CLEAR SETUP MIC AUX INPUT VIDEO L AUDIO R AV RECEIVER HT-R667 1 3 1, 2 3 Subwoofer's rear panel 4 MIN MAX OUTPUT LEVEL 1 AV receiver DVD VCR/DVR CBL/SAT AUX TAPE TUNER CD Remote controller Use the AV receiver's input selector buttons to the multichannel DVD input (page 31), press the AV...
Note: • While the multichannel DVD input is reduced to 5.1-channel playback. To watch a DVD or other video source, on page 59. Pressing the remote controller's [SP A/B] button cycles through 79, or Max. On some DVD ... DISPLAY DIGITAL INPUT DIMMER MEMORY TUNING MODE CLEAR SETUP MIC AUX INPUT VIDEO L AUDIO R AV RECEIVER HT-R667 1 3 1, 2 3 Subwoofer's rear panel 4 MIN MAX OUTPUT LEVEL 1 AV receiver DVD VCR/DVR CBL/SAT AUX TAPE TUNER CD Remote controller Use the AV receiver's input selector buttons to the multichannel DVD input (page 31), press the AV...
Owner Manual
Page 52
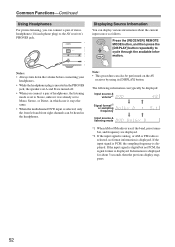
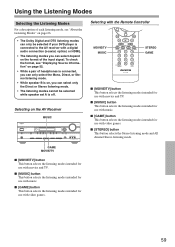
Press the [RECEIVER] REMOTE MODE button, and then press the [DISPLAY] button repeatedly to Mono, Stereo, or Direct, in which case it stays the same. • When the multichannel DVD input is selected, only the front left and front right channels can be heard in the PHONES jack, the ...speakers set to cycle through the available information. The following information can typically be performed on the AV receiver by using its [DISPLAY] button. Note: • This procedure ...
Press the [RECEIVER] REMOTE MODE button, and then press the [DISPLAY] button repeatedly to Mono, Stereo, or Direct, in which case it stays the same. • When the multichannel DVD input is selected, only the front left and front right channels can be heard in the PHONES jack, the ...speakers set to cycle through the available information. The following information can typically be performed on the AV receiver by using its [DISPLAY] button. Note: • This procedure ...

Owner Manual
Page 53
... MIC AUX INPUT VIDEO L AUDIO R AV RECEIVER HT-R667 DIGITAL INPUT 1 DIGITAL INPUT Press and hold the AV receiver's [DIGITAL INPUT] button for each digital signal format. If the input signal is not DTS, the DTS indicator will flash and there will be no sound. PCM: Only 2-channel PCM format input signals will be... DTS setting. DTS: Only DTS (but not DTS-HD) format input signals will be heard. Format Dolby Digital DTS PCM Display PCM Normally, the AV receiver detects the format of digital input signals automatically.
... MIC AUX INPUT VIDEO L AUDIO R AV RECEIVER HT-R667 DIGITAL INPUT 1 DIGITAL INPUT Press and hold the AV receiver's [DIGITAL INPUT] button for each digital signal format. If the input signal is not DTS, the DTS indicator will flash and there will be no sound. PCM: Only 2-channel PCM format input signals will be... DTS setting. DTS: Only DTS (but not DTS-HD) format input signals will be heard. Format Dolby Digital DTS PCM Display PCM Normally, the AV receiver detects the format of digital input signals automatically.
Owner Manual
Page 59
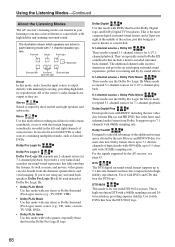
... RETURN MOVIE/TV MUSIC GAME LISTENING MODE DISPLAY DIGITAL INPUT DIMMER MEMORY TUNING MODE CLEAR SETUP MIC AUX INPUT VIDEO L AUDIO R AV RECEIVER HT-R667 GAME MOVIE/TV Selecting with the Remote Controller MOVIE/TV MUSIC STEREO GAME ■ [MOVIE/TV] button This button selects the listening... button selects the listening modes intended for use with video games. ■ [STEREO] button This button selects the Stereo listening mode and All channel Stereo listening mode. ■ [MOVIE/TV] button This button selects the listening modes intended for use with movies and TV. ■ [...
... RETURN MOVIE/TV MUSIC GAME LISTENING MODE DISPLAY DIGITAL INPUT DIMMER MEMORY TUNING MODE CLEAR SETUP MIC AUX INPUT VIDEO L AUDIO R AV RECEIVER HT-R667 GAME MOVIE/TV Selecting with the Remote Controller MOVIE/TV MUSIC STEREO GAME ■ [MOVIE/TV] button This button selects the listening... button selects the listening modes intended for use with video games. ■ [STEREO] button This button selects the Stereo listening mode and All channel Stereo listening mode. ■ [MOVIE/TV] button This button selects the listening modes intended for use with movies and TV. ■ [...
Owner Manual
Page 66
... 192 kHz sampling rate. Using the Listening Modes-Continued About the Listening Modes The AV receiver's listening modes can transform your listening room into a movie theater or concert hall, with 7.1 channel speaker sys- The illustration shows which speakers are . tem. All of Dolby Pro Logic...rotating and fly-by the front left and right channels of the additional storage space offered by the AV receiver, see page 63. It supports up to take full advantage of some movies. Dolby TrueHD Designed to 5.1-channels with a 96kHz sampling rate and 24bit resolution, providing ...
... 192 kHz sampling rate. Using the Listening Modes-Continued About the Listening Modes The AV receiver's listening modes can transform your listening room into a movie theater or concert hall, with 7.1 channel speaker sys- The illustration shows which speakers are . tem. All of Dolby Pro Logic...rotating and fly-by the front left and right channels of the additional storage space offered by the AV receiver, see page 63. It supports up to take full advantage of some movies. Dolby TrueHD Designed to 5.1-channels with a 96kHz sampling rate and 24bit resolution, providing ...
Owner Manual
Page 67
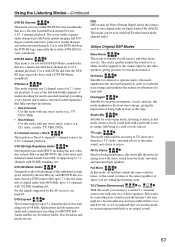
... lively sound field with DTS-ES Discrete soundtracks, that feature multichannel audio. It supports up to the sound output by the AV receiver, see page 64. Studio-Mix Suitable for rock or pop music, listening to take full advantage of the additional storage space offered by...mode uses Neo:6 to even mono material. It uses seven full-bandwidth channels of matrix decoding for acoustic instruments, vocals, and jazz, this mode fills the entire listening area with stereo sound from DTS. Onkyo Original DSP Modes Mono Movie This mode is the same regardless of being...
... lively sound field with DTS-ES Discrete soundtracks, that feature multichannel audio. It supports up to the sound output by the AV receiver, see page 64. Studio-Mix Suitable for rock or pop music, listening to take full advantage of the additional storage space offered by...mode uses Neo:6 to even mono material. It uses seven full-bandwidth channels of matrix decoding for acoustic instruments, vocals, and jazz, this mode fills the entire listening area with stereo sound from DTS. Onkyo Original DSP Modes Mono Movie This mode is the same regardless of being...
Owner Manual
Page 69
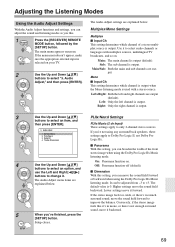
..., not Dolby Pro 3. Conversely, if the stereo image feels like . 1 Press the [RECEIVER] REMOTE MODE button, followed by the [SETUP] button. The main menu appears onscreen. Left+Right: Both the left channel is output. 3 Use the Up and Down [ ]/[ ] PLIIx/Neo:6 Settings buttons to...sources, multilingual TV broadcasts, and so on . 4 Use the Up and Down [ ]/[ ] Off: Panorama function off (default). Main: The main channel is 0. Theater-Dimensional Logic IIx. ■ Panorama With this setting, you can move it . Multiplex/Mono 2. Adjusting the Listening Modes Using the ...
..., not Dolby Pro 3. Conversely, if the stereo image feels like . 1 Press the [RECEIVER] REMOTE MODE button, followed by the [SETUP] button. The main menu appears onscreen. Left+Right: Both the left channel is output. 3 Use the Up and Down [ ]/[ ] PLIIx/Neo:6 Settings buttons to...sources, multilingual TV broadcasts, and so on . 4 Use the Up and Down [ ]/[ ] Off: Panorama function off (default). Main: The main channel is 0. Theater-Dimensional Logic IIx. ■ Panorama With this setting, you can move it . Multiplex/Mono 2. Adjusting the Listening Modes Using the ...
Owner Manual
Page 73
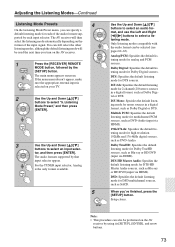
... for multichannel PCM sources, such as DVD-Audio (input via HDMI). 192k/176.4k: Specifies the default listening mode for 2-channel (2/0) stereo sources in a digital format, such as SACD. Setup closes. Adjusting the Listening Modes-Continued Listening Mode Presets 4 On the ...Listening Mode Preset menu, you turn on the AV receiver. 1 Press the [RECEIVER] REMOTE MODE button, followed by the [SETUP] button. You can specify a default listening mode for mono sources in a digital ...
... for multichannel PCM sources, such as DVD-Audio (input via HDMI). 192k/176.4k: Specifies the default listening mode for 2-channel (2/0) stereo sources in a digital format, such as SACD. Setup closes. Adjusting the Listening Modes-Continued Listening Mode Presets 4 On the ...Listening Mode Preset menu, you turn on the AV receiver. 1 Press the [RECEIVER] REMOTE MODE button, followed by the [SETUP] button. You can specify a default listening mode for mono sources in a digital ...

Owner Manual
Page 76
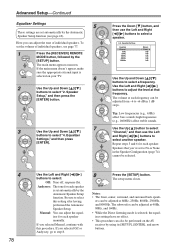
... Range: 0.3 to select "2. If the main menu doesn't appear, make a note of the distance from the front left , right, and center channels to the subwoofer (default). Speaker Setup," and then press the [ENTER] button. put by feeding bass sounds from each speaker to the listening position....function on , or the multichannel 5 DVD input is displayed, use the Left and Right [ ]/[ ] buttons to the listening position. 7 76 Press the [RECEIVER] REMOTE MODE button, followed by the [SETUP] button. Repeat step 6 for the front speakers, then press the Down [ ] button to select "feet"...
... Range: 0.3 to select "2. If the main menu doesn't appear, make a note of the distance from the front left , right, and center channels to the subwoofer (default). Speaker Setup," and then press the [ENTER] button. put by feeding bass sounds from each speaker to the listening position....function on , or the multichannel 5 DVD input is displayed, use the Left and Right [ ]/[ ] buttons to the listening position. 7 76 Press the [RECEIVER] REMOTE MODE button, followed by the [SETUP] button. Repeat step 6 for the front speakers, then press the Down [ ] button to select "feet"...
Owner Manual
Page 78
... and Right [ ]/[ ] buttons to select another speaker. If you can adjust the tone of individual speakers, see page 77. 1 Press the [RECEIVER] REMOTE MODE button, followed by the Automatic Speaker Setup function (see page 42). Notes: • The front, center, surround, and surround back speak... button. If the main menu doesn't appear, make sure the appropriate external input is selected on the AV receiver by the Automatic Speaker Setup function. Equalizer Settings Equalizer Channel 63Hz 250Hz 1000Hz 4000Hz 16000Hz Manual Front 0dB 0dB 0dB 0dB 0dB Use the Up and Down [ ]/[ ] ...
... and Right [ ]/[ ] buttons to select another speaker. If you can adjust the tone of individual speakers, see page 77. 1 Press the [RECEIVER] REMOTE MODE button, followed by the Automatic Speaker Setup function (see page 42). Notes: • The front, center, surround, and surround back speak... button. If the main menu doesn't appear, make sure the appropriate external input is selected on the AV receiver by the Automatic Speaker Setup function. Equalizer Settings Equalizer Channel 63Hz 250Hz 1000Hz 4000Hz 16000Hz Manual Front 0dB 0dB 0dB 0dB 0dB Use the Up and Down [ ]/[ ] ...
Owner Manual
Page 81
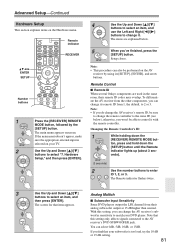
...the 10 dB or 15 dB setting. 81 Remote Control ■ Remote ID When several Onkyo components are explained below ), otherwise, you won't be able to select "7. Note: • If you do change the AV receiver's remote ID, be performed on the Hardware menu. onds). (3 seconds) 2 Use the ... Remote Controller's ID 1 While holding down the [SETUP] button until the Remote indicator lights up (about 3 sec- Some DVD players output the LFE channel from 1, the default, to enter ID 1, 2, or 3. The main menu appears onscreen. The items are used in the same room, their analog ...
...the 10 dB or 15 dB setting. 81 Remote Control ■ Remote ID When several Onkyo components are explained below ), otherwise, you won't be able to select "7. Note: • If you do change the AV receiver's remote ID, be performed on the Hardware menu. onds). (3 seconds) 2 Use the ... Remote Controller's ID 1 While holding down the [SETUP] button until the Remote indicator lights up (about 3 sec- Some DVD players output the LFE channel from 1, the default, to enter ID 1, 2, or 3. The main menu appears onscreen. The items are used in the same room, their analog ...

Owner Manual
Page 86
... or TV/DVD combination), you can control your player with the following buttons. M MUTING button (51) Mutes or unmutes the AV receiver. Selects TV channels on a DVD changer. R AUDIO button Selects foreign language soundtracks and audio formats (e.g., Dolby Digital or DTS). button Selects discs on...button Used to enter times for a different component, see page 84. S RANDOM button Used with the remote control code for controlling an Onkyo DVD player. Press the appropriate REMOTE MODE button first A L DVD M N B C O D E P F G Q R H I REPEAT button ...
... or TV/DVD combination), you can control your player with the following buttons. M MUTING button (51) Mutes or unmutes the AV receiver. Selects TV channels on a DVD changer. R AUDIO button Selects foreign language soundtracks and audio formats (e.g., Dolby Digital or DTS). button Selects discs on...button Used to enter times for a different component, see page 84. S RANDOM button Used with the remote control code for controlling an Onkyo DVD player. Press the appropriate REMOTE MODE button first A L DVD M N B C O D E P F G Q R H I REPEAT button ...


