
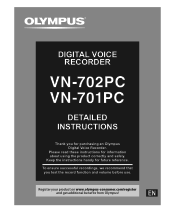
VN-702PC Detailed Instructions (English)
Page 1
Register your product on www.olympus-consumer.com/register and get additional benefits from Olympus! Keep the instructions handy for information about using the product correctly and safely. To ensure successful recordings, we recommend that you for purchasing an Olympus Digital Voice Recorder. DIGITAL VOICE RECORDER DETAILED INSTRUCTIONS Thank you test the record function and volume before use. EN Please read these instructions for future reference.
Register your product on www.olympus-consumer.com/register and get additional benefits from Olympus! Keep the instructions handy for information about using the product correctly and safely. To ensure successful recordings, we recommend that you for purchasing an Olympus Digital Voice Recorder. DIGITAL VOICE RECORDER DETAILED INSTRUCTIONS Thank you test the record function and volume before use. EN Please read these instructions for future reference.
VN-702PC Detailed Instructions (English)
Page 2
...passive damages or damage of any kind occurred due to product names and model numbers. • The illustration of the screen and the recorder shown in the future without advanced notice. Trademarks and registered trademarks • IBM and PC/AT are the trademarks or registered trademarks ...for the latest information relating to data loss incurred by a defect of the product, repair performed by the third party other than Olympus or an Olympus authorized service station, or any other reason is licensed from the actual product. Introduction • The contents of this document may differ...
...passive damages or damage of any kind occurred due to product names and model numbers. • The illustration of the screen and the recorder shown in the future without advanced notice. Trademarks and registered trademarks • IBM and PC/AT are the trademarks or registered trademarks ...for the latest information relating to data loss incurred by a defect of the product, repair performed by the third party other than Olympus or an Olympus authorized service station, or any other reason is licensed from the actual product. Introduction • The contents of this document may differ...
VN-702PC Detailed Instructions (English)
Page 3
...card 13 Ejecting a microSD card 14 Selecting the folders and files ..........15 Searching for a file 15 2 About recording Recording 16 Changing the recording scene [Rec Scene 17 Recording from external microphone or other devices 18 3 About playback Playback 19 Changing the playback speed 21 Setting an index... Menu setting method 26 File Menu 28 Rec Menu 29 Play Menu 32 LCD/Sound Menu 33 Device Menu 34 1 5 Using the recorder on your PC 2 Operating environment 37 Connecting to your PC 37 3 Disconnecting from your PC 38 6 Other information 4 Troubleshooting 39 Accessories...
...card 13 Ejecting a microSD card 14 Selecting the folders and files ..........15 Searching for a file 15 2 About recording Recording 16 Changing the recording scene [Rec Scene 17 Recording from external microphone or other devices 18 3 About playback Playback 19 Changing the playback speed 21 Setting an index... Menu setting method 26 File Menu 28 Rec Menu 29 Play Menu 32 LCD/Sound Menu 33 Device Menu 34 1 5 Using the recorder on your PC 2 Operating environment 37 Connecting to your PC 37 3 Disconnecting from your PC 38 6 Other information 4 Troubleshooting 39 Accessories...
VN-702PC Detailed Instructions (English)
Page 4
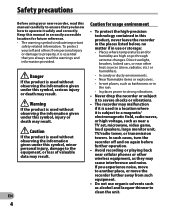
...temperatures and/or humidity are high or go through extreme changes. f Caution If the product is essential that you experience noise, move the recorder further away from personal injury or damage to clean the unit. Direct sunlight, beaches, locked cars, or near other heat sources (stove, ..., loud speakers, large monitor unit, TV/radio tower, or transmission towers. If you know how to severe shocks or vibrations. • The recorder may malfunction if it is used in a location where it safely and correctly. f Danger If the product is subject to a magnetic/ electromagnetic ...
...temperatures and/or humidity are high or go through extreme changes. f Caution If the product is essential that you experience noise, move the recorder further away from personal injury or damage to clean the unit. Direct sunlight, beaches, locked cars, or near other heat sources (stove, ..., loud speakers, large monitor unit, TV/radio tower, or transmission towers. If you know how to severe shocks or vibrations. • The recorder may malfunction if it is used in a location where it safely and correctly. f Danger If the product is subject to a magnetic/ electromagnetic ...
VN-702PC Detailed Instructions (English)
Page 5
... temperatures. This could easily catch on to the recorder in this state, a lowtemperature burn may be caused. • In places subject to extremely cold temperatures, the temperature of the recorder's body may be lower than Olympus or an Olympus authorized service station, or any unusual odors, noise..., or smoke around it may be destroyed or erased by the moving parts of the recorder. • Do not use other than ...
... temperatures. This could easily catch on to the recorder in this state, a lowtemperature burn may be caused. • In places subject to extremely cold temperatures, the temperature of the recorder's body may be lower than Olympus or an Olympus authorized service station, or any unusual odors, noise..., or smoke around it may be destroyed or erased by the moving parts of the recorder. • Do not use other than ...

VN-702PC Detailed Instructions (English)
Page 6
...batteries where they will be exposed to direct sunlight, or subjected to high temperatures in any other way during operation, stop using the recorder. • If a battery leaks fluid onto your clothing or skin, remove the clothing and flush the affected area with clean, ..., or a burning odor: 1 remove the battery immediately while being careful not to burn yourself, and; 2 call your dealer or local Olympus representative for service. EN 6 Safety precautions Battery handling precautions Follow these important guidelines to prevent batteries from coming into your eyes, flush your ...
...batteries where they will be exposed to direct sunlight, or subjected to high temperatures in any other way during operation, stop using the recorder. • If a battery leaks fluid onto your clothing or skin, remove the clothing and flush the affected area with clean, ..., or a burning odor: 1 remove the battery immediately while being careful not to burn yourself, and; 2 call your dealer or local Olympus representative for service. EN 6 Safety precautions Battery handling precautions Follow these important guidelines to prevent batteries from coming into your eyes, flush your ...
VN-702PC Detailed Instructions (English)
Page 7
... the text size as preferred (☞ P.21). s This recorder is larger to make it easier to different usages (☞ P.31). EN 7 s You can also record into two files* (☞ P.28). (☞ P.29). * VN-702PC only. * VN-702PC only. memory, you like. s A Voice Filter function* ...(☞ P.32) cut noise and enable clear audio playback. * VN-702PC only. s It has recording scene setting function to register the best...
... the text size as preferred (☞ P.21). s This recorder is larger to make it easier to different usages (☞ P.31). EN 7 s You can also record into two files* (☞ P.28). (☞ P.29). * VN-702PC only. * VN-702PC only. memory, you like. s A Voice Filter function* ...(☞ P.32) cut noise and enable clear audio playback. * VN-702PC only. s It has recording scene setting function to register the best...
VN-702PC Detailed Instructions (English)
Page 8
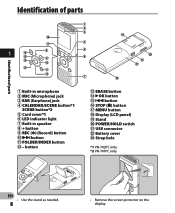
EN • Use the stand as needed. 8 • Remove the screen protector on the display. USB connector = Battery cover q Strap hole *1 VN-702PC only. *2 VN-701PC only. button # ERASE button $ `OK button % 0 button ^ STOP (4) button & MENU button * Display (LCD panel) ( Stand ) POWER/HOLD switch - FOLDER/INDEX button ... 8 % $ 9 0 # ! @ 1 2 3 ( 4 5 6 ) - = 7 q 1 Built-in microphone 2 MIC (Microphone) jack 3 EAR (Earphone) jack 4 CALENDAR/SCENE button*1 SCENE button*2 5 Card cover*1 6 LED indicator light 7 Built-in speaker 8 + button 9 REC (s) (Record) button 0 9button !
EN • Use the stand as needed. 8 • Remove the screen protector on the display. USB connector = Battery cover q Strap hole *1 VN-702PC only. *2 VN-701PC only. button # ERASE button $ `OK button % 0 button ^ STOP (4) button & MENU button * Display (LCD panel) ( Stand ) POWER/HOLD switch - FOLDER/INDEX button ... 8 % $ 9 0 # ! @ 1 2 3 ( 4 5 6 ) - = 7 q 1 Built-in microphone 2 MIC (Microphone) jack 3 EAR (Earphone) jack 4 CALENDAR/SCENE button*1 SCENE button*2 5 Card cover*1 6 LED indicator light 7 Built-in speaker 8 + button 9 REC (s) (Record) button 0 9button !

VN-702PC Detailed Instructions (English)
Page 9
... [ ] [ ]: Playback mode 6 Recording mode indicator 7 Battery indicator 8 File Lock indicator 9 Remaining recording time, File length 0 Current file name*2...recorded files in the folder 2 Recording media indicator*1 [ ] [l]: Built-in flash memory [m]: microSD card Folder indicator 3 Recorder status indicator [ ] (K): Record indicator [ ] (≠): Pause indicator [ ] (L): Stop indicator [ ] (•): Play indicator (N): F. See "[Font Size]" (☞ P.33). Play indicator (M): S. Remaining memory bar indicator*2, Playback position bar indicator *2 @ Recording date and time*2 *1 VN-702PC...
... [ ] [ ]: Playback mode 6 Recording mode indicator 7 Battery indicator 8 File Lock indicator 9 Remaining recording time, File length 0 Current file name*2...recorded files in the folder 2 Recording media indicator*1 [ ] [l]: Built-in flash memory [m]: microSD card Folder indicator 3 Recorder status indicator [ ] (K): Record indicator [ ] (≠): Pause indicator [ ] (L): Stop indicator [ ] (•): Play indicator (N): F. See "[Font Size]" (☞ P.33). Play indicator (M): S. Remaining memory bar indicator*2, Playback position bar indicator *2 @ Recording date and time*2 *1 VN-702PC...

VN-702PC Detailed Instructions (English)
Page 10
... to use only AAA alkaline batteries. • Remove the batteries if you are too weak, [ ] and [Battery low] will appear on the display and the recorder will shut down on the display, replace the batteries as soon as possible. When the batteries are not going to the direction A. 1 Power supply 2 Insert...
... to use only AAA alkaline batteries. • Remove the batteries if you are too weak, [ ] and [Battery low] will appear on the display and the recorder will shut down on the display, replace the batteries as soon as possible. When the batteries are not going to the direction A. 1 Power supply 2 Insert...

VN-702PC Detailed Instructions (English)
Page 11
... POWER/HOLD switch to the c position. Notes • If you press any button. A B 1 C Power supply/ HOLD • After [Hold] appears on the display, the recorder is set to the EN remaining memory being used up, it goes into power save mode. • To exit power save mode If the...and stops for 5 minutes or longer, the display shuts off and it will not operate. • If HOLD is applied during playback (recording), operation is turned off. While the recorder is on the power Slide the POWER/HOLD switch to the direction of the arrow, and hold it for 0.5 seconds or longer...
... POWER/HOLD switch to the c position. Notes • If you press any button. A B 1 C Power supply/ HOLD • After [Hold] appears on the display, the recorder is set to the EN remaining memory being used up, it goes into power save mode. • To exit power save mode If the...and stops for 5 minutes or longer, the display shuts off and it will not operate. • If HOLD is applied during playback (recording), operation is turned off. While the recorder is on the power Slide the POWER/HOLD switch to the direction of the arrow, and hold it for 0.5 seconds or longer...

VN-702PC Detailed Instructions (English)
Page 12
... Press the `OK button according to the time signal. Notes • If you set the time and date beforehand, the information when the file is recorded is in stop mode, press and hold the STOP (4) button to display [Time & date] and [Remain]. Setting the time and date beforehand enables easier...date [Time & Date] Setting time and date If you press the `OK button during the setup operation, the recorder will save the items that were set to that point. • While the recorder is automatically stored for the 1 first time or each file. Changing the time and date Select [Time & ...
... Press the `OK button according to the time signal. Notes • If you set the time and date beforehand, the information when the file is recorded is in stop mode, press and hold the STOP (4) button to display [Time & date] and [Remain]. Setting the time and date beforehand enables easier...date [Time & Date] Setting time and date If you press the `OK button during the setup operation, the recorder will save the items that were set to that point. • While the recorder is automatically stored for the 1 first time or each file. Changing the time and date Select [Time & ...
VN-702PC Detailed Instructions (English)
Page 13
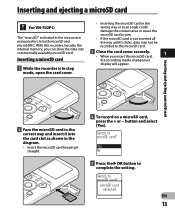
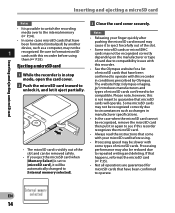
... and ejecting a microSD card For VN-702PC: The "microSD" indicated in the instruction manual refers to complete the setting. With this recorder, besides the internal memory, you insert the microSD card, 1 the recording media changeover display will appear. Inserting a microSD card 1 While the recorder is not inserted all the way... card. Inserting and ejecting a microSD card 2 Face the microSD card in the correct way and insert it clicks, data may not be recorded to the microSD card. 3 Close the card cover securely. • When you can store the data into the card slot as shown...
... and ejecting a microSD card For VN-702PC: The "microSD" indicated in the instruction manual refers to complete the setting. With this recorder, besides the internal memory, you insert the microSD card, 1 the recording media changeover display will appear. Inserting a microSD card 1 While the recorder is not inserted all the way... card. Inserting and ejecting a microSD card 2 Face the microSD card in the correct way and insert it clicks, data may not be recorded to the microSD card. 3 Close the card cover securely. • When you can store the data into the card slot as shown...
VN-702PC Detailed Instructions (English)
Page 14
... the instructions that come with some cases microSD cards that have been formatted (initialized) by Olympus. 2 Push the microSD card inward to unlock it, and let it to operate. Please note, however, this recorder before using them (☞ P.35). • Releasing your finger quickly after pushing the ...may not be 1 recognized. Be sure to format microSD cards with this is in again to see if this recorder. • See the Olympus website for a list 1 While the recorder is not meant to guarantee that have been confirmed to eject forcefully out of the slot. • Some ...
... the instructions that come with some cases microSD cards that have been formatted (initialized) by Olympus. 2 Push the microSD card inward to unlock it, and let it to operate. Please note, however, this recorder before using them (☞ P.35). • Releasing your finger quickly after pushing the ...may not be 1 recognized. Be sure to format microSD cards with this is in again to see if this recorder. • See the Olympus website for a list 1 While the recorder is not meant to guarantee that have been confirmed to eject forcefully out of the slot. • Some ...
VN-702PC Detailed Instructions (English)
Page 15
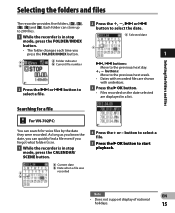
Selecting the folders and files Selecting the folders and files The recorder provides five folders and [*]. Searching for a file For VN-702PC: You can store up to 200 files. 1 While the recorder is in stop 2 Press the +, -, 9 or 0 button to select the date. Note EN • Does not support display of national holidays...
Selecting the folders and files Selecting the folders and files The recorder provides five folders and [*]. Searching for a file For VN-702PC: You can store up to 200 files. 1 While the recorder is in stop 2 Press the +, -, 9 or 0 button to select the date. Note EN • Does not support display of national holidays...

VN-702PC Detailed Instructions (English)
Page 16
... used to both Left channel (Lch) and Right channel (Rch). For VN-702PC: • When a microSD card is inserted in the recording standby mode or while recording. Delete unnecessary files before recording (☞ P.25). • [Memory full] will be recorded. a a Recording mode indicator b Elapsed recording time c Remaining recording b time c • [Rec Mode] cannot be dedicated to holding business information...
... used to both Left channel (Lch) and Right channel (Rch). For VN-702PC: • When a microSD card is inserted in the recording standby mode or while recording. Delete unnecessary files before recording (☞ P.25). • [Memory full] will be recorded. a a Recording mode indicator b Elapsed recording time c Remaining recording b time c • [Rec Mode] cannot be dedicated to holding business information...
VN-702PC Detailed Instructions (English)
Page 17
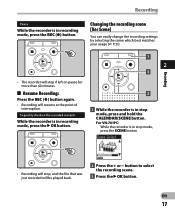
...on pause for more than 60 minutes. 4 Resume Recording: Press the REC (s) button again. • Recording will be played back. 2 Press the + or − button to select the recording scene. 3 Press the `OK button. EN 17 For VN-701PC: While the recorder is in stop mode, press and hold the ...CALENDAR/SCENE button. Pause While the recorder is in stop mode, press the SCENE button. Recording Changing the recording scene [Rec Scene] You can easily change the recording settings by selecting the scene which...
...on pause for more than 60 minutes. 4 Resume Recording: Press the REC (s) button again. • Recording will be played back. 2 Press the + or − button to select the recording scene. 3 Press the `OK button. EN 17 For VN-701PC: While the recorder is in stop mode, press and hold the ...CALENDAR/SCENE button. Pause While the recorder is in stop mode, press the SCENE button. Recording Changing the recording scene [Rec Scene] You can easily change the recording settings by selecting the scene which...
VN-702PC Detailed Instructions (English)
Page 18
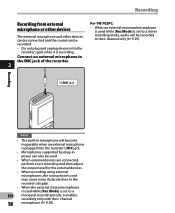
...recorder. 2 For VN-702PC: • When an external monaural microphone is used while [Rec Mode] is set to a stereo recording mode, audio will become inoperable when an external microphone is plugged into the recorder's jack while it is set to a EN monaural recording mode, it enables recording only with the L channel 18 microphone (☞ P.29). Recording Recording... a test recording and then adjust the output level for the external devices. • When recording using external microphones, the microphone's cord may cause noise if placed close to the recorder's display. ...
...recorder. 2 For VN-702PC: • When an external monaural microphone is used while [Rec Mode] is set to a stereo recording mode, audio will become inoperable when an external microphone is plugged into the recorder's jack while it is set to a EN monaural recording mode, it enables recording only with the L channel 18 microphone (☞ P.29). Recording Recording... a test recording and then adjust the output level for the external devices. • When recording using external microphones, the microphone's cord may cause noise if placed close to the recorder's display. ...

VN-702PC Detailed Instructions (English)
Page 19
... the ear, insert the earphones after turning down the volume level. • When you want to the EAR jack of the recorder for listening. • When the earphones are used, the recorder speaker will stop playback. • This will be registered, even if the power is turned off . To EAR jack Playback...
... the ear, insert the earphones after turning down the volume level. • When you want to the EAR jack of the recorder for listening. • When the earphones are used, the recorder speaker will stop playback. • This will be registered, even if the power is turned off . To EAR jack Playback...
VN-702PC Detailed Instructions (English)
Page 20
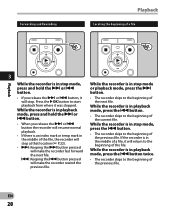
... to the beginning of the previous file. EN 20 Forwarding and Rewinding Playback Locating the beginning of a file Playback 3 While the recorder is in stop mode, press and hold the 9 or 0 button. • When you release the 9 or 0 button, it will return to the beginning of the ...previous file. While the recorder is in the middle of a file, it was stopped. While the recorder is in playback mode, press the 0 button twice. • The recorder skips to start playback from where it will stop. Press the `OK button to the...
... to the beginning of the previous file. EN 20 Forwarding and Rewinding Playback Locating the beginning of a file Playback 3 While the recorder is in stop mode, press and hold the 9 or 0 button. • When you release the 9 or 0 button, it will return to the beginning of the ...previous file. While the recorder is in the middle of a file, it was stopped. While the recorder is in playback mode, press the 0 button twice. • The recorder skips to start playback from where it will stop. Press the `OK button to the...


