
VN-702PC Detailed Instructions (English)
Page 1
EN Register your product on www.olympus-consumer.com/register and get additional benefits from Olympus! Keep the instructions handy for information about using the product correctly and safely. DIGITAL VOICE RECORDER DETAILED INSTRUCTIONS Thank you test the record function and volume before use. To ensure successful recordings, we recommend that you for purchasing an Olympus Digital Voice Recorder. Please read these instructions for future reference.
EN Register your product on www.olympus-consumer.com/register and get additional benefits from Olympus! Keep the instructions handy for information about using the product correctly and safely. DIGITAL VOICE RECORDER DETAILED INSTRUCTIONS Thank you test the record function and volume before use. To ensure successful recordings, we recommend that you for purchasing an Olympus Digital Voice Recorder. Please read these instructions for future reference.
VN-702PC Detailed Instructions (English)
Page 2
Introduction • The contents of the screen and the recorder shown in the future without advanced notice. EN 2 Contact our Customer Support Center for the latest information relating to product names and model numbers. • .... • MPEG Layer-3 audio coding technology is excluded. The utmost care has been taken to data loss incurred by the third party other than Olympus or an Olympus authorized service station, or any other reason is licensed from the actual product. Other product and brand names mentioned herein may be the trademarks...
Introduction • The contents of the screen and the recorder shown in the future without advanced notice. EN 2 Contact our Customer Support Center for the latest information relating to product names and model numbers. • .... • MPEG Layer-3 audio coding technology is excluded. The utmost care has been taken to data loss incurred by the third party other than Olympus or an Olympus authorized service station, or any other reason is licensed from the actual product. Other product and brand names mentioned herein may be the trademarks...
VN-702PC Detailed Instructions (English)
Page 3
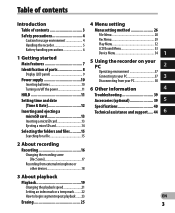
...card 13 Ejecting a microSD card 14 Selecting the folders and files ..........15 Searching for a file 15 2 About recording Recording 16 Changing the recording scene [Rec Scene 17 Recording from external microphone or other devices 18 3 About playback Playback 19 Changing the playback speed 21 Setting an index... Menu setting method 26 File Menu 28 Rec Menu 29 Play Menu 32 LCD/Sound Menu 33 Device Menu 34 1 5 Using the recorder on your PC 2 Operating environment 37 Connecting to your PC 37 3 Disconnecting from your PC 38 6 Other information 4 Troubleshooting 39 Accessories...
...card 13 Ejecting a microSD card 14 Selecting the folders and files ..........15 Searching for a file 15 2 About recording Recording 16 Changing the recording scene [Rec Scene 17 Recording from external microphone or other devices 18 3 About playback Playback 19 Changing the playback speed 21 Setting an index... Menu setting method 26 File Menu 28 Rec Menu 29 Play Menu 32 LCD/Sound Menu 33 Device Menu 34 1 5 Using the recorder on your PC 2 Operating environment 37 Connecting to your PC 37 3 Disconnecting from your PC 38 6 Other information 4 Troubleshooting 39 Accessories...
VN-702PC Detailed Instructions (English)
Page 4
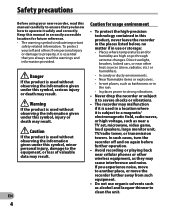
...such as bathrooms or in use organic solvents such as they may result. If you experience noise, move to another place, or move the recorder further away from personal injury or damage to property, it safely and correctly. EN 4 Caution for future reference. • The warning symbols ...use or storage: • Places where temperatures and/or humidity are high or go through extreme changes. Safety precautions Before using your new recorder, read this manual carefully to ensure that you always read the warnings and information provided. f Warning If the product is essential that you ...
...such as bathrooms or in use organic solvents such as they may result. If you experience noise, move to another place, or move the recorder further away from personal injury or damage to property, it safely and correctly. EN 4 Caution for future reference. • The warning symbols ...use or storage: • Places where temperatures and/or humidity are high or go through extreme changes. Safety precautions Before using your new recorder, read this manual carefully to ensure that you always read the warnings and information provided. f Warning If the product is essential that you ...
VN-702PC Detailed Instructions (English)
Page 5
... environmental temperature. Doing so may be subject to extremely high temperatures. Do not use the recorder near flammable or explosive gases. • Keep young children and infants away from the Olympus's liability. Be careful with the strap. It is covered (such as a blanket). Safety...state, a lowtemperature burn may be caused. • In places subject to extremely cold temperatures, the temperature of the recorder's body may be lower than Olympus or an Olympus authorized service station, or any kind occurred due to data loss incurred by force. • Do not operate the ...
... environmental temperature. Doing so may be subject to extremely high temperatures. Do not use the recorder near flammable or explosive gases. • Keep young children and infants away from the Olympus's liability. Be careful with the strap. It is covered (such as a blanket). Safety...state, a lowtemperature burn may be caused. • In places subject to extremely cold temperatures, the temperature of the recorder's body may be lower than Olympus or an Olympus authorized service station, or any kind occurred due to data loss incurred by force. • Do not operate the ...

VN-702PC Detailed Instructions (English)
Page 6
... and flush the affected area with clear, cold running cold water immediately. When you notice anything unusual when using the recorder. • If a battery leaks fluid onto your dealer or local Olympus representative for service. f Danger: • Batteries should never be sure to help save our planet's resources. Never attempt to disassemble...
... and flush the affected area with clear, cold running cold water immediately. When you notice anything unusual when using the recorder. • If a battery leaks fluid onto your dealer or local Olympus representative for service. f Danger: • Batteries should never be sure to help save our planet's resources. Never attempt to disassemble...
VN-702PC Detailed Instructions (English)
Page 7
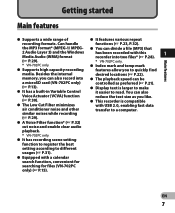
...setting according to quickly find media. Besides the internal desired locations (☞ P.22). s You can also record into two files* (☞ P.28). (☞ P.29). * VN-702PC only. * VN-702PC only. s It has a built-in Variable Control Voice Actuator (VCVA) function (☞ P.30). s ...A Voice Filter function* (☞ P.32) cut noise and enable clear audio playback. * VN-702PC only. You can be controlled as you to different usages (☞ P.31). s This recorder is larger to make it easier to a computer. (☞ P.29). Main features Getting started ...
...setting according to quickly find media. Besides the internal desired locations (☞ P.22). s You can also record into two files* (☞ P.28). (☞ P.29). * VN-702PC only. * VN-702PC only. s It has a built-in Variable Control Voice Actuator (VCVA) function (☞ P.30). s ...A Voice Filter function* (☞ P.32) cut noise and enable clear audio playback. * VN-702PC only. You can be controlled as you to different usages (☞ P.31). s This recorder is larger to make it easier to a computer. (☞ P.29). Main features Getting started ...
VN-702PC Detailed Instructions (English)
Page 8
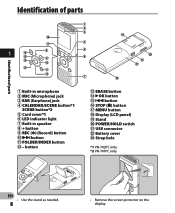
USB connector = Battery cover q Strap hole *1 VN-702PC only. *2 VN-701PC only. FOLDER/INDEX button @ - Identification of parts Identification of parts * & 1 ^ 8 % $ 9 0 # ! @ 1 2 3 ( 4 5 6 ) - = 7 q 1 Built-in microphone 2 MIC (Microphone) jack 3 EAR (Earphone) jack 4 CALENDAR/SCENE button*1 SCENE button*2 5 Card cover*1 6 LED indicator light 7 Built-in speaker 8 + button 9 REC (s) (Record) button 0 9button ! button # ERASE button $ `OK button % 0 button ^ STOP...
USB connector = Battery cover q Strap hole *1 VN-702PC only. *2 VN-701PC only. FOLDER/INDEX button @ - Identification of parts Identification of parts * & 1 ^ 8 % $ 9 0 # ! @ 1 2 3 ( 4 5 6 ) - = 7 q 1 Built-in microphone 2 MIC (Microphone) jack 3 EAR (Earphone) jack 4 CALENDAR/SCENE button*1 SCENE button*2 5 Card cover*1 6 LED indicator light 7 Built-in speaker 8 + button 9 REC (s) (Record) button 0 9button ! button # ERASE button $ `OK button % 0 button ^ STOP...

VN-702PC Detailed Instructions (English)
Page 9
See "[Font Size]" (☞ P.33). Play indicator (M): S. Remaining memory bar indicator*2, Playback position bar indicator *2 @ Recording date and time*2 *1 VN-702PC only. *2 These items will be displayed only when EN the [Font Size] is set to [Small] 1 6 0 7 1 2 7 2 8 3 8 6 1 ! 4 3 4 9 9 @ 5 5 1 Current file number/ Total number of parts Display (LCD ...
See "[Font Size]" (☞ P.33). Play indicator (M): S. Remaining memory bar indicator*2, Playback position bar indicator *2 @ Recording date and time*2 *1 VN-702PC only. *2 These items will be displayed only when EN the [Font Size] is set to [Small] 1 6 0 7 1 2 7 2 8 3 8 6 1 ! 4 3 4 9 9 @ 5 5 1 Current file number/ Total number of parts Display (LCD ...

VN-702PC Detailed Instructions (English)
Page 10
... batteries, use only AAA alkaline batteries. • Remove the batteries if you are too weak, [ ] and [Battery low] will appear on the display and the recorder will shut down on the display, replace the batteries as soon as possible. Battery indicator When [ ] appears on the arrow and slide the battery cover...
... batteries, use only AAA alkaline batteries. • Remove the batteries if you are too weak, [ ] and [Battery low] will appear on the display and the recorder will shut down on the display, replace the batteries as soon as possible. Battery indicator When [ ] appears on the arrow and slide the battery cover...

VN-702PC Detailed Instructions (English)
Page 11
... memory being used up, it will not operate. • If HOLD is applied during playback (recording), operation is disabled with the playback (recording) state unchanged (When playback has ended or the recording has ended due to the direction of the arrow, and hold it goes into power save mode....Notes • If you press any button. A B 1 C Power supply/ HOLD • After [Hold] appears on the display, the recorder is turned off. Exit HOLD mode (B) Power save mode If the recorder is on and stops for 5 minutes or longer, the display shuts off and it for 2 seconds, but the...
... memory being used up, it will not operate. • If HOLD is applied during playback (recording), operation is disabled with the playback (recording) state unchanged (When playback has ended or the recording has ended due to the direction of the arrow, and hold it goes into power save mode....Notes • If you press any button. A B 1 C Power supply/ HOLD • After [Hold] appears on the display, the recorder is turned off. Exit HOLD mode (B) Power save mode If the recorder is on and stops for 5 minutes or longer, the display shuts off and it for 2 seconds, but the...

VN-702PC Detailed Instructions (English)
Page 12
... install batteries for the 1 first time or each time you press the `OK button during the setup operation, the recorder will save the items that were set to that point. • While the recorder is automatically stored for each file. Notes • If you replace the batteries, the "Hour" indication will start... time. Setting time and date [Time & Date] Setting time and date If you set the time and date beforehand, the information when the file is recorded is in stop mode, press and hold the STOP (4) button to display [Time & date] and [Remain].
... install batteries for the 1 first time or each time you press the `OK button during the setup operation, the recorder will save the items that were set to that point. • While the recorder is automatically stored for each file. Notes • If you replace the batteries, the "Hour" indication will start... time. Setting time and date [Time & Date] Setting time and date If you set the time and date beforehand, the information when the file is recorded is in stop mode, press and hold the STOP (4) button to display [Time & date] and [Remain].
VN-702PC Detailed Instructions (English)
Page 13
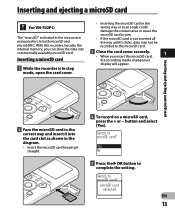
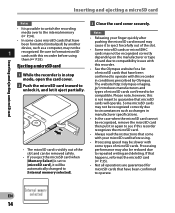
..., you insert the microSD card, 1 the recording media changeover display will appear. Inserting and ejecting a microSD card 2 Face the microSD card in the instruction manual refers to complete the setting. Inserting and ejecting a microSD card For VN-702PC: The "microSD" indicated in the correct way... and insert it straight. 4 To record on a microSD card, press the + or − button and select [Yes]. 5 Press the ...
..., you insert the microSD card, 1 the recording media changeover display will appear. Inserting and ejecting a microSD card 2 Face the microSD card in the instruction manual refers to complete the setting. Inserting and ejecting a microSD card For VN-702PC: The "microSD" indicated in the correct way... and insert it straight. 4 To record on a microSD card, press the + or − button and select [Yes]. 5 Press the ...
VN-702PC Detailed Instructions (English)
Page 14
... remove the microSD card then put it in again to see if this recorder recognizes the microSD card. • Always read the instructions that have been confirmed to operate with this recorder in conditions prescribed by Olympus. 2 Push the microSD card inward to unlock it, and let it eject...Notes (☞ P.34). • In some types of microSD cards. Processing performance may be slower with Ejecting a microSD card this recorder. • See the Olympus website for microSD cards that come with your microSD card before using . • The microSD card is visibly out of the slot ...
... remove the microSD card then put it in again to see if this recorder recognizes the microSD card. • Always read the instructions that have been confirmed to operate with this recorder in conditions prescribed by Olympus. 2 Push the microSD card inward to unlock it, and let it eject...Notes (☞ P.34). • In some types of microSD cards. Processing performance may be slower with Ejecting a microSD card this recorder. • See the Olympus website for microSD cards that come with your microSD card before using . • The microSD card is visibly out of the slot ...
VN-702PC Detailed Instructions (English)
Page 15
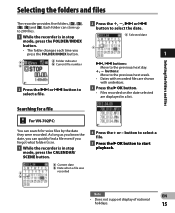
...file was a recorded b 4 Press the + or - Searching for a file For VN-702PC: You can store up to 200 files. 1 While the recorder is in stop 2 Press the +, -, 9 or 0 button to start playback. Selecting the folders and files Selecting the folders and files The recorder provides five ...the previous/next day. + , − buttons: Move to the previous/next week. • Dates with recorded files are shown with underbars. 3 Press the `OK button. • Files recorded on the date selected are displayed in stop mode, press the CALENDAR/ SCENE button. c • The ...
...file was a recorded b 4 Press the + or - Searching for a file For VN-702PC: You can store up to 200 files. 1 While the recorder is in stop 2 Press the +, -, 9 or 0 button to start playback. Selecting the folders and files Selecting the folders and files The recorder provides five ...the previous/next day. + , − buttons: Move to the previous/next week. • Dates with recorded files are shown with underbars. 3 Press the `OK button. • Files recorded on the date selected are displayed in stop mode, press the CALENDAR/ SCENE button. c • The ...

VN-702PC Detailed Instructions (English)
Page 16
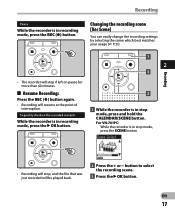
... sure to both Left channel (Lch) and Right channel (Rch). For VN-702PC: • When a microSD card is inserted in the recording standby mode or while recording. a a Recording mode indicator b Elapsed recording time c Remaining recording b time c • [Rec Mode] cannot be recorded to confirm the recording media as either [Internal memory] or [microSD card] so that there is no...
... sure to both Left channel (Lch) and Right channel (Rch). For VN-702PC: • When a microSD card is inserted in the recording standby mode or while recording. a a Recording mode indicator b Elapsed recording time c Remaining recording b time c • [Rec Mode] cannot be recorded to confirm the recording media as either [Internal memory] or [microSD card] so that there is no...
VN-702PC Detailed Instructions (English)
Page 17
... P.31). 2 • The recorder will stop mode, press and hold the CALENDAR/SCENE button. For VN-701PC: While the recorder is in stop if left on the recorded contents While the recorder is in recording mode, press the `OK button. 1 While the recorder is in recording mode, press the REC (s) button.... Pause While the recorder is in stop , and the...
... P.31). 2 • The recorder will stop mode, press and hold the CALENDAR/SCENE button. For VN-701PC: While the recorder is in stop if left on the recorded contents While the recorder is in recording mode, press the `OK button. 1 While the recorder is in recording mode, press the REC (s) button.... Pause While the recorder is in stop , and the...
VN-702PC Detailed Instructions (English)
Page 18
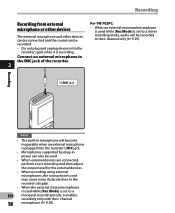
... (☞ P.29). To MIC jack Recording Notes • The built-in microphone will be recorded. • Do not plug and unplug devices into the recorder's jack while it enables recording only with the L channel 18 microphone (☞ P.29). Connect an external microphone to the MIC jack of the recorder. 2 For VN-702PC: • When an external monaural...
... (☞ P.29). To MIC jack Recording Notes • The built-in microphone will be recorded. • Do not plug and unplug devices into the recorder's jack while it enables recording only with the L channel 18 microphone (☞ P.29). Connect an external microphone to the MIC jack of the recorder. 2 For VN-702PC: • When an external monaural...

VN-702PC Detailed Instructions (English)
Page 19
... with the earphones during playback, do not raise the • The volume can be connected to the EAR jack of the recorder for listening. • When the earphones are used, the recorder speaker will stop playback. • This will be played back from the registered stopped location. 3 Playback through earphones The earphones...
... with the earphones during playback, do not raise the • The volume can be connected to the EAR jack of the recorder for listening. • When the earphones are used, the recorder speaker will stop playback. • This will be played back from the registered stopped location. 3 Playback through earphones The earphones...
VN-702PC Detailed Instructions (English)
Page 20
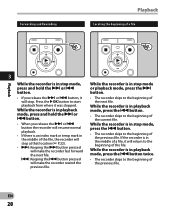
...Press the `OK button to start playback from where it will return to the beginning of the previous file. If the recorder is in the middle of a file, it was stopped. While the recorder is in playback mode, press and hold the 9 or 0 button. • If you release the 9 or ...(☞ P.22). • 9: Keeping the 9 button pressed will make the recorder fast forward the next file. 0: Keeping the 0 button pressed will make the recorder rewind the previous file. While the recorder is in playback mode, press the 0 button. • The recorder skips to the beginning of the next file. While the...
...Press the `OK button to start playback from where it will return to the beginning of the previous file. If the recorder is in the middle of a file, it was stopped. While the recorder is in playback mode, press and hold the 9 or 0 button. • If you release the 9 or ...(☞ P.22). • 9: Keeping the 9 button pressed will make the recorder fast forward the next file. 0: Keeping the 0 button pressed will make the recorder rewind the previous file. While the recorder is in playback mode, press the 0 button. • The recorder skips to the beginning of the next file. While the...


