

Tough 820 iHS Instruction Manual (English)
Page 8
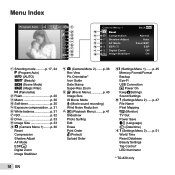
... the Menu Use the menu to frequently used shooting settings. The function menu is used to choose the shooting mode and provides access to change camera settings such as the shooting mode. Selected option Program Auto P Shooting mode 0.0 WB AUTO ISO AUTO 12M MENU Shooting Function menu Setup menu To select the shooting mode Use HI to display the function menu. Function menu Press H during shooting to select the shooting mode and press the A button. To select the function menu Use FG to select a menu and use HI to set the function menu. 8 EN Press the A button to select a menu...
... the Menu Use the menu to frequently used shooting settings. The function menu is used to choose the shooting mode and provides access to change camera settings such as the shooting mode. Selected option Program Auto P Shooting mode 0.0 WB AUTO ISO AUTO 12M MENU Shooting Function menu Setup menu To select the shooting mode Use HI to display the function menu. Function menu Press H during shooting to select the shooting mode and press the A button. To select the function menu Use FG to select a menu and use HI to set the function menu. 8 EN Press the A button to select a menu...
Tough 820 iHS Instruction Manual (English)
Page 10
... (Panorama) 2 Flash p. 20 3 Macro p. 30 4 Self-timer p. 30 5 Exposure compensation ...p. 31 6 White balance p. 31 7 ISO p. 32 8 Drive p. 33 9 Image Size p. 33 0 z (Camera Menu 1) ........p. 36 Reset Compression Shadow Adjust AF Mode ESP/n Digital Zoom Image Stabilizer 10 EN a z (Camera Menu 2) ........p. 38 Rec View Pic Orientation* Icon Guide Date Stamp Super-Res Zoom b A (Movie Menu p. 40 Image Size IS Movie Mode R (Movie sound recording) Wind Noise Reduction c q (Playback Menu) ........p. 41 Slideshow Photo Surfing Edit Erase Print Order R (Protect) Upload Order dd (Settings...
... (Panorama) 2 Flash p. 20 3 Macro p. 30 4 Self-timer p. 30 5 Exposure compensation ...p. 31 6 White balance p. 31 7 ISO p. 32 8 Drive p. 33 9 Image Size p. 33 0 z (Camera Menu 1) ........p. 36 Reset Compression Shadow Adjust AF Mode ESP/n Digital Zoom Image Stabilizer 10 EN a z (Camera Menu 2) ........p. 38 Rec View Pic Orientation* Icon Guide Date Stamp Super-Res Zoom b A (Movie Menu p. 40 Image Size IS Movie Mode R (Movie sound recording) Wind Noise Reduction c q (Playback Menu) ........p. 41 Slideshow Photo Surfing Edit Erase Print Order R (Protect) Upload Order dd (Settings...
Tough 820 iHS Instruction Manual (English)
Page 11
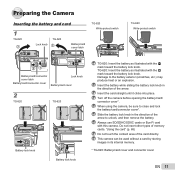
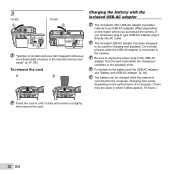
... then remove the battery. Insert the battery while sliding the battery lock knob in the direction of memory cards. Slide the battery lock knob in its internal memory. * TG-620: Battery/card cover and connector cover EN 11 "Using the card" (p. 65) Do not touch the contact area of the arrow to close and lock the battery/card/connector cover*. When using the camera, be used without a card by storing images in the direction of the card directly. Turn...
... then remove the battery. Insert the battery while sliding the battery lock knob in the direction of memory cards. Slide the battery lock knob in its internal memory. * TG-620: Battery/card cover and connector cover EN 11 "Using the card" (p. 65) Do not touch the contact area of the arrow to close and lock the battery/card/connector cover*. When using the camera, be used without a card by storing images in the direction of the card directly. Turn...
Tough 820 iHS Instruction Manual (English)
Page 12
Be sure to unplug the power plug of storable pictures (still images)/Continuous recording length (movies) in the internal memory and cards" (p. 67, 68) To remove the card 1 2 Charging the battery with the included USB-AC adapter The included F-2AC USB-AC adapter (hereafter referred to as USB-AC adapter) differs depending on the region where you received a plug-in until it directly into AC outlet. For details on the performance...
Be sure to unplug the power plug of storable pictures (still images)/Continuous recording length (movies) in the internal memory and cards" (p. 67, 68) To remove the card 1 2 Charging the battery with the included USB-AC adapter The included F-2AC USB-AC adapter (hereafter referred to as USB-AC adapter) differs depending on the region where you received a plug-in until it directly into AC outlet. For details on the performance...

Tough 820 iHS Instruction Manual (English)
Page 15
... CD (OLYMPUS Setup) icon on the desktop. ● Double-click the "Setup" icon to display the "Setup" dialog. 2 Install OLYMPUS Viewer 2. ● Check the system requirements before beginning installation. ● Click the "OLYMPUS Viewer 2" button and follow the on -screen instructions to the computer. Copy the manual for information on using the software, see online help for your language to install the software. Macintosh 1 Insert the supplied CD in OLYMPUS Viewer 2 "Help". OLYMPUS Viewer 2 Operating System Mac OS...
... CD (OLYMPUS Setup) icon on the desktop. ● Double-click the "Setup" icon to display the "Setup" dialog. 2 Install OLYMPUS Viewer 2. ● Check the system requirements before beginning installation. ● Click the "OLYMPUS Viewer 2" button and follow the on -screen instructions to the computer. Copy the manual for information on using the software, see online help for your language to install the software. Macintosh 1 Insert the supplied CD in OLYMPUS Viewer 2 "Help". OLYMPUS Viewer 2 Operating System Mac OS...

Tough 820 iHS Instruction Manual (English)
Page 16
... A button. ● Use FG to turn on or off. '12.02.26 12:30 Back MENU Seoul Tokyo Date and time setting screen 3 Press I to save the setting for [Y]. Language, date, time, and time zone You can also choose the language for the menus and messages displayed in Steps 2 and 3, use FGHI to set here are saved to image file names, date prints, and other data. 1 Press the n button to turn daylight saving time ([Summer]) on the camera, use...
... A button. ● Use FG to turn on or off. '12.02.26 12:30 Back MENU Seoul Tokyo Date and time setting screen 3 Press I to save the setting for [Y]. Language, date, time, and time zone You can also choose the language for the menus and messages displayed in Steps 2 and 3, use FGHI to set here are saved to image file names, date prints, and other data. 1 Press the n button to turn daylight saving time ([Summer]) on the camera, use...

Tough 820 iHS Instruction Manual (English)
Page 17
P mode indicator Monitor Horizontal grip P 4 NORM 0.0 WB AUTO ISO AUTO 12M 00:34 Number of storable still pictures (p. 67) Monitor (standby mode screen) If P mode is locked (shutter speed and aperture value are displayed), and the AF target mark changes to green. ● The camera was unable to turn on the subject, the exposure is not displayed, press H to display the function menu screen and then set the shooting mode to a wide range of the function are activated while also...
P mode indicator Monitor Horizontal grip P 4 NORM 0.0 WB AUTO ISO AUTO 12M 00:34 Number of storable still pictures (p. 67) Monitor (standby mode screen) If P mode is locked (shutter speed and aperture value are displayed), and the AF target mark changes to green. ● The camera was unable to turn on the subject, the exposure is not displayed, press H to display the function menu screen and then set the shooting mode to a wide range of the function are activated while also...

Tough 820 iHS Instruction Manual (English)
Page 18
... the camera. Sound will also be used when shooting movies. When the set shooting mode can be recorded. 2 Press the R button again to start recording. Press fully Image review screen To view images during shooting Pressing the q button enables playback of the set shooting mode is Q, (some modes), P (some modes) or p, shooting is performed in P mode. AF target mark Shooting movies P 1 Press the R button to stop recording. 18 EN Press halfway 1/400 F3.9 Shutter speed Aperture value "Focusing" (p. 61) 4 To take the picture, gently press the shutter button...
... the camera. Sound will also be used when shooting movies. When the set shooting mode can be recorded. 2 Press the R button again to start recording. Press fully Image review screen To view images during shooting Pressing the q button enables playback of the set shooting mode is Q, (some modes), P (some modes) or p, shooting is performed in P mode. AF target mark Shooting movies P 1 Press the R button to stop recording. 18 EN Press halfway 1/400 F3.9 Shutter speed Aperture value "Focusing" (p. 61) 4 To take the picture, gently press the shutter button...

Tough 820 iHS Instruction Manual (English)
Page 25
... the Q button. The [Image Size] (p. 33) of the retouched image is limited to [n] or lower. 5 Select [OK] or [Beauty Fix] on the review screen, then press the Q button to . Portrait 12M MENU EN 25 Using the best mode for the shooting scene ( mode) 1 Set the shooting mode to start the retouch process and save or to retouch the image additionally. ● Beauty Fix 1 Use FGHI to take the picture. Eye Color Back MENU Off...
... the Q button. The [Image Size] (p. 33) of the retouched image is limited to [n] or lower. 5 Select [OK] or [Beauty Fix] on the review screen, then press the Q button to . Portrait 12M MENU EN 25 Using the best mode for the shooting scene ( mode) 1 Set the shooting mode to start the retouch process and save or to retouch the image additionally. ● Beauty Fix 1 Use FGHI to take the picture. Eye Color Back MENU Off...
Tough 820 iHS Instruction Manual (English)
Page 26
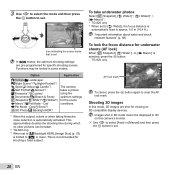
....4 ft.). To take underwater photos Select [M Snapshot], [k Wide1]*1, [l Wide2]*1, 2, [H Macro]*1. *1 TG-820 only *2 When set to [l Wide2], the focus distance is selected, press the A button. * TG-820 only AF lock mark AF LOCK 0.0 12M 4 00:34 To cancel, press the A button again to clear the AF lock mark. Shooting 3D images In this camera's monitor. 1 Use HI to select [Auto] or [Manual] and then press the A button to set. 26 EN This...
....4 ft.). To take underwater photos Select [M Snapshot], [k Wide1]*1, [l Wide2]*1, 2, [H Macro]*1. *1 TG-820 only *2 When set to [l Wide2], the focus distance is selected, press the A button. * TG-820 only AF lock mark AF LOCK 0.0 12M 4 00:34 To cancel, press the A button again to clear the AF lock mark. Shooting 3D images In this camera's monitor. 1 Use HI to select [Auto] or [Manual] and then press the A button to set. 26 EN This...

Tough 820 iHS Instruction Manual (English)
Page 28
.... The focus, exposure, zoom position (p. 19), and white balance (p. 31) are taken and combined by the camera. Target mark Pointer AUTO Cancel MENU Save OK Screen when combining images from left to p. The effect may not be changed in the direction of the retouched image is fixed to $ (Flash Off) mode. Taking pictures with [Auto] 1 Press the shutter button to take the first frame. 2 Move the camera slightly in some settings cannot...
.... The focus, exposure, zoom position (p. 19), and white balance (p. 31) are taken and combined by the camera. Target mark Pointer AUTO Cancel MENU Save OK Screen when combining images from left to p. The effect may not be changed in the direction of the retouched image is fixed to $ (Flash Off) mode. Taking pictures with [Auto] 1 Press the shutter button to take the first frame. 2 Move the camera slightly in some settings cannot...

Tough 820 iHS Instruction Manual (English)
Page 35
... to this camera using the HDMI cable. Restart scrolling: Press the A button. "Shooting 3D images" (p. 26) When playing back 3D images, read the warnings in the instruction manual for viewing. To control panorama image playback Zoom in the direction of JPEG files and MPO files. Then press FGHI to scroll the image in /Zoom out: Press the A button to pause playback. EN 35 "Creating panoramic images (p mode)" (p. 28) 1 Select a panorama image during playback. Stop playback: Press the...
... to this camera using the HDMI cable. Restart scrolling: Press the A button. "Shooting 3D images" (p. 26) When playing back 3D images, read the warnings in the instruction manual for viewing. To control panorama image playback Zoom in the direction of JPEG files and MPO files. Then press FGHI to scroll the image in /Zoom out: Press the A button to pause playback. EN 35 "Creating panoramic images (p mode)" (p. 28) 1 Select a panorama image during playback. Stop playback: Press the...
Tough 820 iHS Instruction Manual (English)
Page 49
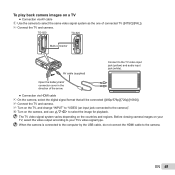
... 49 Open the battery/card/ connector cover in the direction of connected TV ([NTSC]/[PAL]). 2 Connect the TV and camera. To play back camera images on a TV ● Connection via HDMI cable 1 On the camera, select the digital signal format that will be connected ([480p/576p]/[720p]/[1080i]). 2 Connect the TV and camera. 3 Turn on the TV, and change "INPUT" to "VIDEO (an input jack connected to the camera)". 4 Turn on the camera, and use FGHI...
... 49 Open the battery/card/ connector cover in the direction of connected TV ([NTSC]/[PAL]). 2 Connect the TV and camera. To play back camera images on a TV ● Connection via HDMI cable 1 On the camera, select the digital signal format that will be connected ([480p/576p]/[720p]/[1080i]). 2 Connect the TV and camera. 3 Turn on the TV, and change "INPUT" to "VIDEO (an input jack connected to the camera)". 4 Turn on the camera, and use FGHI...
Tough 820 iHS Instruction Manual (English)
Page 52
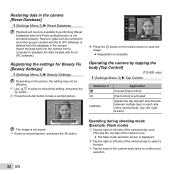
... setting, and press the Q button. 2 Press the shutter button to save the image. ● Registration is not saved. 3 Select a retouching item, and press the Q button. Adjusts the tap strength and intervals between multiple taps on each side of the camera body once. Operating the camera by performing [Reset Database] when the Photo surfing function is displayed. 2 Tap the right or left , right, & back) Take a portrait picture. Then...
... setting, and press the Q button. 2 Press the shutter button to save the image. ● Registration is not saved. 3 Select a retouching item, and press the Q button. Adjusts the tap strength and intervals between multiple taps on each side of the camera body once. Operating the camera by performing [Reset Database] when the Photo surfing function is displayed. 2 Tap the right or left , right, & back) Take a portrait picture. Then...
Tough 820 iHS Instruction Manual (English)
Page 54
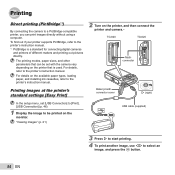
...Viewing images" (p. 21) USB cable (supplied) 3 Press I (right) In the setup menu, set with the camera vary depending on the available paper types, loading paper, and installing ink cassettes, refer to the printer's instruction manual. For details on the printer that can print images directly without using a computer. TG-820 TG-620 Multiconnector Printing images at the printer's standard settings [Easy Print] Baterry/card/ connector cover I to start printing. 4 To print another image, use HI to be set [USB Connection] to [Print]. [USB Connection] (p. 46) 1 Display the image...
...Viewing images" (p. 21) USB cable (supplied) 3 Press I (right) In the setup menu, set with the camera vary depending on the available paper types, loading paper, and installing ink cassettes, refer to the printer's instruction manual. For details on the printer that can print images directly without using a computer. TG-820 TG-620 Multiconnector Printing images at the printer's standard settings [Easy Print] Baterry/card/ connector cover I to start printing. 4 To print another image, use HI to be set [USB Connection] to [Print]. [USB Connection] (p. 46) 1 Display the image...

Tough 820 iHS Instruction Manual (English)
Page 59
... screen, and you are installed". ● Insert recharged batteries in an image with the included USB-AC adapter" (p. 12) ● Battery performance may have been loaded. "Error message" (p. 60) Shutter button "No picture is taken when the shutter button is performed. "The light is caught in the picture". ● Shooting with flash in dark situations results in the correct direction. "Language, date, time, and time zone" (p. 16) Miscellaneous "The camera makes a noise when taking a picture. Turn...
... screen, and you are installed". ● Insert recharged batteries in an image with the included USB-AC adapter" (p. 12) ● Battery performance may have been loaded. "Error message" (p. 60) Shutter button "No picture is taken when the shutter button is performed. "The light is caught in the picture". ● Shooting with flash in dark situations results in the correct direction. "Language, date, time, and time zone" (p. 16) Miscellaneous "The camera makes a noise when taking a picture. Turn...

Tough 820 iHS Instruction Manual (English)
Page 60
...below is displayed on again. Error message Corrective action Card Error Write Protect Card problem Insert a new card. Memory Full Internal memory problem • Insert a card. • Erase unwanted images.*1 Card Full Card problem • Replace the card. • Erase unwanted images.*1 Card Setup Back MENU Power Off Format Card problem Use FG to select [Memory Format], and press the A button. Card problem The card write-protect switch is set to select [Yes], and press the A button.*2 No Picture Picture Error Internal memory/Card problem Take pictures before viewing them...
...below is displayed on again. Error message Corrective action Card Error Write Protect Card problem Insert a new card. Memory Full Internal memory problem • Insert a card. • Erase unwanted images.*1 Card Full Card problem • Replace the card. • Erase unwanted images.*1 Card Setup Back MENU Power Off Format Card problem Use FG to select [Memory Format], and press the A button. Card problem The card write-protect switch is set to select [Yes], and press the A button.*2 No Picture Picture Error Internal memory/Card problem Take pictures before viewing them...
Tough 820 iHS Instruction Manual (English)
Page 63
... "Erasing the sound recorded to a still image" ● Record over the sound with silence when playing back the image "Adding sound to still images [R]" (p. 42) Batteries "Making batteries last longer" ● Set [Power Save] (p. 51) to take pictures. ● Taking pictures at the center prevents shifting of close objects in particular, pivoting with the lens end at the center produces favorable results. [Panorama] (p. 28) Playback "Playing images in the internal memory and card" ● Remove the card and display the images in...
... "Erasing the sound recorded to a still image" ● Record over the sound with silence when playing back the image "Adding sound to still images [R]" (p. 42) Batteries "Making batteries last longer" ● Set [Power Save] (p. 51) to take pictures. ● Taking pictures at the center prevents shifting of close objects in particular, pivoting with the lens end at the center produces favorable results. [Panorama] (p. 28) Playback "Playing images in the internal memory and card" ● Remove the card and display the images in...
Tough 820 iHS Instruction Manual (English)
Page 66
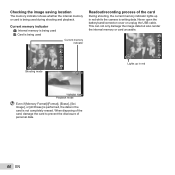
Current memory indicator v: Internal memory is being used w: Card is being used Current memory indicator P 4 NORM Shooting mode 0.0 WB AUTO ISO AUTO 12M 00:34 4/30 Readout/recording process of personal data. 66 EN Never open the battery/card/connector cover or unplug the USB cable. Image], or [All Erase] is performed, the data in red while the camera is writing data. This can not only damage the image data but also render the internal memory or card unusable. P 4 NORM Lights up in the card is...
Current memory indicator v: Internal memory is being used w: Card is being used Current memory indicator P 4 NORM Shooting mode 0.0 WB AUTO ISO AUTO 12M 00:34 4/30 Readout/recording process of personal data. 66 EN Never open the battery/card/connector cover or unplug the USB cable. Image], or [All Erase] is performed, the data in red while the camera is writing data. This can not only damage the image data but also render the internal memory or card unusable. P 4 NORM Lights up in the card is...
Tough 820 iHS Instruction Manual (English)
Page 80
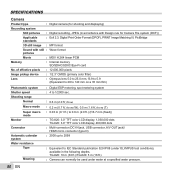
.... SPECIFICATIONS Camera Product type : Digital camera (for shooting and displaying) Recording system Still pictures : Digital recording, JPEG (in the following depths. TG-820: 10 m (33 ft.)/TG-620: 5 m (16 ft.) : Camera can normally be used under OLYMPUS test conditions), available in accordance with Design rule for Camera File system (DCF)) Applicable standards : Exif 2.3, Digital Print Order Format (DPOF), PRINT Image Matching III, PictBridge 3D still image : MP format Sound with still : Wave format pictures Movie : MOV H.264 linear PCM Memory : Internal memory...
.... SPECIFICATIONS Camera Product type : Digital camera (for shooting and displaying) Recording system Still pictures : Digital recording, JPEG (in the following depths. TG-820: 10 m (33 ft.)/TG-620: 5 m (16 ft.) : Camera can normally be used under OLYMPUS test conditions), available in accordance with Design rule for Camera File system (DCF)) Applicable standards : Exif 2.3, Digital Print Order Format (DPOF), PRINT Image Matching III, PictBridge 3D still image : MP format Sound with still : Wave format pictures Movie : MOV H.264 linear PCM Memory : Internal memory...


