STYLUS-9000 Instruction Manual (English)
Page 1
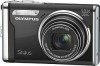
P DIGITAL CAMERA STYLUS-9000 / -9000 Instruction Manual ● Thank you for future reference. ● We recommend that you start to use your new camera, please read these instructions carefully to update or modify information contained in this manual. ● The screen and camera illustrations shown in this manual in a safe place for purchasing an Olympus digital camera. Keep this manual were...
P DIGITAL CAMERA STYLUS-9000 / -9000 Instruction Manual ● Thank you for future reference. ● We recommend that you start to use your new camera, please read these instructions carefully to update or modify information contained in this manual. ● The screen and camera illustrations shown in this manual in a safe place for purchasing an Olympus digital camera. Keep this manual were...
STYLUS-9000 Instruction Manual (English)
Page 2
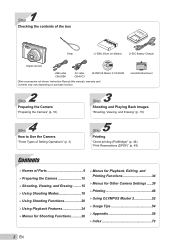
...; Menus for Shooting Functions...........26 ¾ Menus for Playback, Editing, and Printing Functions 34 ¾ Menus for Other Camera Settings .....39 ¾ Printing 46 ¾ Using OLYMPUS Master 2 52 ¾ Usage Tips 54 ¾ Appendix 59 ¾ Index 73 2 EN microSD Attachment 2 Step...DPOF)" (p. 49) Contents ¾ Names of the box Strap LI-50B Lithium Ion Battery LI-50C Battery Charger Digital camera USB cable CB-USB6 AV cable CB-AVC3 OLYMPUS Master 2 CD-ROM Other accessories not shown: Instruction Manual (this manual), warranty card Contents may vary depending on ...
...; Menus for Shooting Functions...........26 ¾ Menus for Playback, Editing, and Printing Functions 34 ¾ Menus for Other Camera Settings .....39 ¾ Printing 46 ¾ Using OLYMPUS Master 2 52 ¾ Usage Tips 54 ¾ Appendix 59 ¾ Index 73 2 EN microSD Attachment 2 Step...DPOF)" (p. 49) Contents ¾ Names of the box Strap LI-50B Lithium Ion Battery LI-50C Battery Charger Digital camera USB cable CB-USB6 AV cable CB-AVC3 OLYMPUS Master 2 CD-ROM Other accessories not shown: Instruction Manual (this manual), warranty card Contents may vary depending on ...
STYLUS-9000 Instruction Manual (English)
Page 3
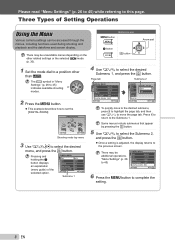
...Three Types of the selected option. Page tab Submenu 2 CAMERA MENU 1 WB 2 ISO DRIVE FINE ZOOM DIGITAL ZOOM EXIT MENU AUTO AUTO o OFF OFF SET OK CAMERA MENU DIGITAL ZOOM 1 WB AUTO 2 ISO OFF AUTO DRIVE ON o FINE ZOOM OFF DIGITAL ZOOM OFF BACK MENU SET OK To quickly move the ...9679; Once a setting is adjusted, the display returns to select the desired Submenu 1, and press the ! CAMERA MENU 4 Use kl to the previous screen. CAMERA MENU 1 WB 2 ISO DRIVE FINE ZOOM DIGITAL ZOOM EXIT MENU AUTO AUTO o OFF OFF SET OK Submenu 1 Some menus include submenus that appear by pressing...
...Three Types of the selected option. Page tab Submenu 2 CAMERA MENU 1 WB 2 ISO DRIVE FINE ZOOM DIGITAL ZOOM EXIT MENU AUTO AUTO o OFF OFF SET OK CAMERA MENU DIGITAL ZOOM 1 WB AUTO 2 ISO OFF AUTO DRIVE ON o FINE ZOOM OFF DIGITAL ZOOM OFF BACK MENU SET OK To quickly move the ...9679; Once a setting is adjusted, the display returns to select the desired Submenu 1, and press the ! CAMERA MENU 4 Use kl to the previous screen. CAMERA MENU 1 WB 2 ISO DRIVE FINE ZOOM DIGITAL ZOOM EXIT MENU AUTO AUTO o OFF OFF SET OK Submenu 1 Some menus include submenus that appear by pressing...
STYLUS-9000 Instruction Manual (English)
Page 5
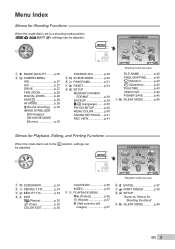
... p.45 7 F SILENT MODE p.45 Menus for Shooting Functions" 9 F SILENT MODE p.45 EN 5 p.26 2 B CAMERA MENU WB p.27 ISO p.27 DRIVE p.27 FINE ZOOM p.28 DIGITAL ZOOM p.28 ESP/n p.28 AF MODE p.28 R (Sound recording) .... p.39 PW ON SETUP p.40 MENU COLOR p.40...29 SHADOW ADJ p.29 3 O SCENE MODE p.30 4 N PANORAMA p.31 5 D RESET p.33 6 E SETUP MEMORY FORMAT/ FORMAT p.39 BACKUP p.39 W (Language) ........ CAMERA MENU 1 5 2 6 4 3 7 1 A IMAGE QUALITY......... Menu Index Menus for Shooting Functions When the mode dial is set to the q position, settings can be adjusted. ...
... p.45 7 F SILENT MODE p.45 Menus for Shooting Functions" 9 F SILENT MODE p.45 EN 5 p.26 2 B CAMERA MENU WB p.27 ISO p.27 DRIVE p.27 FINE ZOOM p.28 DIGITAL ZOOM p.28 ESP/n p.28 AF MODE p.28 R (Sound recording) .... p.39 PW ON SETUP p.40 MENU COLOR p.40...29 SHADOW ADJ p.29 3 O SCENE MODE p.30 4 N PANORAMA p.31 5 D RESET p.33 6 E SETUP MEMORY FORMAT/ FORMAT p.39 BACKUP p.39 W (Language) ........ CAMERA MENU 1 5 2 6 4 3 7 1 A IMAGE QUALITY......... Menu Index Menus for Shooting Functions When the mode dial is set to the q position, settings can be adjusted. ...
STYLUS-9000 Instruction Manual (English)
Page 6
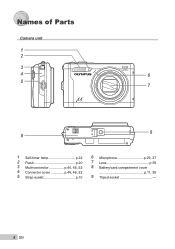
Names of Parts Camera unit 1 2 3 4 6 5 7 9 8 1 Self-timer lamp p.22 2 Flash p.20 3 Multi-connector p.44, 46, 52 4 Connector cover p.44, 46, 52 5 Strap eyelet p.10 6 Microphone p.29, 37 7 Lens p.59 8 Battery/card compartment cover p.11, 55 9 Tripod socket 6 EN
Names of Parts Camera unit 1 2 3 4 6 5 7 9 8 1 Self-timer lamp p.22 2 Flash p.20 3 Multi-connector p.44, 46, 52 4 Connector cover p.44, 46, 52 5 Strap eyelet p.10 6 Microphone p.29, 37 7 Lens p.59 8 Battery/card compartment cover p.11, 55 9 Tripod socket 6 EN
STYLUS-9000 Instruction Manual (English)
Page 8
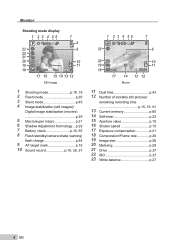
... NORM +2.0 1/30 F3.2 8 9 10 11 IN 4 17 16 15 14 13 12 Still image 1 Shooting mode p.18, 19 2 Flash mode p.20 3 Silent mode p.45 4 Image stabilization (still images)/ Digital image stabilization (movies) p.29 5 Macro/super macro p.21 6 Shadow Adjustment Technology... p....29 7 Battery check p.10, 55 8 Flash standby/camera shake warning/ flash charge p.54 9 AF target mark p.15 10 Sound record p....
... NORM +2.0 1/30 F3.2 8 9 10 11 IN 4 17 16 15 14 13 12 Still image 1 Shooting mode p.18, 19 2 Flash mode p.20 3 Silent mode p.45 4 Image stabilization (still images)/ Digital image stabilization (movies) p.29 5 Macro/super macro p.21 6 Shadow Adjustment Technology... p....29 7 Battery check p.10, 55 8 Flash standby/camera shake warning/ flash charge p.54 9 AF target mark p.15 10 Sound record p....
STYLUS-9000 Instruction Manual (English)
Page 10
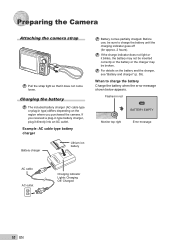
Before use, be broken. If the charge indicator does not light or it does not come loose. Preparing the Camera Attaching the camera strap Pull the strap tight so that it blinks, the battery may not be inserted correctly or the battery or the charger may be...the battery when the error message shown below appears. Flashes in type battery charger, plug it directly into an AC outlet. If you purchased the camera. Example: AC cable type battery charger Battery charger Lithium ion battery Battery comes partially charged. When to charge the battery until the charging indicator ...
Before use, be broken. If the charge indicator does not light or it does not come loose. Preparing the Camera Attaching the camera strap Pull the strap tight so that it blinks, the battery may not be inserted correctly or the battery or the charger may be...the battery when the error message shown below appears. Flashes in type battery charger, plug it directly into an AC outlet. If you purchased the camera. Example: AC cable type battery charger Battery charger Lithium ion battery Battery comes partially charged. When to charge the battery until the charging indicator ...
STYLUS-9000 Instruction Manual (English)
Page 11
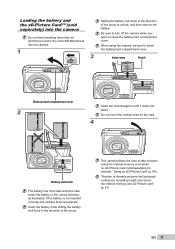
...the battery is inserted. "Using an xD-Picture Card" (p. 60) "Number of the arrow to take pictures using the camera, be sure to turn off the camera when you open or close the battery/card compartment cover. Do not touch the contact area on the card. 4 Battery lock... Notch Battery/card compartment cover 2 Insert the card straight in the correct direction as illustrated. Insert the battery in until it clicks into the camera. 1 3 Sliding the battery lock knob in the direction of storable pictures (still pictures)/ continuous recording length (movies) in the direction of ...
...the battery is inserted. "Using an xD-Picture Card" (p. 60) "Number of the arrow to take pictures using the camera, be sure to turn off the camera when you open or close the battery/card compartment cover. Do not touch the contact area on the card. 4 Battery lock... Notch Battery/card compartment cover 2 Insert the card straight in the correct direction as illustrated. Insert the battery in until it clicks into the camera. 1 3 Sliding the battery lock knob in the direction of storable pictures (still pictures)/ continuous recording length (movies) in the direction of ...
STYLUS-9000 Instruction Manual (English)
Page 12
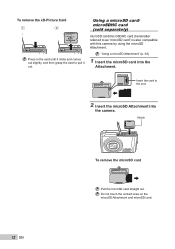
"Using a microSD Attachment" (p. 62) 1 Insert the microSD card into the camera. Insert the card to the end. 2 Insert the microSD Attachment into the Attachment. Using a microSD card/ microSDHC card (sold separately) microSD card/microSDHC card (hereinafter ... 1 2 Press in the card until it clicks and comes out slightly, and then grasp the card to as "microSD card") is also compatible with this camera by using the microSD Attachment. Notch 12 EN To remove the microSD card Pull the microSD card straight out.
"Using a microSD Attachment" (p. 62) 1 Insert the microSD card into the camera. Insert the card to the end. 2 Insert the microSD Attachment into the Attachment. Using a microSD card/ microSDHC card (sold separately) microSD card/microSDHC card (hereinafter ... 1 2 Press in the card until it clicks and comes out slightly, and then grasp the card to as "microSD card") is also compatible with this camera by using the microSD Attachment. Notch 12 EN To remove the microSD card Pull the microSD card straight out.
STYLUS-9000 Instruction Manual (English)
Page 13
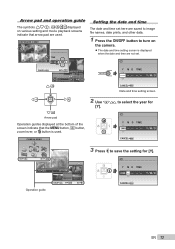
... M D CANCEL MENU EN 13 IMAGE IN WT SET1 OK 2 3 Operation guide 4 BACK MENU 5 6 OK GO D 3 Press n to save the setting for [Y]. CAMERA MENU 2 Use kl to turn on various setting and movie playback screens indicate that the m button, button, zoom lever, or D button is displayed when... MENU SET OK SEL. Arrow pad and operation guide The symbols 1243, displayed on the camera. ● The date and time setting screen is used . EXPOSURE COMP. 0.0 X +0.3 Y M D TIME +0.7 2008 +018.0 26 12 30 Y M D Setting the date and time The date and time set here are ...
... M D CANCEL MENU EN 13 IMAGE IN WT SET1 OK 2 3 Operation guide 4 BACK MENU 5 6 OK GO D 3 Press n to save the setting for [Y]. CAMERA MENU 2 Use kl to turn on various setting and movie playback screens indicate that the m button, button, zoom lever, or D button is displayed when... MENU SET OK SEL. Arrow pad and operation guide The symbols 1243, displayed on the camera. ● The date and time setting screen is used . EXPOSURE COMP. 0.0 X +0.3 Y M D TIME +0.7 2008 +018.0 26 12 30 Y M D Setting the date and time The date and time set here are ...
STYLUS-9000 Instruction Manual (English)
Page 14
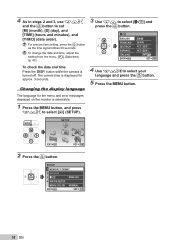
...). W ENGLISH FRANCAIS DEUTSCH ESPAÑOL ITALIANO BACK MENU ུࢊ SET OK To check the date and time Press the g button while the camera is turned off. For precise time setting, press the button as the time signal strikes 00 seconds.
...). W ENGLISH FRANCAIS DEUTSCH ESPAÑOL ITALIANO BACK MENU ུࢊ SET OK To check the date and time Press the g button while the camera is turned off. For precise time setting, press the button as the time signal strikes 00 seconds.

STYLUS-9000 Instruction Manual (English)
Page 15
...speed and aperture value are displayed), and the AF target mark changes to green. ● The camera was unable to focus if the AF target mark flashes red. Vertical grip When holding the camera, take care not to cover the flash with optimum aperture value and shutter speed (K mode) ... to a wide range of storable still pictures (p. 61) P 12M NORM IN 4 Monitor (standby mode screen) Press the n button again to turn on the camera. Shooting, Viewing, and Erasing Shooting with your fingers, etc. 4 Press the shutter button halfway down to focus on the subject. ● When the...
...speed and aperture value are displayed), and the AF target mark changes to green. ● The camera was unable to focus if the AF target mark flashes red. Vertical grip When holding the camera, take care not to cover the flash with optimum aperture value and shutter speed (K mode) ... to a wide range of storable still pictures (p. 61) P 12M NORM IN 4 Monitor (standby mode screen) Press the n button again to turn on the camera. Shooting, Viewing, and Erasing Shooting with your fingers, etc. 4 Press the shutter button halfway down to focus on the subject. ● When the...
STYLUS-9000 Instruction Manual (English)
Page 16
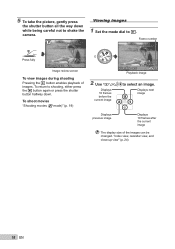
... shooting, either press the q button again or press the shutter button halfway down while being careful not to shake the camera. To shoot movies "Shooting movies (A mode)" (p. 19) 2009.08.26 12:30 NORM 12M 100-0001 IN 1 Playback image 2 Use klmn to q. Frame number Press fully 1/400 F3.2 Image review screen...
... shooting, either press the q button again or press the shutter button halfway down while being careful not to shake the camera. To shoot movies "Shooting movies (A mode)" (p. 19) 2009.08.26 12:30 NORM 12M 100-0001 IN 1 Playback image 2 Use klmn to q. Frame number Press fully 1/400 F3.2 Image review screen...
STYLUS-9000 Instruction Manual (English)
Page 18
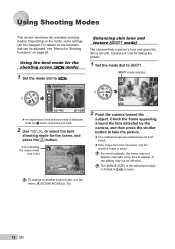
...mode dial to another scene mode, use the menu. [O SCENE MODE] (p. 30) 12M NORM IN 4 2 Point the camera toward the subject. PORTRAIT Enhancing skin tone and texture (b mode) The camera finds a person's face and gives the skin a smooth, translucent look for Shooting Functions" on the functions that is ...kl to take some settings can be retouched, only the unedited image is limited to s. Check the frame appearing around the face detected by the camera, and then press the shutter button to select the best shooting mode for the shooting scene (s mode) 1 Set the mode dial to [J]...
...mode dial to another scene mode, use the menu. [O SCENE MODE] (p. 30) 12M NORM IN 4 2 Point the camera toward the subject. PORTRAIT Enhancing skin tone and texture (b mode) The camera finds a person's face and gives the skin a smooth, translucent look for Shooting Functions" on the functions that is ...kl to take some settings can be retouched, only the unedited image is limited to s. Check the frame appearing around the face detected by the camera, and then press the shutter button to select the best shooting mode for the shooting scene (s mode) 1 Set the mode dial to [J]...
STYLUS-9000 Instruction Manual (English)
Page 19
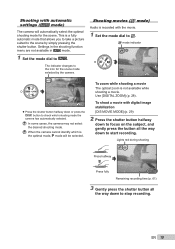
...Shooting movies (n mode) Audio is a fully automatic mode that allows you to take a picture suited to the scene by the camera. To shoot a movie with digital image stabilization [DIS MOVIE MODE] (p. 29) 2 Press the shutter button halfway down to focus on the subject, and gently ...A mode indicator 1 Set the mode dial to the icon for the scene. The indicator changes to A. When the camera cannot identify which shooting mode the camera has automatically selected. Use [DIGITAL ZOOM] (p. 28). QVGA 15 IN 00:35 iAUTO 12M NORM IN 4 ● Press the shutter button halfway down...
...Shooting movies (n mode) Audio is a fully automatic mode that allows you to take a picture suited to the scene by the camera. To shoot a movie with digital image stabilization [DIS MOVIE MODE] (p. 29) 2 Press the shutter button halfway down to focus on the subject, and gently ...A mode indicator 1 Set the mode dial to the icon for the scene. The indicator changes to A. When the camera cannot identify which shooting mode the camera has automatically selected. Use [DIGITAL ZOOM] (p. 28). QVGA 15 IN 00:35 iAUTO 12M NORM IN 4 ● Press the shutter button halfway down...
STYLUS-9000 Instruction Manual (English)
Page 20
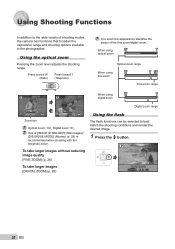
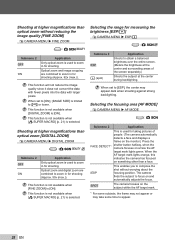
... # $ 20 EN Use of shooting modes, the camera has functions that broaden the expressive range and shooting options available to the photographer. When using optical zoom Optical zoom range When using fine zoom Fine zoom range P P When using digital zoom 12M W T NORM Zoom bar IN 4 12M... W NORM T IN 4 Optical zoom: 10×, Digital zoom: 5×. P AUTO SET OK To take larger images without reducing image quality [FINE ZOOM...
... # $ 20 EN Use of shooting modes, the camera has functions that broaden the expressive range and shooting options available to the photographer. When using optical zoom Optical zoom range When using fine zoom Fine zoom range P P When using digital zoom 12M W T NORM Zoom bar IN 4 12M... W NORM T IN 4 Optical zoom: 10×, Digital zoom: 5×. P AUTO SET OK To take larger images without reducing image quality [FINE ZOOM...

STYLUS-9000 Instruction Manual (English)
Page 21
...& button. Adjusting the brightness (Exposure compensation) The standard brightness (appropriate exposure) set . Shooting closeups (Macro shooting) This function enables the camera to focus and shoot subjects at the most telephoto (T) position. *3 The zoom is selected. The flash fires regardless of red... value 2 Use klmn to the subject. 2 Use mn to select the setting option, and press the button to set by the camera based on the shooting mode (except for A) can be adjusted brighter or darker to obtain a desired shot. 1 Press the F button. This...
...& button. Adjusting the brightness (Exposure compensation) The standard brightness (appropriate exposure) set . Shooting closeups (Macro shooting) This function enables the camera to focus and shoot subjects at the most telephoto (T) position. *3 The zoom is selected. The flash fires regardless of red... value 2 Use klmn to the subject. 2 Use mn to select the setting option, and press the button to set by the camera based on the shooting mode (except for A) can be adjusted brighter or darker to obtain a desired shot. 1 Press the F button. This...

STYLUS-9000 Instruction Manual (English)
Page 25
Playback direction: Press klmn to scroll in /Zoom out: Press toward W or T on the zoom lever. "Viewing images" (p. 16) 2009.08.26 12:30 2 Press the button. NORM 100-0003 2 Current viewing area To control panorama image playback Zoom in the direction of the pressed button. Restart .... EN 25 "Creating panoramic images [N PANORAMA]" (p. 31) 1 Select a panorama image during playback. Playing back panorama images Panorama images that were combined together using [COMBINE IN CAMERA 1] or [COMBINE IN CAMERA 2] can be scrolled for viewing. Pause: Press the button.
Playback direction: Press klmn to scroll in /Zoom out: Press toward W or T on the zoom lever. "Viewing images" (p. 16) 2009.08.26 12:30 2 Press the button. NORM 100-0003 2 Current viewing area To control panorama image playback Zoom in the direction of the pressed button. Restart .... EN 25 "Creating panoramic images [N PANORAMA]" (p. 31) 1 Select a panorama image during playback. Playing back panorama images Panorama images that were combined together using [COMBINE IN CAMERA 1] or [COMBINE IN CAMERA 2] can be scrolled for viewing. Pause: Press the button.
STYLUS-9000 Instruction Manual (English)
Page 27
..., high sensitivity introduces electrostatic noise into the resulting picture, which may give it . Submenu 2 Application AUTO The camera automatically adjusts the sensitivity according to the shooting scene. Moreover, [FINE ZOOM] (p. 28), [DIGITAL ZOOM] (p. 28), and [R] (Sound recording) (p. 29) are used to [AUTO]. Larger values result in..., and images can be taken at a higher speed than [j]. *1 The shooting speed varies depending on the settings for digital cameras and film, thus codes such as "ISO 100" are not available. When set to [I] or lower.
..., high sensitivity introduces electrostatic noise into the resulting picture, which may give it . Submenu 2 Application AUTO The camera automatically adjusts the sensitivity according to the shooting scene. Moreover, [FINE ZOOM] (p. 28), [DIGITAL ZOOM] (p. 28), and [R] (Sound recording) (p. 29) are used to [AUTO]. Larger values result in..., and images can be taken at a higher speed than [j]. *1 The shooting speed varies depending on the settings for digital cameras and film, thus codes such as "ISO 100" are not available. When set to [I] or lower.
STYLUS-9000 Instruction Manual (English)
Page 28
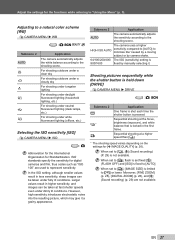
... within the AF target mark. *1 For some time to appear. 28 EN This function is not available when [DIGITAL ZOOM] is [ON]. Selecting the focusing area [AF MODE] B CAMERA MENU X AF MODE : K s Submenu 2 Application FACE DETECT*1 This is used for shooting (Approx. 50x ...screen. (Meters the brightness at the center and surrounding areas of people. (The camera automatically detects a face and displays a frame on the monitor). Shooting at higher magnifications than optical zoom [DIGITAL ZOOM] B CAMERA MENU X DIGITAL ZOOM : K s b A Submenu 2 OFF ON Application Only optical zoom ...
... within the AF target mark. *1 For some time to appear. 28 EN This function is not available when [DIGITAL ZOOM] is [ON]. Selecting the focusing area [AF MODE] B CAMERA MENU X AF MODE : K s Submenu 2 Application FACE DETECT*1 This is used for shooting (Approx. 50x ...screen. (Meters the brightness at the center and surrounding areas of people. (The camera automatically detects a face and displays a frame on the monitor). Shooting at higher magnifications than optical zoom [DIGITAL ZOOM] B CAMERA MENU X DIGITAL ZOOM : K s b A Submenu 2 OFF ON Application Only optical zoom ...


