P-10 Instruction Manual
Page 3
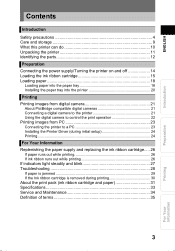
... 9 What this printer can do 10 Unpacking the printer 11 Identifying the parts 12 Preparation Connecting the power supply/Turning the printer on and off 14 Loading the ink ribbon cartridge 15 Loading paper 18 Loading paper into the paper tray 18 Installing the paper tray into the printer 20 Printing Printing images from digital camera 21...
... 9 What this printer can do 10 Unpacking the printer 11 Identifying the parts 12 Preparation Connecting the power supply/Turning the printer on and off 14 Loading the ink ribbon cartridge 15 Loading paper 18 Loading paper into the paper tray 18 Installing the paper tray into the printer 20 Printing Printing images from digital camera 21...
P-10 Instruction Manual
Page 11
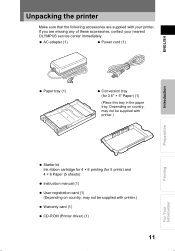
... be supplied with your nearest OLYMPUS service center immediately. AC adapter (1) Power cord (1) Paper tray (1) Conversion tray (for 5 prints) and 4 × 6 Paper (5 sheets) Instruction manual (1) User registration card (1) (Depending on country, may not be supplied with printer.) Introduction Preparation Printing For Your Information Starter kit Ink ribbon cartridge for 4 × 6 printing (for 3.5" ×...
... be supplied with your nearest OLYMPUS service center immediately. AC adapter (1) Power cord (1) Paper tray (1) Conversion tray (for 5 prints) and 4 × 6 Paper (5 sheets) Instruction manual (1) User registration card (1) (Depending on country, may not be supplied with printer.) Introduction Preparation Printing For Your Information Starter kit Ink ribbon cartridge for 4 × 6 printing (for 3.5" ×...

P-10 Instruction Manual
Page 12
For Your Information Printing Preparation Introduction ENGLISH Identifying the parts QFront RIBBON indicator ( P.27) PAPER indicator ( P.27) ACCESS indicator ( P.27) Paper eject section Cartridge door ( P.15) Cartridge door tab ( P.15) Cartridge slot QPaper tray Conversion tray ( P.18, 19) 12 POWER button ( P.14) POWER indicator ( P.27) PictBridge connector ( P.21) Paper tray door tab ( P.20) Ventilation holes Paper tray door ( P.20) Tab ( P.16) Tray cover Tray cover tab ( P.18)
For Your Information Printing Preparation Introduction ENGLISH Identifying the parts QFront RIBBON indicator ( P.27) PAPER indicator ( P.27) ACCESS indicator ( P.27) Paper eject section Cartridge door ( P.15) Cartridge door tab ( P.15) Cartridge slot QPaper tray Conversion tray ( P.18, 19) 12 POWER button ( P.14) POWER indicator ( P.27) PictBridge connector ( P.21) Paper tray door tab ( P.20) Ventilation holes Paper tray door ( P.20) Tab ( P.16) Tray cover Tray cover tab ( P.18)

P-10 Instruction Manual
Page 15
...paper or paper that has been fed through the printer. 1 Open the cartridge door while pushing down on the cartridge door tab. 2 Release the ink ribbon cartridge stop, and wind the ink ribbon to remove the slack. Do not use the ink ribbon cartridge and print paper supplied together in the direction ...of the reel, wind the ink ribbon in the same carton. ENGLISH Introduction Preparation Loading the ink ribbon cartridge About the print pack You need the provided starter kit or an optional print pack for printing. While pressing the center of the arrow...
...paper or paper that has been fed through the printer. 1 Open the cartridge door while pushing down on the cartridge door tab. 2 Release the ink ribbon cartridge stop, and wind the ink ribbon to remove the slack. Do not use the ink ribbon cartridge and print paper supplied together in the direction ...of the reel, wind the ink ribbon in the same carton. ENGLISH Introduction Preparation Loading the ink ribbon cartridge About the print pack You need the provided starter kit or an optional print pack for printing. While pressing the center of the arrow...

P-10 Instruction Manual
Page 16
ENGLISH Introduction Preparation Loading the ink ribbon cartridge 3 Insert the ink ribbon cartridge all the way into the compartment, until you can't close the cartridge door, remove the ink ribbon cartridge, and then re-insert it fully into the compartment and close the cartridge door firmly. Removing the ink ribbon cartridge Open the cartridge door, lift up on the tab to slide it . Press from the center of the ink ribbon cartridge to release the ink ribbon cartridge, and remove the cartridge. 16 Printing For Your Information If you hear a locking sound.
ENGLISH Introduction Preparation Loading the ink ribbon cartridge 3 Insert the ink ribbon cartridge all the way into the compartment, until you can't close the cartridge door, remove the ink ribbon cartridge, and then re-insert it fully into the compartment and close the cartridge door firmly. Removing the ink ribbon cartridge Open the cartridge door, lift up on the tab to slide it . Press from the center of the ink ribbon cartridge to release the ink ribbon cartridge, and remove the cartridge. 16 Printing For Your Information If you hear a locking sound.

P-10 Instruction Manual
Page 17
...3.5"×5" printing. P L P L Ink ribbon cartridge for 4×6 printing Ink ribbon cartridge for 3.5"×5" printing When setting an ink ribbon cartridge down, stand it on its side to avoid getting dust on 3.5"×5" paper, use an ink ribbon cartridge for 4×6 printing. If the ink ribbon tears.... 17 For Your Information Do not insert your finger or hand into the cartridge compartment. Storage considerations Do not store the ink ribbon cartridge in a place subject to use an ink ribbon cartridge for 4×6 or 3.5"×5" paper. Do not touch the ink ribbon,...
...3.5"×5" printing. P L P L Ink ribbon cartridge for 4×6 printing Ink ribbon cartridge for 3.5"×5" printing When setting an ink ribbon cartridge down, stand it on its side to avoid getting dust on 3.5"×5" paper, use an ink ribbon cartridge for 4×6 printing. If the ink ribbon tears.... 17 For Your Information Do not insert your finger or hand into the cartridge compartment. Storage considerations Do not store the ink ribbon cartridge in a place subject to use an ink ribbon cartridge for 4×6 or 3.5"×5" paper. Do not touch the ink ribbon,...
P-10 Instruction Manual
Page 22
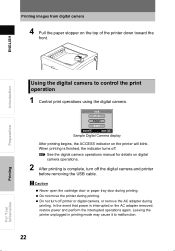
.... 22 Printing For Your Information Do not turn off the digital camera and printer before removing the USB cable. Caution Never open the cartridge door or paper tray door during printing. SELECt GO Sample Digital Camera display After printing begins, the ACCESS indicator on the printer will blink. When printing is interrupted or the AC...
.... 22 Printing For Your Information Do not turn off the digital camera and printer before removing the USB cable. Caution Never open the cartridge door or paper tray door during printing. SELECt GO Sample Digital Camera display After printing begins, the ACCESS indicator on the printer will blink. When printing is interrupted or the AC...
P-10 Instruction Manual
Page 25
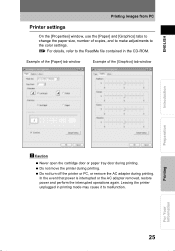
.... In the event that power is interrupted or the AC adapter removed, restore power and perform the interrupted operations again. Do not move the printer during printing. Example of the [Paper] tab window Example of copies, and to make adjustments to the color settings. For details, refer to... the ReadMe file contained in printing mode may cause it to malfunction. 25 For Your Information ENGLISH Printing images from PC Printer settings On the [Properties] window, use the [Paper] and [Graphics] tabs to change the paper size, number of the [Graphics] tab window ...
.... In the event that power is interrupted or the AC adapter removed, restore power and perform the interrupted operations again. Do not move the printer during printing. Example of the [Paper] tab window Example of copies, and to make adjustments to the color settings. For details, refer to... the ReadMe file contained in printing mode may cause it to malfunction. 25 For Your Information ENGLISH Printing images from PC Printer settings On the [Properties] window, use the [Paper] and [Graphics] tabs to change the paper size, number of the [Graphics] tab window ...

P-10 Instruction Manual
Page 26
...printing The PAPER indicator blinks slowly. Replenish the paper supply in a print pack is used up, so please replace the ink ribbon cartridge at the same time the paper in the paper tray. If ink ribbon runs out while printing The RIBBON indicator blinks fast. The... automatically continue to print. The ink ribbon normally ends at the same time. After the paper has ejected from the printer, replace the ink with a new ink ribbon cartridge. After closing the cartridge door, the remaining copies will automatically continue to print. 26 Preparation Printing For Your Information
...printing The PAPER indicator blinks slowly. Replenish the paper supply in a print pack is used up, so please replace the ink ribbon cartridge at the same time the paper in the paper tray. If ink ribbon runs out while printing The RIBBON indicator blinks fast. The... automatically continue to print. The ink ribbon normally ends at the same time. After the paper has ejected from the printer, replace the ink with a new ink ribbon cartridge. After closing the cartridge door, the remaining copies will automatically continue to print. 26 Preparation Printing For Your Information

P-10 Instruction Manual
Page 27
... OLYMPUS service center. Page 14 - - Install an ink ribbon cartridge on 3.5"×5" paper, use an ink ribbon cartridge for 4×6 printing. Remove jammed paper. 18,26 17 15,26 15 17 29 Communi- Preparation Printing For Your Information * When communication is cation error PictBridge compatible. - When printing on the printer. Ensure that the digital camera...
... OLYMPUS service center. Page 14 - - Install an ink ribbon cartridge on 3.5"×5" paper, use an ink ribbon cartridge for 4×6 printing. Remove jammed paper. 18,26 17 15,26 15 17 29 Communi- Preparation Printing For Your Information * When communication is cation error PictBridge compatible. - When printing on the printer. Ensure that the digital camera...
P-10 Instruction Manual
Page 28
... digital camera. 23 a digital camera. If the problem persists, contact your printer for service, check the following to try to prevent the internal - Cannot print. Push the ink ribbon cartridge in...cartridge. The printer takes a long Opening time varies depending time to start. Trimming selected by camera were printed from overheating. and then install the paper tray. 18, 20 Paper is not Install or re-install the printer... properly installed on the driver on the image size. Connect the AC adapter properly. 14 The printer turned off during ...
... digital camera. 23 a digital camera. If the problem persists, contact your printer for service, check the following to try to prevent the internal - Cannot print. Push the ink ribbon cartridge in...cartridge. The printer takes a long Opening time varies depending time to start. Trimming selected by camera were printed from overheating. and then install the paper tray. 18, 20 Paper is not Install or re-install the printer... properly installed on the driver on the image size. Connect the AC adapter properly. 14 The printer turned off during ...

P-10 Instruction Manual
Page 30
... it through the paper tray door. 7 Turn the printer on . 30 Printing For Your Information Insert your printer. If operation is removed during printing 1 Turn the printer off. 2 Insert the ink ribbon cartridge all the way into the compartment, and close the cartridge door firmly. 3 Turn the printer on . 8 Reinsert the paper tray in the paper...
... it through the paper tray door. 7 Turn the printer on . 30 Printing For Your Information Insert your printer. If operation is removed during printing 1 Turn the printer off. 2 Insert the ink ribbon cartridge all the way into the compartment, and close the cartridge door firmly. 3 Turn the printer on . 8 Reinsert the paper tray in the paper...
P-10 Instruction Manual
Page 31
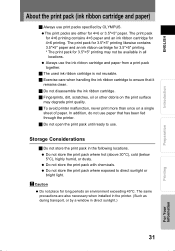
...For Your Information The same precautions are either for 4×6 printing. J Exercise care when handling the ink ribbon cartridge to direct sunlight or bright light. J To avoid printer malfunction, never print more than once on the print surface may not be available in all locations. Do not...above 30°C), cold (below 5°C), highly humid, or dusty. The print packs are also necessary when installed in the printer. (Such as during transport, or by OLYMPUS. Always use . In addition, do not use paper that it remains clean. Caution Do not place for 3.5"×5" printing...
...For Your Information The same precautions are either for 4×6 printing. J Exercise care when handling the ink ribbon cartridge to direct sunlight or bright light. J To avoid printer malfunction, never print more than once on the print surface may not be available in all locations. Do not...above 30°C), cold (below 5°C), highly humid, or dusty. The print packs are also necessary when installed in the printer. (Such as during transport, or by OLYMPUS. Always use . In addition, do not use paper that it remains clean. Caution Do not place for 3.5"×5" printing...

P-10 Instruction Manual
Page 32
... the print surface to direct sunlight, high temperature/ humidity, or are in the reach of a used ink ribbon cartridge J Dispose of children. OLYMPUS is not responsible for an extended period of time. J Avoid locations that are subject to become discolored. Disposing of... used ink ribbon cartridge in contact with the plastic waste disposal method prescribed by your local authorities. J Avoid prolonged exposure of an OLYMPUS manufacturing defect. J OLYMPUS is not responsibility in contact with the printed surfaces facing each...
... the print surface to direct sunlight, high temperature/ humidity, or are in the reach of a used ink ribbon cartridge J Dispose of children. OLYMPUS is not responsible for an extended period of time. J Avoid locations that are subject to become discolored. Disposing of... used ink ribbon cartridge in contact with the plastic waste disposal method prescribed by your local authorities. J Avoid prolonged exposure of an OLYMPUS manufacturing defect. J OLYMPUS is not responsibility in contact with the printed surfaces facing each...

P-10 Instruction Manual
Page 33
ENGLISH Introduction Specifications Printer Printing Method Sublimation dye transfer printing 4-pass printing (Yellow/Magenta/ Cyan and protective overcoat layer) Resolution 310 dpi Print paper size 3.5" × 5" ...; 6 Paper: Approx. 44 seconds per sheet (excluding data transmission time from digital camera or PC) Interfaces PictBridge compatible digital camera connection: USB Type-A connector PC connection: USB Type-B connector Compatible OS Windows 98/Me/2000/XP Ink ribbon cartridge Y+M+C 3 layers and light-resistant overcoat (protective layer) Compatible Graphics File Exif ...
ENGLISH Introduction Specifications Printer Printing Method Sublimation dye transfer printing 4-pass printing (Yellow/Magenta/ Cyan and protective overcoat layer) Resolution 310 dpi Print paper size 3.5" × 5" ...; 6 Paper: Approx. 44 seconds per sheet (excluding data transmission time from digital camera or PC) Interfaces PictBridge compatible digital camera connection: USB Type-A connector PC connection: USB Type-B connector Compatible OS Windows 98/Me/2000/XP Ink ribbon cartridge Y+M+C 3 layers and light-resistant overcoat (protective layer) Compatible Graphics File Exif ...
