FE-140 Advanced Manual (English)
Page 33
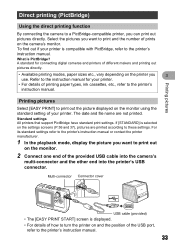
...the printer's instruction manual. If [STANDARD] is displayed. • For details of the provided USB cable into the camera's multi-connector and the other end into the printer's USB connector. A standard for your printer. The date and file name are printed according to turn ... pictures Direct printing (PictBridge) Using the direct printing function By connecting the camera to print out on the printer you 3 use. Refer to the instruction manual for connecting digital cameras and printers of different makers and printing out pictures directly. • Available...
...the printer's instruction manual. If [STANDARD] is displayed. • For details of the provided USB cable into the camera's multi-connector and the other end into the printer's USB connector. A standard for your printer. The date and file name are printed according to turn ... pictures Direct printing (PictBridge) Using the direct printing function By connecting the camera to print out on the printer you 3 use. Refer to the instruction manual for connecting digital cameras and printers of different makers and printing out pictures directly. • Available...

FE-140 Advanced Manual (English)
Page 34
EASY PRINT START < PC/CUSTOM PRINT OK EXIT PRINT 5 Disconnect the USB cable from the camera. To print another picture, press X/Y to select a picture, and press the < button. • When you have finished, disconnect the USB cable from the camera with the picture 3 selection screen displayed. 4 Disconnect the USB cable from the printer. Printing pictures 34 3 Press the < button. • Printing starts. • When printing is finished, the picture selection screen is displayed.
EASY PRINT START < PC/CUSTOM PRINT OK EXIT PRINT 5 Disconnect the USB cable from the camera. To print another picture, press X/Y to select a picture, and press the < button. • When you have finished, disconnect the USB cable from the camera with the picture 3 selection screen displayed. 4 Disconnect the USB cable from the printer. Printing pictures 34 3 Press the < button. • Printing starts. • When printing is finished, the picture selection screen is displayed.
FE-140 Advanced Manual (English)
Page 35
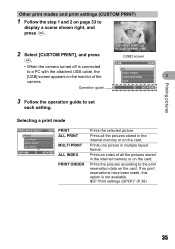
... PRINT 3 camera. Printing pictures Other print modes and print settings (CUSTOM PRINT) 1 Follow the step 1 and 2 on the card. Prints one picture in the internal memory or on the card. If no print reservations have been made, this option is connected PC to a PC with the attached USB cable, the EASY PRINT [USB] screen... according to the print reservation data on page 33 to set each setting. EASY PRINT START < PC/CUSTOM PRINT OK 2 Select [CUSTOM PRINT], and press F. [USB] screen USB • When the camera turned off is not available. g"Print settings (DPOF)" (P.39) 35
... PRINT 3 camera. Printing pictures Other print modes and print settings (CUSTOM PRINT) 1 Follow the step 1 and 2 on the card. Prints one picture in the internal memory or on the card. If no print reservations have been made, this option is connected PC to a PC with the attached USB cable, the EASY PRINT [USB] screen... according to the print reservation data on page 33 to set each setting. EASY PRINT START < PC/CUSTOM PRINT OK 2 Select [CUSTOM PRINT], and press F. [USB] screen USB • When the camera turned off is not available. g"Print settings (DPOF)" (P.39) 35

FE-140 Advanced Manual (English)
Page 38
Printing pictures 6 Disconnect the USB cable from the camera. • The camera turns off. 7 Disconnect the USB cable from the printer. 3 38
Printing pictures 6 Disconnect the USB cable from the camera. • The camera turns off. 7 Disconnect the USB cable from the printer. 3 38

FE-140 Advanced Manual (English)
Page 43
...OLYMPUS Master software gP.44 OLYMPUS Master CD-ROM USB cable Connect the camera to the computer using the USB cable gP.48 Start up the OLYMPUS Master software gP.49 4 Download image files to the computer gP.50 Computer equipped with a USB port Disconnect the camera from the camera or other functions and operations, refer to the "Help" guide and OLYMPUS...Prepare the following : Connecting the camera to a computer Download images from the computer gP.50 Using OLYMPUS Master What is an application software for editing images taken with a digital camera on your computer lets you do ...
...OLYMPUS Master software gP.44 OLYMPUS Master CD-ROM USB cable Connect the camera to the computer using the USB cable gP.48 Start up the OLYMPUS Master software gP.49 4 Download image files to the computer gP.50 Computer equipped with a USB port Disconnect the camera from the camera or other functions and operations, refer to the "Help" guide and OLYMPUS...Prepare the following : Connecting the camera to a computer Download images from the computer gP.50 Using OLYMPUS Master What is an application software for editing images taken with a digital camera on your computer lets you do ...

FE-140 Advanced Manual (English)
Page 45
...and click "Agree" to proceed with a built-in unstable computer operation and the need to reboot. • Disconnect the cable connecting the camera to use OLYMPUS Master. In this case, go to remove the media (drag & drop onto the trash icon) before performing the following ...operations. ROM icon. 2 Click "OLYMPUS Master". • The QuickTime installation screen is displayed. • QuickTime is required to the computer. • Turn off the camera. • Open the camera's battery compartment/card cover. Failure to do so could result in USB port. • QuickTime 6 or ...
...and click "Agree" to proceed with a built-in unstable computer operation and the need to reboot. • Disconnect the cable connecting the camera to use OLYMPUS Master. In this case, go to remove the media (drag & drop onto the trash icon) before performing the following ...operations. ROM icon. 2 Click "OLYMPUS Master". • The QuickTime installation screen is displayed. • QuickTime is required to the computer. • Turn off the camera. • Open the camera's battery compartment/card cover. Failure to do so could result in USB port. • QuickTime 6 or ...

FE-140 Advanced Manual (English)
Page 48
... start OLYMPUS Master. When you connect the camera to the computer for the first time, the computer attempts to exit the message that is displayed. Note • The camera functions are disabled while the camera is the default application for managing digital images. The camera is ... manual to locate the position of the USB port. 4 • The camera turns on automatically. • The monitor turns on the computer using the provided USB cable. Connecting the camera to a computer Connecting the camera to a computer 1 Make sure the camera is turned off. • The monitor...
... start OLYMPUS Master. When you connect the camera to the computer for the first time, the computer attempts to exit the message that is displayed. Note • The camera functions are disabled while the camera is the default application for managing digital images. The camera is ... manual to locate the position of the USB port. 4 • The camera turns on automatically. • The monitor turns on the computer using the provided USB cable. Connecting the camera to a computer Connecting the camera to a computer 1 Make sure the camera is turned off. • The monitor...

FE-140 Advanced Manual (English)
Page 51
...saying that the hardware can be displayed. Drag and drop it on the eject icon. 3 Disconnect the USB cable from the camera and that is displayed. 4 3 When a message is not being downloaded from the camera. Note • Windows Me/2000/XP: When you click "Unplug or Eject Hardware", a warning ... icon in the system tray. 2 Click the message that all applications are closed. Click the "Unplug or Eject Hardware" icon again and disconnect the cable. 51 Macintosh 1 The trash icon changes to the eject icon when the "Untitled" or "NO_NAME" icon on the menu. Windows 98SE 1 Double...
...saying that the hardware can be displayed. Drag and drop it on the eject icon. 3 Disconnect the USB cable from the camera and that is displayed. 4 3 When a message is not being downloaded from the camera. Note • Windows Me/2000/XP: When you click "Unplug or Eject Hardware", a warning ... icon in the system tray. 2 Click the message that all applications are closed. Click the "Unplug or Eject Hardware" icon again and disconnect the cable. 51 Macintosh 1 The trash icon changes to the eject icon when the "Untitled" or "NO_NAME" icon on the menu. Windows 98SE 1 Double...

FE-140 Advanced Manual (English)
Page 54
...• Computers without using the USB cable provided with USB mass storage. Windows: Windows 98SE/Me/2000 Professional/XP Macintosh: Mac OS 9.0 to 9.2/X Note • If the computer is required to use the USB cable to connect the camera to the computer using OLYMPUS Master. To download and save ...images without a factory-installed OS and home-built computers 54 You can connect the camera to the computer. The following environments, even if...
...• Computers without using the USB cable provided with USB mass storage. Windows: Windows 98SE/Me/2000 Professional/XP Macintosh: Mac OS 9.0 to 9.2/X Note • If the computer is required to use the USB cable to connect the camera to the computer using OLYMPUS Master. To download and save ...images without a factory-installed OS and home-built computers 54 You can connect the camera to the computer. The following environments, even if...
FE-140 Advanced Manual (English)
Page 76
... no guarantee that to which can radiate radio frequency energy and, if not installed and used to connect the camera to radio communications. Only the OLYMPUS-supplied USB cable should be reproduced or used in a residential installation. Miscellaneous 76 This equipment has been tested and 6 found to the use ... materials or software, or for damages resulting from that interference will not occur in accordance with the limits for a Class B digital device, pursuant to alter the features and contents of the FCC Rules. These limits are designed to operate it.
... no guarantee that to which can radiate radio frequency energy and, if not installed and used to connect the camera to radio communications. Only the OLYMPUS-supplied USB cable should be reproduced or used in a residential installation. Miscellaneous 76 This equipment has been tested and 6 found to the use ... materials or software, or for damages resulting from that interference will not occur in accordance with the limits for a Class B digital device, pursuant to alter the features and contents of the FCC Rules. These limits are designed to operate it.

FE-140 Advanced Manual (English)
Page 79
... 33 SUNSET S 21 Super macro mode 12 T TFT 68 TITLE 27 Top menu 15 Total recording time 24 Trimming P 26, 37 U USB cable 33, 43, 48, 54 USB driver 44, 54 V Video cable 31 VIDEO OUT 31 X xD-Picture Card 19, 71 Z Zoom 11 ZOOM (SLIDE SHOW 23 Zoom bar 18 Zoom lever 11...
... 33 SUNSET S 21 Super macro mode 12 T TFT 68 TITLE 27 Top menu 15 Total recording time 24 Trimming P 26, 37 U USB cable 33, 43, 48, 54 USB driver 44, 54 V Video cable 31 VIDEO OUT 31 X xD-Picture Card 19, 71 Z Zoom 11 ZOOM (SLIDE SHOW 23 Zoom bar 18 Zoom lever 11...
FE-140 Basic Manual (English, Français, Español, Português)
Page 4
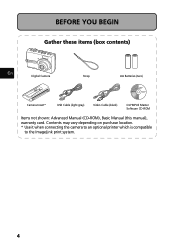
Contents may vary depending on purchase location. * Use it when connecting the camera to an optional printer which is compatible to the ImageLink print system. 4 BEFORE YOU BEGIN Gather these items (box contents) En Digital Camera Strap AA Batteries (two) Camera Insert* USB Cable (light gray) Video Cable (black) OLYMPUS Master Software CD-ROM Items not shown: Advanced Manual (CD-ROM), Basic Manual (this manual), warranty card.
Contents may vary depending on purchase location. * Use it when connecting the camera to an optional printer which is compatible to the ImageLink print system. 4 BEFORE YOU BEGIN Gather these items (box contents) En Digital Camera Strap AA Batteries (two) Camera Insert* USB Cable (light gray) Video Cable (black) OLYMPUS Master Software CD-ROM Items not shown: Advanced Manual (CD-ROM), Basic Manual (this manual), warranty card.

FE-140 Basic Manual (English, Français, Español, Português)
Page 8
Macintosh: Double-click the En "Installer" icon. 3 Simply follow the on automatically. The monitor will now recognize your camera as a removable storage drive. Connect the camera to the computer 1 Connect the camera and computer using the USB cable (provided). Your PC will turn on -screen instructions. b. USB cable 2 1 2 Select [PC] on the monitor, and press F. USB PC EASY PRINT CUSTOM PRINT EXIT SET OK 8 Step 4 Transfer Images TRANSFER IMAGES a. Install the software 1 Insert the OLYMPUS Master CD-ROM. 2 Windows: Click the "OLYMPUS Master" button.
Macintosh: Double-click the En "Installer" icon. 3 Simply follow the on automatically. The monitor will now recognize your camera as a removable storage drive. Connect the camera to the computer 1 Connect the camera and computer using the USB cable (provided). Your PC will turn on -screen instructions. b. USB cable 2 1 2 Select [PC] on the monitor, and press F. USB PC EASY PRINT CUSTOM PRINT EXIT SET OK 8 Step 4 Transfer Images TRANSFER IMAGES a. Install the software 1 Insert the OLYMPUS Master CD-ROM. 2 Windows: Click the "OLYMPUS Master" button.

FE-140 Basic Manual (English, Français, Español, Português)
Page 19
... USB cable into the camera's multi-connector and the other end into the printer's USB connector. < Button Multi-Connector Connector cover En USB Cable 3 Press the < button. When you are finished, disconnect the USB cable from the camera with simple operations. 1 In playback mode, display the picture you may connect your camera directly to a PictBridge compatible printer such as the Olympus...
... USB cable into the camera's multi-connector and the other end into the printer's USB connector. < Button Multi-Connector Connector cover En USB Cable 3 Press the < button. When you are finished, disconnect the USB cable from the camera with simple operations. 1 In playback mode, display the picture you may connect your camera directly to a PictBridge compatible printer such as the Olympus...
FE-140 Quick Start Guide (English, Português)
Page 1
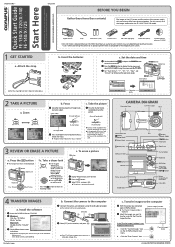
...Digital Camera Strap AA Batteries (two) Camera insert* USB Cable (light gray) Video Cable (black) OLYMPUS Master software CD-ROM Items not shown: Advanced Manual (CD-ROM), Basic Manual, warranty card. Shutter Button Pictures will be recorded in the internal memory of the camera. Press F to return to shooting mode. Install the software 1 Insert the OLYMPUS... FE-130/X-720/X-740 FE-140/X-725 Start Here For more information, please refer to reduce the size. Attach the strap Pull the strap tight so that it when connecting the camera to the ImageLink print system. CAMERA ...
...Digital Camera Strap AA Batteries (two) Camera insert* USB Cable (light gray) Video Cable (black) OLYMPUS Master software CD-ROM Items not shown: Advanced Manual (CD-ROM), Basic Manual, warranty card. Shutter Button Pictures will be recorded in the internal memory of the camera. Press F to return to shooting mode. Install the software 1 Insert the OLYMPUS... FE-130/X-720/X-740 FE-140/X-725 Start Here For more information, please refer to reduce the size. Attach the strap Pull the strap tight so that it when connecting the camera to the ImageLink print system. CAMERA ...


