
E-P3 Instruction Manual (English)
Page 1
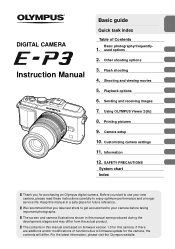
...future reference. We recommend that you start to use your camera before taking important photographs. The screen and camera illustrations shown in a safe place for purchasing an Olympus digital camera. DIGITAL CAMERA Instruction Manual Basic guide Quick task index Table of functions ...Basic photography/frequently- 1. The contents in this manual in this camera. Flash shooting 4. Shooting and viewing movies 5. If there are based on firmware version 1.0 for the camera, the contents will differ. Using OLYMPUS Viewer 2/[ib] 8. used options 2. Other shooting options 3....
...future reference. We recommend that you start to use your camera before taking important photographs. The screen and camera illustrations shown in a safe place for purchasing an Olympus digital camera. DIGITAL CAMERA Instruction Manual Basic guide Quick task index Table of functions ...Basic photography/frequently- 1. The contents in this manual in this camera. Flash shooting 4. Shooting and viewing movies 5. If there are based on firmware version 1.0 for the camera, the contents will differ. Using OLYMPUS Viewer 2/[ib] 8. used options 2. Other shooting options 3....

E-P3 Instruction Manual (English)
Page 2
... software CD-ROM • Instruction manual • Warranty card Body cap Strap USB cable CB-USB6 AV cable (Monaural) CB-AVC3 Camera grip MCG-1 Lithium ion battery PS-BLS1 (BLS-1) or BLS-5 Lithium ion charger PS-BCS1 (BCS-1) or BCS-5 Attaching the strap 1 ... Notes % Tips g Important information on factors which may lead to the other end of the strap to a malfunction or operational problems. Also warns of your camera. Reference pages describing details or related information. 2 EN If anything is fastened securely. 1 2 3 Attaching the grip Use a coin or similar object to ...
... software CD-ROM • Instruction manual • Warranty card Body cap Strap USB cable CB-USB6 AV cable (Monaural) CB-AVC3 Camera grip MCG-1 Lithium ion battery PS-BLS1 (BLS-1) or BLS-5 Lithium ion charger PS-BCS1 (BCS-1) or BCS-5 Attaching the strap 1 ... Notes % Tips g Important information on factors which may lead to the other end of the strap to a malfunction or operational problems. Also warns of your camera. Reference pages describing details or related information. 2 EN If anything is fastened securely. 1 2 3 Attaching the grip Use a coin or similar object to ...
E-P3 Instruction Manual (English)
Page 3
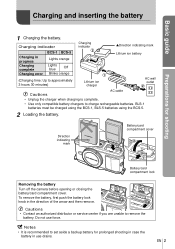
...-1, BLS-5 batteries using the BCS-5. 2 Loading the battery. Direction indicating mark Battery/card compartment cover 2 3 1 Battery/card compartment lock Removing the battery Turn off the camera before opening or closing the battery/card compartment cover. EN 3 Do not use drains. Charging indicator BCS-1 BCS-5 Charging in progress Charging complete Charging error...
...-1, BLS-5 batteries using the BCS-5. 2 Loading the battery. Direction indicating mark Battery/card compartment cover 2 3 1 Battery/card compartment lock Removing the battery Turn off the camera before opening or closing the battery/card compartment cover. EN 3 Do not use drains. Charging indicator BCS-1 BCS-5 Charging in progress Charging complete Charging error...

E-P3 Instruction Manual (English)
Page 4
... (P. 9) is lit. 2 Closing the battery/card compartment cover. • Close the cover until it will be ejected. g "Card basics" (P. 99) # Cautions • Turn off the camera before loading or removing the card. Basic guide Preparations for shooting Inserting and removing cards 1 Loading the card. • Insert the SD/SDHC/SDXC/Eye... the inserted card lightly and it locks in these instructions) until you hear a click. # Cautions • Close the battery/card compartment cover when using the camera. 4 EN
... (P. 9) is lit. 2 Closing the battery/card compartment cover. • Close the cover until it will be ejected. g "Card basics" (P. 99) # Cautions • Turn off the camera before loading or removing the card. Basic guide Preparations for shooting Inserting and removing cards 1 Loading the card. • Insert the SD/SDHC/SDXC/Eye... the inserted card lightly and it locks in these instructions) until you hear a click. # Cautions • Close the battery/card compartment cover when using the camera. 4 EN

E-P3 Instruction Manual (English)
Page 5
... you hear it click. 3 Remove the lens cap. 1 1 2 Removing the lens from the lens. 1 2 1 2 2 Attach a lens to the camera. # Cautions • Make sure the camera is turned off. • Do not press the lens release button. • Do not touch internal portions of the arrow. Lens attachment mark... Alignment mark • Align the lens attachment mark (red) on the camera with the alignment mark (red) on the lens, then insert the lens into the camera's body. • Rotate the lens in the direction of the...
... you hear it click. 3 Remove the lens cap. 1 1 2 Removing the lens from the lens. 1 2 1 2 2 Attach a lens to the camera. # Cautions • Make sure the camera is turned off. • Do not press the lens release button. • Do not touch internal portions of the arrow. Lens attachment mark... Alignment mark • Align the lens attachment mark (red) on the camera with the alignment mark (red) on the lens, then insert the lens into the camera's body. • Rotate the lens in the direction of the...

E-P3 Instruction Manual (English)
Page 6
Basic guide Power on 1 Press the ON/OFF button to turn on the camera. • When the camera is turned on, the (blue) power lamp will light and the monitor will turn on. • When the camera is turned on , dust reduction will be performed to shoot. Displayed for about 10 seconds after the... camera is turned on . 8 (green): Low battery LN 9 (blinks red): Charge the battery HD 01:02:03...
Basic guide Power on 1 Press the ON/OFF button to turn on the camera. • When the camera is turned on, the (blue) power lamp will light and the monitor will turn on. • When the camera is turned on , dust reduction will be performed to shoot. Displayed for about 10 seconds after the... camera is turned on . 8 (green): Low battery LN 9 (blinks red): Charge the battery HD 01:02:03...

E-P3 Instruction Manual (English)
Page 7
... Y/M/D Cancel The time is displayed using a 24-hour clock. 4 Save settings and exit. • Press Q to set the correct date and time before using the camera. 1 Display the menus. • Press the MENU button to display the menus. Shooting Menu 1 1 Card Setup Reset/Myset 2 Picture Mode j D Image Aspect 4:3 MENU button Back... the card together with the date and time information. The file name is also included with the images. EN 7 Be sure to set the camera clock and exit to the main menu. • Press the MENU button to select the date format.
... Y/M/D Cancel The time is displayed using a 24-hour clock. 4 Save settings and exit. • Press Q to set the correct date and time before using the camera. 1 Display the menus. • Press the MENU button to display the menus. Shooting Menu 1 1 Card Setup Reset/Myset 2 Picture Mode j D Image Aspect 4:3 MENU button Back... the card together with the date and time information. The file name is also included with the images. EN 7 Be sure to set the camera clock and exit to the main menu. • Press the MENU button to select the date format.

E-P3 Instruction Manual (English)
Page 8
Basic guide Names of parts Camera 1 9 2 3 0 4 5 a 6 7 5 b 8 c Names of parts and functions d e f h g i 1 Mode dial P. 6, 10 2 Shutter button P. 11, 12, 36, 92 3 ON/OFF button P. 6 4 Fn2 button P. 89 5 Strap eyelet P. 2 6 Self-timer lamp/...
Basic guide Names of parts Camera 1 9 2 3 0 4 5 a 6 7 5 b 8 c Names of parts and functions d e f h g i 1 Mode dial P. 6, 10 2 Shutter button P. 11, 12, 36, 92 3 ON/OFF button P. 6 4 Fn2 button P. 89 5 Strap eyelet P. 2 6 Self-timer lamp/...

E-P3 Instruction Manual (English)
Page 10
The camera optimizes settings automatically. • When rotating the mode dial or turning off . Movie zone ■ Movie mode n Movie ... value and shutter speed. • The settings made in the advanced shooting modes are retained even if the camera is selected, the camera automatically optimizes settings to suit the subject. • Select ART or SCN options according to shoot movies. After...R button to your subject or creative intent. Basic guide Names of parts and functions Camera controls Mode dial Use the mode dial to the factory default settings. % Tips • Resetting...
The camera optimizes settings automatically. • When rotating the mode dial or turning off . Movie zone ■ Movie mode n Movie ... value and shutter speed. • The settings made in the advanced shooting modes are retained even if the camera is selected, the camera automatically optimizes settings to suit the subject. • Select ART or SCN options according to shoot movies. After...R button to your subject or creative intent. Basic guide Names of parts and functions Camera controls Mode dial Use the mode dial to the factory default settings. % Tips • Resetting...

E-P3 Instruction Manual (English)
Page 11
... and the movie footage following the photograph. • Only one photograph can not be taken at the settings selected in which the camera A automatically optimizes settings for different effects while shooting movies. ■ Taking photographs during movie recording • To take photographs. &#... for the current scene. ART Select an art filter. M You control aperture and shutter speed. Movies: R button The camera automatically adjusts settings and records a movie. Press the R button to record movies in the following instances: shutter button pressed halfway/BULB...
... and the movie footage following the photograph. • Only one photograph can not be taken at the settings selected in which the camera A automatically optimizes settings for different effects while shooting movies. ■ Taking photographs during movie recording • To take photographs. &#... for the current scene. ART Select an art filter. M You control aperture and shutter speed. Movies: R button The camera automatically adjusts settings and records a movie. Press the R button to record movies in the following instances: shutter button pressed halfway/BULB...

E-P3 Instruction Manual (English)
Page 12
... with other Four Thirds mounts * Visit our website for more information. • The shutter speed and aperture value that have been set automatically by the camera are displayed. 12 EN To store, turn the zoom ring in the direction of arrow (4) while sliding the UNLOCK switch (3). 1 4 3 2 2 Adjust the focus. • Lightly... 01:02:03 38 Shutter speed Aperture value • The AF confirmation mark (( or n) will lock. ( Lenses that your fingers or the camera strap do not obstruct the lens or flash.
... with other Four Thirds mounts * Visit our website for more information. • The shutter speed and aperture value that have been set automatically by the camera are displayed. 12 EN To store, turn the zoom ring in the direction of arrow (4) while sliding the UNLOCK switch (3). 1 4 3 2 2 Adjust the focus. • Lightly... 01:02:03 38 Shutter speed Aperture value • The AF confirmation mark (( or n) will lock. ( Lenses that your fingers or the camera strap do not obstruct the lens or flash.

E-P3 Instruction Manual (English)
Page 13
... again when you touch any button (the shutter button, q button, etc.). [Sleep]: g "Customizing camera settings" (P. 81) # Cautions • If the camera is used for a minute, the camera enters "sleep" (stand-by) mode to turn the camera off the monitor and to the second position "pressing the shutter button all actions. Press halfway Press the...
... again when you touch any button (the shutter button, q button, etc.). [Sleep]: g "Customizing camera settings" (P. 81) # Cautions • If the camera is used for a minute, the camera enters "sleep" (stand-by) mode to turn the camera off the monitor and to the second position "pressing the shutter button all actions. Press halfway Press the...

E-P3 Instruction Manual (English)
Page 19
... [Shooting Tips] is selected, highlight an item and press Q to view a description. • Press the shutter button halfway to select. • The effect of the camera exposure meters may not be visible in pictures that are not applied to the RAW copy. • Pictures may appear grainy at some live guide... & Vivid 0 Flat & Muted Set 4 Shoot. • Press the shutter button to live guide options cancel previous changes. • Choosing live guide settings. [Button Function]: g "Customizing camera settings" (P. 81) EN 19
... [Shooting Tips] is selected, highlight an item and press Q to view a description. • Press the shutter button halfway to select. • The effect of the camera exposure meters may not be visible in pictures that are not applied to the RAW copy. • Pictures may appear grainy at some live guide... & Vivid 0 Flat & Muted Set 4 Shoot. • Press the shutter button to live guide options cancel previous changes. • Choosing live guide settings. [Button Function]: g "Customizing camera settings" (P. 81) EN 19

E-P3 Instruction Manual (English)
Page 20
... the FGbuttons on the arrow pad to select settings, use HI to display the live control. • To hide the live control. [KControl Settings]: g "Customizing camera settings" (P. 81) 20 EN Displays the selected function name Cursor P WB Auto AAUTOO Arrow pad Cursor IS OFF j Arrow WWBB AAUUTTOO pad 4:3 LF HD WB...
... the FGbuttons on the arrow pad to select settings, use HI to display the live control. • To hide the live control. [KControl Settings]: g "Customizing camera settings" (P. 81) 20 EN Displays the selected function name Cursor P WB Auto AAUTOO Arrow pad Cursor IS OFF j Arrow WWBB AAUUTTOO pad 4:3 LF HD WB...

E-P3 Instruction Manual (English)
Page 21
...$ Notes • For details on the functions that can be set with the menu, refer to your shooting style: Use the custom menus to customize camera settings to "Menu directory" (P. 107). • A guide is not displayed by default, and you will need to display the menus. Press the ... customized to your own goals or taste. This menu is displayed for about 2 seconds after you will need to display options for the EVF and OLYMPUS PENPAL accessories are not displayed by default, and you select an option. Tab Shooting Menu 1 1 Card Setup Reset/Myset 2 Picture Mode j D Image ...
...$ Notes • For details on the functions that can be set with the menu, refer to your shooting style: Use the custom menus to customize camera settings to "Menu directory" (P. 107). • A guide is not displayed by default, and you will need to display the menus. Press the ... customized to your own goals or taste. This menu is displayed for about 2 seconds after you will need to display options for the EVF and OLYMPUS PENPAL accessories are not displayed by default, and you select an option. Tab Shooting Menu 1 1 Card Setup Reset/Myset 2 Picture Mode j D Image ...

E-P3 Instruction Manual (English)
Page 22
Tap a subject to control the camera. Basic guide Basic operations Using the Touch screen The monitor acts as a touch screen to focus and automatically release the shutter. Photographs can be used ...
Tap a subject to control the camera. Basic guide Basic operations Using the Touch screen The monitor acts as a touch screen to focus and automatically release the shutter. Photographs can be used ...

E-P3 Instruction Manual (English)
Page 23
... or other sharp objects. • Gloves or monitor covers may interfere with touch screen operation. % Tips • Disabling the touch screen. [Touch Screen Settings]: g "Customizing camera settings" (P. 81) EN 23 Playback Zoom • Slide the bar up to view the next page, down to zoom in use • In self-timer...
... or other sharp objects. • Gloves or monitor covers may interfere with touch screen operation. % Tips • Disabling the touch screen. [Touch Screen Settings]: g "Customizing camera settings" (P. 81) EN 23 Playback Zoom • Slide the bar up to view the next page, down to zoom in use • In self-timer...

E-P3 Instruction Manual (English)
Page 24
... P. 48 x AF mode P. 36 y Metering mode P. 41 z Flash mode P. 59 A Battery check 7 Lit up (green) : Ready for use (displayed for about ten seconds after the camera is turned on) 8 Lit up (green) : Battery is running low 9 Blinks (red) : Charging required B Live guide recall P. 18, 22 You can switch the monitor display...
... P. 48 x AF mode P. 36 y Metering mode P. 41 z Flash mode P. 59 A Battery check 7 Lit up (green) : Ready for use (displayed for about ten seconds after the camera is turned on) 8 Lit up (green) : Battery is running low 9 Blinks (red) : Charging required B Live guide recall P. 18, 22 You can switch the monitor display...

E-P3 Instruction Manual (English)
Page 26
...Taking pictures with the correct color Processing pictures to match the subject/ Taking monotone pictures Focus/Focusing on one area When the camera won't focus on your subject Focusing on a small spot in the frame/ confirming focus before shooting Recomposing photographs ...after focusing Turning off the beep speaker Disabling the flash/taking photos without the flash Reducing camera shake Taking pictures of a subject against backlight Photographing fireworks Reducing image noise (mottling) iAUTO (A) Art filter (ART) ...
...Taking pictures with the correct color Processing pictures to match the subject/ Taking monotone pictures Focus/Focusing on one area When the camera won't focus on your subject Focusing on a small spot in the frame/ confirming focus before shooting Recomposing photographs ...after focusing Turning off the beep speaker Disabling the flash/taking photos without the flash Reducing camera shake Taking pictures of a subject against backlight Photographing fireworks Reducing image noise (mottling) iAUTO (A) Art filter (ART) ...

E-P3 Instruction Manual (English)
Page 27
...Playback/Retouch Viewing images on a TV Viewing slideshows with background music Brightening shadows Dealing with red-eye Printing made easy Commercial prints Simple photo sharing Camera Settings Restoring default settings Saving the settings Changing the menu display language Gradation (Picture Mode) Histogram/ Exposure compensation Tone control Monitor brightness adjustment Live... 49 Sleep 84 Record mode 47 Playback on TV Slideshow Shadow Adj (JPEG Edit) Redeye Fix (JPEG Edit) Direct printing Creating a print order OLYMPUS PENPAL Reset Myset W g 69 66 67 67 77 76 71 g 35 35 80 EN 27
...Playback/Retouch Viewing images on a TV Viewing slideshows with background music Brightening shadows Dealing with red-eye Printing made easy Commercial prints Simple photo sharing Camera Settings Restoring default settings Saving the settings Changing the menu display language Gradation (Picture Mode) Histogram/ Exposure compensation Tone control Monitor brightness adjustment Live... 49 Sleep 84 Record mode 47 Playback on TV Slideshow Shadow Adj (JPEG Edit) Redeye Fix (JPEG Edit) Direct printing Creating a print order OLYMPUS PENPAL Reset Myset W g 69 66 67 67 77 76 71 g 35 35 80 EN 27


