

E-P3 Instruction Manual (English)
Page 6
.../OFF button to turn on the camera. • When the camera is turned on, the (blue) power lamp will light and the monitor will turn on. • When the camera is turned on. 8 (green): Low battery LN 9 (blinks red): Charge the battery HD 01:02:03 38 Number of storable still pictures Available recording time 6 EN Displayed for shooting ■ ON/OFF button ■ Monitor ISO-A 200 250 F5.6 Battery level 7 (green): Camera ready to A. ■ Mode dial...
.../OFF button to turn on the camera. • When the camera is turned on, the (blue) power lamp will light and the monitor will turn on. • When the camera is turned on. 8 (green): Low battery LN 9 (blinks red): Charge the battery HD 01:02:03 38 Number of storable still pictures Available recording time 6 EN Displayed for shooting ■ ON/OFF button ■ Monitor ISO-A 200 250 F5.6 Battery level 7 (green): Camera ready to A. ■ Mode dial...

E-P3 Instruction Manual (English)
Page 24
... indicator P. 40 n Exposure compensation value........P. 40 o Aperture value P. 50 - 53 p Shutter speed P. 50 - 53 q Histogram P. 32, 33 r AE Lock u P. 41 s Shooting mode P. 10, 50 - 55 t Myset P. 35 u Touch screen mode P. 22 v Flash intensity control P. 60 w ISO sensitivity P. 48 x AF mode P. 36 y Metering mode P. 41 z Flash mode P. 59 A Battery check 7 Lit up (green) : Ready for use (displayed for about ten seconds after the camera is turned on) 8 Lit up (green) : Battery is running low 9 Blinks (red) : Charging required B Live guide recall...
... indicator P. 40 n Exposure compensation value........P. 40 o Aperture value P. 50 - 53 p Shutter speed P. 50 - 53 q Histogram P. 32, 33 r AE Lock u P. 41 s Shooting mode P. 10, 50 - 55 t Myset P. 35 u Touch screen mode P. 22 v Flash intensity control P. 60 w ISO sensitivity P. 48 x AF mode P. 36 y Metering mode P. 41 z Flash mode P. 59 A Battery check 7 Lit up (green) : Ready for use (displayed for about ten seconds after the camera is turned on) 8 Lit up (green) : Battery is running low 9 Blinks (red) : Charging required B Live guide recall...

E-P3 Instruction Manual (English)
Page 27
... Zooming in on photos to check focus Self-portraits Sequential shooting Extending the useful life of the battery Increasing the number of pictures that can be taken Playback/Retouch Viewing images on a TV Viewing slideshows with background music Brightening shadows Dealing with red-eye Printing made easy Commercial prints Simple photo sharing Camera Settings Restoring default settings Saving the settings Changing the menu display language Gradation (Picture Mode) Histogram/ Exposure compensation Tone control Monitor brightness adjustment Live View Boost Multi view display Preview function...
... Zooming in on photos to check focus Self-portraits Sequential shooting Extending the useful life of the battery Increasing the number of pictures that can be taken Playback/Retouch Viewing images on a TV Viewing slideshows with background music Brightening shadows Dealing with red-eye Printing made easy Commercial prints Simple photo sharing Camera Settings Restoring default settings Saving the settings Changing the menu display language Gradation (Picture Mode) Histogram/ Exposure compensation Tone control Monitor brightness adjustment Live View Boost Multi view display Preview function...

E-P3 Instruction Manual (English)
Page 29
...shutter speed (S shutter-priority mode)...........52 Choosing aperture and shutter speed (M manual mode 53 Choosing when the exposure ends (bulb 53 Taking Panoramas 54 Taking pictures for a panorama 54 3D Photography 55 Recording multiple exposures in a single image (multiple exposure 56 Varying settings over a series of photographs (bracketing) .....57 Digital Zoom (Digital Tele-converter 58 Flash shooting 59 Using a flash (flash photography 59 Adjusting flash output (Flash intensity control 60 Using external flash units designated for use with this camera...
...shutter speed (S shutter-priority mode)...........52 Choosing aperture and shutter speed (M manual mode 53 Choosing when the exposure ends (bulb 53 Taking Panoramas 54 Taking pictures for a panorama 54 3D Photography 55 Recording multiple exposures in a single image (multiple exposure 56 Varying settings over a series of photographs (bracketing) .....57 Digital Zoom (Digital Tele-converter 58 Flash shooting 59 Using a flash (flash photography 59 Adjusting flash output (Flash intensity control 60 Using external flash units designated for use with this camera...

E-P3 Instruction Manual (English)
Page 30
... Easy printing 78 Custom printing 78 Camera setup 80 Setup Menu 80 X (Date/time setting 80 W (Changing the display language 80 i (Monitor brightness adjustment 80 Rec View 80 c/# Menu Display 80 Firmware 80 Customizing camera settings 81 Before Using the Custom/ Accessory Port Menus ..........81 Custom Menu options 81 R AF/MF 81 S Button/Dial 82 T Release 83 U Disp/8/PC 83 V Exp/p/ISO 84 W #Custom 85 X K/Color/WB 85 Y Record/Erase 86 Z Movie 87 b K Utility 88 AEL/AFL 88 U Function, V Function, R Function...
... Easy printing 78 Custom printing 78 Camera setup 80 Setup Menu 80 X (Date/time setting 80 W (Changing the display language 80 i (Monitor brightness adjustment 80 Rec View 80 c/# Menu Display 80 Firmware 80 Customizing camera settings 81 Before Using the Custom/ Accessory Port Menus ..........81 Custom Menu options 81 R AF/MF 81 S Button/Dial 82 T Release 83 U Disp/8/PC 83 V Exp/p/ISO 84 W #Custom 85 X K/Color/WB 85 Y Record/Erase 86 Z Movie 87 b K Utility 88 AEL/AFL 88 U Function, V Function, R Function...
E-P3 Instruction Manual (English)
Page 31
... Mount adapter 102 Remote cable (RM-UC1) .......102 Converter lenses 102 Macro arm light (MAL-1) ........102 Microphone set (SEMA-1) .....102 Electronic viewfinder (VF-2) ...102 Camera grip 102 Exposure warning display.......103 Flash modes that can be set by shooting mode 104 Flash synchronization and shutter speed 105 External flash shooting............105 Record mode and file size/ number of Contents Using the super control panel...91 Recording movies with the shutter button 92 Taking a photograph when recording ends...
... Mount adapter 102 Remote cable (RM-UC1) .......102 Converter lenses 102 Macro arm light (MAL-1) ........102 Microphone set (SEMA-1) .....102 Electronic viewfinder (VF-2) ...102 Camera grip 102 Exposure warning display.......103 Flash modes that can be set by shooting mode 104 Flash synchronization and shutter speed 105 External flash shooting............105 Record mode and file size/ number of Contents Using the super control panel...91 Recording movies with the shutter button 92 Taking a photograph when recording ends...

E-P3 Instruction Manual (English)
Page 33
...) INFO INFO ×10 INFO Basic photography/frequently-used to choose the information displayed during playback. Areas above the upper limit of the display. g "Customizing camera settings" (P. 81) • The base image is selected for [q Close Up Mode]. Use the sub dial to zoom in blue. [Histogram Settings]: g "Customizing camera settings" (P. 81) Light box display Compare two images side-by-side. INFO INFO INFO or or...
...) INFO INFO ×10 INFO Basic photography/frequently-used to choose the information displayed during playback. Areas above the upper limit of the display. g "Customizing camera settings" (P. 81) • The base image is selected for [q Close Up Mode]. Use the sub dial to zoom in blue. [Histogram Settings]: g "Customizing camera settings" (P. 81) Light box display Compare two images side-by-side. INFO INFO INFO or or...

E-P3 Instruction Manual (English)
Page 56
... use the [Overlay] option to make repeated multiple exposures. • For more frames: Select RAW for image quality. 1 Select [Multiple Exposure] in shooting menu X (P. 107). 2 Adjust settings. ISO 400 • a is reset to the factory default setting. 56 EN While the overlay image is being saved, bracketing is displayed in green when shooting starts. HD • The previous shot is superimposed on the view through P 250 F5.6 0.0 01:02:03 38 the lens as a separate image...
... use the [Overlay] option to make repeated multiple exposures. • For more frames: Select RAW for image quality. 1 Select [Multiple Exposure] in shooting menu X (P. 107). 2 Adjust settings. ISO 400 • a is reset to the factory default setting. 56 EN While the overlay image is being saved, bracketing is displayed in green when shooting starts. HD • The previous shot is superimposed on the view through P 250 F5.6 0.0 01:02:03 38 the lens as a separate image...

E-P3 Instruction Manual (English)
Page 71
... press Q. JPEG Send A Picture Erase 6 3 Select the destination and press Q. • The image will be uploaded to the receiving device. • If prompted to make sure that the receiving device is set to the mode for [c/# Menu Display] > [# Menu Display] to provide a PIN code, enter 0000 and press Q. Bluetooth devices in range, or in [Address Book] will be downloaded to the camera. • If prompted...
... press Q. JPEG Send A Picture Erase 6 3 Select the destination and press Q. • The image will be uploaded to the receiving device. • If prompted to make sure that the receiving device is set to the mode for [c/# Menu Display] > [# Menu Display] to provide a PIN code, enter 0000 and press Q. Bluetooth devices in range, or in [Address Book] will be downloaded to the camera. • If prompted...

E-P3 Instruction Manual (English)
Page 74
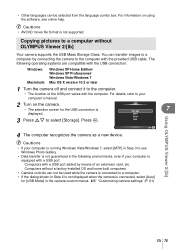
... online help for information on -screen instructions to display the "Setup" dialog. 2 Install OLYMPUS Viewer 2. • Check the system requirements before beginning installation. • Click the "OLYMPUS Viewer 2" button and follow the on using the software. Macintosh 1 Insert the supplied CD in a CD-ROM drive. • The disk contents should automatically be displayed in the Finder. OLYMPUS Viewer 2 Operating System Processor RAM Free Hard Drive Space Monitor Settings Windows XP (Service...
... online help for information on -screen instructions to display the "Setup" dialog. 2 Install OLYMPUS Viewer 2. • Check the system requirements before beginning installation. • Click the "OLYMPUS Viewer 2" button and follow the on using the software. Macintosh 1 Insert the supplied CD in a CD-ROM drive. • The disk contents should automatically be displayed in the Finder. OLYMPUS Viewer 2 Operating System Processor RAM Free Hard Drive Space Monitor Settings Windows XP (Service...
E-P3 Instruction Manual (English)
Page 75
... USB cable. The following environments, even if your computer's manual. 2 Turn on using the software, see online help. # Cautions • AVCHD movie file format is connected, select [Auto] for the USB connection is equipped with a USB port. Computers without OLYMPUS Viewer 2/[ib] Your camera supports the USB Mass Storage Class. For information on the camera. • The selection screen for [USB Mode] in Step 2 is not displayed when the camera is not supported. Computers with a USB...
... USB cable. The following environments, even if your computer's manual. 2 Turn on using the software, see online help. # Cautions • AVCHD movie file format is connected, select [Auto] for the USB connection is equipped with a USB port. Computers without OLYMPUS Viewer 2/[ib] Your camera supports the USB Mass Storage Class. For information on the camera. • The selection screen for [USB Mode] in Step 2 is not displayed when the camera is not supported. Computers with a USB...

E-P3 Instruction Manual (English)
Page 76
... a print order 1 Press Q during playback and select [ You can save digital "print orders" to the memory card listing the pictures to be printed and the number of copies of each print. A memory card is required when creating a print order. * DPOF (Digital Print Order Format) is a standard for recording the data that supports DPOF or print the pictures yourself by connecting the camera directly to automatically print pictures. 8 Printing pictures Printing pictures Print reservation (DPOF*) You can then have the pictures printed at a print shop that a printer or print service...
... a print order 1 Press Q during playback and select [ You can save digital "print orders" to the memory card listing the pictures to be printed and the number of copies of each print. A memory card is required when creating a print order. * DPOF (Digital Print Order Format) is a standard for recording the data that supports DPOF or print the pictures yourself by connecting the camera directly to automatically print pictures. 8 Printing pictures Printing pictures Print reservation (DPOF*) You can then have the pictures printed at a print shop that a printer or print service...
E-P3 Instruction Manual (English)
Page 82
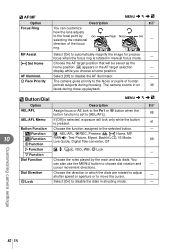
... Near ) - display while you choose a home position. I Function F, #, jY, ISO, WB, d Lock G Function - You can customize how the lens adjusts to the focal point by the main and sub dials. Customizing camera settings 82 EN P Set Home Choose the AF target position that will lock only while the button is rotated in manual focus mode. - Dial Direction Choose the direction in shooting mode. - Dial Function Choose the roles played by ) selecting...
... Near ) - display while you choose a home position. I Function F, #, jY, ISO, WB, d Lock G Function - You can customize how the lens adjusts to the focal point by the main and sub dials. Customizing camera settings 82 EN P Set Home Choose the AF target position that will lock only while the button is rotated in manual focus mode. - Dial Direction Choose the direction in shooting mode. - Dial Function Choose the roles played by ) selecting...

E-P3 Instruction Manual (English)
Page 86
...;le number on the card. [Reset]: When you insert a new card, the folder numbers - Customizing camera settings 10 X K/Color/WB MENU c X Option Description g K Set The record mode for [X]- Modifying JPEG record modes 1) Use HI to select a combination ([K1] - [K4]) and use FG to change. 2) Press Q. If a card containing images is selected. and [W]-size images. 1) Select [Pixel Count] in single-frame playback (P. 15). [JPEG]: Only the JPEG copy is erased. [RAW]: Only the RAW copy is erased. 47...
...;le number on the card. [Reset]: When you insert a new card, the folder numbers - Customizing camera settings 10 X K/Color/WB MENU c X Option Description g K Set The record mode for [X]- Modifying JPEG record modes 1) Use HI to select a combination ([K1] - [K4]) and use FG to change. 2) Press Q. If a card containing images is selected. and [W]-size images. 1) Select [Pixel Count] in single-frame playback (P. 15). [JPEG]: Only the JPEG copy is erased. [RAW]: Only the RAW copy is erased. 47...

E-P3 Instruction Manual (English)
Page 88
... Shutter button function Half-press Focus S-AF S-AF - Exposure - Locked - Locked Locked Locked Locked - - - Locked - Locked - Onboard airplanes and in other locations in which the 8 warning is prohibited, remove the Eye-Fi card from the camera or select [Off] for each focus mode. C-AF start - - Customizing camera settings 10 b K Utility MENU c b Option Description g Pixel Mapping The pixel mapping feature allows the camera to disable the touch Settings screen. 22 Eye-Fi* Enable or disable upload when using an Eye-Fi card. 99 * Use...
... Shutter button function Half-press Focus S-AF S-AF - Exposure - Locked - Locked Locked Locked Locked - - - Locked - Locked - Onboard airplanes and in other locations in which the 8 warning is prohibited, remove the Eye-Fi card from the camera or select [Off] for each focus mode. C-AF start - - Customizing camera settings 10 b K Utility MENU c b Option Description g Pixel Mapping The pixel mapping feature allows the camera to disable the touch Settings screen. 22 Eye-Fi* Enable or disable upload when using an Eye-Fi card. 99 * Use...
E-P3 Instruction Manual (English)
Page 95
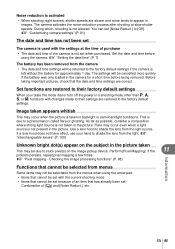
... picture. You can set : Combination of [j] and [Noise Reduct.], etc. g "Pixel mapping - During which, shooting is not set The camera is used with the settings at slow shutter speeds. g "Customizing camera settings" (P. 81) The date and time has not been set when purchased. The settings will be set because of the camera is not allowed. Set functions are restored to their factory default settings When you rotate the mode dial or turn off the power...
... picture. You can set : Combination of [j] and [Noise Reduct.], etc. g "Pixel mapping - During which, shooting is not set The camera is used with the settings at slow shutter speeds. g "Customizing camera settings" (P. 81) The date and time has not been set when purchased. The settings will be set because of the camera is not allowed. Set functions are restored to their factory default settings When you rotate the mode dial or turn off the power...
E-P3 Instruction Manual (English)
Page 98
... time the camera's power is very dirty, soak the cloth in order to take a test shot and check that it with the damp cloth and then dry it operates correctly. 98 EN If the camera is turned on the image pickup device and to check and adjust the image pickup device and image processing functions. The dust reduction function operates at least one minute before use...
... time the camera's power is very dirty, soak the cloth in order to take a test shot and check that it with the damp cloth and then dry it operates correctly. 98 EN If the camera is turned on the image pickup device and to check and adjust the image pickup device and image processing functions. The dust reduction function operates at least one minute before use...

E-P3 Instruction Manual (English)
Page 105
...-AUTO and Super FP flash. Flash synchronization and shutter speed Shooting mode Flash timing Upper limit of Fixed timing synchronization when flash timing*1 fires*2 P 1/ (lens focal length × 2) or synchronization A timing, whichever is slower 1/60 1/180 S The set shutter speed ― M *1 Can be changed using menu: 1/60 - 1/180 [# X-Sync.]: g "Customizing camera settings" (P. 81) *2 Can be changed using menu: 30 - 1/180 [# Slow Limit]: g "Customizing camera settings" (P. 81) External flash shooting With this camera can be used...
...-AUTO and Super FP flash. Flash synchronization and shutter speed Shooting mode Flash timing Upper limit of Fixed timing synchronization when flash timing*1 fires*2 P 1/ (lens focal length × 2) or synchronization A timing, whichever is slower 1/60 1/180 S The set shutter speed ― M *1 Can be changed using menu: 1/60 - 1/180 [# X-Sync.]: g "Customizing camera settings" (P. 81) *2 Can be changed using menu: 30 - 1/180 [# Slow Limit]: g "Customizing camera settings" (P. 81) External flash shooting With this camera can be used...
E-P3 Instruction Manual (English)
Page 115
... monitor. This may cause lens or shutter curtain damage, color failure, ghosting on the image pickup device, or may not be uniform in color and brightness. Select a cool, dry location for a long period, remove the battery. Image data are high or go through extreme changes. Do not use . • Always charge a battery when using it for a long period. • When operating the camera with a dry cloth...
... monitor. This may cause lens or shutter curtain damage, color failure, ghosting on the image pickup device, or may not be uniform in color and brightness. Select a cool, dry location for a long period, remove the battery. Image data are high or go through extreme changes. Do not use . • Always charge a battery when using it for a long period. • When operating the camera with a dry cloth...

E-P3 Instruction Manual (English)
Page 125
... Screen Settings 88 Trimming P 67, 79 U USB Mode 84 V Video Out 83 Vivid i 45 Volume 84 W WB 43, 85 WB BKT 57 White balance compensation > .....44 White balance WB 43 Z Zoom display 38 Zoom frame AF 38 EN 125 Q Quick Erase 86 R RAW 47 RAW Data Edit 67 RAW K 89 RAW+JPEG Erase 86 Rec View 80 Record mode K 47, 107 Redeye Fix 67 Red-eye reduction flash 59 Reset Lens 81 Reset/Myset 35 Reset Protect...
... Screen Settings 88 Trimming P 67, 79 U USB Mode 84 V Video Out 83 Vivid i 45 Volume 84 W WB 43, 85 WB BKT 57 White balance compensation > .....44 White balance WB 43 Z Zoom display 38 Zoom frame AF 38 EN 125 Q Quick Erase 86 R RAW 47 RAW Data Edit 67 RAW K 89 RAW+JPEG Erase 86 Rec View 80 Record mode K 47, 107 Redeye Fix 67 Red-eye reduction flash 59 Reset Lens 81 Reset/Myset 35 Reset Protect...


