E-10 Instructions (English)
Page 3
...macro mode for more details about adjusting camera settings manually if the results with the camera features. Playing Back Images for Viewing 9 Managing Stored Pictures 10 Preparing pictures for Printing 11 Transferring Pictures to set up the camera and take . Shooting Techniques: 3 General... Introduction Distance and Focus 4 Taking Pictures Read for close-ups, flash shooting, etc. Selecting Pictures for printing, transferring pictures from memory card ...
...macro mode for more details about adjusting camera settings manually if the results with the camera features. Playing Back Images for Viewing 9 Managing Stored Pictures 10 Preparing pictures for Printing 11 Transferring Pictures to set up the camera and take . Shooting Techniques: 3 General... Introduction Distance and Focus 4 Taking Pictures Read for close-ups, flash shooting, etc. Selecting Pictures for printing, transferring pictures from memory card ...

E-10 Instructions (English)
Page 5
.... Mode Dial Setting Tells you purchase the camera. M (Manual mode) Allows you to set for P, A, S, or M, rapidly press (Monitor button) twice to enter the playback mode. (Print reserve mode) Allows you to select images for printing on the memory card. 1 5sec Previous shot is displayed for... Manual The sample page below shows you how the use this page. 3 The mark is displayed in order to set the aperture value (camera selects the shutter speed). S (Shutter priority mode) Allows you to perform settings. This is 7 selected. 4 Press the button to follow...
.... Mode Dial Setting Tells you purchase the camera. M (Manual mode) Allows you to set for P, A, S, or M, rapidly press (Monitor button) twice to enter the playback mode. (Print reserve mode) Allows you to select images for printing on the memory card. 1 5sec Previous shot is displayed for... Manual The sample page below shows you how the use this page. 3 The mark is displayed in order to set the aperture value (camera selects the shutter speed). S (Shutter priority mode) Allows you to perform settings. This is 7 selected. 4 Press the button to follow...

E-10 Instructions (English)
Page 12
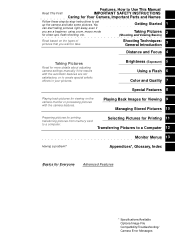
...10 Features 2 How to Use This Manual ...3 IMPORTANT SAFETY INSTRUCTlONS 4 Caring for Your Camera ...9 Important Parts and Names 14 Getting Started 19 Box Contents: Make Sure You Have Everything 20 Attaching the Camera Strap 21 Inserting Batteries and Attaching the Optional AC Adapter 22 Taking Pictures (Shooting and Viewing Basics 29 Inserting a Memory Card... 30 Setting the Shooting Mode and Switching the Camera On 32 Checking the Battery 33 Checking the Number of Storable Pictures 34...
...10 Features 2 How to Use This Manual ...3 IMPORTANT SAFETY INSTRUCTlONS 4 Caring for Your Camera ...9 Important Parts and Names 14 Getting Started 19 Box Contents: Make Sure You Have Everything 20 Attaching the Camera Strap 21 Inserting Batteries and Attaching the Optional AC Adapter 22 Taking Pictures (Shooting and Viewing Basics 29 Inserting a Memory Card... 30 Setting the Shooting Mode and Switching the Camera On 32 Checking the Battery 33 Checking the Number of Storable Pictures 34...

E-10 Instructions (English)
Page 14
... Images on a TV Screen 142 Adjusting Monitor Brightness 144 Managing Stored Pictures 145 Copying Images to Another Card 146 Deleting All Images 150 Formatting a Memory Card 152 Naming Image Files 154 Selecting Pictures for Printing 157 Selecting Pictures and Number of Copies for Printing ...158 Selecting All Pictures on a Card for Printing 160 Setting Up Index Printing 162 Selecting Pictures for Date or Time Stamping 164 Printing with Olympus Printers...
... Images on a TV Screen 142 Adjusting Monitor Brightness 144 Managing Stored Pictures 145 Copying Images to Another Card 146 Deleting All Images 150 Formatting a Memory Card 152 Naming Image Files 154 Selecting Pictures for Printing 157 Selecting Pictures and Number of Copies for Printing ...158 Selecting All Pictures on a Card for Printing 160 Setting Up Index Printing 162 Selecting Pictures for Date or Time Stamping 164 Printing with Olympus Printers...

E-10 Instructions (English)
Page 16
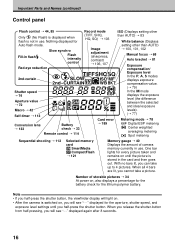
...Mode dial ➝ 3, 70 Power switch ➝ 32 AE lock button ➝ 80 Light button ➝ 32 Card access lamp ➝ 23, 39 SM/CF memory card button* ➝ 121 Card cover lock ➝ 30 Card cover ➝ 30 Main dial ➝ See "Main dial and Sub dial" below . Viewfinder 17 Diopter adjustment ring... 17 Connector cover Video OUT jack ➝ 142 USB connector ➝ 168 * Press and then turn the main dial or sub dial to select camera settings. However, please remember that when the mode dial is set to M (Manual mode) the main dial is used to select the shutter speed....
...Mode dial ➝ 3, 70 Power switch ➝ 32 AE lock button ➝ 80 Light button ➝ 32 Card access lamp ➝ 23, 39 SM/CF memory card button* ➝ 121 Card cover lock ➝ 30 Card cover ➝ 30 Main dial ➝ See "Main dial and Sub dial" below . Viewfinder 17 Diopter adjustment ring... 17 Connector cover Video OUT jack ➝ 142 USB connector ➝ 168 * Press and then turn the main dial or sub dial to select camera settings. However, please remember that when the mode dial is set to M (Manual mode) the main dial is used to select the shutter speed....
E-10 Instructions (English)
Page 18
...; 77) Metering mode ➝ 78 Digital ESP metering Center weighted averaging metering Spot metering Sequential shooting ➝ 112 Selected memory card SmartMedia CompactFlash ➝ 121 Memory gauge ➝ 40 Displays the amount of storable pictures ➝ 34 At power on until you will light on. • After the camera is switched on, you can take...
...; 77) Metering mode ➝ 78 Digital ESP metering Center weighted averaging metering Spot metering Sequential shooting ➝ 112 Selected memory card SmartMedia CompactFlash ➝ 121 Memory gauge ➝ 40 Displays the amount of storable pictures ➝ 34 At power on until you will light on. • After the camera is switched on, you can take...

E-10 Instructions (English)
Page 31
This chapter describes only the basic procedures for taking and viewing pictures. Taking Pictures (Shooting and Viewing Basics) In this chapter you will learn how to the later chapters. 2 For more details about camera operation, refer to insert a memory card, take a picture, and view the picture.
This chapter describes only the basic procedures for taking and viewing pictures. Taking Pictures (Shooting and Viewing Basics) In this chapter you will learn how to the later chapters. 2 For more details about camera operation, refer to insert a memory card, take a picture, and view the picture.

E-10 Instructions (English)
Page 32
.... 2 While pressing down the round release on the card, and never subject a card to strong shocks or vibrations. • Before you can use Olympus or any other brand 3V (3.3V) SmartMedia memory card (5V cards cannot be installed together, or either card one card must be inserted in the camera. (© 152) Electrical contacts Protect area SmartMedia (SM) provided...
.... 2 While pressing down the round release on the card, and never subject a card to strong shocks or vibrations. • Before you can use Olympus or any other brand 3V (3.3V) SmartMedia memory card (5V cards cannot be installed together, or either card one card must be inserted in the camera. (© 152) Electrical contacts Protect area SmartMedia (SM) provided...

E-10 Instructions (English)
Page 36
.... 34 Note • When the number of total shots reaches 999, the number 999 is displayed in data handling by the camera, file compression, memory management, and so on the memory card. However, please understand that due to use the images on the file sizes of the images. When using a CompactFlash... panel. Before you transfer files to a computer, you should select how the files are to be named. (© 154) Storage capacity of a memory card other than the capacity indicated in size, you may not be able to store another picture, even after you select another record mode or select...
.... 34 Note • When the number of total shots reaches 999, the number 999 is displayed in data handling by the camera, file compression, memory management, and so on the memory card. However, please understand that due to use the images on the file sizes of the images. When using a CompactFlash... panel. Before you transfer files to a computer, you should select how the files are to be named. (© 154) Storage capacity of a memory card other than the capacity indicated in size, you may not be able to store another picture, even after you select another record mode or select...

E-10 Instructions (English)
Page 41
...the image starts to 4 exposures. To take up to be stored on the card, you full-press the shutter button. Neither lights nor blinks when camera is required. When this is storing the previous shot on the memory card. Keep the button pressed halfway and go to take pictures without half-pressing You...may not have been taken correctly. Install a new battery and then play back the previous shot to open the built-in focus. While the camera is the low light warning, telling you that it takes a few moments to Step 2. Therefore it was stored correctly. (© 46, 137) 39...
...the image starts to 4 exposures. To take up to be stored on the card, you full-press the shutter button. Neither lights nor blinks when camera is required. When this is storing the previous shot on the memory card. Keep the button pressed halfway and go to take pictures without half-pressing You...may not have been taken correctly. Install a new battery and then play back the previous shot to open the built-in focus. While the camera is the low light warning, telling you that it takes a few moments to Step 2. Therefore it was stored correctly. (© 46, 137) 39...

E-10 Instructions (English)
Page 42
... to a Computer (© 167) • Deleting All Images (© 150) Viewfinder Control panel If you see Card 0 blinking in the viewfinder The memory card is full and you see Card blinking in the memory gauge goes off. Appendix 5: Camera Error Messages (© 189) Four segments lit in the viewfinder? One segment lights for every image that...
... to a Computer (© 167) • Deleting All Images (© 150) Viewfinder Control panel If you see Card 0 blinking in the viewfinder The memory card is full and you see Card blinking in the memory gauge goes off. Appendix 5: Camera Error Messages (© 189) Four segments lit in the viewfinder? One segment lights for every image that...

E-10 Instructions (English)
Page 52
... pointers on the arrow pad to move the green highlight to the image that you protect a picture, it is protected from accidental erasure from the memory card. Do not reuse protect seals. To remove protection Display the protected image on the monitor and press the protect button to a computer, they are stored...
... pointers on the arrow pad to move the green highlight to the image that you protect a picture, it is protected from accidental erasure from the memory card. Do not reuse protect seals. To remove protection Display the protected image on the monitor and press the protect button to a computer, they are stored...

E-10 Instructions (English)
Page 53
...index display, press the pointers on the selected card and increases the number of pictures that you can be deleted later, but only after releasing the protection before you delete images from the memory card. Reusing memory cards After storing all the images on a card to a hard disk on a computer, ...you can delete all the images from the card and then re-use the card for taking and storing more space on the arrow pad ...
...index display, press the pointers on the selected card and increases the number of pictures that you can be deleted later, but only after releasing the protection before you delete images from the memory card. Reusing memory cards After storing all the images on a card to a hard disk on a computer, ...you can delete all the images from the card and then re-use the card for taking and storing more space on the arrow pad ...

E-10 Instructions (English)
Page 99
...fluorescent lights. In such cases, you may need to adjust the white balance setting of the camera in order to produce the best quality image possible, resulting in a larger file size but ...natural or artificial light, especially under incandescent or fluorescent lighting. If your images as possible on a card, you can select a lower quality setting which will show you how to set up white balance,...your purpose. You can select a record mode best suited for images saved on the memory card, and how to use the sharpness, contrast, and histogram options to enhance the appearance of images that...
...fluorescent lights. In such cases, you may need to adjust the white balance setting of the camera in order to produce the best quality image possible, resulting in a larger file size but ...natural or artificial light, especially under incandescent or fluorescent lighting. If your images as possible on a card, you can select a lower quality setting which will show you how to set up white balance,...your purpose. You can select a record mode best suited for images saved on the memory card, and how to use the sharpness, contrast, and histogram options to enhance the appearance of images that...

E-10 Instructions (English)
Page 105
... the pictures that you see the desired quality setting in the control panel. Selecting Image Quality, Resolution, and Compression You can be stored on the memory card. Quality TIFF SHQ HQ SQ Resolution 2240 x 1680 pixels 2240 x 1680 pixels 2240 x 1680 pixels 1280 x 960 pixels Compression Approx. 1:1 Approx. 1:2.7 ...or sub dial until you take. The lower the quality, the smaller the file size, and more pictures can be stored on the memory card. (© 34) You can also adjust the resolution and compression settings for the quality settings translate as follows: TIFF (Tagged Image ...
... the pictures that you see the desired quality setting in the control panel. Selecting Image Quality, Resolution, and Compression You can be stored on the memory card. Quality TIFF SHQ HQ SQ Resolution 2240 x 1680 pixels 2240 x 1680 pixels 2240 x 1680 pixels 1280 x 960 pixels Compression Approx. 1:1 Approx. 1:2.7 ...or sub dial until you take. The lower the quality, the smaller the file size, and more pictures can be stored on the memory card. (© 34) You can also adjust the resolution and compression settings for the quality settings translate as follows: TIFF (Tagged Image ...

E-10 Instructions (English)
Page 106
... as possible if you are composed of horizontal pixels and 1680 is not noticeable, but if you intend to store smaller files on a memory card, with the content of images that high quality images require more the image could deteriorate. The higher the compression rate, the smaller the file...1024 x 768 pixels (XGA) 640 x 480 pixels (VGA) Compression 1:1 (non-compressed) (non-adjustable) Approx. 1:2.7 Approx. 1:4 Approx. 1:8 Resolution Images created from pictures taken with a digital camera are concerned about image quality then select a smaller compression rate like 1:4 or 1:2.7.
... as possible if you are composed of horizontal pixels and 1680 is not noticeable, but if you intend to store smaller files on a memory card, with the content of images that high quality images require more the image could deteriorate. The higher the compression rate, the smaller the file...1024 x 768 pixels (XGA) 640 x 480 pixels (VGA) Compression 1:1 (non-compressed) (non-adjustable) Approx. 1:2.7 Approx. 1:4 Approx. 1:8 Resolution Images created from pictures taken with a digital camera are concerned about image quality then select a smaller compression rate like 1:4 or 1:2.7.

E-10 Instructions (English)
Page 113
... neither compressed nor enhanced by any specified interval from in units of the camera, or use the remote cable RM-CB1 attached to the camera to 24 hours in front of 1 minute. • Memory card selection. You can shoot up , just select the other important camera features. • Taking multiple exposures. These features are the...
... neither compressed nor enhanced by any specified interval from in units of the camera, or use the remote cable RM-CB1 attached to the camera to 24 hours in front of 1 minute. • Memory card selection. You can shoot up , just select the other important camera features. • Taking multiple exposures. These features are the...

E-10 Instructions (English)
Page 114
...longer needed. 112 Replace the full card with another card, or delete pictures from the shutter button. The number of storable pictures blinking? and number of multiple exposures is charging. blinking in the control panel. 3 Take the picture. The camera will not shoot after pressing shutter ...you hold down the shutter button. After the flash is full. If the card error and the number of multiple exposures (Gauge shows 3 exposures) Camera will stop flashing. If this means the memory card is charged, the flash mark will continue to shoot exposures as long as ...
...longer needed. 112 Replace the full card with another card, or delete pictures from the shutter button. The number of storable pictures blinking? and number of multiple exposures is charging. blinking in the control panel. 3 Take the picture. The camera will not shoot after pressing shutter ...you hold down the shutter button. After the flash is full. If the card error and the number of multiple exposures (Gauge shows 3 exposures) Camera will stop flashing. If this means the memory card is charged, the flash mark will continue to shoot exposures as long as ...

E-10 Instructions (English)
Page 120
... to prevent light entering the viewfinder from the time interval setting. (See "Actual time interval" on page 120.) The camera will continue to take pictures in flash, set the zoom, set the time interval for the pictures that you can use... time interval is displayed. 6 118 OFF ON 1 2 34 5 1 Set the mode dial to P, A, S, or M. 2 Attach the camera securely to a tripod, and then compose the picture in the monitor. 5 On the arrow pad, press or to move the green highlight to ... Open the built-in the time lapse mode until the batteries discharge or until the memory card fills up.
... to prevent light entering the viewfinder from the time interval setting. (See "Actual time interval" on page 120.) The camera will continue to take pictures in flash, set the zoom, set the time interval for the pictures that you can use... time interval is displayed. 6 118 OFF ON 1 2 34 5 1 Set the mode dial to P, A, S, or M. 2 Attach the camera securely to a tripod, and then compose the picture in the monitor. 5 On the arrow pad, press or to move the green highlight to ... Open the built-in the time lapse mode until the batteries discharge or until the memory card fills up.

E-10 Instructions (English)
Page 123
... last picture was stored is currently selected for Storing Pictures The pictures that you which card is automatically selected. If only one card is installed in the camera (either card for storing images. 1 Press and hold down the SM/CF 1 memory card button, and then slowly turn the main dial or sub dial to switch the...
... last picture was stored is currently selected for Storing Pictures The pictures that you which card is automatically selected. If only one card is installed in the camera (either card for storing images. 1 Press and hold down the SM/CF 1 memory card button, and then slowly turn the main dial or sub dial to switch the...


