

DM-4 Detailed Instructions (English)
Page 1
To ensure successful recordings, we recommend that you for purchasing an Olympus Digital Voice Recorder. DIGITAL VOICE RECORDER DM-4 DM-2 DETAILED INSTRUCTIONS Thank you test the record function and volume before use. Keep the instructions handy for information about using the product correctly and safely. EN Register your product on www.olympus-consumer.com/register and get additional benefits from Olympus! Please read these instructions for future reference.
To ensure successful recordings, we recommend that you for purchasing an Olympus Digital Voice Recorder. DIGITAL VOICE RECORDER DM-4 DM-2 DETAILED INSTRUCTIONS Thank you test the record function and volume before use. Keep the instructions handy for information about using the product correctly and safely. EN Register your product on www.olympus-consumer.com/register and get additional benefits from Olympus! Please read these instructions for future reference.
DM-4 Detailed Instructions (English)
Page 5
... 101 Formatting the schedule 102 Viewing images (For DM-4 103 Importing images 103 Viewing images 104 Erasing a images 105 Using voice recognition (For DM-4)..........107 Using voice control 107 Using voice commands 108 4 Using the Olympus Sonority Saving files in your PC 109 Operating environment...to the recorder 130 Program guide functions 131 About DAISY (For DM-4 132 Importing contents 133 Playing contents 134 Transfer content to the recorder 135 Upgrade function 136 Functions available in the Olympus Sonority Plus 137 Functions available with the music editing plug-in 137...
... 101 Formatting the schedule 102 Viewing images (For DM-4 103 Importing images 103 Viewing images 104 Erasing a images 105 Using voice recognition (For DM-4)..........107 Using voice control 107 Using voice commands 108 4 Using the Olympus Sonority Saving files in your PC 109 Operating environment...to the recorder 130 Program guide functions 131 About DAISY (For DM-4 132 Importing contents 133 Playing contents 134 Transfer content to the recorder 135 Upgrade function 136 Functions available in the Olympus Sonority Plus 137 Functions available with the music editing plug-in 137...

DM-4 Detailed Instructions (English)
Page 12
...Variable Control Voice Actuator (VCVA) function (☞ P.69). s For WMA-format recording, you can import and view images (☞ P.103) (For DM-4). s By connecting a digital camera, you can select one of recording sound quality equivalent to or surpassing CD-level. s It has a built-in...monaural (☞ P.67). In addition, when connected to files recorded by file date or keyword (☞ P.53). Besides the 8GB (DM-4) or 4GB (DM-2) built-in addition to an external device, the recorder can also record onto a commerciallyavailable microSD card (☞ P.30). s The ...
...Variable Control Voice Actuator (VCVA) function (☞ P.69). s For WMA-format recording, you can import and view images (☞ P.103) (For DM-4). s By connecting a digital camera, you can select one of recording sound quality equivalent to or surpassing CD-level. s It has a built-in...monaural (☞ P.67). In addition, when connected to files recorded by file date or keyword (☞ P.53). Besides the 8GB (DM-4) or 4GB (DM-2) built-in addition to an external device, the recorder can also record onto a commerciallyavailable microSD card (☞ P.30). s The ...
DM-4 Detailed Instructions (English)
Page 13
... switching between the built-in this recorder. There is compatible with Audio Book (☞ P.157). s It is also a function to a "Olympus Sonority", which is compatible with DAISY (☞ P.132) (For DM-4). s The guidance feature (in the memory (☞ P.91). EN 13 If you can easily playback, organize, and edit the files. be...
... switching between the built-in this recorder. There is compatible with Audio Book (☞ P.157). s It is also a function to a "Olympus Sonority", which is compatible with DAISY (☞ P.132) (For DM-4). s The guidance feature (in the memory (☞ P.91). EN 13 If you can easily playback, organize, and edit the files. be...
DM-4 Detailed Instructions (English)
Page 15
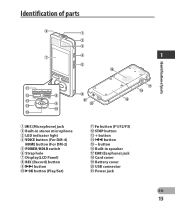
Power jack EN 15 Identification of parts Identification of parts 2 1 2 3 7 4 1 5 ^ ! @ 8 STOP VOL REC # $ 9 0 % 6 ) & * ( 1 MIC (Microphone) jack 2 Built-in speaker & EAR (Earphone) jack * Card cover ( Battery cover ) USB connector - Fn button (F1/F2/F3) @ STOP button # + button $ 0 button % - button ^ Built-in stereo microphone 3 LED indicator light 4 VOICE button (For DM-4) HOME button (For DM-2) 5 POWER/HOLD switch 6 Strap hole 7 Display(LCD Panel) 8 REC (Record) button 9 9 button 0 `OK button (Play/Set) !
Power jack EN 15 Identification of parts Identification of parts 2 1 2 3 7 4 1 5 ^ ! @ 8 STOP VOL REC # $ 9 0 % 6 ) & * ( 1 MIC (Microphone) jack 2 Built-in speaker & EAR (Earphone) jack * Card cover ( Battery cover ) USB connector - Fn button (F1/F2/F3) @ STOP button # + button $ 0 button % - button ^ Built-in stereo microphone 3 LED indicator light 4 VOICE button (For DM-4) HOME button (For DM-2) 5 POWER/HOLD switch 6 Strap hole 7 Display(LCD Panel) 8 REC (Record) button 9 9 button 0 `OK button (Play/Set) !

DM-4 Detailed Instructions (English)
Page 16
...a music player (☞ P.138, P.150). This recorder can import images by connecting a digital camera to this recorder using the supplied "Olympus Sonority" software. You can be managed in a database (☞ P.75). EN [F2] button 16 [F3] button Informs the battery ...C Podcast D Audiobooks E Picture F Audio Diary G Preferences Function Records files to this recorder. Also manages text files (☞ P.158) (For DM-4) directly transferred to various functions. When the recorder is displayed. Identification of parts [Home] menu display When the power is turned on, the [Home...
...a music player (☞ P.138, P.150). This recorder can import images by connecting a digital camera to this recorder using the supplied "Olympus Sonority" software. You can be managed in a database (☞ P.75). EN [F2] button 16 [F3] button Informs the battery ...C Podcast D Audiobooks E Picture F Audio Diary G Preferences Function Records files to this recorder. Also manages text files (☞ P.158) (For DM-4) directly transferred to various functions. When the recorder is displayed. Identification of parts [Home] menu display When the power is turned on, the [Home...

DM-4 Detailed Instructions (English)
Page 19
Identification of parts Identification of parts [Audiobooks] mode display DAISY playback display (For DM-4) 7 1 2 8 3 9 4 0 5 6 Audio book playback display 8 1 2 1 3 9 4 0 5 ! 6 7 1 Table of contents indicator 2 Contents name 3 Playback position bar indicator 4 Recorder status indicator 5 Text display area 6 Function guide indicator 7 Current time 8 ...
Identification of parts Identification of parts [Audiobooks] mode display DAISY playback display (For DM-4) 7 1 2 8 3 9 4 0 5 6 Audio book playback display 8 1 2 1 3 9 4 0 5 ! 6 7 1 Table of contents indicator 2 Contents name 3 Playback position bar indicator 4 Recorder status indicator 5 Text display area 6 Function guide indicator 7 Current time 8 ...

DM-4 Detailed Instructions (English)
Page 20
Identification of parts [Audiobooks] mode display Text playback display (For DM-4) 1 1 2 3 4 7 8 5 6 1 File name 2 Folder name 3Playback position bar indicator 4 Recorder status indicator 5 Text display area 6 Function guide indicator 7 Current time 8 File format Identification of parts [Audio Diary] mode display Calendar display 6 1 2 3 7 8 4 5 1 Title indicator 2 Year and month 3 Calendar display area 4 Schedule display area for selected day 5 Function guide indicator 6 Current time 7 Current day 8 Day registered in schedule EN 20
Identification of parts [Audiobooks] mode display Text playback display (For DM-4) 1 1 2 3 4 7 8 5 6 1 File name 2 Folder name 3Playback position bar indicator 4 Recorder status indicator 5 Text display area 6 Function guide indicator 7 Current time 8 File format Identification of parts [Audio Diary] mode display Calendar display 6 1 2 3 7 8 4 5 1 Title indicator 2 Year and month 3 Calendar display area 4 Schedule display area for selected day 5 Function guide indicator 6 Current time 7 Current day 8 Day registered in schedule EN 20
DM-4 Detailed Instructions (English)
Page 28
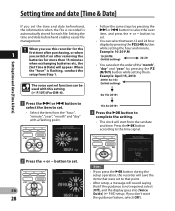
... the "month", "day" and "year" by pressing the F2 (24H) button while setting the hour and minute. When you use this setting (☞ P.107) (For DM-4). 1 Press the 9 or 0 button to select the item to set. • Select the item from the set . Setting the time and date beforehand enables easier...
... the "month", "day" and "year" by pressing the F2 (24H) button while setting the hour and minute. When you use this setting (☞ P.107) (For DM-4). 1 Press the 9 or 0 button to select the item to set. • Select the item from the set . Setting the time and date beforehand enables easier...

DM-4 Detailed Instructions (English)
Page 29
Setting time and date [Time & Date] EN 29 The voice control function can be used with this setting (☞ P.107) (For DM-4). 1 Select [Time & Date] from the menu on the [System Menu]. • For details on how to enter the menu settings, please see "Menu setting method" (&#...
Setting time and date [Time & Date] EN 29 The voice control function can be used with this setting (☞ P.107) (For DM-4). 1 Select [Time & Date] from the menu on the [System Menu]. • For details on how to enter the menu settings, please see "Menu setting method" (&#...

DM-4 Detailed Instructions (English)
Page 70
...standby. You can change , and then press the `OK or 9 button. the `OK button. [Off]: Disables this setting (☞ P.107) (For DM-4). testing and adjustment of [Folder A] • If the starting level is set to [Folder E] for audio recording into names preset in the template with... the menu setting, the recording will return to the to [On] with • To ensure successful recordings, prior "Olympus Sonority". VCVA standby monitor setting: When [Standby] is not adjusted within 2 seconds, the display will not be used with the 1 Select [Folder...
...standby. You can change , and then press the `OK or 9 button. the `OK button. [Off]: Disables this setting (☞ P.107) (For DM-4). testing and adjustment of [Folder A] • If the starting level is set to [Folder E] for audio recording into names preset in the template with... the menu setting, the recording will return to the to [On] with • To ensure successful recordings, prior "Olympus Sonority". VCVA standby monitor setting: When [Standby] is not adjusted within 2 seconds, the display will not be used with the 1 Select [Folder...
DM-4 Detailed Instructions (English)
Page 82
... mode. 2Press the `OK or 9 button. [Start Time] and [Stop Time] setting: The voice control function can be used with this setting (☞ P.107) (For DM-4). 3 1 Press the 9 or 0 button to exit Recording mode selection. button to set. 3 Press the `OK button to exit [Start Time] and [Stop Time] selection. [Mic...
... mode. 2Press the `OK or 9 button. [Start Time] and [Stop Time] setting: The voice control function can be used with this setting (☞ P.107) (For DM-4). 3 1 Press the 9 or 0 button to exit Recording mode selection. button to set. 3 Press the `OK button to exit [Start Time] and [Stop Time] selection. [Mic...
DM-4 Detailed Instructions (English)
Page 83
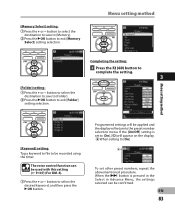
... to the preset number selection menu. a When setting to [On] a To set to [On], [j] will return to be used with this setting (☞ P.107) (For DM-4). 1Press the + or - button to select the destination to save to (Folder). 2Press the `OK button to exit [Memory Select] setting selection. The voice control...
... to the preset number selection menu. a When setting to [On] a To set to [On], [j] will return to be used with this setting (☞ P.107) (For DM-4). 1Press the + or - button to select the destination to save to (Folder). 2Press the `OK button to exit [Memory Select] setting selection. The voice control...
DM-4 Detailed Instructions (English)
Page 85
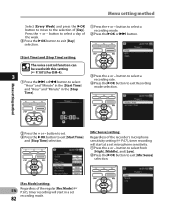
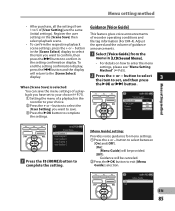
... press the 9 button to confirm in 1 Select [Voice Guide] from Guidance [Voice Guide] 1 to 5 of guidance scene settings, press the + or - file tag information (For DM-4). button to select the [User Setting] you have set , and then press 3 When [Scene Save] is selected: the `OK or 9 button. will be provided. [Off...
... press the 9 button to confirm in 1 Select [Voice Guide] from Guidance [Voice Guide] 1 to 5 of guidance scene settings, press the + or - file tag information (For DM-4). button to select the [User Setting] you have set , and then press 3 When [Scene Save] is selected: the `OK or 9 button. will be provided. [Off...

DM-4 Detailed Instructions (English)
Page 88
... volume. 2 Press the `OK button to exit [Volume] selection. [Start Time] setting: The voice control function can be used with this setting (☞ P.107) (For DM-4). 3 1 Press the 9 or 0 button to select a day of [Day].
... volume. 2 Press the `OK button to exit [Volume] selection. [Start Time] setting: The voice control function can be used with this setting (☞ P.107) (For DM-4). 3 1 Press the 9 or 0 button to select a day of [Day].

DM-4 Detailed Instructions (English)
Page 98
Schedule settings [Audio Diary] 3 [Date] setting: The voice control function can be used with this setting (☞ P.107) (For DM-4). 1 Press the 9, 0, + or - button to set , and then press the `OK button. • You can specify the event frequency from [One Time], [Everyday], ...Week], [Every Month], and [Every Year]. [Start Time] and [Stop Time] setting: The voice control function can be used with this setting (☞ P.107) (For DM-4). 1 Press the 9, 0, + or - button, set the "Year", "Month", and "Date". Schedule settings [Audio Diary] 4 Move the cursor to the item you want...
Schedule settings [Audio Diary] 3 [Date] setting: The voice control function can be used with this setting (☞ P.107) (For DM-4). 1 Press the 9, 0, + or - button to set , and then press the `OK button. • You can specify the event frequency from [One Time], [Everyday], ...Week], [Every Month], and [Every Year]. [Start Time] and [Stop Time] setting: The voice control function can be used with this setting (☞ P.107) (For DM-4). 1 Press the 9, 0, + or - button, set the "Year", "Month", and "Date". Schedule settings [Audio Diary] 4 Move the cursor to the item you want...

DM-4 Detailed Instructions (English)
Page 103
Viewing images (For DM-4) This recorder can connect to this recorder, please visit our web site. 3 Press the + or − button to select [microSD] or [USB], and then press ... to set (complete) the memory for importing destination. 5 Press the + button to select [OK], and then press the `OK button. EN 103 Viewing images (For DM-4) • The display changes to a digital camera and import images. Importing images 1 From the [Home] menu display, select [E Picture], and then press the `OK or...
Viewing images (For DM-4) This recorder can connect to this recorder, please visit our web site. 3 Press the + or − button to select [microSD] or [USB], and then press ... to set (complete) the memory for importing destination. 5 Press the + button to select [OK], and then press the `OK button. EN 103 Viewing images (For DM-4) • The display changes to a digital camera and import images. Importing images 1 From the [Home] menu display, select [E Picture], and then press the `OK or...

DM-4 Detailed Instructions (English)
Page 104
... or 9 button. 6 Press the + or − button to select a date images were taken, and then press the `OK or 9 button. EN 104 Viewing images (For DM-4) Viewing images 1 From the [Home] menu display, select [E Picture], and then press the `OK or 9 button. 4 Select [IMAGE] folder, and then press the `OK or...
... or 9 button. 6 Press the + or − button to select a date images were taken, and then press the `OK or 9 button. EN 104 Viewing images (For DM-4) Viewing images 1 From the [Home] menu display, select [E Picture], and then press the `OK or 9 button. 4 Select [IMAGE] folder, and then press the `OK or...

DM-4 Detailed Instructions (English)
Page 105
Viewing images (For DM-4) 3 Press the + or − button to the next image file. Viewing images (For DM-4) 7 Press the 9 or 0 button to move to select [Built-in], [microSD] or [USB], and then press the `OK or 9 button. Erasing a images 1 From the [Home] menu display, select [E Picture], and then press the `OK or 9 button. 3 2 Press the + or − button to select [Browse], and then press the `OK or 9 button. EN 105
Viewing images (For DM-4) 3 Press the + or − button to the next image file. Viewing images (For DM-4) 7 Press the 9 or 0 button to move to select [Built-in], [microSD] or [USB], and then press the `OK or 9 button. Erasing a images 1 From the [Home] menu display, select [E Picture], and then press the `OK or 9 button. 3 2 Press the + or − button to select [Browse], and then press the `OK or 9 button. EN 105

DM-4 Detailed Instructions (English)
Page 106
Viewing images (For DM-4) • Dates on which images were taken 3 are displayed as a list. 5 Press the + or − button to select a date images were taken, and then press ... select [File Erase], and then press the `OK or 9 button. 4 Select [IMAGE] folder, and then press the `OK or 9 button. EN 106 Viewing images (For DM-4) 7 Press the + or − button to erase, and then press the F2 (ERASE) button.
Viewing images (For DM-4) • Dates on which images were taken 3 are displayed as a list. 5 Press the + or − button to select a date images were taken, and then press ... select [File Erase], and then press the `OK or 9 button. 4 Select [IMAGE] folder, and then press the `OK or 9 button. EN 106 Viewing images (For DM-4) 7 Press the + or − button to erase, and then press the F2 (ERASE) button.


