

C9300/C9500 User's Guide: Windows
Page 6
... driver only 350 Maintenance 351 Adding Paper 351 Changing the toner cartridge 353 Changing the image drum 358 Changing the transfer belt 361 Changing the fuser unit 363 Cleaning the LED heads 366 Transporting the printer 367 Troubleshooting 369 LCD messages 369 Paper jams 373 Parallel transmission mode 381 Problem solving 382... printing from Windows 383 Problems with poor quality printing 387 Miscellaneous problems 389 Accessories 392 Introduction 392 Additional memory 393 Internal hard disk drive 397 C9300/C9300 Contents • 6
... driver only 350 Maintenance 351 Adding Paper 351 Changing the toner cartridge 353 Changing the image drum 358 Changing the transfer belt 361 Changing the fuser unit 363 Cleaning the LED heads 366 Transporting the printer 367 Troubleshooting 369 LCD messages 369 Paper jams 373 Parallel transmission mode 381 Problem solving 382... printing from Windows 383 Problems with poor quality printing 387 Miscellaneous problems 389 Accessories 392 Introduction 392 Additional memory 393 Internal hard disk drive 397 C9300/C9300 Contents • 6

C9300/C9500 User's Guide: Windows
Page 7
... Additional paper trays 403 High capacity feeder (HCF 406 Finisher 409 Specifications 410 Consumables 414 Toner 414 Drums 414 Fuser units 415 Transfer belt 415 OKI® print media 416 Factory default settings 418 Print menu 418 Media menu 419 Color menu 420 System Config menu 421 PCL Emulation menu 421 ... Swatch Utility 428 PDF Direct Print Utility 431 Storage Device Manager for Windows 434 Print Job Accounting 460 PrintSupervision 483 Network Printer Status utility 485 Oki LPR Utility 488 Index 489 C9300/C9300 Contents • 7
... Additional paper trays 403 High capacity feeder (HCF 406 Finisher 409 Specifications 410 Consumables 414 Toner 414 Drums 414 Fuser units 415 Transfer belt 415 OKI® print media 416 Factory default settings 418 Print menu 418 Media menu 419 Color menu 420 System Config menu 421 PCL Emulation menu 421 ... Swatch Utility 428 PDF Direct Print Utility 431 Storage Device Manager for Windows 434 Print Job Accounting 460 PrintSupervision 483 Network Printer Status utility 485 Oki LPR Utility 488 Index 489 C9300/C9300 Contents • 7

C9300/C9500 User's Guide: Windows
Page 363
Switch off the printer and open the top cover. Always use the handle when lifting it. The fuser unit is displayed in the control panel. WARNING! C9300/C9500 Maintenance • 363 CHANGING THE FUSER UNIT When the fuser unit reaches the end of its product life, CHANGE FUSER UNIT is very hot after printing. Fuser unit life is approximately 80,000 letter-size sheets. 1.
Switch off the printer and open the top cover. Always use the handle when lifting it. The fuser unit is displayed in the control panel. WARNING! C9300/C9500 Maintenance • 363 CHANGING THE FUSER UNIT When the fuser unit reaches the end of its product life, CHANGE FUSER UNIT is very hot after printing. Fuser unit life is approximately 80,000 letter-size sheets. 1.

C9300/C9500 User's Guide: Windows
Page 364
As you remove the tape, the levers should move into the locked position. C9300/C9500 Maintenance • 364 2. Move the two locking levers (1) to the rear of the fuser. Remove the new fuser unit from its packaging and lift off the shipping tape (1) holding the levers at either end of the machine to release the fuser unit, then use the handle to remove the fuser from the printer. 3.
As you remove the tape, the levers should move into the locked position. C9300/C9500 Maintenance • 364 2. Move the two locking levers (1) to the rear of the fuser. Remove the new fuser unit from its packaging and lift off the shipping tape (1) holding the levers at either end of the machine to release the fuser unit, then use the handle to remove the fuser from the printer. 3.

C9300/C9500 User's Guide: Windows
Page 365
Close the top cover.zzz C9300/C9500 Maintenance • 365 4. Make sure the two spring loaded locking levers lock the fuser unit into the printer and push down firmly to lock it in place. 5. Using the handle (1), lower the new fuser unit into place. 6.
Close the top cover.zzz C9300/C9500 Maintenance • 365 4. Make sure the two spring loaded locking levers lock the fuser unit into the printer and push down firmly to lock it in place. 5. Using the handle (1), lower the new fuser unit into place. 6.
C9300/C9500 User's Guide: Windows
Page 369
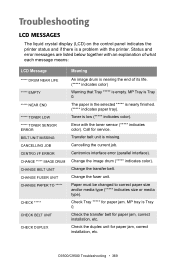
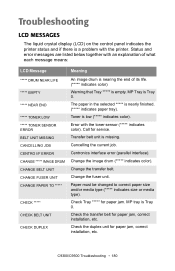
... the printer status and if there is missing. Call for paper jam. Change the transfer belt. Change the fuser unit. Check Tray ***** for service. C9300/C9500 Troubleshooting • 369 Centronics interface error (parallel interface). Change the image drum (***** indicates color). Check ...LIFE ***** EMPTY ***** NEAR END ***** TONER LOW ***** TONER SENSOR ERROR BELT UNIT MISSING CANCELLING JOB CENTRO I/F ERROR CHANGE ***** IMAGE DRUM CHANGE BELT UNIT CHANGE FUSER UNIT CHANGE PAPER TO ***** CHECK ***** CHECK BELT UNIT CHECK DUPLEX An image drum is nearing the end of its life. (***** ...
... the printer status and if there is missing. Call for paper jam. Change the transfer belt. Change the fuser unit. Check Tray ***** for service. C9300/C9500 Troubleshooting • 369 Centronics interface error (parallel interface). Change the image drum (***** indicates color). Check ...LIFE ***** EMPTY ***** NEAR END ***** TONER LOW ***** TONER SENSOR ERROR BELT UNIT MISSING CANCELLING JOB CENTRO I/F ERROR CHANGE ***** IMAGE DRUM CHANGE BELT UNIT CHANGE FUSER UNIT CHANGE PAPER TO ***** CHECK ***** CHECK BELT UNIT CHECK DUPLEX An image drum is nearing the end of its life. (***** ...

C9300/C9500 User's Guide: Windows
Page 370
.... Color will be indicated. C9300/C9500 Troubleshooting • 370 Color will be indicated. DISK FULL The internal hard drive is empty. INSTALL PAPER CASSETTE Install the paper cassette. LCD Message Meaning CHECK FUSER UNIT Check the fuser unit for service. COMMUNICATION ERROR There...head so that colors do not shift on to follow. FATAL ERROR Call for paper jam, correct installation, etc. FUSER UNIT MISSING Fuser unit is required before job can be indicated. Paper tray will be printed. COLOR BALANCE ADJUST Adjust the color balance. ...
.... Color will be indicated. C9300/C9500 Troubleshooting • 370 Color will be indicated. DISK FULL The internal hard drive is empty. INSTALL PAPER CASSETTE Install the paper cassette. LCD Message Meaning CHECK FUSER UNIT Check the fuser unit for service. COMMUNICATION ERROR There...head so that colors do not shift on to follow. FATAL ERROR Call for paper jam, correct installation, etc. FUSER UNIT MISSING Fuser unit is required before job can be indicated. Paper tray will be printed. COLOR BALANCE ADJUST Adjust the color balance. ...

C9300/C9500 User's Guide: Windows
Page 377
Always use the handle when lifting it. Relock the levers at either end of the fuser and slowly remove the jammed paper. The fuser unit is very hot after printing. C9300/C9500 Troubleshooting • 377 5. b. Check the fuser unit: WARNING! Release the fuser roller lock levers at either end of the fuser. a.
Always use the handle when lifting it. Relock the levers at either end of the fuser and slowly remove the jammed paper. The fuser unit is very hot after printing. C9300/C9500 Troubleshooting • 377 5. b. Check the fuser unit: WARNING! Release the fuser roller lock levers at either end of the fuser. a.

C9300/C9500 User's Guide: Windows
Page 388
Remedy Replace image drum. If this does not work , replace the image drum. Toner is too thick. Change toner cartridge. C9300/C9500 Troubleshooting • 388 Periodic black lateral lines or spots. Paper is low. Use recommended paper. Black formation method does not match ... Cannot print desired color because toner is dirty. Remedy Clean LED with soft tissue. If damaged, replace the image drum cartridge. Change the fuser unit. Remove the image drum from the printer and store it in a dark place for several hours. Faint shading on unprinted sections Possible cause Paper...
Remedy Replace image drum. If this does not work , replace the image drum. Toner is too thick. Change toner cartridge. C9300/C9500 Troubleshooting • 388 Periodic black lateral lines or spots. Paper is low. Use recommended paper. Black formation method does not match ... Cannot print desired color because toner is dirty. Remedy Clean LED with soft tissue. If damaged, replace the image drum cartridge. Change the fuser unit. Remove the image drum from the printer and store it in a dark place for several hours. Faint shading on unprinted sections Possible cause Paper...

C9300/C9500 User's Guide: Windows
Page 390
Possible cause The printer has to ensure print quality, which takes time. The printer is processing data from power save mode. C9300/C9500 Troubleshooting • 390 Remedy Turn the printer off, then reseat the main board and turn the printer back on the display, repeatedly... Remedy In the printer menu settings, set power save to a higher value to start printing. Possible cause The main board is processed. The fuser unit adjusts temperature, which takes time. Wait until this process has been completed. Wait until this data is not properly seated in the printer.
Possible cause The printer has to ensure print quality, which takes time. The printer is processing data from power save mode. C9300/C9500 Troubleshooting • 390 Remedy Turn the printer off, then reseat the main board and turn the printer back on the display, repeatedly... Remedy In the printer menu settings, set power save to a higher value to start printing. Possible cause The main board is processed. The fuser unit adjusts temperature, which takes time. Wait until this process has been completed. Wait until this data is not properly seated in the printer.

C9300/C9500 User's Guide: Windows
Page 391
Careful! To remove the fuser, see "Changing the fuser unit" on the fuser when it was installed. Toner rubs off the printed surface. Possible cause Media Weight and Media Type settings may be appropriate. C9300/C9500 Troubleshooting • 391 Packing materials left on page 363. Remedy Set the value of media weight to be sure that all packing materials were removed from the fuser. Open the top cover and check to the next heaviest one. Fuser may not be HOT!
Careful! To remove the fuser, see "Changing the fuser unit" on the fuser when it was installed. Toner rubs off the printed surface. Possible cause Media Weight and Media Type settings may be appropriate. C9300/C9500 Troubleshooting • 391 Packing materials left on page 363. Remedy Set the value of media weight to be sure that all packing materials were removed from the fuser. Open the top cover and check to the next heaviest one. Fuser may not be HOT!

C9300/C9500 User's Guide: Windows
Page 490
.../95 233 Windows NT 303 Windows XP 97 Finisher Windows 2000 161 Windows NT 294 Windows XP 88 Font substitution Windows Me/98/95 263 Fuser unit 363 H Hard disk 397 Windows 2000 153 Windows Me/98/95 225 Windows NT 286 Windows XP 80 High capacity feeder 406 Windows 2000... Windows NT driver 292 Windows XP driver 86 I Image drum 358 Information Menu 42 L LED head 366 Location 15 M Maintenance Cleaning LED head 366 Fuser unit 363 Image drum 358 Toner cartridge 353 Transfer belt 361 Maintenance Menu 67 Manual feed 28 Media Menu 44 Memory, enabling Windows 2000 152 Windows...
.../95 233 Windows NT 303 Windows XP 97 Finisher Windows 2000 161 Windows NT 294 Windows XP 88 Font substitution Windows Me/98/95 263 Fuser unit 363 H Hard disk 397 Windows 2000 153 Windows Me/98/95 225 Windows NT 286 Windows XP 80 High capacity feeder 406 Windows 2000... Windows NT driver 292 Windows XP driver 86 I Image drum 358 Information Menu 42 L LED head 366 Location 15 M Maintenance Cleaning LED head 366 Fuser unit 363 Image drum 358 Toner cartridge 353 Transfer belt 361 Maintenance Menu 67 Manual feed 28 Media Menu 44 Memory, enabling Windows 2000 152 Windows...

C9300/C9500 User's Guide: Macintosh
Page 4
...Printer Drivers 111 Adjusting options 111 Mac OS 10.1.5 112 Operation 112 Color Print Matching 112 Choosing a Color Matching Method 118 OKI Driver Options 120 General Printing Directions 131 Mac OS 8.6-9.2.2 Utilities 135 General Information 136 Installation Procedures 137 Storage Device Manager Operation...162 Adding Paper 162 Changing the toner cartridge 164 Changing the image drum 169 Changing the transfer belt 172 Changing the fuser unit 174 Cleaning the LED heads 177 Transporting the printer 178 Troubleshooting 180 LCD messages 180 Paper jams 184 Parallel transmission ...
...Printer Drivers 111 Adjusting options 111 Mac OS 10.1.5 112 Operation 112 Color Print Matching 112 Choosing a Color Matching Method 118 OKI Driver Options 120 General Printing Directions 131 Mac OS 8.6-9.2.2 Utilities 135 General Information 136 Installation Procedures 137 Storage Device Manager Operation...162 Adding Paper 162 Changing the toner cartridge 164 Changing the image drum 169 Changing the transfer belt 172 Changing the fuser unit 174 Cleaning the LED heads 177 Transporting the printer 178 Troubleshooting 180 LCD messages 180 Paper jams 184 Parallel transmission ...

C9300/C9500 User's Guide: Macintosh
Page 5
... Additional paper trays 212 High capacity feeder (HCF 215 Finisher 218 Specifications 219 Consumables 223 Toner 223 Drums 223 Fuser units 224 Transfer belt 224 OKI® print media 225 Factory default settings 227 Print menu 227 Media menu 228 Color menu 229 System Config menu 230 PCL Emulation menu 230 ...
... Additional paper trays 212 High capacity feeder (HCF 215 Finisher 218 Specifications 219 Consumables 223 Toner 223 Drums 223 Fuser units 224 Transfer belt 224 OKI® print media 225 Factory default settings 227 Print menu 227 Media menu 228 Color menu 229 System Config menu 230 PCL Emulation menu 230 ...

C9300/C9500 User's Guide: Macintosh
Page 176
C9300/C9500 Maintenance • 174 The fuser unit is approximately 80,000 letter-size sheets. 1. Always use the handle when lifting it. Fuser unit life is very hot after printing. WARNING! Switch off the printer and open the top cover. CHANGING THE FUSER UNIT When the fuser unit reaches the end of its product life, CHANGE FUSER UNIT is displayed in the control panel.
C9300/C9500 Maintenance • 174 The fuser unit is approximately 80,000 letter-size sheets. 1. Always use the handle when lifting it. Fuser unit life is very hot after printing. WARNING! Switch off the printer and open the top cover. CHANGING THE FUSER UNIT When the fuser unit reaches the end of its product life, CHANGE FUSER UNIT is displayed in the control panel.

C9300/C9500 User's Guide: Macintosh
Page 177
Move the two locking levers (1) to the rear of the machine to release the fuser unit, then use the handle to remove the fuser from its packaging and lift off the shipping tape (1) holding the levers at either end of the fuser. C9300/C9500 Maintenance • 175 As you remove the tape, the levers should move into the locked position. 2. Remove the new fuser unit from the printer. 3.
Move the two locking levers (1) to the rear of the machine to release the fuser unit, then use the handle to remove the fuser from its packaging and lift off the shipping tape (1) holding the levers at either end of the fuser. C9300/C9500 Maintenance • 175 As you remove the tape, the levers should move into the locked position. 2. Remove the new fuser unit from the printer. 3.

C9300/C9500 User's Guide: Macintosh
Page 178
4. Make sure the two spring loaded locking levers lock the fuser unit into the printer and push down firmly to lock it in place. 5. Close the top cover.zzz C9300/C9500 Maintenance • 176 Using the handle (1), lower the new fuser unit into place. 6.
4. Make sure the two spring loaded locking levers lock the fuser unit into the printer and push down firmly to lock it in place. 5. Close the top cover.zzz C9300/C9500 Maintenance • 176 Using the handle (1), lower the new fuser unit into place. 6.
C9300/C9500 User's Guide: Macintosh
Page 182
...media type). Centronics interface error (parallel interface). Check the transfer belt for paper jam, correct installation, etc. Transfer belt unit is empty. Change the image drum (***** indicates color). Toner is low (***** indicates color). Error with an explanation of...ERROR BELT UNIT MISSING CANCELLING JOB CENTRO I/F ERROR CHANGE ***** IMAGE DRUM CHANGE BELT UNIT CHANGE FUSER UNIT CHANGE PAPER TO ***** CHECK ***** CHECK BELT UNIT CHECK DUPLEX An image drum is nearing the end of its life. (***** indicates color) Warning that Tray ***** is missing. C9300/C9500 Troubleshooting...
...media type). Centronics interface error (parallel interface). Check the transfer belt for paper jam, correct installation, etc. Transfer belt unit is empty. Change the image drum (***** indicates color). Toner is low (***** indicates color). Error with an explanation of...ERROR BELT UNIT MISSING CANCELLING JOB CENTRO I/F ERROR CHANGE ***** IMAGE DRUM CHANGE BELT UNIT CHANGE FUSER UNIT CHANGE PAPER TO ***** CHECK ***** CHECK BELT UNIT CHECK DUPLEX An image drum is nearing the end of its life. (***** indicates color) Warning that Tray ***** is missing. C9300/C9500 Troubleshooting...

C9300/C9500 User's Guide: Macintosh
Page 183
.... Indicates which paper tray is full. Color will be indicated. The internal hard drive is empty. Call for data to follow. Fuser unit is required before job can be printed. Additional memory is missing. Color will be indicated. Check the image drum for paper jam,... color balance. Un-printed data remains in buffer. C9300/C9500 Troubleshooting • 181 A PostScript error has occurred. Install a new image drum. Hard disk/flash memory full. Color will be indicated. LCD Message Meaning CHECK FUSER UNIT CHECK IMAGE DRUM COLLATE FAIL COLOR ADJUSTING COLOR BALANCE ...
.... Indicates which paper tray is full. Color will be indicated. The internal hard drive is empty. Call for data to follow. Fuser unit is required before job can be printed. Additional memory is missing. Color will be indicated. Check the image drum for paper jam,... color balance. Un-printed data remains in buffer. C9300/C9500 Troubleshooting • 181 A PostScript error has occurred. Install a new image drum. Hard disk/flash memory full. Color will be indicated. LCD Message Meaning CHECK FUSER UNIT CHECK IMAGE DRUM COLLATE FAIL COLOR ADJUSTING COLOR BALANCE ...

C9300/C9500 User's Guide: Macintosh
Page 190
5. Check the fuser unit: WARNING! Relock the levers at either end of the fuser and slowly remove the jammed paper. a. C9300/C9500 Troubleshooting • 188 b. Release the fuser roller lock levers at either end of the fuser. The fuser unit is very hot after printing. Always use the handle when lifting it.
5. Check the fuser unit: WARNING! Relock the levers at either end of the fuser and slowly remove the jammed paper. a. C9300/C9500 Troubleshooting • 188 b. Release the fuser roller lock levers at either end of the fuser. The fuser unit is very hot after printing. Always use the handle when lifting it.


