
Safety, Warranty and Regulatory Information (English, Fran栩s, Espa?ol, Portugu鱩
Page 3
... risk of movement or injury. 3 - The product battery should not require replacement during the life of safe, reliable performance. Do not throw toner cartridges or image drum cartridges into the ventilation holes or operate this product for example water) is easily accessible at all around the product to prevent any operations on...
... risk of movement or injury. 3 - The product battery should not require replacement during the life of safe, reliable performance. Do not throw toner cartridges or image drum cartridges into the ventilation holes or operate this product for example water) is easily accessible at all around the product to prevent any operations on...

Safety, Warranty and Regulatory Information (English, Fran栩s, Espa?ol, Portugu鱩
Page 4
...purchased, by contacting Oki Data directly at 1-800-654-3282 (1-800-OKI-DATA), or www.okiprintingsolutions.com. This Limited Warranty does not extend to abuse, misuse, misapplication, accident, improper storage, or installation, an unsuitable physical operating environment, or as toner cartridges, image drums, ribbon cartridges, ... service center and assume the risk of the service 4 - Oki Data will, for a period of one (1) year from the date of purchase except for the printhead (LED imaging array), which is performed by any defective component(s) of physical harm or danger. ...
...purchased, by contacting Oki Data directly at 1-800-654-3282 (1-800-OKI-DATA), or www.okiprintingsolutions.com. This Limited Warranty does not extend to abuse, misuse, misapplication, accident, improper storage, or installation, an unsuitable physical operating environment, or as toner cartridges, image drums, ribbon cartridges, ... service center and assume the risk of the service 4 - Oki Data will, for a period of one (1) year from the date of purchase except for the printhead (LED imaging array), which is performed by any defective component(s) of physical harm or danger. ...

C8800 Handy Reference Guide (English, Fran栩s, Espa?ol, Portugu鱩
Page 22
... tray and press ON-LINE. 22 ORDER XXX Appears on the second line of the display to indicate that consumable XXX (E.g., toner cartridge, image drum, belt, fuser) is nearing end of the display to continue printing. Note If you have changed the LOW TONER setting to be replaced.... Replace the indicated item. (See the instructions supplied with a genuine OKI Toner Cartridge. Be sure you have a genuine OKI replacement toner cartridge on -line User's Guide. Close the cover. LOAD mmm/ppp AND PRESS ONLINE SWITCH nnn: ttt ...
... tray and press ON-LINE. 22 ORDER XXX Appears on the second line of the display to indicate that consumable XXX (E.g., toner cartridge, image drum, belt, fuser) is nearing end of the display to continue printing. Note If you have changed the LOW TONER setting to be replaced.... Replace the indicated item. (See the instructions supplied with a genuine OKI Toner Cartridge. Be sure you have a genuine OKI replacement toner cartridge on -line User's Guide. Close the cover. LOAD mmm/ppp AND PRESS ONLINE SWITCH nnn: ttt ...

C8800 User Guide (Amer Eng)
Page 4
Replace an Image Drum 76 Replace the Fuser 79 Replace the Belt Unit 82 Printer Settings (Menu Settings 85 Print a list of the current settings 85 Changing Settings 86 ... Options 116 Part Numbers 116 Additional Memory (RAM 117 Duplex Unit 118 Hard Disk Drive 119 Second Paper Tray 120 Part Numbers 121 Toner 121 Image Drum 121 Fuser 121 Belt 121 Rollers 121 Options 121 Specifications 122 Troubleshooting 124 General Information 124 Display Panel Messages 125 Paper Jams 128 Print Quality...
Replace an Image Drum 76 Replace the Fuser 79 Replace the Belt Unit 82 Printer Settings (Menu Settings 85 Print a list of the current settings 85 Changing Settings 86 ... Options 116 Part Numbers 116 Additional Memory (RAM 117 Duplex Unit 118 Hard Disk Drive 119 Second Paper Tray 120 Part Numbers 121 Toner 121 Image Drum 121 Fuser 121 Belt 121 Rollers 121 Options 121 Specifications 122 Troubleshooting 124 General Information 124 Display Panel Messages 125 Paper Jams 128 Print Quality...

C8800 User Guide (Amer Eng)
Page 19
However, this will reduce the output speed and prevent the use of the image drum and give proper toner fusion, you can be stored flat, away from moisture, direct sunlight and heat sources. • The use of heavily laid or ...
However, this will reduce the output speed and prevent the use of the image drum and give proper toner fusion, you can be stored flat, away from moisture, direct sunlight and heat sources. • The use of heavily laid or ...

C8800 User Guide (Amer Eng)
Page 21
... setting does not give proper toner fusion, you can be stored flat, away from moisture, direct sunlight and heat sources. • The use of the image drum and give poor print quality. Very smooth, shiny or glossy paper. - However, this will reduce the output speed and prevent the use of heavily laid...
... setting does not give proper toner fusion, you can be stored flat, away from moisture, direct sunlight and heat sources. • The use of the image drum and give poor print quality. Very smooth, shiny or glossy paper. - However, this will reduce the output speed and prevent the use of heavily laid...

C8800 User Guide (Amer Eng)
Page 22
Letterhead General Information The size, weight, and type of the image drum is also known as simplex printing. C8800 User's Guide 22 When using 'Ultra Heavy': • print speed slows • duplexing cannot be made in the ...
Letterhead General Information The size, weight, and type of the image drum is also known as simplex printing. C8800 User's Guide 22 When using 'Ultra Heavy': • print speed slows • duplexing cannot be made in the ...

C8800 User Guide (Amer Eng)
Page 23
..., direct sunlight and heat sources. • The use of heavily laid or textured paper will reduce the output speed and prevent the use of the image drum and give proper toner fusion, you can be able to 'Ultra Heavy.' Carbon paper, recycled paper, NCR paper, photosensitive paper, pressure sensitive paper or thermal...
..., direct sunlight and heat sources. • The use of heavily laid or textured paper will reduce the output speed and prevent the use of the image drum and give proper toner fusion, you can be able to 'Ultra Heavy.' Carbon paper, recycled paper, NCR paper, photosensitive paper, pressure sensitive paper or thermal...

C8800 User Guide (Amer Eng)
Page 73
Unpack the new toner cartridge. Do not touch the toner release lever until the toner cartridge is installed in the image drum. If you do, it from the underside of the C8800 User's Guide 73 Insert the left end of the cartridge. Hold the cartridge by its top center with the colored release lever to loosen and distribute the toner evenly inside the cartridge. Tape.eps CAUTION! Shake.eps 6. Remove the adhesive tape from side to side to the right. Gently shake it will open the toner release slot and spill toner. 7. Install a Toner Cartridge 5.
Unpack the new toner cartridge. Do not touch the toner release lever until the toner cartridge is installed in the image drum. If you do, it from the underside of the C8800 User's Guide 73 Insert the left end of the cartridge. Hold the cartridge by its top center with the colored release lever to loosen and distribute the toner evenly inside the cartridge. Tape.eps CAUTION! Shake.eps 6. Remove the adhesive tape from side to side to the right. Gently shake it will open the toner release slot and spill toner. 7. Install a Toner Cartridge 5.

C8800 User Guide (Amer Eng)
Page 74
The lever should move easily. C8800 User's Guide 74 Push it firmly against the spring on the lever again. Lower the right end of the cartridge into the top of the image drum. Then, push the colored lock lever back to be sure that it in the image drum. Press back on the drum unit. Push down in Situ.eps 1 Important! Press it does not, STOP! Toner Close in place. If it firmly down on the toner cartridge to open the toner slot and lock it is properly seated in place. cartridge into the image drum unit. Toner In in Situ.eps 2 1 8.
The lever should move easily. C8800 User's Guide 74 Push it firmly against the spring on the lever again. Lower the right end of the cartridge into the top of the image drum. Then, push the colored lock lever back to be sure that it in the image drum. Press back on the drum unit. Push down in Situ.eps 1 Important! Press it does not, STOP! Toner Close in place. If it firmly down on the toner cartridge to open the toner slot and lock it is properly seated in place. cartridge into the image drum unit. Toner In in Situ.eps 2 1 8.

C8800 User Guide (Amer Eng)
Page 75
Close and latch the top cover. Gently wipe the LED. Use the provided LED lens cleaner. C8800 User's Guide 75 LED head clean.eps 10. To avoid toner spillage, DO NOT open the toner release lever until the toner cartridge is firmly seated in the image drum. 9.
Close and latch the top cover. Gently wipe the LED. Use the provided LED lens cleaner. C8800 User's Guide 75 LED head clean.eps 10. To avoid toner spillage, DO NOT open the toner release lever until the toner cartridge is firmly seated in the image drum. 9.

C8800 User Guide (Amer Eng)
Page 76
Fig1_001.eps 2 1 WARNING! Do not touch it. 2. The life expectancy of the four image drums: Cyan (1), Magenta (2), Yellow (3), Black (4). ID Order.eps 1 2 3 4 C8800 User's Guide 76 Note the positions of the cartridge will be reduced as the toner charges the new drum. 1. If the printer has been powered on, the fuser is clearly labelled. This area is HOT. You must replace the toner cartridge when you replace the image drum. Press the cover release (1) and fully open the top cover (2). Replace an Image Drum Important!
Fig1_001.eps 2 1 WARNING! Do not touch it. 2. The life expectancy of the four image drums: Cyan (1), Magenta (2), Yellow (3), Black (4). ID Order.eps 1 2 3 4 C8800 User's Guide 76 Note the positions of the cartridge will be reduced as the toner charges the new drum. 1. If the printer has been powered on, the fuser is clearly labelled. This area is HOT. You must replace the toner cartridge when you replace the image drum. Press the cover release (1) and fully open the top cover (2). Replace an Image Drum Important!

C8800 User Guide (Amer Eng)
Page 77
...carefully place it in a drawer or cabinet to keep it away from light. 4. Remove the clear plastic film. 8. Place the image drum in accordance with its toner cartridge, out of each image drum is very delicate and light sensitive. • Do not touch the green surface. • Never expose the...Do not expose it to normal room light for longer than 5 minutes. • If the image drum must be careful to keep it in the printer. ID Lift Out.eps CAUTION! Image drum handling The image drum contains toner. 3. The green surface at the base of the printer. If present, remove the ...
...carefully place it in a drawer or cabinet to keep it away from light. 4. Remove the clear plastic film. 8. Place the image drum in accordance with its toner cartridge, out of each image drum is very delicate and light sensitive. • Do not touch the green surface. • Never expose the...Do not expose it to normal room light for longer than 5 minutes. • If the image drum must be careful to keep it in the printer. ID Lift Out.eps CAUTION! Image drum handling The image drum contains toner. 3. The green surface at the base of the printer. If present, remove the ...

C8800 User Guide (Amer Eng)
Page 78
Close and latch the top cover. Install the new toner cartridge in the image drum. C8800 User's Guide 78 See "Install a Toner Cartridge" on page 73. 12. Gently wipe the LED. Remove the orange drum seal. 11. LED head clean.eps 13. Use the provided LED lens cleaner. 10.
Close and latch the top cover. Install the new toner cartridge in the image drum. C8800 User's Guide 78 See "Install a Toner Cartridge" on page 73. 12. Gently wipe the LED. Remove the orange drum seal. 11. LED head clean.eps 13. Use the provided LED lens cleaner. 10.

C8800 User Guide (Amer Eng)
Page 82
... the cover release and open the top cover fully. Do not touch it. 2. Note the positions of the printer. Lift each of the image drum units out of the four image drums: Cyan (1), Magenta (2), Yellow (3), Black (4). C8800 User's Guide 82 It is clearly labelled. If the printer has been powered on a flat surface in... back in a safe place away from direct sources of heat and light. ID Order.eps 1 2 3 4 3. Place them on , the fuser is located under the four image drums. 1.
... the cover release and open the top cover fully. Do not touch it. 2. Note the positions of the printer. Lift each of the image drum units out of the four image drums: Cyan (1), Magenta (2), Yellow (3), Black (4). C8800 User's Guide 82 It is clearly labelled. If the printer has been powered on a flat surface in... back in a safe place away from direct sources of heat and light. ID Order.eps 1 2 3 4 3. Place them on , the fuser is located under the four image drums. 1.

C8800 User Guide (Amer Eng)
Page 83
... bright room lighting. • Do not expose it to keep it in a drawer or cabinet to normal room light for more than 5 minutes, place the image drum inside a black plastic bag or carefully place it away from light. 4. Lower the belt unit into the printer. 9. The green surface at the right rear... corner of the printer for longer than 5 minutes. • If the image drum must be out of the printer. Turn the two locks about 45° clockwise to release the belt. 6. Belt in place.
... bright room lighting. • Do not expose it to keep it in a drawer or cabinet to normal room light for more than 5 minutes, place the image drum inside a black plastic bag or carefully place it away from light. 4. Lower the belt unit into the printer. 9. The green surface at the right rear... corner of the printer for longer than 5 minutes. • If the image drum must be out of the printer. Turn the two locks about 45° clockwise to release the belt. 6. Belt in place.
C8800 User Guide (Amer Eng)
Page 84
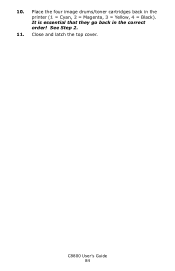
It is essential that they go back in the printer (1 = Cyan, 2 = Magenta, 3 = Yellow, 4 = Black). 10. See Step 2. 11. C8800 User's Guide 84 Close and latch the top cover. Place the four image drums/toner cartridges back in the correct order!
It is essential that they go back in the printer (1 = Cyan, 2 = Magenta, 3 = Yellow, 4 = Black). 10. See Step 2. 11. C8800 User's Guide 84 Close and latch the top cover. Place the four image drums/toner cartridges back in the correct order!

C8800 User Guide (Amer Eng)
Page 99
Selecting this menu provide a means of 100, 300 and 500 drum counts. If a 500 drum count interval occurs during a print job it will only be automatically adjusted at intervals of changing the default settings for ...x = C: Cyan M: Magenta Y: Yellow K: Black x DARKNESS x = C: Cyan M: Magenta Y: Yellow K: Black -3~0~+3 Adjusts darkness of each color component (cyan, magenta, yellow and black). Adjusts image density for bright white paper viewed in bold. C8800 User's Guide 99 Item Settings Explanation DENSITY CONTROL ADJUST DENSITY COLOR TUNING x HIGHLIGHT x MID-TONE x DARK...
Selecting this menu provide a means of 100, 300 and 500 drum counts. If a 500 drum count interval occurs during a print job it will only be automatically adjusted at intervals of changing the default settings for ...x = C: Cyan M: Magenta Y: Yellow K: Black x DARKNESS x = C: Cyan M: Magenta Y: Yellow K: Black -3~0~+3 Adjusts darkness of each color component (cyan, magenta, yellow and black). Adjusts image density for bright white paper viewed in bold. C8800 User's Guide 99 Item Settings Explanation DENSITY CONTROL ADJUST DENSITY COLOR TUNING x HIGHLIGHT x MID-TONE x DARK...

C8800 User Guide (Amer Eng)
Page 121
Part Numbers Toner Black 43487736 Cyan 43487735 Magenta 43487734 Yellow 43487733 Image Drum Black 43449025 Cyan 43449026 Magenta 43449027 Yellow 43449028 Fuser 120 V 43529404 230 V 43529409 Belt Belt 43449704 Rollers Roller Set Tray1 43651504 Roller Set Tray2 43651704 Roller Set MPT 43651804 Options Additional Memory (RAM) 256 MB . . . . 70051601 Additional Memory (RAM) 512 MB . . . . 70051701 Duplex Unit 43226004 Hard Disk Drive 70054201 Second Paper Tray 43231806 C8800 User's Guide 121
Part Numbers Toner Black 43487736 Cyan 43487735 Magenta 43487734 Yellow 43487733 Image Drum Black 43449025 Cyan 43449026 Magenta 43449027 Yellow 43449028 Fuser 120 V 43529404 230 V 43529409 Belt Belt 43449704 Rollers Roller Set Tray1 43651504 Roller Set Tray2 43651704 Roller Set MPT 43651804 Options Additional Memory (RAM) 256 MB . . . . 70051601 Additional Memory (RAM) 512 MB . . . . 70051701 Duplex Unit 43226004 Hard Disk Drive 70054201 Second Paper Tray 43231806 C8800 User's Guide 121

C8800 User Guide (Amer Eng)
Page 125
... 320: FUSER MISSING CHECK MP TRAY 390: PAPER JAM The fuser unit is too large for Jam Recovery in the latched position. Then, reinstall the image drums. See "Replace the Belt Unit" on page 117). Clear the jam. The setting for the printer's memory. Open the top cover and lift out the... black (K) and Yellow (Y) image drums, placing them on page 139. Paper has jammed while exiting the MP Tray. Reduce the size of the print job. Check to be sure that...
... 320: FUSER MISSING CHECK MP TRAY 390: PAPER JAM The fuser unit is too large for Jam Recovery in the latched position. Then, reinstall the image drums. See "Replace the Belt Unit" on page 117). Clear the jam. The setting for the printer's memory. Open the top cover and lift out the... black (K) and Yellow (Y) image drums, placing them on page 139. Paper has jammed while exiting the MP Tray. Reduce the size of the print job. Check to be sure that...


